2017 SUBARU LEGACY tow
[x] Cancel search: towPage 346 of 610
Interior light......................................................... 6-2
Dome light.......................................................... 6-2
Map light ............................................................. 6-2
Cargo area light (Outback) ................................... 6-3
OFF delay timer .................................................. 6-4
Sun visors........................................................... 6-4Vanity mirror with light ........................................ 6-5
Storage compartment......................................... 6-6Glove box........................................................... 6-6
Center console .................................................... 6-6
Overhead console ............................................... 6-7
Pocket ................................................................ 6-7
Cup holder ........................................................... 6-8Front passenger ’s cup holder .............................. 6-8
Rear passenger ’s cup holder ............................... 6-9
Bottle holders ...................................................... 6-9
Accessory power outlets ................................... 6-10
Ashtray (if equipped) ......................................... 6-12
Coat hook ........................................................... 6-12 Shopping bag hook
........................................... 6-13
Legacy.............................................................. 6-13
Outback ............................................................ 6-14
Convenient grip (Outback) ................................ 6-14
Floor mat ............................................................ 6-15
Cargo area cover (Outback –if equipped) ....... 6-15
Using the cover ................................................. 6-15
To install the front cover .................................... 6-16
To remove the front cover .................................. 6-17
To remove the cover housing ... .......................... 6-17
Stowage of the cargo area cover ........................ 6-17
To take out the stowed cover housing ................ 6-18
To install the cover housing ............................... 6-19
Convenient tie-down hooks (Outback) ............. 6-19
Under-floor storage compartment .................... 6-20
Rear view camera .............................................. 6-20
How to use the rear view camera ....................... 6-22
Viewing range on the screen .............................. 6-22
Help line ............................................................ 6-24
Interior equipment
6
Page 350 of 610
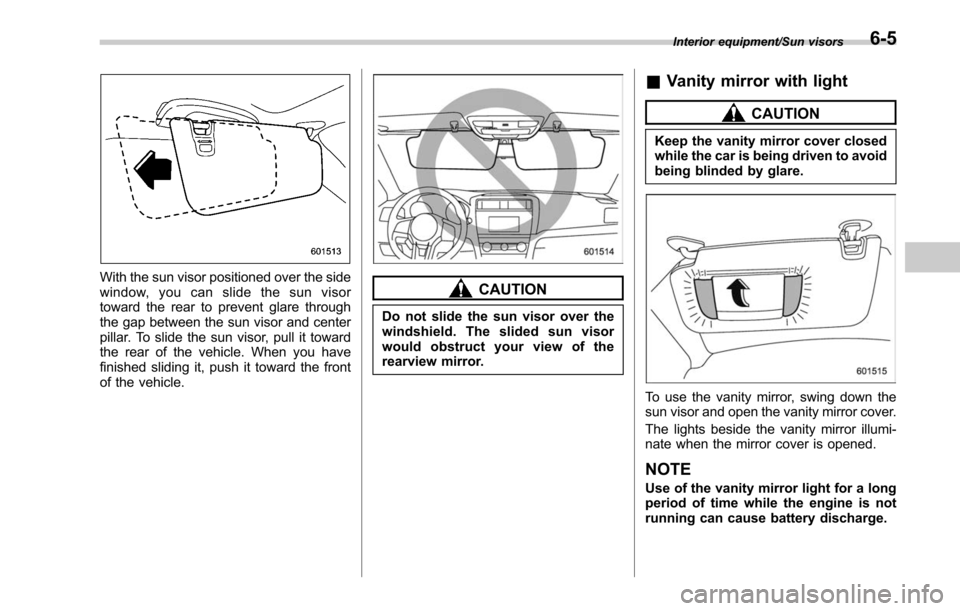
With the sun visor positioned over the side
window, you can slide the sun visor
toward the rear to prevent glare through
the gap between the sun visor and center
pillar. To slide the sun visor, pull it toward
the rear of the vehicle. When you have
finished sliding it, push it toward the front
of the vehicle.CAUTION
Do not slide the sun visor over the
windshield. The slided sun visor
would obstruct your view of the
rearview mirror.
&Vanity mirror with light
CAUTION
Keep the vanity mirror cover closed
while the car is being driven to avoid
being blinded by glare.
To use the vanity mirror, swing down the
sun visor and open the vanity mirror cover.
The lights beside the vanity mirror illumi-
nate when the mirror cover is opened.
NOTE
Use of the vanity mirror light for a long
period of time while the engine is not
running can cause battery discharge.
Interior equipment/Sun visors6-5
Page 361 of 610

Interior equipment/Cargo area cover (Outback–if equipped)
2. Pull the handle toward you to extend
the cargo area cover. Then insert its hooks
into the catches as shown.
To rewind the cargo area cover:
1. Hold the handle located at the center
of the cargo area cover, pull it toward you
and lift up slightly to unlock the cargo area
cover from the catches.1) Stopper
2. Slowly rewind the cargo area cover
completely. Then lift the handle upward
slightly to lock the stoppers.
WARNING
Do not place anything on the ex-
tended cover. Putting excessive
weight on the extended cover can
break it and an object on the cover
could tumble forward in the event of
a sudden stop or collision. This
could cause serious injury.
CAUTION
. Be careful not to scratch the rear
gate stays while extending and
rewinding the cover. Scratches
on the stays could cause leakage
of gas from the stays, which may
result in their inability to hold the
rear gate open.
. When reclining the rear seatback,
move the front cover backward
so that the cover is not damaged.
& To install the front cover
CAUTION
When reclining the rear seatback,
move the front cover backward so
that the cover is not damaged.
6-16
Page 362 of 610
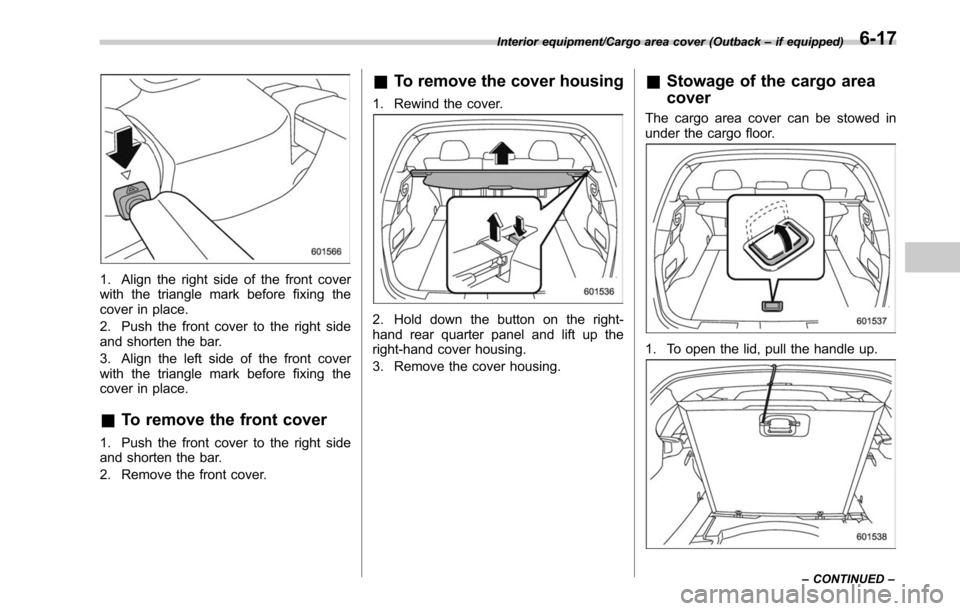
1. Align the right side of the front cover
with the triangle mark before fixing the
cover in place.
2. Push the front cover to the right side
and shorten the bar.
3. Align the left side of the front cover
with the triangle mark before fixing the
cover in place.
&To remove the front cover
1. Push the front cover to the right side
and shorten the bar.
2. Remove the front cover.
&To remove the cover housing
1. Rewind the cover.
2. Hold down the button on the right-
hand rear quarter panel and lift up the
right-hand cover housing.
3. Remove the cover housing.
&Stowage of the cargo area
cover
The cargo area cover can be stowed in
under the cargo floor.
1. To open the lid, pull the handle up.
Interior equipment/Cargo area cover (Outback –if equipped)
–CONTINUED –6-17
Page 363 of 610
Interior equipment/Cargo area cover (Outback–if equipped)
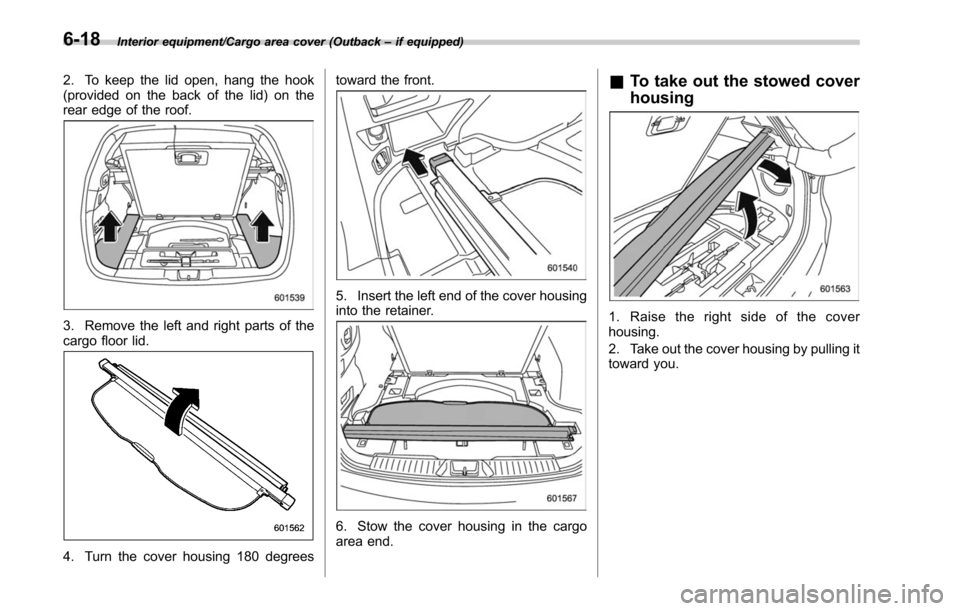
2. To keep the lid open, hang the hook
(provided on the back of the lid) on the
rear edge of the roof.
3. Remove the left and right parts of the
cargo floor lid.
4. Turn the cover housing 180 degrees toward the front.
5. Insert the left end of the cover housing
into the retainer.
6. Stow the cover housing in the cargo
area end.
&
To take out the stowed cover
housing
1. Raise the right side of the cover
housing.
2. Take out the cover housing by pulling it
toward you.
6-18
Page 367 of 610

Interior equipment/Rear view camera
.Under fluorescent lighting, the dis-
play may flicker. However, this is not a
malfunction.
. The image of the rear view camera
may be slightly different from the
actual color of the objects.
& How to use the rear view
camera
When performing the following procedure,
the rear view camera automatically dis-
plays the rear view image from the
vehicle.
1. Set the ignition switch to “ON”.
2. Set the shift lever or select lever to “R”.
When any of the following conditions
occur, the image before setting to “R”will
be displayed.
. Several seconds have passed after the
following operation (off delay function).
–Setting the shift lever to a position
other than “R”(MT models)
– Setting the select lever to a position
other than “P”or “R”(CVT models)
. The vehicle speed is more than 5 mph
(8 km/h).
. The select lever is set to “P”(CVT
models).
NOTE
. For models with the genuine
SUBARU navigation system or audio
system, the image of the rear view
camera has priority over other screen
displays. To operate other screens, set
the shift lever (MT models) or select
lever (CVT models) to a position other
than “R ”.
. The image of the rear view camera is
horizontally reversed as is the case
with the vehicle inside rear view mirror
or the side view mirror.
. It may be difficult to see the image of
the rear view camera in the following
cases. This is not a malfunction of the
camera.
–The vehicle is used for towing or
a trailer hitch is installed.
– The vehicle is in a dark place (at
night, in a tunnel, etc.).
– The vehicle is in an extremely hot
or cold place.
– An object (such as raindrops,
snow, dirt, etc.) that disturbs the
view of the rear view camera sticks
to the lens of the camera.
– Strong light shined directly on
the camera lens (occasionally, there
are vertical lines on the screen).& Viewing range on the screen
Range of view
Range of view
6-22
Page 380 of 610

CAUTION
Trapping small animals in the cool-
ing fan and belts of the engine may
result in a malfunction. Check that
no small animal enters the engine
compartment and under the vehicle
before starting the engine.
NOTE
.Engine oil, engine coolant, brake
fluid, washer fluid and other fluid levels
should be checked daily, weekly or at
fuel stops.
. When towing a trailer, refer to “Trai-
ler hitch (Outback —if equipped) ”F 8-
19.
Starting and stopping the
engine (models without
push-button ignition switch)
& General precautions when
starting/stopping engine
WARNING
. Never start the engine from out-
side the vehicle (except when
using the remote engine start
system). It may result in an
accident.
. Do not leave the engine running
in locations with poor ventilation,
such as a garage and indoors.
The exhaust gas may enter the
vehicle or indoors, and it may
result in carbon monoxide poi-
soning.
. Do not start the engine near dry
foliage, paper, or other flam-
mable substances. The exhaust
pipe and exhaust emissions can
create a fire hazard at high
temperatures.
CAUTION
. If the engine is stopped during driving, the catalyst may over-
heat and burn.
. When starting the engine, be sure
to sit in the driver ’s seat (except
when using the remote engine
start system).
NOTE
. Avoid rapid racing and rapid accel-
eration immediately after the engine
has started.
. For a short time after the engine has
started, the engine speed is kept high.
When the warm-up is completed, the
engine speed lowers automatically.
. On rare occasions, it may be difficult
to start the engine depending on the
fuel and the usage condition (repeated
driving of a distance in which the
engine has not warmed up sufficiently).
In such a case, it is recommended that
you change to a different brand of fuel.
. On rare occasions, transient knock-
ing may be heard from the engine when
the accelerator is operated rapidly
such as a rapid start-up and a rapid
acceleration. This is not a malfunction.
. The engine starts more easily when
the headlights, air conditioner and rear
window defogger are turned off.
Starting and operating/Starting and stopping the engine (models without push –button ignition switch)
–CONTINUED –7-9
Page 397 of 610
Starting and operating/Continuously variable transmission
.Immediately after transmission fluid
is replaced, you may feel that the
transmission operation is somewhat
unusual. This results from invalidation
of data which the on-board computer
has collected and stored in memory to
allow the transmission to shift at the
most appropriate times for the current
condition of your vehicle. Optimized
shifting will be restored as the vehicle
continues to be driven for a while.
. When driving under continuous hea-
vy load conditions such as towing a
camper or climbing a long, steep hill,
the engine speed, vehicle speed and air
conditioning system cooling perfor-
mance may automatically be reduced.
This is not a malfunction. This phe-
nomenon results from the engine con-
trol function maintaining the cooling
performance of the vehicle. The engine
and vehicle speed will return to a
normal speed when the engine is able
to maintain the optimum cooling per-
formance after the heavy load de-
creases. Driving under a heavy load
must be performed with extreme care.
Do not try to pass a vehicle in front
when driving on an uphill slope while
towing.
. The continuously variable transmis-
sion is a chain type system that
provides superior transmission effi- ciency for maximum fuel economy. At
times, depending on varying driving
conditions, a chain operating noise
may be heard that is characteristic of
this type of system.
&
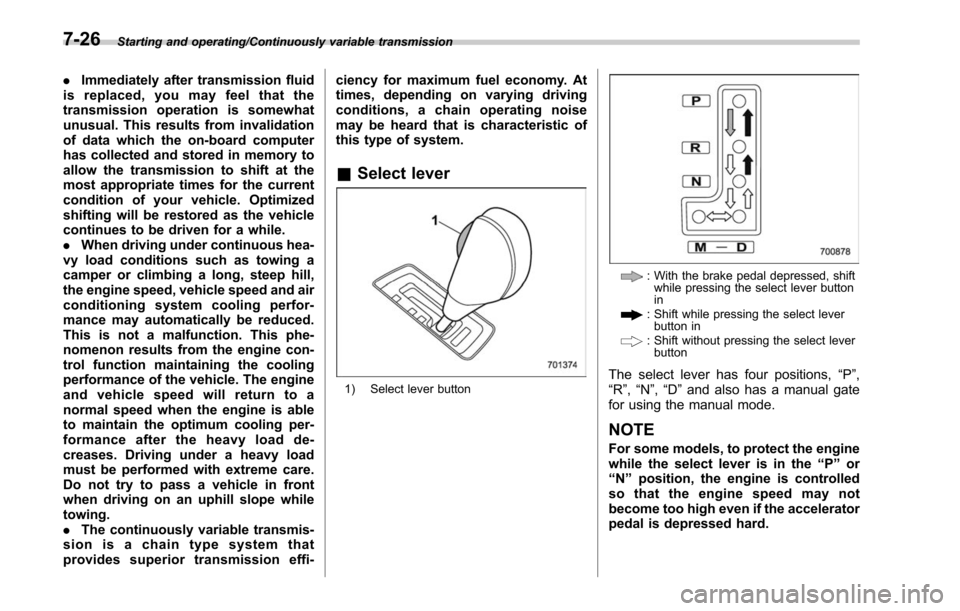
Select lever
1) Select lever button
: With the brake pedal depressed, shift
while pressing the select lever button
in
: Shift while pressing the select leverbutton in
: Shift without pressing the select leverbutton
The select lever has four positions, “P”,
“R ”,“N ”,“D ”and also has a manual gate
for using the manual mode.
NOTE
For some models, to protect the engine
while the select lever is in the “P ” or
“ N ” position, the engine is controlled
sothattheenginespeedmaynot
become too high even if the accelerator
pedal is depressed hard.
7-26