2017 SUBARU LEGACY alarm
[x] Cancel search: alarmPage 188 of 610

NOTE
.The outside temperature indicator
shows the temperature in the area
around the sensor. Therefore, the tem-
perature indication may differ from the
actual outside air temperature.
. The icy road surface warning indi-
cator should be treated only as a guide.
Be sure to check the condition of the
road surface before driving.
. Once the icy road surface warning
indicator appears, it will not disappear
unless the outside temperature has
increased to 41 8F(5 8C) or higher.
&RAB warning
indicator (if equipped)
This indicator illuminates if the Reverse
Automatic Braking System malfunctions.
Refer to “Reverse Automatic Braking
System ”F 7-63.
&RAB OFF indicator (if
equipped)
This indicator illuminates when the Re-
verse Automatic Braking System is turned
OFF, or when the Reverse Automatic
Braking System is suspended temporarily.
Refer to “Reverse Automatic Braking
System ”F 7-63.
&Sonar audible alarm
OFF indicator (if
equipped)
This indicator illuminates when the sonar
audible alarm is turned OFF. For the
setting procedure, refer to “Sonar Audible
Alarm” F3-45.
Information display
1) Clock
2) Climate control mode indicators
3) Outside temperature indicator
With the ignition switch in the “ON ”
position, the following items are shown
on the information display.
. Clock
. Climate control mode indicators
. Outside temperature indicator
Instruments and controls/Information display
–CONTINUED –3-33
Page 196 of 610

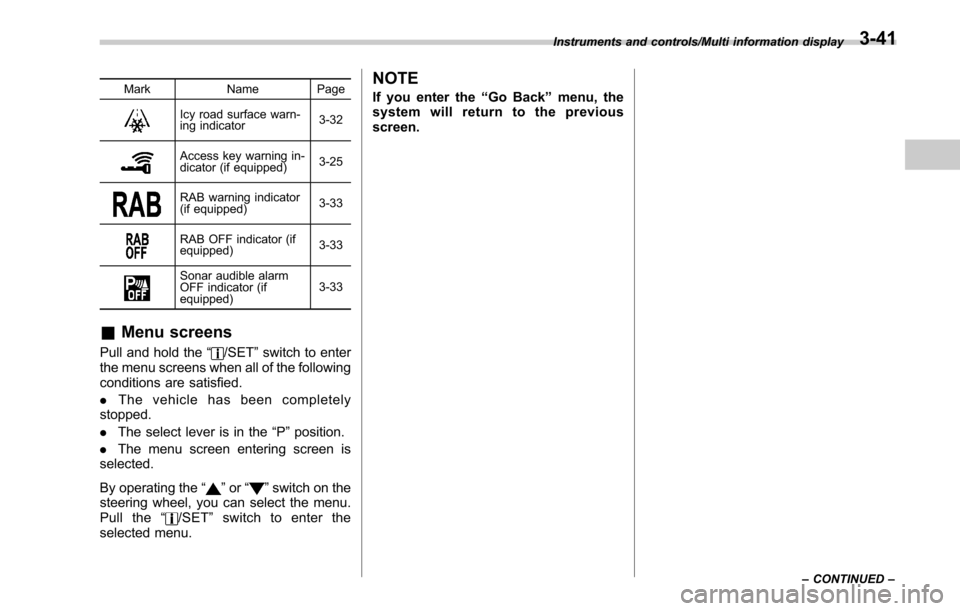
MarkName Page
Icy road surface warn-
ing indicator 3-32
Access key warning in-
dicator (if equipped)3-25
RAB warning indicator
(if equipped)
3-33
RAB OFF indicator (if
equipped)3-33
Sonar audible alarm
OFF indicator (if
equipped)3-33
&
Menu screens
Pull and hold the “/SET”switch to enter
the menu screens when all of the following
conditions are satisfied.
. The vehicle has been completely
stopped.
. The select lever is in the “P”position.
. The menu screen entering screen is
selected.
By operating the “
”or “”switch on the
steering wheel, you can select the menu.
Pull the “
/SET”switch to enter the
selected menu.
NOTE
If you enter the “Go Back ”menu, the
system will return to the previous
screen.
Instruments and controls/Multi information display
–CONTINUED –3-41
Page 197 of 610

Instruments and controls/Multi information display
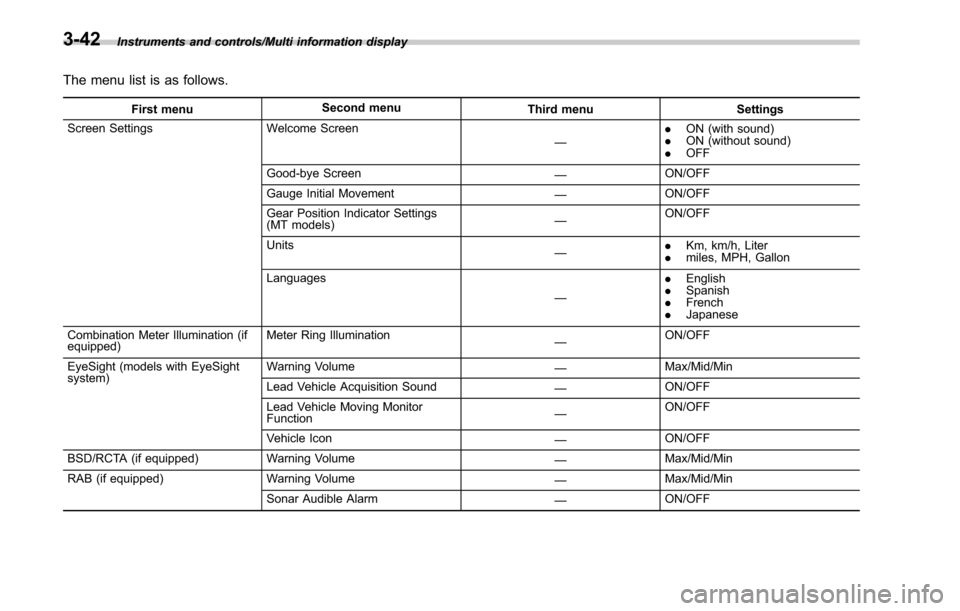
The menu list is as follows.
First menuSecond menu
Third menu Settings
Screen Settings Welcome Screen
—.
ON (with sound)
. ON (without sound)
. OFF
Good-bye Screen —ON/OFF
Gauge Initial Movement —ON/OFF
Gear Position Indicator Settings
(MT models) —ON/OFF
Units —.
Km, km/h, Liter
. miles, MPH, Gallon
Languages —.
English
. Spanish
. French
. Japanese
Combination Meter Illumination (if
equipped) Meter Ring Illumination
—ON/OFF
EyeSight (models with EyeSight
system) Warning Volume
—Max/Mid/Min
Lead Vehicle Acquisition Sound —ON/OFF
Lead Vehicle Moving Monitor
Function —ON/OFF
Vehicle Icon —ON/OFF
BSD/RCTA (if equipped) Warning Volume
—Max/Mid/Min
RAB (if equipped) Warning Volume
—Max/Mid/Min
Sonar Audible Alarm —ON/OFF
3-42
Page 200 of 610

!BSD/RCTA (if equipped)
After entering the “BSD/RCTA ”menu,
select the “Warning Volume ”menu. You
can set the volume of the warning buzzer
for RCTA (Rear Cross Traffic Alert). You
can select “Max”,“Mid ”or “Min ”.
! RAB (if equipped)
After entering the “RAB”menu, select one
of the following menus.
NOTE
For models with RAB (Reverse Auto-
matic Braking) system, refer to “Re-
verse Automatic Braking System ”F 7-
63.
!Warning Volume
The volume of the warning buzzer that
sounds when the RAB (Reverse Auto-
matic Braking) system is in operation can
be set in 3 stages (“Max ”,“Mid ”and “Min ”).
! Sonar Audible Alarm
When the RAB (Reverse Automatic Brak-
ing) system is in operation, the buzzer that
sounds if an obstacle is detected in the
rear or if detection is not possible can be
activated or deactivated. Select “On”to
activate the buzzer. Select “Off”to deac-
tivate the buzzer. !
Vehicle Setting
After entering the “Vehicle Setting”menu,
select one of the following menus.
!Keyless Entry System
After entering the “Keyless Entry System ”
menu, select one of the following menus.
. Audible Signal (models with “key-
less access with push-button start
system ”):
The audible signal can be activated or
deactivated. Select “On”to activate. Se-
lect “Off”to deactivate.
. Hazard Warning Flasher (all mod-
els):
The hazard warning flasher operation can
be activated or deactivated. Select “On”to
activate. Select “Off ”to deactivate.
. Driver Door Unlock (models with
“ keyless access with push-button start
system ”):
The door unlock selection function is
available for the “keyless access”entry
function. For details, refer to “Door
unlock
selection function ”F 2-18. On this setting
menu, the door unlock selection function
for the driver ’s door can be customized.
Select “Driver Door Only ”to set as
“Operational ”. Select “All”to set as “Non-
operational ”. .
Rear Gate Unlock (Outback with
“ keyless access with push-button start
system ”):
The door unlock selection function is
available for the “keyless access”entry
function. For details, refer to “Door unlock
selection function ”F 2-18. On this setting
menu, the door unlock selection function
for the rear gate can be customized.
Select “Rear Gate Only ”to set as “Opera-
tional ”. Select “All”to set as “Non-opera-
tional ”.
! Defogger
The defogger and deicer system can be
set for the continuous operation mode or
automatic shut-off mode. Select “Contin-
uous” to select the continuous operation
mode. Select “15 minutes”to select the
automatic shut-off mode.
!Interior Light
The setting for the period of time in which
the interior lights remain on (OFF delay
timer) after closing the doors and/or the
rear gate can be set or customized. Select
the preferred seconds to customize the
operation period. Select “Off”to deactivate
the OFF delay timer.
Instruments and controls/Multi information display
–CONTINUED –3-45
Page 389 of 610

Starting and operating/Remote engine start system (dealer option)
RPM
.The security alarm is triggered
. The select lever is not in the “P ”
position
If the system detects any door (including
the rear gate/trunk lid) open during opera-
tion, it will prevent starting or stop the
engine, and sound the horn and flash side
marker lights, tail lights, and parking lights
6 times.
In addition to the items above, if the
vehicle ’s engine management system
determines there is a safety risk due to a
vehicle-related problem, the vehicle will
power down and the horn will sound 3
times.
NOTE
. If the alarm system is armed at the
time of remote engine starter activation
(the security indicator light on the
combination meter is flashing), the
alarm system will remain armed
throughout the remote start run cycle.
. If the alarm system is disarmed at
the time of remote engine starter
activation (the security indicator light
on the combination meter is not flash-
ing), the alarm system will remain
disarmed throughout the remote start
run cycle. !
Remote start operation - fob con-
firmation
Your remote engine starter fob is a
bidirectional transceiver that can confirm
system operation with several different
visual and audible indications. The fob ’s
LED-backlit button and internal piezo
buzzer will indicate status of the system
using the following flash and beep se-
quences, provided the fob is within opera-
tional range of the system.
7-18
Page 391 of 610

Starting and operating/Remote engine start system (dealer option)
&Entering the vehicle while it
is running via remote start
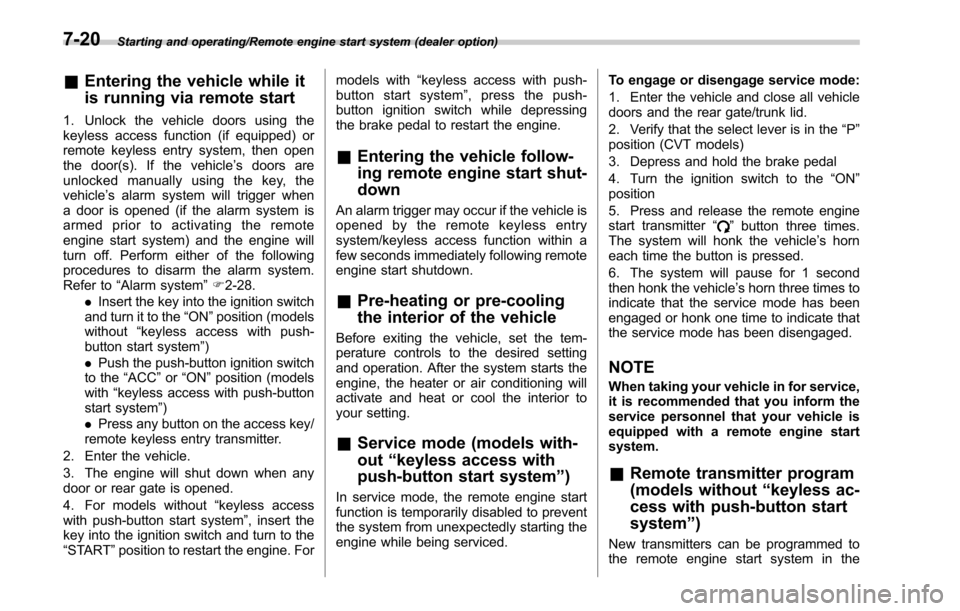
1. Unlock the vehicle doors using the
keyless access function (if equipped) or
remote keyless entry system, then open
the door(s). If the vehicle ’s doors are
unlocked manually using the key, the
vehicle’ s alarm system will trigger when
a door is opened (if the alarm system is
armed prior to activating the remote
engine start system) and the engine will
turn off. Perform either of the following
procedures to disarm the alarm system.
Refer to “Alarm system ”F 2-28.
. Insert the key into the ignition switch
and turn it to the “ON ”position (models
without “keyless access with push-
button start system ”)
. Push the push-button ignition switch
to the “ACC”or “ON ”position (models
with “keyless access with push-button
start system ”)
. Press any button on the access key/
remote keyless entry transmitter.
2. Enter the vehicle.
3. The engine will shut down when any
door or rear gate is opened.
4. For models without “keyless access
with push-button start system ”, insert the
key into the ignition switch and turn to the
“START ”position to restart the engine. For models with
“keyless access with push-
button start system ”, press the push-
button ignition switch while depressing
the brake pedal to restart the engine.
& Entering the vehicle follow-
ing remote engine start shut-
down
An alarm trigger may occur if the vehicle is
opened by the remote keyless entry
system/keyless access function within a
few seconds immediately following remote
engine start shutdown.
&Pre-heating or pre-cooling
the interior of the vehicle
Before exiting the vehicle, set the tem-
perature controls to the desired setting
and operation. After the system starts the
engine, the heater or air conditioning will
activate and heat or cool the interior to
your setting.
&Service mode (models with-
out “keyless access with
push-button start system ”)
In service mode, the remote engine start
function is temporarily disabled to prevent
the system from unexpectedly starting the
engine while being serviced. To engage or disengage service mode:
1. Enter the vehicle and close all vehicle
doors and the rear gate/trunk lid.
2. Verify that the select lever is in the
“P ”
position (CVT models)
3. Depress and hold the brake pedal
4. Turn the ignition switch to the “ON”
position
5. Press and release the remote engine
start transmitter “
”button three times.
The system will honk the vehicle ’s horn
each time the button is pressed.
6. The system will pause for 1 second
then honk the vehicle’ s horn three times to
indicate that the service mode has been
engaged or honk one time to indicate that
the service mode has been disengaged.
NOTE
When taking your vehicle in for service,
it is recommended that you inform the
service personnel that your vehicle is
equipped with a remote engine start
system.
& Remote transmitter program
(models without “keyless ac-
cess with push-button start
system ”)
New transmitters can be programmed to
the remote engine start system in the
7-20
Page 439 of 610

Starting and operating/Reverse Automatic Braking System
to“Electronic parking brake ”F 7-43.
– When 2 minutes pass after the
vehicle is stopped
– When any door is opened
– When the EyeSight system mal-
functions
– When the EyeSight system stops
temporarily
– When the Reverse Automatic
Braking system malfunctions
– When the Reverse Automatic
Braking system stops temporarily
. The message/warning message will
not display for approximately 8 sec-
onds after turning the ignition switch to
the “ON ”position.Guideline of detecting range
Alarm pattern Range of detected object* Audible warning sound
Medium proximity warning
(First braking and warning) 28 to 35 inches (70 to 90 cm) Short beeps
Short proximity warning (First
braking and warning) 20 to 28 inches (50 to 70 cm) Rapid short beeps
Closest proximity warning
(Second braking and warning) 20 inches (50 cm) or less
Continuous beep
*: Range of detection may vary depending on the environmental condition.
7-68
Page 441 of 610

Starting and operating/Reverse Automatic Braking System
When the OFF setting is shown, the
corresponding setting is OFF.
Touch and hold the OFF setting key to turn
the setting ON.
When the Reverse Automatic Braking
system and/or the object detection warn-
ing beeping sounds are turned OFF, the
following indicator(s) will illuminate.
1) RAB OFF indicator: illuminates when theReverse Automatic Braking system is
turned OFF.
2) Sonar audible alarm OFF indicator: illuminates when the object detection
warning beeping sound is turned OFF.
Each indicator will turn off when the
corresponding function is turned ON.
NOTE
.When the settings cannot be chan-
ged, the ON/OFF setting key will be
grayed out.
. The settings cannot be changed for
approximately 14 seconds after turning
the ignition switch to the “ON ”posi-
tion.
. The ON/OFF setting key may be
greyed out if the Reverse Automatic
Braking system malfunctions, etc. In
this case, turn the ignition switch to the
“ LOCK ”/“ OFF ”position and then turn it
to the “ON ”position again. If the
setting cannot be changed even after
turning the ignition switch to the “ON ”
position again, consult your SUBARU
dealer.
. The settings will be restored as
follows when the select lever is shifted
to the “R ” position next time.
– Reverse Automatic Braking sys-
tem settings: default (ON setting)
– Object detection warning beep-
ing sound: the setting selected by
operating the multi function display
Also, the following settings can be chan-
ged by operating the multi information
display.
. Warning volume
. Sonar audible alarm For details, refer to
“RAB”F 3-45.& Handling of the sonar sen-
sors
The 4 sonar sensors are located in the
rear bumper. To ensure the proper opera-
tion of the Reverse Automatic Braking
system, observe the following precau-
tions.
. Do not affix any stickers or other items
on the bumper surface near the sonar
sensors.
. Always keep the rear bumper surface
near the sonar sensors clean.
. Do not modify the rear bumper.
. Do not paint the bumper near the sonar
sensors.
. Do not apply strong impacts to the rear
7-70