2017 SUBARU LEGACY clutch
[x] Cancel search: clutchPage 421 of 610

Starting and operating/Cruise control
OFF
When using the Hill start assist system, a
braking effect may be felt even after the
brake pedal has been released. However,
this braking effect should disappear once
the clutch pedal is released.
CAUTION
The braking power of the Hill start
assist system may not be sufficient
when strong braking power is
needed (e.g., when towing a trailer
(Outback)).
NOTE
A slight jolt may be felt when the
vehicle begins to move forward after
being reversed.
&To activate/deactivate the Hill
start assist system
When activating/deactivation the Hill
Holder function, the Hill start assist system
will also be activated/deactivated. For
details about activating/deactivating the
Hill Holder function, refer to “Hill Holder
switch ”F 7-46.
Cruise control
NOTE
For models with EyeSight system:
Refer to the Owner ’s Manual supple-
ment for the EyeSight system.
Cruise control enables you to maintain a
constant vehicle speed without holding
your foot on the accelerator pedal and it is
operative when the vehicle speed is 25
mph (40 km/h) or more.
WARNING
Do not use the cruise control under
any of the following conditions.
These may cause loss of vehicle
control.
. driving up or down a steep grade
. driving on slippery or winding
roads
. driving in heavy traffic
. towing a trailer
NOTE
Make sure the cruise control system is
turned off when the cruise control is
not in use to avoid unintentionally
setting of the cruise control.
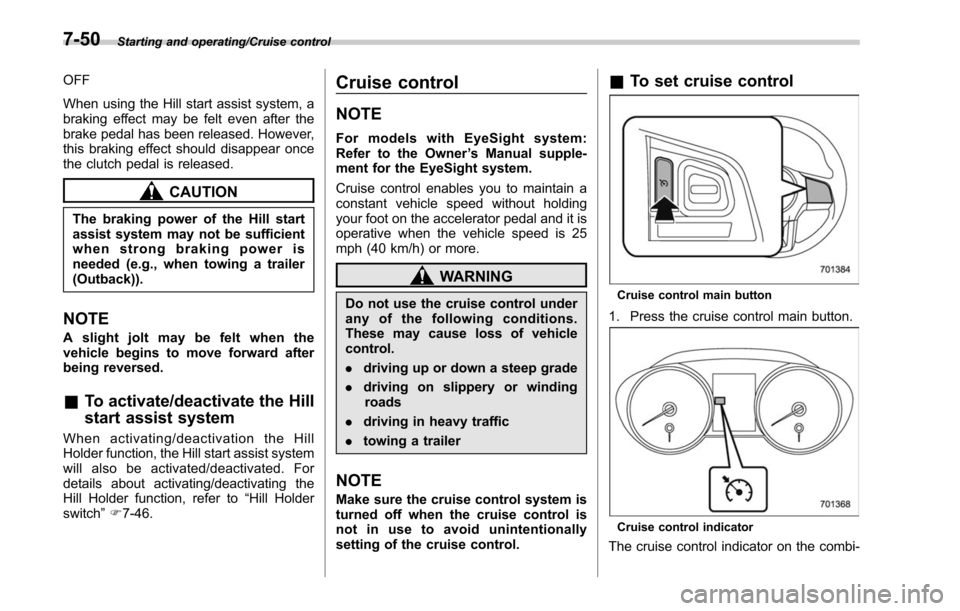
&To set cruise control
Cruise control main button
1. Press the cruise control main button.
Cruise control indicator
The cruise control indicator on the combi-
7-50
Page 422 of 610

nation meter will appear.
2. Depress the accelerator pedal until the
vehicle reaches the desired speed.
3. Press the“RES/SET”switch to the
“SET ”side and release it. Then release
the accelerator pedal.
Cruise control set indicator
1) When setting the displayed unit as “MPH ”.
2) When setting the displayed unit as “km/h ”.
At this time, the cruise control set indicator
appears in the combination meter. The set
speed will be shown on the combination
meter. You can change the displayed unit
by operating the multi information display.
For details, refer to “Units”F 3-44.
The vehicle will maintain the desired
speed.
Vehicle speed can be temporarily in-
creased while driving with the cruise
control activated. Simply depress the
accelerator pedal to accelerate the vehi-
cle. When the accelerator pedal is re-
leased, the vehicle will return to and maintain the previous cruising speed.
&
To temporarily cancel the
cruise control
The cruise control can be temporarily
canceled in the following ways.
. Press the “CANCEL”button.
. Press the X-mode switch to activate
the X-mode (models with X-mode).
. Depress the brake pedal.
. Depress the clutch pedal (MT models).
WARNING
For CVT models, do not place the
select lever in the “N ” position while
driving. If the select lever is shifted
into the “N ” position, cruise control
can be canceled but the engine
Starting and operating/Cruise control
–CONTINUED –7-51
Page 471 of 610

Driving tips/Trailer towing (Outback)
country on hot days.
. When towing a trailer, steering,
stability, stopping distance and
braking performance will be dif-
ferent when compared to normal
operation. You should never
drive at excessive speeds but
always employ extra caution
when towing a trailer. You should
also keep the following tips in
mind.
. When parking on a steep slope
with a trailer attached to your
vehicle, the braking power of the
electronic parking brake may not
be sufficient since strong brak-
ing power is needed.
! Before starting out on a trip
. Check the towing regulations for trailer
or caravan vehicles that vary by state/
region. Failure to comply with the proce-
dures set forth will not only compromise
your safety, but will also negate your
insurance coverage and/or may violate
the state road and traffic acts and regula-
tions.
. Check that the vehicle and vehicle-to-
hitch mounting are in good condition. If
any problems are apparent, do not tow the
trailer. .
Check that the vehicle rests horizon-
tally with the trailer attached. If the vehicle
is tipped sharply up at the front and down
at the rear, check the total trailer weight,
GVW, GAWs and tongue load again, then
confirm that the load and its distribution
are acceptable.
. Check that the tire pressures are
correct.
. Check that the vehicle and trailer are
connected properly. Confirm that
–the trailer tongue is connected
properly to the hitch ball.
– the trailer lights connector is con-
nected properly and trailer ’s stop lights
illuminate when the vehicle’ s brake
pedal is pressed, and that the trailer ’s
turn signal lights flash when the
vehicle’ s turn signal lever is operated.
– the safety chains are connected
properly.
– all cargo in the trailer is secured
safely in position.
– the side mirrors provide a good
rearward field of view without a sig-
nificant blind spot.
. Sufficient time should be taken to learn
the “feel ”of the vehicle/trailer combination
before starting out on a trip. In an area free
of traffic, practice turning, stopping and
backing up. !
Driving with a trailer
. You should allow for considerably more
stopping distance when towing a trailer.
Avoid sudden braking because it may
result in skidding or jackknifing and loss of
control.
. Avoid abrupt starts and sudden accel-
erations. For MT models, always start out
in first gear and release the clutch pedal at
moderate engine revolution.
. Avoid uneven steering, sharp turns and
rapid lane changes.
. Slow down before turning. Make a
longer than normal turning radius because
the trailer wheels will be closer than the
vehicle wheels to the inside of the turn. In
a tight turn, the trailer could hit your
vehicle.
. Crosswinds will adversely affect the
handling of your vehicle and trailer, caus-
ing sway. Crosswinds can be due to
weather conditions or the passing of large
trucks or buses. If swaying occurs, firmly
grip the steering wheel and promptly begin
decelerating your vehicle at a gradual
pace.
. When passing other vehicles, consid-
erable distance is required because of the
added weight and length caused by
attaching the trailer to your vehicle.
8-28
Page 504 of 610

Maintenance schedule....................................... 11-3
Maintenance precautions ................................... 11-3
Before checking or servicing in the engine
compartment .................................................... 11-4
When checking or servicing in the engine compartment (2.5 L models) ............................. 11-5
When checking or servicing in the engine compartment while the engine is running .......... 11-5
Maintenance tips................................................ 11-5Removing and reinstalling clips .......................... 11-5
Engine hood....................................................... 11-7
Engine compartment overview .......................... 11-9
2.5 L models...................................................... 11-9
3.6 L models .................................................... 11-10
Engine oil.......................................................... 11-11Engine oil consumption .................................... 11-11
Checking the oil level ....................................... 11-11
Changing the oil and oil filter ............................ 11-13
Recommended grade and viscosity .................. 11-13
Synthetic oil ..................................................... 11-13
Cooling system ................................................ 11-14
Cooling fan, hose and connections ................... 11-14
Engine coolant ................................................. 11-15
Air cleaner element .......................................... 11-15Replacing the air cleaner element ..................... 11-16
Spark plugs...................................................... 11-18Recommended spark plugs .............................. 11-18
Drive belts........................................................ 11-18
Manual transmission oil .................................. 11-19
Recommended grade and viscosity .................. 11-19
Continuously variable transmission fluid ...... 11-19
Front differential gear oil (CVT models) and rear differential gear oil ................................ 11-19
Recommended grade and viscosity .................. 11-19
Brake fluid........................................................ 11-20Checking the fluid level .................................... 11-20
Recommended brake fluid ............................... 11-21
Clutch fluid (MT models)................................. 11-21Checking the fluid level.................................... 11-21
Recommended clutch fluid ............................... 11-22
Brake booster.................................................. 11-22
Brake pedal ...................................................... 11-23
Checking the brake pedal free play .................. 11-23
Checking the brake pedal reserve distance ....... 11-23
Clutch pedal (MT models) ............................... 11-23Checking the clutch function ............................ 11-23
Checking the clutch pedal free play .................. 11-24
Replacement of brake pad.............................. 11-24Breaking-in of new brake pads . ........................ 11-24
Tires and wheels.............................................. 11-25Types of tires................................................... 11-25
Tire pressure monitoring system (TPMS) (if equipped) ...................................................... 11-25
Tire inspection ................................................. 11-27
Tire pressures and wear .................................. 11-27
Wheel balance ................................................. 11-29
Wear indicators ............................................... 11-29
Tire rotation direction mark .............................. 11-29
Tire rotation ..................................................... 11-30
Tire replacement .............................................. 11-30
Maintenance and service
11
Page 512 of 610

Engine compartment overview
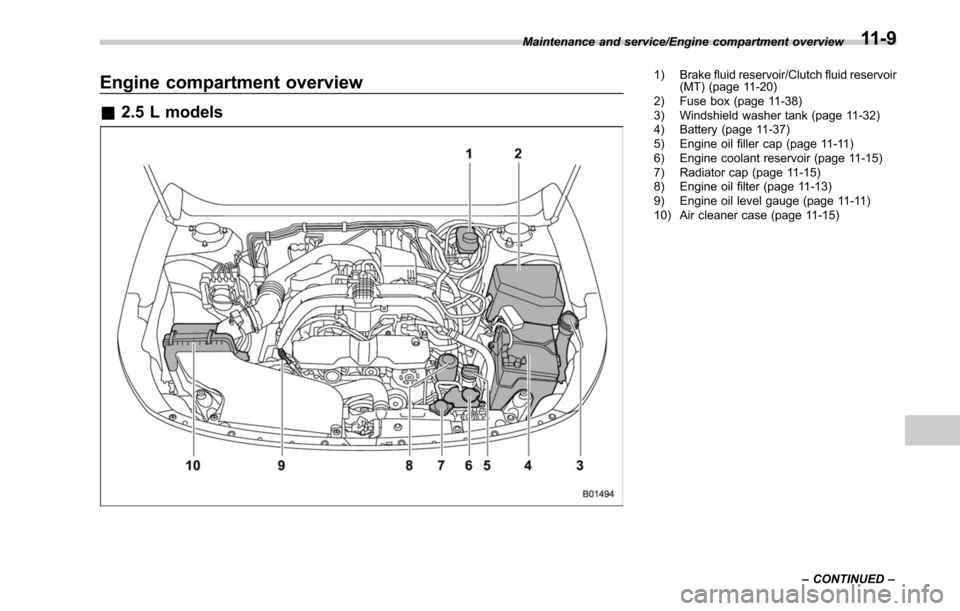
&2.5 L models
1) Brake fluid reservoir/Clutch fluid reservoir
(MT) (page 11-20)
2) Fuse box (page 11-38)
3) Windshield washer tank (page 11-32)
4) Battery (page 11-37)
5) Engine oil filler cap (page 11-11)
6) Engine coolant reservoir (page 11-15)
7) Radiator cap (page 11-15)
8) Engine oil filter (page 11-13)
9) Engine oil level gauge (page 11-11)
10) Air cleaner case (page 11-15)
Maintenance and service/Engine compartment overview
–CONTINUED –
11-9
Page 523 of 610

Maintenance and service/Brake fluid
Brake fluid
&Checking the fluid level
WARNING
. Never let brake fluid contact your
eyes because brake fluid can be
harmful to your eyes. If brake
fluid gets in your eyes, immedi-
ately flush them thoroughly with
clean water. For safety, when
performing this work, wearing
eye protection is advisable.
. Brake fluid absorbs moisture
from the air. Any absorbed moist-
ure can cause a dangerous loss
of braking performance.
. If the vehicle requires frequent
refilling, there may be a leak. If
you suspect a problem, have the
vehicle checked at your SUBARU
dealer.
CAUTION
. When adding brake fluid, be care-
ful not to allow any dirt into the
reservoir.
. Never splash the brake fluid over
painted surfaces or rubber parts. Alcohol contained in the brake
fluid may damage them.
. Be careful not to spill brake fluid
when adding it. If brake fluid
touches the exhaust pipe, it may
cause a bad smell, smoke, and/or
a fire. If brake fluid gets on the
exhaust pipe, be sure to wipe it
off.
The reservoir has two chambers, one for
clutch fluid and the other for brake fluid.
Each fluid level must therefore be checked
in the appropriate chamber. Check the
fluid level on the outside of the reservoir
monthly.
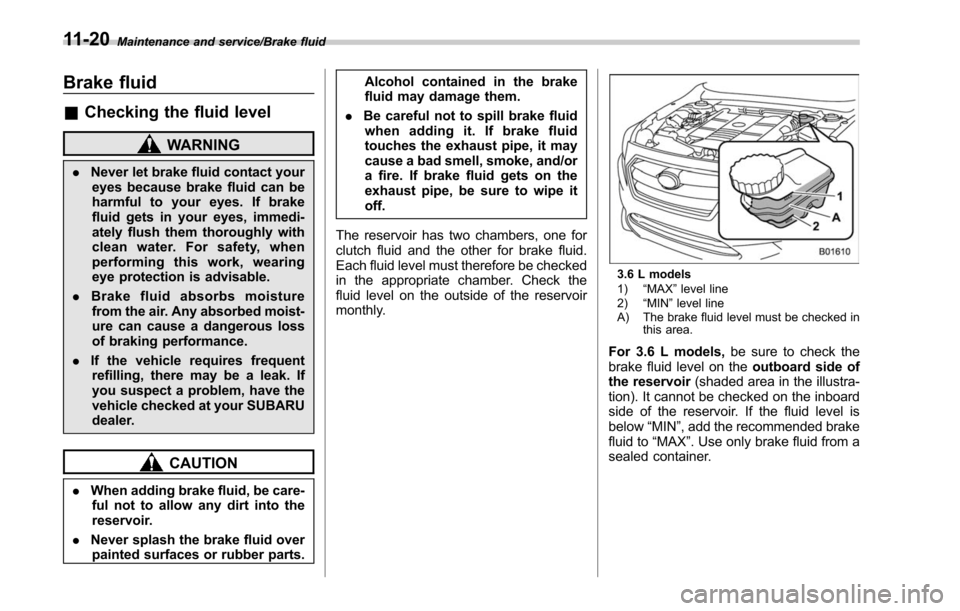
3.6 L models
1) “MAX ”level line
2) “MIN ”level line
A) The brake fluid level must be checked in this area.
For 3.6 L models, be sure to check the
brake fluid level on the outboard side of
the reservoir (shaded area in the illustra-
tion). It cannot be checked on the inboard
side of the reservoir. If the fluid level is
below “MIN”, add the recommended brake
fluid to “MAX”. Use only brake fluid from a
sealed container.
11-20
Page 524 of 610

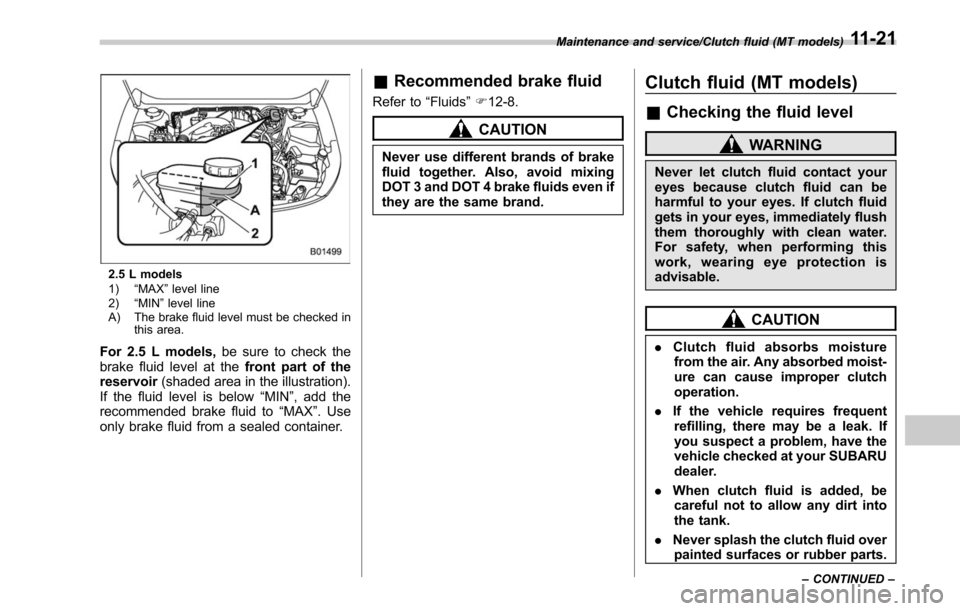
2.5 L models
1)“MAX ”level line
2) “MIN ”level line
A) The brake fluid level must be checked in this area.
For 2.5 L models, be sure to check the
brake fluid level at the front part of the
reservoir (shaded area in the illustration).
If the fluid level is below “MIN”, add the
recommended brake fluid to “MAX”. Use
only brake fluid from a sealed container.
& Recommended brake fluid
Refer to “Fluids”F 12-8.
CAUTION
Never use different brands of brake
fluid together. Also, avoid mixing
DOT 3 and DOT 4 brake fluids even if
they are the same brand.
Clutch fluid (MT models)
& Checking the fluid level
WARNING
Never let clutch fluid contact your
eyes because clutch fluid can be
harmful to your eyes. If clutch fluid
gets in your eyes, immediately flush
them thoroughly with clean water.
For safety, when performing this
work, wearing eye protection is
advisable.
CAUTION
. Clutch fluid absorbs moisture
from the air. Any absorbed moist-
ure can cause improper clutch
operation.
. If the vehicle requires frequent
refilling, there may be a leak. If
you suspect a problem, have the
vehicle checked at your SUBARU
dealer.
. When clutch fluid is added, be
careful not to allow any dirt into
the tank.
. Never splash the clutch fluid over
painted surfaces or rubber parts.
Maintenance and service/Clutch fluid (MT models)
–CONTINUED –11-21
Page 525 of 610

Maintenance and service/Brake booster
Alcohol contained in the clutch
fluid may damage them.
. Be careful not to spill clutch fluid
when adding it. If clutch fluid
touches the exhaust pipe, it may
cause a bad smell, smoke, and/or
a fire. If clutch fluid gets on the
exhaust pipe, be sure to wipe it
off.
. The fluid level for the clutch
system must be checked at the
inboard side of the reservoir. It
cannot be checked at the out-
board side of the reservoir.
1) “MAX ”level line
2) “MIN ”level line
A) The clutch fluid level must be checked in this area.
Check the fluid level monthly.
Check the fluid level on the outside of the
reservoir. Because this reservoir is used
for both the brake and clutch systems and
has chambers for each system, be sure to
check the fluid level for the clutch system
at the inboard side of the reservoir
(shaded area in the illustration). If the fluid
level is below “MIN ”, add the recom-
mended clutch fluid to “MAX”.
Use only clutch fluid from a sealed
container.
& Recommended clutch fluid
Refer to “Fluids”F 12-8.
CAUTION
Never use different brands of clutch
fluid together. Also, avoid mixing
DOT 3 and DOT 4 brake fluids even if
they are the same brand.
Brake booster
If the brake booster does not operate as
described in the following procedure, have
it checked by your SUBARU dealer.
1. With the engine off, depress the brake
pedal several times, applying the same
pedal force each time. The distance the
pedal travels should not vary.
2. With the brake pedal depressed, start
the engine. The pedal should move
slightly down to the floor.
3. With the brake pedal depressed, stop
the engine and keep the pedal depressed
for 30 seconds. The pedal height should
not change.
4. Start the engine again and run for
approximately 1 minute then turn it off.
Depress the brake pedal several times to
check the brake booster. The brake
booster operates properly if the pedal
stroke decreases with each depression.
11-22