2017 SUBARU FORESTER malfunction indicator light
[x] Cancel search: malfunction indicator lightPage 251 of 634
Instruments and controls/Turn signal lever
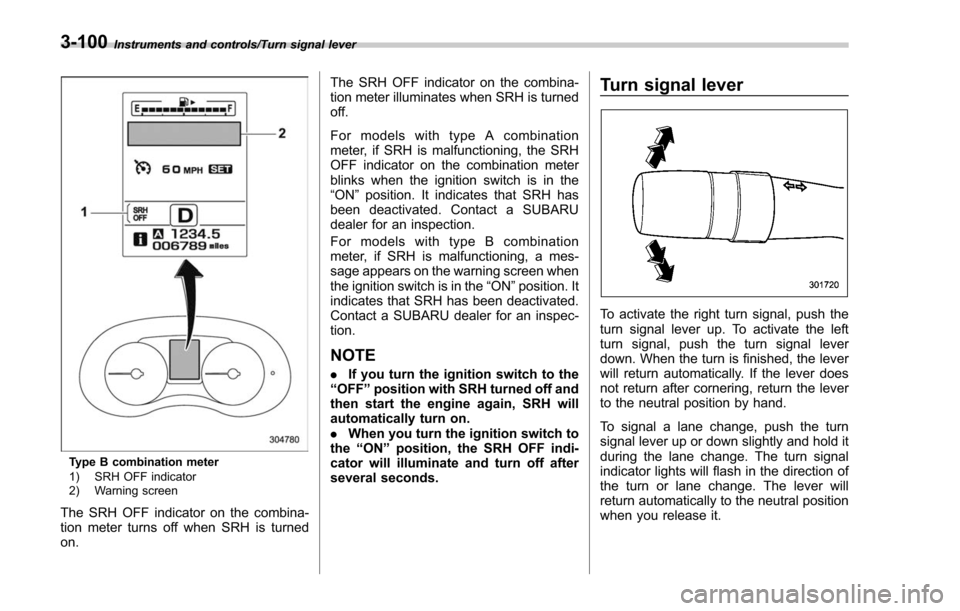
Type B combination meter
1) SRH OFF indicator
2) Warning screen
The SRH OFF indicator on the combina-
tion meter turns off when SRH is turned
on.The SRH OFF indicator on the combina-
tion meter illuminates when SRH is turned
off.
For models with type A combination
meter, if SRH is malfunctioning, the SRH
OFF indicator on the combination meter
blinks when the ignition switch is in the
“ON
”position. It indicates that SRH has
been deactivated. Contact a SUBARU
dealer for an inspection.
For models with type B combination
meter, if SRH is malfunctioning, a mes-
sage appears on the warning screen when
the ignition switch is in the “ON”position. It
indicates that SRH has been deactivated.
Contact a SUBARU dealer for an inspec-
tion.
NOTE
. If you turn the ignition switch to the
“ OFF ”position with SRH turned off and
then start the engine again, SRH will
automatically turn on.
. When you turn the ignition switch to
the “ON ”position, the SRH OFF indi-
cator will illuminate and turn off after
several seconds.
Turn signal lever
To activate the right turn signal, push the
turn signal lever up. To activate the left
turn signal, push the turn signal lever
down. When the turn is finished, the lever
will return automatically. If the lever does
not return after cornering, return the lever
to the neutral position by hand.
To signal a lane change, push the turn
signal lever up or down slightly and hold it
during the lane change. The turn signal
indicator lights will flash in the direction of
the turn or lane change. The lever will
return automatically to the neutral position
when you release it.
3-100
Page 281 of 634
Climate control/Manual climate control operation
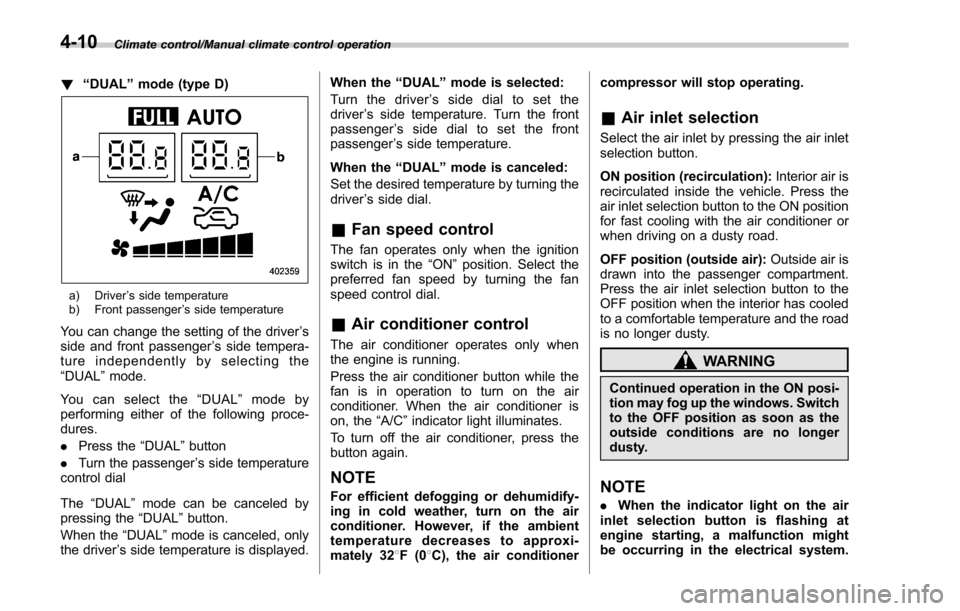
!“DUAL ”mode (type D)
a) Driver ’s side temperature
b) Front passenger ’s side temperature
You can change the setting of the driver ’s
side and front passenger ’s side tempera-
ture independently by selecting the
“DUAL ”mode.
You can select the “DUAL ”mode by
performing either of the following proce-
dures.
. Press the “DUAL”button
. Turn the passenger ’s side temperature
control dial
The “DUAL ”mode can be canceled by
pressing the “DUAL”button.
When the “DUAL”mode is canceled, only
the driver ’s side temperature is displayed. When the
“DUAL ”mode is selected:
Turn the driver ’s side dial to set the
driver ’s side temperature. Turn the front
passenger ’s side dial to set the front
passenger ’s side temperature.
When the “DUAL ”mode is canceled:
Set the desired temperature by turning the
driver ’s side dial.
& Fan speed control
The fan operates only when the ignition
switch is in the “ON”position. Select the
preferred fan speed by turning the fan
speed control dial.
& Air conditioner control
The air conditioner operates only when
the engine is running.
Press the air conditioner button while the
fan is in operation to turn on the air
conditioner. When the air conditioner is
on, the “A/C ”indicator light illuminates.
To turn off the air conditioner, press the
button again.
NOTE
For efficient defogging or dehumidify-
ing in cold weather, turn on the air
conditioner. However, if the ambient
temperature decreases to approxi-
mately 32 8F(0 8C), the air conditioner compressor will stop operating.
&
Air inlet selection
Select the air inlet by pressing the air inlet
selection button.
ON position (recirculation): Interior air is
recirculated inside the vehicle. Press the
air inlet selection button to the ON position
for fast cooling with the air conditioner or
when driving on a dusty road.
OFF position (outside air): Outside air is
drawn into the passenger compartment.
Press the air inlet selection button to the
OFF position when the interior has cooled
to a comfortable temperature and the road
is no longer dusty.
WARNING
Continued operation in the ON posi-
tion may fog up the windows. Switch
to the OFF position as soon as the
outside conditions are no longer
dusty.
NOTE
. When the indicator light on the air
inlet selection button is flashing at
engine starting, a malfunction might
be occurring in the electrical system.
4-10
Page 282 of 634
Contact your SUBARU dealer for in-
spection.
.The indicator light on the air inlet
selection button may flash in the
following cases. However, this does
not indicate a malfunction.
–After the vehicle battery has been
disconnected and reconnected.
– When the vehicle battery voltage
is low.Defrosting
& Type A and B
Select the “”or “”mode by turning the
airflow mode selection dial to defrost or to
dehumidify the windshield and front door
windows.
& Type C
Select the “”mode by pressing the
defroster button, or select the “”mode
by turning the airflow mode selection dial
to defrost or to dehumidify the windshield
and front door windows.
& Type D
Select the “”mode by pressing the
defroster button, or select the “”mode
by pressing the airflow mode selection
button to defrost or to dehumidify the
windshield and front door windows.
NOTE
. When the “”or “”mode is
selected, the air conditioner compres-
sor operates automatically regardless
of the position of the air conditioner
button to defrost the windshield more
quickly. However the indicator on the
air conditioner button will not illumi-
nate. At the same time, the air inlet selection is automatically set to the
outside air mode.
For type A climate control system, in
this state:
–You cannot stop the air condi-
tioner compressor by pressing the
air conditioner button.
– You cannot select the recircula-
tion mode by pressing the air inlet
selection button.
. For type C and D climate control
system, after defrosting the windshield
by pressing the defroster button “
”,
pressing the button again returns the
system to the setting that had been
selected before the defroster was acti-
vated.
Climate control/Defrosting4-11
Page 404 of 634

Fuel...................................................................... 7-3Fuel requirements ............................................... 7-3
Fuel filler lid and cap ........................................... 7-5
State emission testing (U.S. only) ...................... 7-7
Preparing to drive ............................................... 7-8
Starting and stopping the engine (models without push-button start system) .................. 7-9
Starting engine.................................................... 7-9
Stopping the engine ........................................... 7-11
Starting and stopping engine (models with
push-button start system) .............................. 7-12
Safety precautions............................................. 7-12
Operating range for push-button start system ............................................................. 7-12
Starting engine ................................................... 7-12
Stopping engine ................................................. 7-13
When access key does not operate properly ....... 7-14
Remote engine start system (dealer
option) .............................................................. 7-14
Models with “keyless access with push-button
start system ”................................................... 7-14
Models without “keyless access with push-button
start system ”................................................... 7-15
Entering the vehicle while it is running via remote start ................................................................. 7-19
Entering the vehicle following remote engine start shutdown ......................................................... 7-19
Pre-heating or pre-cooling the interior of the vehicle ............................................................. 7-19
Service mode (models without “keyless access
with push-button start system ”)........................ 7-19 Remote transmitter program (models without
“keyless access with push-button start
system ”).......................................................... 7-20
System maintenance .......................................... 7-20
Manual transmission ......................................... 7-22Shifting speeds.................................................. 7-23
Driving tips ........................................................ 7-24
Continuously variable transmission ................. 7-24Select lever....................................................... 7-25
Selection of manual mode (if equipped) .............. 7-27
Selection of “L ” (if equipped) ... .......................... 7-29
Shift lock function ............................................. 7-30
Driving tips ........................................................ 7-31
SI-DRIVE (if equipped) ....................................... 7-32Intelligent (I) mode............................................. 7-32
Sport (S) mode .................................................. 7-32
Sport Sharp (S#) mode. ...................................... 7-33
SI-DRIVE switches ............................................. 7-34
Power steering................................................... 7-34
Braking ............................................................... 7-35
Braking tips ....................................................... 7-35
Brake system .................................................... 7-36
Disc brake pad wear warning indicators ............. 7-36
ABS (Anti-lock Brake System).......................... 7-37ABS self-check.................................................. 7-37
ABS warning light .............................................. 7-37
Electronic Brake Force Distribution (EBD)
system ............................................................. 7-38
Steps to take if EBD system malfunctions .......... 7-38
Vehicle Dynamics Control system.................... 7-39Vehicle Dynamics Control system monitor .......... 7-41
Starting and operating
7
Page 409 of 634

Starting and operating/Fuel
left. Do not remove the cap
quickly. Fuel may be under pres-
sure and spray out of the fuel
filler neck, especially in hot
weather. If you hear a hissing
sound while you are removing
the cap, wait for the sound to
stop and then slowly open the
cap to prevent fuel from spraying
out and creating a fire hazard.
3. Set the fuel filler cap on the cap holder
inside the fuel filler lid.
WARNING
.When refueling, insert the fuel
nozzle securely into the fuel filler
pipe. If the nozzle is lifted or not
fully inserted, its automatic stop- ping mechanism may not func-
tion, causing fuel to overflow the
tank and creating a fire hazard.
. Stop refueling when the auto-
matic stop mechanism on the
fuel nozzle activates. If you con-
tinue to add fuel, temperature
changes or other conditions
may cause fuel to overflow from
the tank and create a fire hazard.
4. Stop filling the tank after the fuel filler
pump automatically stops. Do not add any
more fuel.
5. Put the cap back on, turn it clockwise
until you hear a clicking noise. Be certain
not to catch the tether under the cap while
tightening.
6. Close the fuel filler lid completely.
If you spill any fuel on the painted surface,
rinse it off immediately. Otherwise, the
painted surface could be damaged.
NOTE
. You will see the “”sign in the fuel
gauge. This indicates that the fuel filler
door (lid) is located on the right side of
the vehicle.
. If the fuel filler cap is not tightened
until it clicks or if the tether is caught
under the cap, the CHECK ENGINE warning light/malfunction indicator
light may illuminate. Refer to
“CHECK
ENGINE warning light/Malfunction in-
dicator light ”F 3-16.
CAUTION
. Never add any cleaning agents to
the fuel tank. The addition of a
cleaning agent may cause da-
mage to the fuel system.
. After refueling, turn the cap to the
right until it clicks to ensure that
it is fully tightened. If the cap is
not securely tightened, fuel may
leak out while the vehicle is being
driven or fuel spillage could
occur in the event of an accident,
creating a fire hazard.
. Do not let fuel spill on the exterior
surfaces of the vehicle. Because
fuel may damage the paint, be
sure to wipe off any spilled fuel
quickly. Paint damage caused by
spilled fuel is not covered under
the SUBARU Limited Warranty.
. Always use a genuine SUBARU
fuel filler cap. If you use the
wrong cap, it may not fit or have
proper venting and your fuel tank
and emission control system
may be damaged. It could also
7-6
Page 413 of 634

Starting and operating/Starting and stopping the engine (models without push–button start system)
. When starting the engine, be sure
to sit in the driver ’s seat (except
when using the remote engine
start system).
NOTE
. Avoid rapid racing and rapid accel-
eration immediately after the engine
has started.
. For a short time after the engine has
started, the engine speed is kept high.
When the warm-up is completed, the
engine speed lowers automatically.
. On rare occasions, it may be difficult
to start the engine depending on the
fuel and the usage condition (repeated
driving of a distance in which the
engine has not warmed up sufficiently).
In such a case, it is recommended that
you change to a different brand of fuel.
. On rare occasions, transient knock-
ing may be heard from the engine when
the accelerator is operated rapidly
such as a rapid start-up and a rapid
acceleration. This is not a malfunction.
. The engine starts more easily when
the headlights, air conditioner and rear
window defogger are turned off.
. After the engine starts, the engine
speed will be kept high until the engine
has warmed up sufficiently. !
MT models
1. Apply the parking brake.
2. Turn off unnecessary lights and ac-
cessories.
3. Depress the clutch pedal to the floor
and shift the shift lever into neutral. Hold
the clutch pedal to the floor while starting
the engine.
The starter motor will only operate when
the clutch pedal is depressed fully to the
floor.
4. Turn the ignition switch to the “ON”
position and check the operation of the
warning and indicator lights. Refer to
“Warning and indicator lights ”F 3-13.
5. Turn the ignition switch to the “START”
position without depressing the accelera-
tor pedal. Release the key immediately
after the engine has started.
If the engine does not start, try the
following procedure.
(1) Turn the ignition switch to the
“OFF ”position and wait for at least
10 seconds. After checking that the
parking brake is firmly set, turn the
ignition switch to the “START”position
while depressing the accelerator pedal
slightly (approximately a quarter of the
full stroke). Release the accelerator
pedal as soon as the engine starts.
(2) If this fails to start the engine, turn the ignition switch back to the
“OFF”
position and wait for at least 10
seconds. Then fully depress the accel-
erator pedal and turn the ignition
switch to the “START”position. If the
engine starts, quickly release the
accelerator pedal.
(3) If this fails to start the engine, turn
the ignition switch again to the “OFF”
position. After waiting for 10 seconds
or longer, turn the ignition switch to the
“START ”position without depressing
the accelerator pedal.
(4) If the engine still does not start,
contact your nearest SUBARU dealer
for assistance.
6. Confirm that all warning and indicator
lights have turned off after the engine has
started. The fuel injection system auto-
matically lowers the idle speed as the
engine warms up.
! CVT models
1. Apply the parking brake.
2. Turn off unnecessary lights and ac-
cessories.
3. Shift the select lever to the “P”or “N
”
position (preferably the “P”position).
The
starter motor will only operate when
the select lever is at the “P”or “N”position.
4. Turn the ignition switch to the “ON”
7-10
Page 415 of 634
Starting and operating/Starting and stopping engine (models with push–button start system)
Starting and stopping engine
(models with push-button
start system)
& Safety precautions
Refer to “Safety precautions ”F 2-10.
& Operating range for push-
button start system
Refer to “Operating range for push-button
start system ”F 3-6.
& Starting engine
WARNING
. There are some general precau-
tions when starting the engine.
Carefully read the precautions
described in “Starting engine ”
F 7-9.
. If the indicator on the push-
button ignition switch flashes in
green after the engine has
started, never drive the vehicle.
The steering is still locked, and it
may result in an accident.
CAUTION
. When the operation indicator on
the push-button ignition switch is
flashing in orange, there may be
a malfunction with the vehicle.
Contact a SUBARU dealer imme-
diately.
. If the indicator on the push-
button ignition switch is flashing
in green after the engine has
started, it means that the steering
is still locked. Depress the brake
pedal while moving the steering
wheel to the right and left, and
press the push-button ignition
switch.
. Do not continue pressing the
push-button ignition switch for
more than 10 seconds. Doing so
could cause a malfunction. If the
engine does not start, stop
pressing the push-button ignition
switch. Instead, press the push-
button ignition switch without
depressing the brake pedal to
switch the power status to
“ OFF ”. Wait 10 seconds, and
then press the push-button igni-
tion switch to start the engine.
NOTE
. When the push-button ignition
switch is pressed while depressing
the brake pedal, the engine starter
operates for a maximum of 10 seconds
and after starting the engine, the starter
stops automatically.
. When the push-button ignition
switch is pressed while depressing
the brake pedal, the engine can be
started regardless of the status of the
push-button ignition switch.
. If the security indicator light illumi-
nates when you attempt to start the
engine but the engine does not start,
press the push-button ignition switch
to switch the power to “OFF”and then
try to start the engine again.
. If the engine does not start, press
the push-button ignition switch without
depressing the brake pedal to switch
the power to “OFF ”. Then, while de-
pressing the brake pedal more force-
fully, press the push-button ignition
switch.
. The engine start procedures may
not function depending on the radio
wave conditions around the vehicle. In
such a case, refer to “Starting engine ”
F 9-18.
. If the vehicle battery is discharged,
the steering cannot be unlocked.
7-12
Page 419 of 634
Starting and operating/Remote engine start system (dealer option)
operating range of the system and the
start request is received, the following
phenomena will occur.
.The fob flashes and beeps once.
. The horn sounds once.
. The side marker lights, tail lights, and
parking lights flash once.
If the fob is not within range (the user is
too far away from the vehicle), the fob will
indicate two long flashes without beeping.
The system will check certain safety
preconditions before starting, and if all
conditions are met, the engine will start
within 5 seconds. After the engine starts,
the following phenomena will occur.
. The fob flashes and beeps twice.
. The horn sounds once.
. The side marker lights, tail lights, and
parking lights flash once.
While the engine is idling via the remote
engine start system, the following phe-
nomena will occur.
. The side marker lights, tail lights, and
parking lights remain illuminated.
. The fob button flashes once every 3
seconds.
. The power windows are disabled.
If the engine turns over but does not start
(or starts and stalls) the remote engine start system will power off and then
attempt to start the engine 3 additional
times. The system will not attempt to
restart the engine if it determines a vehicle
malfunction is preventing starting. If the
engine does not start after 3 additional
attempts, the remote engine start request
will be aborted.
!
Stopping the engine
Press and hold the fob button for at least 2
seconds to stop the engine. The fob will
flash and beep three times, indicating the
engine has stopped. If the stop request is
not received (for example, if the user is too
far away from the vehicle), the fob will
continue to flash once every 3 seconds.
The system will automatically stop the
engine after 15 minutes.
! Remote start safety features
For safety and security reasons, the
remote engine start system will prevent
starting (or stop the engine if running) and
sound the horn twice if any of the following
conditions is detected. In addition, the fob
will flash and beep 3 times.
. The brake pedal is depressed
. A key is in the ignition switch
. The engine hood is open
. The remote start system “Service
mode ”is engaged
. The engine idle speed exceeds 3,500 RPM
.
The security alarm is triggered
. The select lever is not in the “P ”
position
If the system detects any door (including
the rear gate) open during operation, it will
prevent starting or stop the engine, and
sound the horn and flash side marker
lights, tail lights, and parking lights 6
times.
In addition to the items above, if the
vehicle’ s engine management system
determines there is a safety risk due to a
vehicle-related problem, the vehicle will
power down and the horn will sound 3
times.
NOTE
. If the alarm system is armed at the
time of remote engine starter activation
(the security indicator light on the
combination meter is flashing), the
alarm system will remain armed
throughout the remote start run cycle.
. If the alarm system is disarmed at
the time of remote engine starter
activation (the security indicator light
on the combination meter is not flash-
ing), the alarm system will remain
disarmed throughout the remote start
run cycle.
7-16