2017 SUBARU FORESTER display
[x] Cancel search: displayPage 189 of 634
Instruments and controls/Information display (Mexico–spec. models)
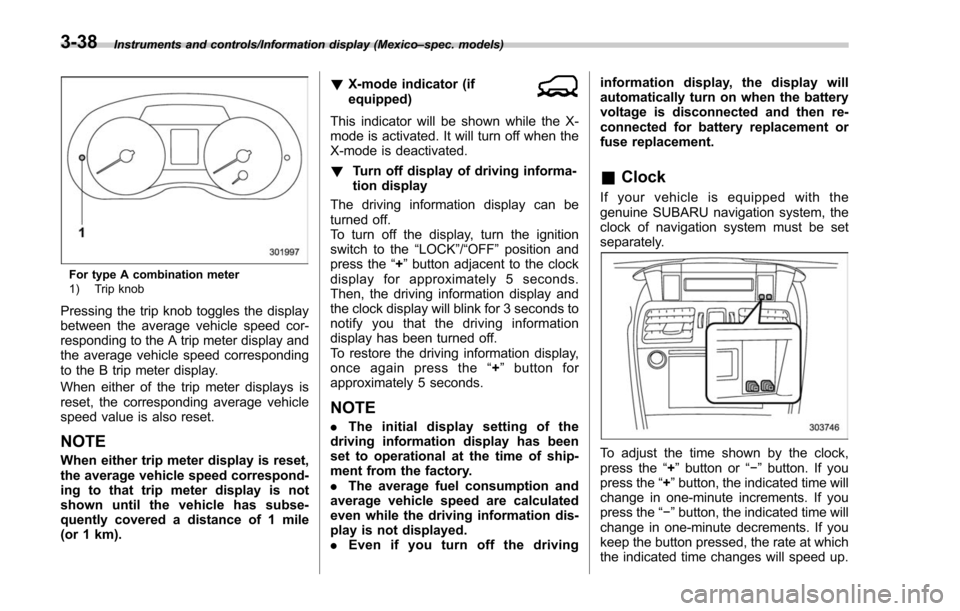
For type A combination meter
1) Trip knob
Pressing the trip knob toggles the display
between the average vehicle speed cor-
responding to the A trip meter display and
the average vehicle speed corresponding
to the B trip meter display.
When either of the trip meter displays is
reset, the corresponding average vehicle
speed value is also reset.
NOTE
When either trip meter display is reset,
the average vehicle speed correspond-
ing to that trip meter display is not
shown until the vehicle has subse-
quently covered a distance of 1 mile
(or 1 km). !
X-mode indicator (if
equipped)
This indicator will be shown while the X-
mode is activated. It will turn off when the
X-mode is deactivated.
! Turn off display of driving informa-
tion display
The driving information display can be
turned off.
To turn off the display, turn the ignition
switch to the “LOCK”/“OFF”position and
press the “+”button adjacent to the clock
display for approximately 5 seconds.
Then, the driving information display and
the clock display will blink for 3 seconds to
notify you that the driving information
display has been turned off.
To restore the driving information display,
once again press the “+ ” button for
approximately 5 seconds.
NOTE
. The initial display setting of the
driving information display has been
set to operational at the time of ship-
ment from the factory.
. The average fuel consumption and
average vehicle speed are calculated
even while the driving information dis-
play is not displayed.
. Even if you turn off the driving information display, the display will
automatically turn on when the battery
voltage is disconnected and then re-
connected for battery replacement or
fuse replacement.
&
Clock
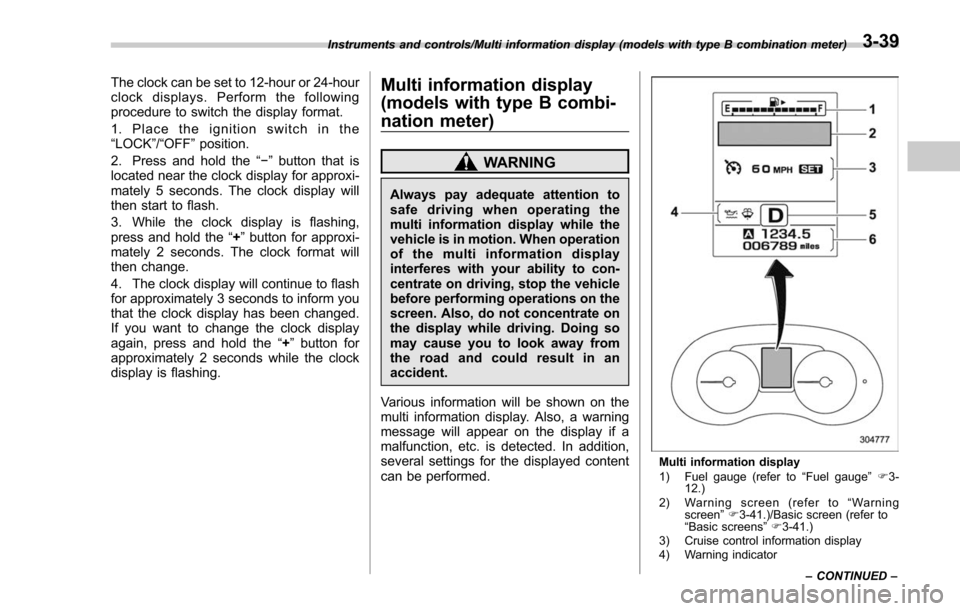
If your vehicle is equipped with the
genuine SUBARU navigation system, the
clock of navigation system must be set
separately.
To adjust the time shown by the clock,
press the “+”button or “− ” button. If you
press the “+ ”button, the indicated time will
change in one-minute increments. If you
press the “− ”button, the indicated time will
change in one-minute decrements. If you
keep the button pressed, the rate at which
the indicated time changes will speed up.
3-38
Page 190 of 634
The clock can be set to 12-hour or 24-hour
clock displays. Perform the following
procedure to switch the display format.
1. Place the ignition switch in the
“LOCK”/“OFF”position.
2. Press and hold the “−”button that is
located near the clock display for approxi-
mately 5 seconds. The clock display will
then start to flash.
3. While the clock display is flashing,
press and hold the “+”button for approxi-
mately 2 seconds. The clock format will
then change.
4. The clock display will continue to flash
for approximately 3 seconds to inform you
that the clock display has been changed.
If you want to change the clock display
again, press and hold the “+”button for
approximately 2 seconds while the clock
display is flashing.Multi information display
(models with type B combi-
nation meter)
WARNING
Always pay adequate attention to
safe driving when operating the
multi information display while the
vehicle is in motion. When operation
of the multi information display
interferes with your ability to con-
centrate on driving, stop the vehicle
before performing operations on the
screen. Also, do not concentrate on
the display while driving. Doing so
may cause you to look away from
the road and could result in an
accident.
Various information will be shown on the
multi information display. Also, a warning
message will appear on the display if a
malfunction, etc. is detected. In addition,
several settings for the displayed content
can be performed.
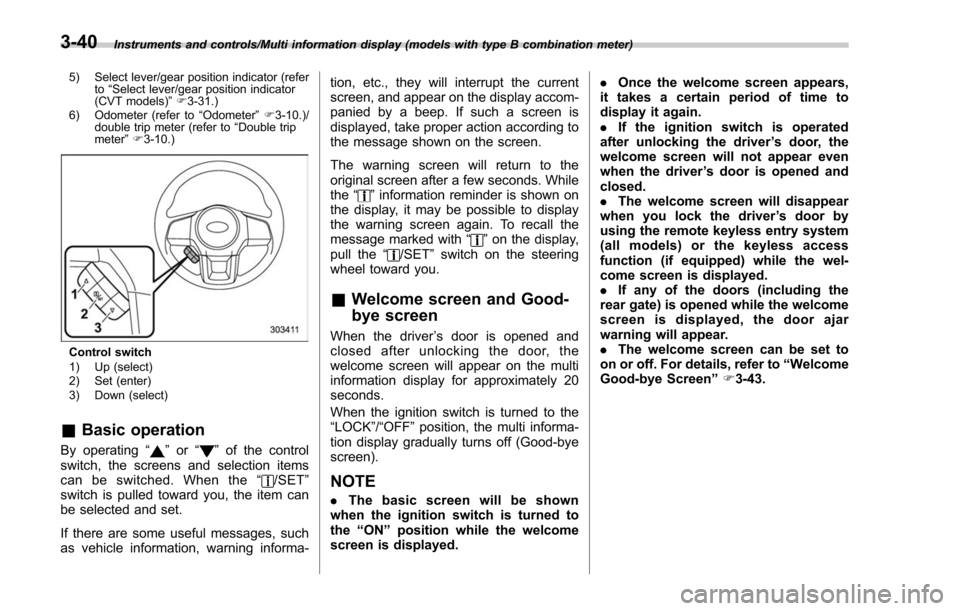
Multi information display
1) Fuel gauge (refer to “Fuel gauge ”F 3-
12.)
2) Warning screen (refer to “Warning
screen ”F 3-41.)/Basic screen (refer to
“ Basic screens ”F 3-41.)
3) Cruise control information display
4) Warning indicator
Instruments and controls/Multi information display (models with type B combination meter)
–CONTINUED –
3-39
Page 191 of 634
Instruments and controls/Multi information display (models with type B combination meter)
5) Select lever/gear position indicator (refer to“Select lever/gear position indicator
(CVT models) ”F 3-31.)
6) Odometer (refer to “Odometer ”F 3-10.)/
double trip meter (refer to “Double trip
meter ”F 3-10.)
Control switch
1) Up (select)
2) Set (enter)
3) Down (select)
& Basic operation
By operating “”or “”of the control
switch, the screens and selection items
can be switched. When the “
/SET”
switch is pulled toward you, the item can
be selected and set.
If there are some useful messages, such
as vehicle information, warning informa- tion, etc., they will interrupt the current
screen, and appear on the display accom-
panied by a beep. If such a screen is
displayed, take proper action according to
the message shown on the screen.
The warning screen will return to the
original screen after a few seconds. While
the
“
”information reminder is shown on
the display, it may be possible to display
the warning screen again. To recall the
message marked with “
”on the display,
pull the “/SET”switch on the steering
wheel toward you.
& Welcome screen and Good-
bye screen
When the driver ’s door is opened and
closed after unlocking the door, the
welcome screen will appear on the multi
information display for approximately 20
seconds.
When the ignition switch is turned to the
“LOCK”/ “OFF ”position, the multi informa-
tion display gradually turns off (Good-bye
screen).
NOTE
. The basic screen will be shown
when the ignition switch is turned to
the “ON ”position while the welcome
screen is displayed. .
Once the welcome screen appears,
it takes a certain period of time to
display it again.
. If the ignition switch is operated
after unlocking the driver ’s door, the
welcome screen will not appear even
when the driver ’s door is opened and
closed.
. The welcome screen will disappear
when you lock the driver ’s door by
using the remote keyless entry system
(all models) or the keyless access
function (if equipped) while the wel-
come screen is displayed.
. If any of the doors (including the
rear gate) is opened while the welcome
screen is displayed, the door ajar
warning will appear.
. The welcome screen can be set to
on or off. For details, refer to “Welcome
Good-bye Screen ”F 3-43.
3-40
Page 192 of 634
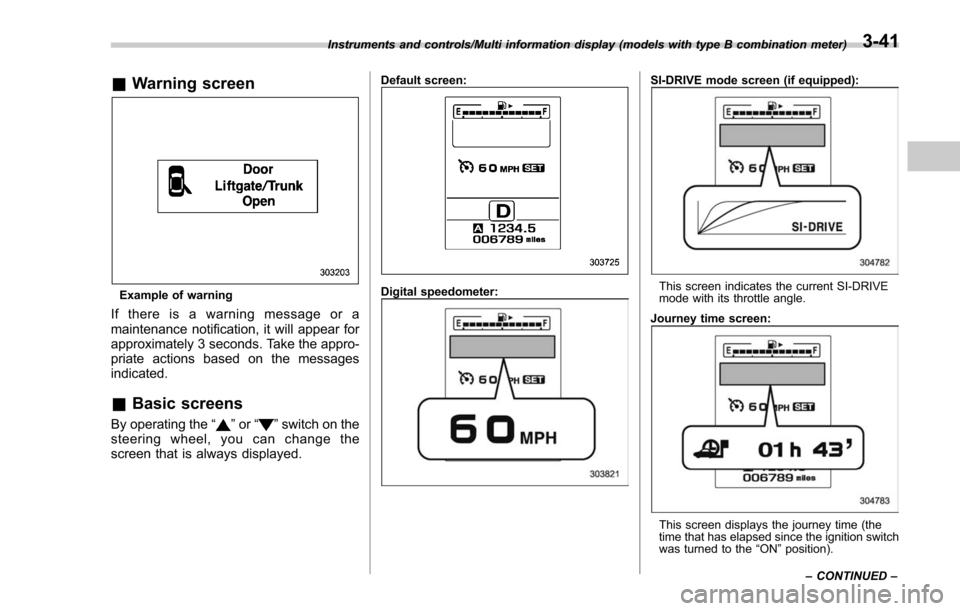
&Warning screen
Example of warning
If there is a warning message or a
maintenance notification, it will appear for
approximately 3 seconds. Take the appro-
priate actions based on the messages
indicated.
&Basic screens
By operating the “”or “”switch on the
steering wheel, you can change the
screen that is always displayed.
Default screen:
Digital speedometer:
SI-DRIVE mode screen (if equipped):
This screen indicates the current SI-DRIVE
mode with its throttle angle.
Journey time screen:
This screen displays the journey time (the
time that has elapsed since the ignition switch
was turned to the “ON ”position).
Instruments and controls/Multi information display (models with type B combination meter)
–CONTINUED –
3-41
Page 193 of 634

Instruments and controls/Multi information display (models with type B combination meter)
Menu screen entering screen:
While this screen is selected, pull the“/
SET ”switch to enter the menu screen.
& Menu screens
Pull the “/SET”switch to enter the menu
screens when all of the following condi-
tions are satisfied.
. The vehicle has been completely
stopped.
. The select lever is in the “P”position.
. The menu screen entering screen is
selected.
. The “
”information reminder is off. The menu list is as follows.
First menu
Second menu
Screen Settings Welcome Good-bye Screen
Gauge Initial Movement
Languages
Go Back
EyeSight (models with EyeSight system) Warning Volume
Lead Vehicle Acquisition Sound
Lead Vehicle Moving Monitor Function
Go Back
BSD/RCTA (if equipped) Warning Volume
RAB (if equipped) Warning Volume
Sonar Audible Alarm
Default Settings ―
3-42
Page 194 of 634

By operating the“”or “”switch on the
steering wheel, you can select the menu.
Pull the “
/SET”switch to enter the
selected menu.
NOTE
If you enter the “Go Back ”menu, the
system will return to the previous
screen.
! Screen Settings
After entering the “Screen Settings”menu,
select one of the following menus.
!Welcome Good-bye Screen
The welcome screen/good-bye screens
can be activated or deactivated. Select
“On” to activate the screens. Select “Off ”
to deactivate the screens.
!Gauge Initial Movement
The movement of the meter needles and
gauge needles that occurs when the
ignition switch is turned to the “ON ”
position can be activated or deactivated.
Select “On”to activate. Select “Off ”to
deactivate.
!Languages
Operate the “
”or “”switch on the
steering wheel to display the preferred
language. Then pull the “
/SET”switch to
select the displayed language. !
EyeSight (models with EyeSight
system)
NOTE
For models with the EyeSight system,
refer to the Owner ’s Manual supple-
ment for the EyeSight system.
After entering the “EyeSight”menu, select
one of the following menus.
!Warning Volume
The volume of the warning buzzer that
sounds when the EyeSight system is in
use can be set in 3 stages (“ Max”,“Mid ”
and “Min ”).
! Lead Vehicle Acquisition Sound
When adaptive cruise control is used, the
buzzer that sounds if a vehicle is detected
in front or if detection is not possible can
be activated or deactivated. Select “On ”to
activate the buzzer. Select “Off”to deac-
tivate the buzzer.
! Lead Vehicle Moving Monitor
Function
When the lead vehicle moving monitor
function is in operation, the buzzer that
sounds if a vehicle in front has started can
be activated or deactivated. Select “On”to
activate the buzzer. Select “Off”to deac-
tivate the buzzer. !
BSD/RCTA (if equipped)
After entering the “BSD/RCTA ”menu,
select the “Warning Volume ”menu. You
can set the volume of the warning buzzer
for RCTA (Rear Cross Traffic Alert). You
can select “Max ”,“Mid ”,“Min ”or “Off ”.
! RAB (if equipped)
NOTE
For models with the RAB (Reverse
Automatic Braking) system, refer to
“Reverse Automatic Braking System ”
F 7-66.
After entering the “RAB”menu, select one
of the following menus.
!Warning Volume
The volume of the warning sound that is
activated when the RAB (Reverse Auto-
matic Braking) system is in operation can
be set in 3 stages (“Max ”,“Mid ”and “Min ”).
! Sonar Audible Alarm
The RAB (Reverse Automatic Braking)
system is equipped with a function that
emits a warning sound when the system
operates. The function can be activated or
deactivated. Select “On”to set the warn-
ing sound to active. Select “Off ”to set the
warning sound to inactive.
Instruments and controls/Multi information display (models with type B combination meter)
–CONTINUED –3-43
Page 195 of 634
Instruments and controls/Multi function display
!Default Settings
Select “Ye s ”to use the menu screen to
restore customized settings to the factory
default settings. Select “No”to return to
the previous screen without restoring the
factory default settings.Multi function display (if
equipped)
NOTE
. If your vehicle is equipped with an
information display (monochrome), re-
fer to “Information display (Mexico-
spec. models) ”F 3-34.
. Illustrations show the display for
U.S.-spec. models as an example. For
models other than U.S.-spec. models,
elements in the illustrations (such as
the display indication and measure-
ment unit) may be different than the
ones for U.S.-spec. models.
. When the vehicle is in motion,
certain functions and selections may
not be available.
WARNING
Always pay adequate attention to
safe driving when operating the
multi function display while the
vehicle is in motion. When operation
of the multi function display is
disturbing your awareness and abil-
ity to concentrate on driving, stop
the vehicle in a safe place before
performing operations on the
screen. Also, do not concentrate
on the display while driving. Doing so may cause you to look away from
the road and could result in an
accident.
The multi function display has the follow-
ing functions.
Description Page
Displays useful messages,
such as warning information,
etc. 3-48
Displays basic screens (e.g.
fuel consumption screen, etc.) 3-48
Sets and adjusts maintenance
notification 3-76
Registers driving history 3-79
Sets and customizes car op-
eration 3-80
Reverse Automatic Braking
system display (if equipped) 7-66
Also, the multi function display can also be
used to set and initialize the multi function
display itself.
3-44
Page 196 of 634
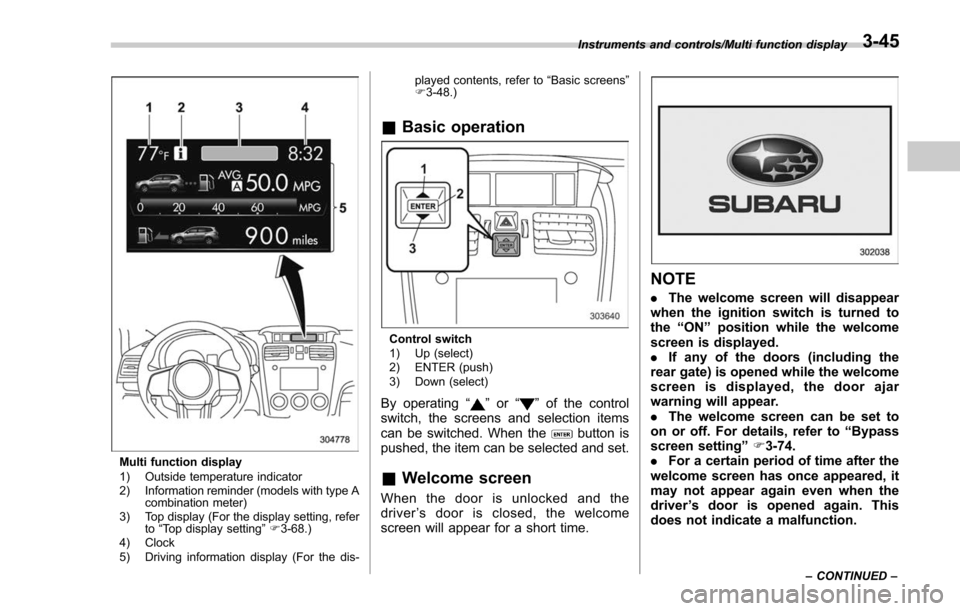
Multi function display
1) Outside temperature indicator
2) Information reminder (models with type Acombination meter)
3) Top display (For the display setting, refer to“Top display setting ”F 3-68.)
4) Clock
5) Driving information display (For the dis- played contents, refer to
“Basic screens ”
F 3-48.)
& Basic operation
Control switch
1) Up (select)
2) ENTER (push)
3) Down (select)
By operating “”or “”of the control
switch, the screens and selection items
can be switched. When the
button is
pushed, the item can be selected and set.
& Welcome screen
When the door is unlocked and the
driver ’s door is closed, the welcome
screen will appear for a short time.
NOTE
. The welcome screen will disappear
when the ignition switch is turned to
the “ON ”position while the welcome
screen is displayed.
. If any of the doors (including the
rear gate) is opened while the welcome
screen is displayed, the door ajar
warning will appear.
. The welcome screen can be set to
on or off. For details, refer to “Bypass
screen setting ”F 3-74.
. For a certain period of time after the
welcome screen has once appeared, it
may not appear again even when the
driver ’s door is opened again. This
does not indicate a malfunction.
Instruments and controls/Multi function display
–CONTINUED –3-45