2017 SUBARU FORESTER Maintenance
[x] Cancel search: MaintenancePage 229 of 634
Instruments and controls/Multi function display
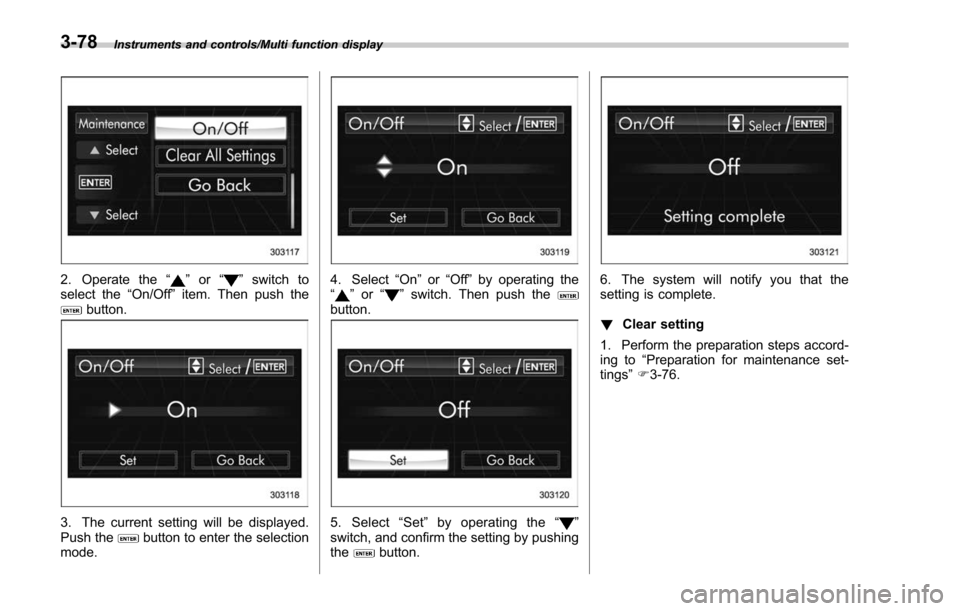
2. Operate the“”or “”switch to
select the “On/Off ”item. Then push the
button.
3. The current setting will be displayed.
Push thebutton to enter the selection
mode.
4. Select “On”or“Off ”by operating the
“” or “”switch. Then push thebutton.
5. Select “Set ”by operating the “”
switch, and confirm the setting by pushing
the
button.
6. The system will notify you that the
setting is complete.
! Clear setting
1. Perform the preparation steps accord-
ing to “Preparation for maintenance set-
tings ”F 3-76.
3-78
Page 230 of 634
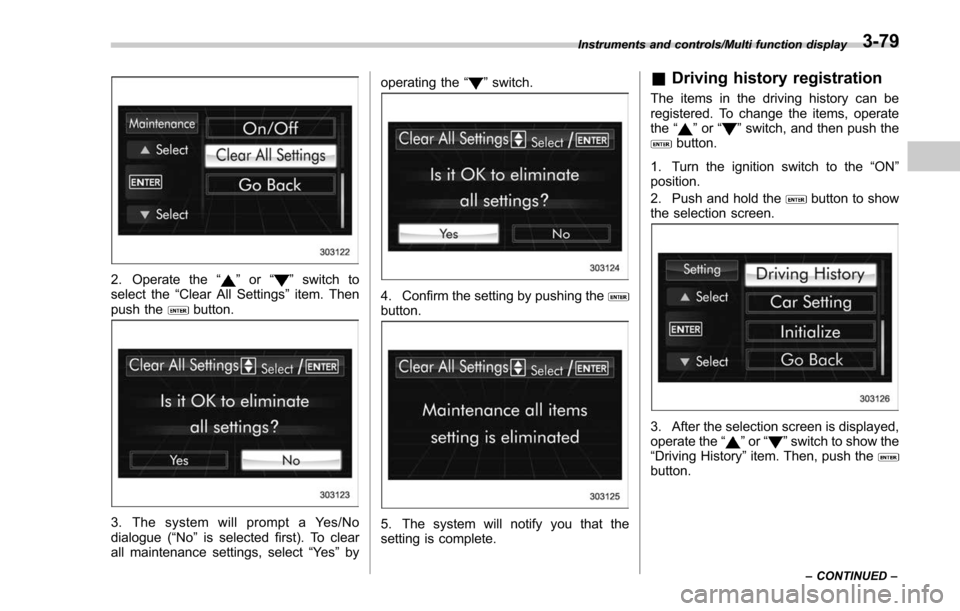
2. Operate the“”or “”switch to
select the “Clear All Settings ”item. Then
push the
button.
3. The system will prompt a Yes/No
dialogue (“ No”is selected first). To clear
all maintenance settings, select “Ye s”by operating the
“
”switch.
4. Confirm the setting by pushing thebutton.
5. The system will notify you that the
setting is complete.
& Driving history registration
The items in the driving history can be
registered. To change the items, operate
the “
”or “”switch, and then push thebutton.
1. Turn the ignition switch to the “ON”
position.
2. Push and hold the
button to show
the selection screen.
3. After the selection screen is displayed,
operate the “”or “”switch to show the
“Driving History ”item. Then, push the
button.
Instruments and controls/Multi function display
–CONTINUED –3-79
Page 284 of 634

refrigerant HFC134a (as shown on the air
conditioner label). Therefore, the method
of adding, changing or checking the
refrigerant is different from the method
for CFC12 (freon). Consult your SUBARU
dealer for service. Repairs needed as a
result of using the wrong refrigerant are
not covered under warranty.Air filtration system
Your vehicle’s air conditioning system is
equipped with an air filtration system.
Replace the air filter element according
to the replacement schedule found in the
“Warranty and Maintenance Booklet ”. This
schedule should be followed to maintain
the filter ’s dust collection ability. Under
extremely dusty conditions, the filter
should be replaced more frequently. Have
your filter checked or replaced by your
SUBARU dealer. For replacement, use
only a genuine SUBARU air filter kit.
CAUTION
Contact your SUBARU dealer if the
following occurs, even if it is not yet
time to change the filter:
. Reduction of the airflow through
the vents.
. Windshield gets easily fogged or
misted.
NOTE
The filter can influence the air condi-
tioning, heating and defroster perfor-
mance if not properly maintained.
& Replacing an air filter
1. Remove the glove box.
NOTE
We recommend that you take mea-
sures to protect the center console
with masking tape first, so that you
avoid scratching the center console
with the glove box.
(1) Open the glove box.
(2) Remove the damper shaft from the
glove box.
Climate control/Air filtration system
–CONTINUED –4-13
Page 404 of 634

Fuel...................................................................... 7-3Fuel requirements ............................................... 7-3
Fuel filler lid and cap ........................................... 7-5
State emission testing (U.S. only) ...................... 7-7
Preparing to drive ............................................... 7-8
Starting and stopping the engine (models without push-button start system) .................. 7-9
Starting engine.................................................... 7-9
Stopping the engine ........................................... 7-11
Starting and stopping engine (models with
push-button start system) .............................. 7-12
Safety precautions............................................. 7-12
Operating range for push-button start system ............................................................. 7-12
Starting engine ................................................... 7-12
Stopping engine ................................................. 7-13
When access key does not operate properly ....... 7-14
Remote engine start system (dealer
option) .............................................................. 7-14
Models with “keyless access with push-button
start system ”................................................... 7-14
Models without “keyless access with push-button
start system ”................................................... 7-15
Entering the vehicle while it is running via remote start ................................................................. 7-19
Entering the vehicle following remote engine start shutdown ......................................................... 7-19
Pre-heating or pre-cooling the interior of the vehicle ............................................................. 7-19
Service mode (models without “keyless access
with push-button start system ”)........................ 7-19 Remote transmitter program (models without
“keyless access with push-button start
system ”).......................................................... 7-20
System maintenance .......................................... 7-20
Manual transmission ......................................... 7-22Shifting speeds.................................................. 7-23
Driving tips ........................................................ 7-24
Continuously variable transmission ................. 7-24Select lever....................................................... 7-25
Selection of manual mode (if equipped) .............. 7-27
Selection of “L ” (if equipped) ... .......................... 7-29
Shift lock function ............................................. 7-30
Driving tips ........................................................ 7-31
SI-DRIVE (if equipped) ....................................... 7-32Intelligent (I) mode............................................. 7-32
Sport (S) mode .................................................. 7-32
Sport Sharp (S#) mode. ...................................... 7-33
SI-DRIVE switches ............................................. 7-34
Power steering................................................... 7-34
Braking ............................................................... 7-35
Braking tips ....................................................... 7-35
Brake system .................................................... 7-36
Disc brake pad wear warning indicators ............. 7-36
ABS (Anti-lock Brake System).......................... 7-37ABS self-check.................................................. 7-37
ABS warning light .............................................. 7-37
Electronic Brake Force Distribution (EBD)
system ............................................................. 7-38
Steps to take if EBD system malfunctions .......... 7-38
Vehicle Dynamics Control system.................... 7-39Vehicle Dynamics Control system monitor .......... 7-41
Starting and operating
7
Page 410 of 634

lead to fuel spillage and a fire.
. Immediately put fuel in the tank
whenever the low fuel warning
light illuminates. Engine misfires
as a result of an empty tank
could cause damage to the en-
gine. Continuing to operate your
vehicle at an extremely low fuel
level may result in a reduction of
engine performance.State emission testing (U.S.
only)
WARNING
Testing of an All-Wheel Drive model
must NEVER be performed on a
single two-wheel dynamometer. At-
tempting to do so will result in
uncontrolled vehicle movement and
may cause an accident or injuries to
persons nearby.
CAUTION
. At state inspection time, remem-
ber to tell your inspection or
service station in advance not to
place your SUBARU AWD vehicle
on a two-wheel dynamometer.
Otherwise, serious transmission
damage will result.
. Resultant vehicle damage due to
improper testing is not covered
under the SUBARU Limited War-
ranty and is the responsibility of
the state inspection program or
its contractors or licensees.
California and a number of federal states have Inspection/Maintenance programs to
inspect your vehicle
’s emission control
system. If your vehicle does not pass this
test, some states may deny renewal of
your vehicle’ s registration.
Your vehicle is equipped with a computer
that monitors the performance of the
engine’ s emission control system. Certi-
fied emission inspectors will inspect the
On-Board Diagnostic (OBDII) system as
part of the state emission inspection
process. The OBDII system is designed
to detect engine and transmission pro-
blems that might cause the vehicle emis-
sions to exceed allowable limits. OBDII
inspections apply to all 1996 model year
and newer passenger cars and trucks.
Over 30 states plus the District of Colum-
bia have implemented emission inspec-
tion of the OBDII system.
. The inspection of the OBDII system
consists of a visual operational check of
the “CHECK ENGINE ”warning light/mal-
function indicator light (MIL) and an
examination of the OBDII system with an
electronic scan tool.
. A vehicle
passes the OBDII system
inspection if proper operation of the
“ CHECK ENGINE ”warning light is ob-
served, there are no stored diagnostic
trouble codes, and the OBDII readiness
monitors are all complete.
Starting and operating/State emission testing (U.S. only)
–CONTINUED –7-7
Page 423 of 634
Starting and operating/Remote engine start system (dealer option)
&Remote transmitter program
(models without “keyless ac-
cess with push-button start
system ”)
New transmitters can be programmed to
the remote engine start system in the
event that a transmitter is lost, stolen,
damaged or additional transmitters are
desired (the system will accept up to eight
transmitters). New remote engine start
transmitters can be programmed accord-
ing to the following procedure.
1. Open the driver ’s door (the driver ’s
door must remain opened throughout the
entire process).
2. Depress and hold the brake pedal.
3. Turn the ignition switch to “ON”then
“LOCK” , back to “ON”then “LOCK ”, back
to “ON ”then “LOCK”, then back to “ON”
again and leave the ignition “ON”through-
out the programming process.
4. The system will flash the side marker
lights, tail lights and parking lights and
honk the horn three times, indicating that
the system has entered the transmitter
learn mode.
5. Press and release the “
”button on
the transmitter that you want to program.
6. The system will flash the side marker
lights, tail lights and parking lights and honk the horn one time, indicating that the
system has learned the transmitter. Upon
successful programming, the remote start
confirmation transmitter button will flash
one time.
7. Repeat step 5 for any additional
transmitters (the system will accept up to
eight transmitters).
8. The system will exit the transmitter
learn mode if the key is turned to the
“LOCK”
position, the door is closed or
after 2 minutes.
& System maintenance
NOTE
For models without “keyless access
with push-button start system ”:
In the event that the vehicle ’s battery is
replaced, discharged or disconnected,
it will be necessary to start the vehicle
a minimum of one time using the key
prior to activating the remote engine
start system. This is required to allow
the vehicle electronic systems to re-
synchronize. !
Changing the battery
CAUTION
.Do not let dust, oil or water get on
or in the remote engine start
transmitter when replacing the
battery.
. Be careful not to damage the
printed circuit board in the re-
mote engine start transmitter
when replacing the battery.
. Be careful not to allow children to
touch the battery and any re-
moved parts; children could
swallow them.
. There is a danger of explosion if
an incorrect replacement battery
is used. Replace only with the
same or equivalent type of bat-
tery.
. Batteries should not be exposed
to excessive heat such as sun-
shine, fire or the like.
For models with “keyless access with
push-button start system ”:
Perform the procedure described in “Re-
placing battery of access key ”F 11-45.
7-20
Page 478 of 634
New vehicle break-in driving–the first
1,000 miles (1,600 km) ..................................... 8-2
Fuel economy hints ............................................ 8-2
Engine exhaust gas (carbon monoxide) ............ 8-2
Catalytic converter .............................................. 8-3
Periodic inspections ........................................... 8-4
Driving in foreign countries ............................... 8-4
Driving tips for AWD models .............................. 8-5
On-road and off-road driving .............................. 8-6
Winter driving ...................................................... 8-8
Operation during cold weather ............................. 8-8
Driving on snowy and icy roads ......................... 8-10
Corrosion protection .......................................... 8-11
Snow tires ......................................................... 8-11
Tire chains ......................................................... 8-11
Rocking the vehicle ............................................ 8-12
Loading your vehicle ......................................... 8-12Vehicle capacity weight ...................................... 8-13
GVWR and GAWR (Gross Vehicle Weight Rating and Gross Axle Weight Rating) ........................ 8-14
Roof rack (if equipped) ...................................... 8-14
Roof molding and crossbar (if equipped) ............ 8-15
Trailer hitch (dealer option)............................... 8-16Connecting a trailer........................................... 8-17
If not towing a trailer .......................................... 8-18
Trailer towing..................................................... 8-19Warranties and maintenance .............................. 8-19
Maximum load limits .......................................... 8-19
Trailer hitches .................................................... 8-22
Connecting a trailer ........................................... 8-22
Trailer towing tips .............................................. 8-23
Driving tips
8
Page 481 of 634
Driving tips/Periodic inspections
operates at very high tempera-
tures.
. Keep everyone and flammable
materials away from the exhaust
pipe while the engine is running.
The exhaust gas is very hot.Periodic inspections
To keep your vehicle in the best condition
at all times, always have the recom-
mended maintenance services listed in
the maintenance schedule in the “War-
ranty and Maintenance Booklet ”per-
formed at the specified time or mileage
intervals.
Driving in foreign countries
When planning to use your vehicle in
another country:
. Confirm the availability of the correct
fuel. Refer to “Fuel requirements ”F 7-3.
. Comply with all regulations and re-
quirements of each country.
8-4