2017 SUBARU FORESTER Maintenance
[x] Cancel search: MaintenancePage 170 of 634

.The warning light may illuminate
temporarily in the following conditions
because a low oil level may be detected
as a result of significant oil movement
in the engine.
–when the vehicle is considerably
inclined on an uphill or steep slope
– when the vehicle has continu-
ously accelerated and decelerated
– when the vehicle is continuously
turned
– when the vehicle is driven on a
road that alternates continuously
between uphill and downhill
&Windshield washer
fluid warning light
This light illuminates when the fluid level in
the windshield washer fluid tank de-
creases to the lower limit (approximately
1.1 US qt, 1.0 liter, 0.9 Imp qt).
&AT OIL TEMP warning
light (CVT models)
If this light illuminates when the engine is
running, it may indicate that the transmis-
sion fluid temperature is too hot.
If the light illuminates while driving, im-
mediately stop the vehicle in a safe place
and let the engine idle until the warning light turns off.
!
Transmission control system warn-
ing
If the “AT OIL TEMP ”warning light flashes
after the engine has started, it may
indicate that the transmission control
system is not working properly. Contact
your nearest SUBARU dealer for service
immediately.
&Low tire pressure
warning light (U.S.-spec.
models)
When the ignition switch is turned to the
“ON ”position, the low tire pressure warn-
ing light will illuminate for approximately 2
seconds to check that the tire pressure
monitoring system (TPMS) is functioning
properly. If there is no problem and all tires
are properly inflated, the light will turn off.
Each tire, including the spare (if provided),
should be checked monthly when cold
and inflated to the inflation pressure
recommended by the vehicle manufac-
turer on the vehicle placard or tire inflation
pressure label. (If your vehicle has tires of
a different size than the size indicated on
the vehicle placard or tire inflation pres-
sure label, you should determine the
proper tire inflation pressure for those
tires.) As an added safety feature, your vehicle
has been equipped with a tire pressure
monitoring system (TPMS) that illuminates
a low tire pressure telltale when one or
more of your tires is significantly under-
inflated. Accordingly, when the low tire
pressure telltale illuminates, you should
stop and check your tires as soon as
possible, and inflate them to the proper
pressure. Driving on a significantly under-
inflated tire causes the tire to overheat and
can lead to tire failure. Under-inflation also
reduces fuel efficiency and tire tread life,
and may affect the vehicle
’s handling and
stopping ability.
Please note that the TPMS is not a
substitute for proper tire maintenance,
and it is the driver ’s responsibility to
maintain correct tire pressure, even if
under-inflation has not reached the level
to trigger illumination of the TPMS low tire
pressure telltale.
Your vehicle has also been equipped with
a TPMS malfunction indicator to indicate
when the system is not operating properly.
The TPMS malfunction indicator is com-
bined with the low tire pressure telltale.
When the system detects a malfunction,
the telltale will flash for approximately one
minute and then remain continuously
illuminated. This sequence will continue
upon subsequent vehicle start-ups as long
Instruments and controls/Warning and indicator lights
–CONTINUED –3-19
Page 192 of 634
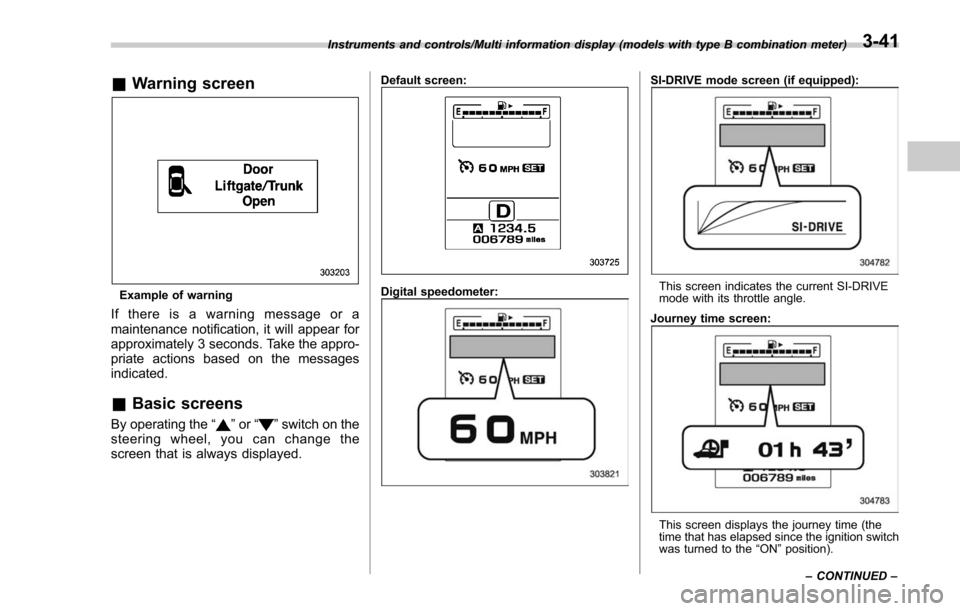
&Warning screen
Example of warning
If there is a warning message or a
maintenance notification, it will appear for
approximately 3 seconds. Take the appro-
priate actions based on the messages
indicated.
&Basic screens
By operating the “”or “”switch on the
steering wheel, you can change the
screen that is always displayed.
Default screen:
Digital speedometer:
SI-DRIVE mode screen (if equipped):
This screen indicates the current SI-DRIVE
mode with its throttle angle.
Journey time screen:
This screen displays the journey time (the
time that has elapsed since the ignition switch
was turned to the “ON ”position).
Instruments and controls/Multi information display (models with type B combination meter)
–CONTINUED –
3-41
Page 195 of 634
Instruments and controls/Multi function display
!Default Settings
Select “Ye s ”to use the menu screen to
restore customized settings to the factory
default settings. Select “No”to return to
the previous screen without restoring the
factory default settings.Multi function display (if
equipped)
NOTE
. If your vehicle is equipped with an
information display (monochrome), re-
fer to “Information display (Mexico-
spec. models) ”F 3-34.
. Illustrations show the display for
U.S.-spec. models as an example. For
models other than U.S.-spec. models,
elements in the illustrations (such as
the display indication and measure-
ment unit) may be different than the
ones for U.S.-spec. models.
. When the vehicle is in motion,
certain functions and selections may
not be available.
WARNING
Always pay adequate attention to
safe driving when operating the
multi function display while the
vehicle is in motion. When operation
of the multi function display is
disturbing your awareness and abil-
ity to concentrate on driving, stop
the vehicle in a safe place before
performing operations on the
screen. Also, do not concentrate
on the display while driving. Doing so may cause you to look away from
the road and could result in an
accident.
The multi function display has the follow-
ing functions.
Description Page
Displays useful messages,
such as warning information,
etc. 3-48
Displays basic screens (e.g.
fuel consumption screen, etc.) 3-48
Sets and adjusts maintenance
notification 3-76
Registers driving history 3-79
Sets and customizes car op-
eration 3-80
Reverse Automatic Braking
system display (if equipped) 7-66
Also, the multi function display can also be
used to set and initialize the multi function
display itself.
3-44
Page 198 of 634

Type A combination meter
1) Engine oil: Checks the interval of engineoil replacement.
2) Oil filter: Checks the interval of oil filter replacement.
3) Tires: Checks the interval of tire rotation.
4) Inspection and maintenance: Checks the interval of inspection and maintenance.Type B combination meter
1) Windshield washer fluid: Checks thelevel of windshield washer fluid.
2) Brake fluid: Checks the level of brake fluid.
3) Engine oil: Checks the interval of engine oil replacement.
4) Oil filter: Checks the interval of oil filter replacement.
5) Tires: Checks the interval of tire rotation.
6) Inspection and maintenance: Checks the interval of inspection and maintenance.
When the checks are performed, the color
of the icon corresponding to the checked
item will turn green.
If there is no warning message, the self-
check will complete without notification.
Example of notification
If there is a warning message or a
maintenance notification, the color of the
icon corresponding to the item will turn
yellow and the warning message or the
maintenance notification will be displayed.
Take the appropriate actions based on the
messages indicated.
NOTE
.The self-check screen can be set to
on or off. For details, refer to “On/Off
setting ”F 3-77.
. After performing the maintenance,
change the setting of the correspond-
ing maintenance item. For details, refer
to “Maintenance settings ”F 3-76.
. The maintenance notification screen
will be displayed under either of the
Instruments and controls/Multi function display
–CONTINUED –3-47
Page 199 of 634
Instruments and controls/Multi function display
following conditions.–The period of time remaining
until the registered notification date
is 15 days or less.
– The total driving distance remain-
ing until the registered notification
distance is approximately 311 miles
(500 km) or less.
. The maintenance notification screen
will be displayed until either of the
following conditions is satisfied.
–The period of time passed after
the registered notification date is 15
days or more.
– The total distance driven after the
registered notification distance is
approximately 311 miles (500 km) or
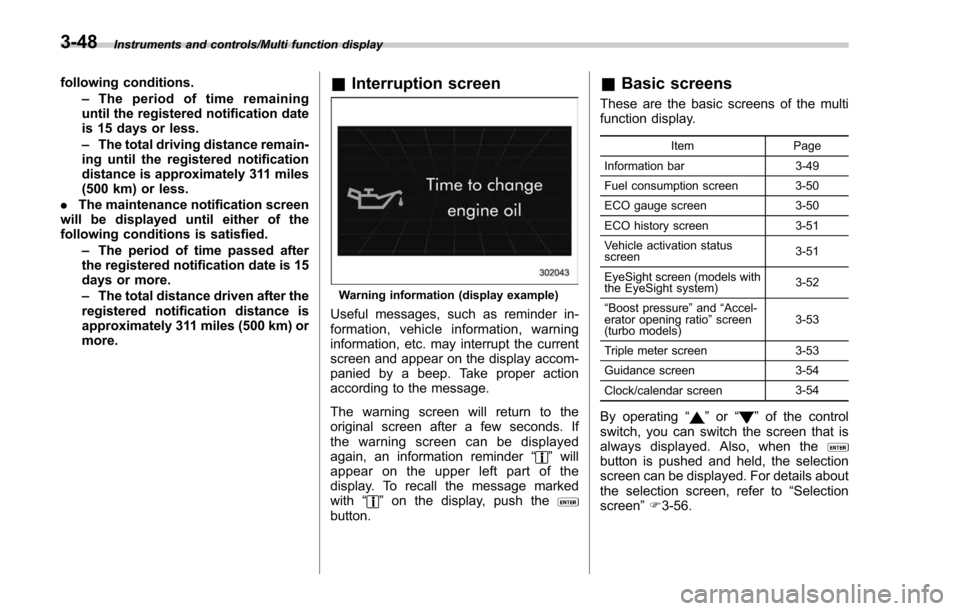
more.& Interruption screen
Warning information (display example)
Useful messages, such as reminder in-
formation, vehicle information, warning
information, etc. may interrupt the current
screen and appear on the display accom-
panied by a beep. Take proper action
according to the message.
The warning screen will return to the
original screen after a few seconds. If
the warning screen can be displayed
again, an information reminder “
”will
appear on the upper left part of the
display. To recall the message marked
with “
”on the display, push thebutton.
& Basic screens
These are the basic screens of the multi
function display.
Item Page
Information bar 3-49
Fuel consumption screen 3-50
ECO gauge screen 3-50
ECO history screen 3-51
Vehicle activation status
screen 3-51
EyeSight screen (models with
the EyeSight system) 3-52
“ Boost pressure ”and “Accel-
erator opening ratio ”screen
(turbo models) 3-53
Triple meter screen 3-53
Guidance screen 3-54
Clock/calendar screen 3-54
By operating
“”or “”of the control
switch, you can switch the screen that is
always displayed. Also, when the
button is pushed and held, the selection
screen can be displayed. For details about
the selection screen, refer to “Selection
screen” F3-56.
3-48
Page 208 of 634
Top menuMenu option DescriptionPage
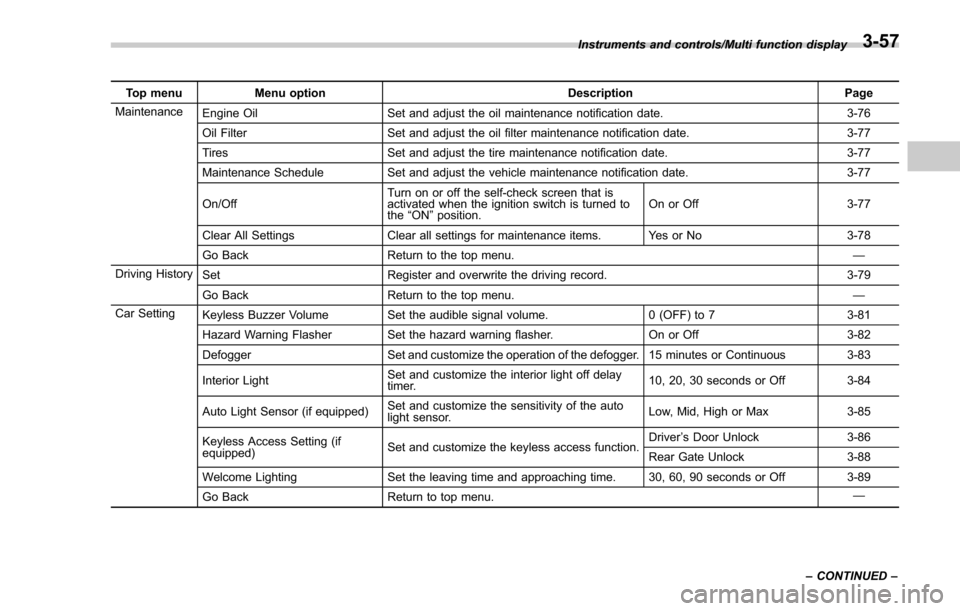
Maintenance Engine Oil Set and adjust the oil maintenance notification date. 3-76
Oil Filter Set and adjust the oil filter maintenance notification date. 3-77
Tires Set and adjust the tire maintenance notification date. 3-77
Maintenance Schedule Set and adjust the vehicle maintenance notification date. 3-77
On/Off Turn on or off the self-check screen that is
activated when the ignition switch is turned to
the
“ON ”position. On or Off
3-77
Clear All Settings Clear all settings for maintenance items. Yes or No 3-78
Go Back Return to the top menu. —
Driving History Set Register and overwrite the driving record. 3-79
Go Back Return to the top menu. —
Car Setting Keyless Buzzer Volume Set the audible signal volume. 0 (OFF) to 73-81
Hazard Warning Flasher Set the hazard warning flasher. On or Off3-82
Defogger Set and customize the operation of the defogger. 15 minutes or Continuous 3-83
Interior Light Set and customize the interior light off delay
timer. 10, 20, 30 seconds or Off
3-84
Auto Light Sensor (if equipped) Set and customize the sensitivity of the auto
light sensor. Low, Mid, High or Max
3-85
Keyless Access Setting (if
equipped) Set and customize the keyless access function. Driver
’s Door Unlock 3-86
Rear Gate Unlock 3-88
Welcome Lighting Set the leaving time and approaching time. 30, 60, 90 seconds or Off 3-89
Go Back Return to top menu. —
Instruments and controls/Multi function display
–CONTINUED –
3-57
Page 227 of 634
Instruments and controls/Multi function display
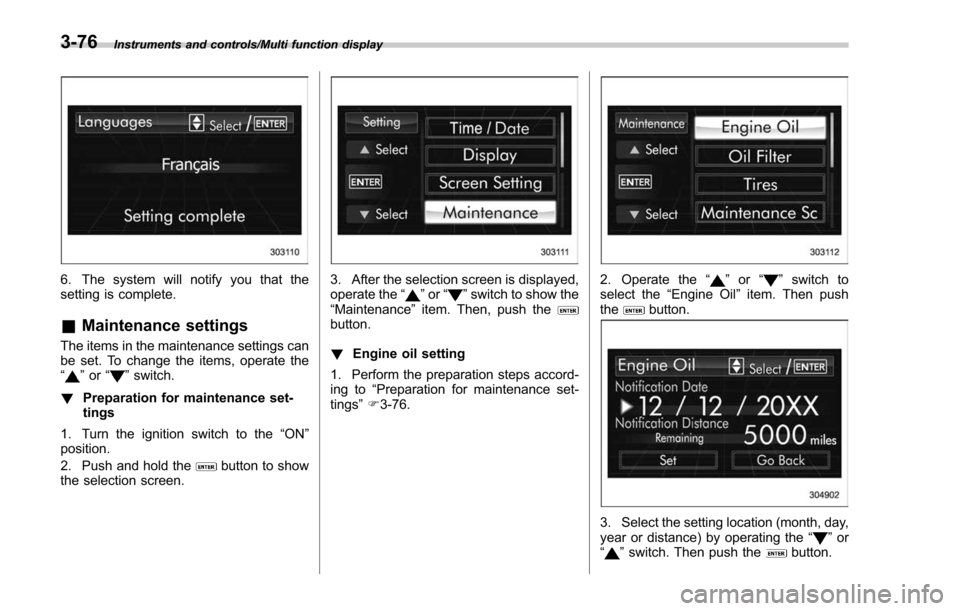
6. The system will notify you that the
setting is complete.
&Maintenance settings
The items in the maintenance settings can
be set. To change the items, operate the
“
”or “”switch.
! Preparation for maintenance set-
tings
1. Turn the ignition switch to the “ON”
position.
2. Push and hold the
button to show
the selection screen.
3. After the selection screen is displayed,
operate the “”or “”switch to show the
“Maintenance ”item. Then, push the
button.
! Engine oil setting
1. Perform the preparation steps accord-
ing to “Preparation for maintenance set-
tings ”F 3-76.
2. Operate the “”or “”switch to
select the “Engine Oil ”item. Then push
the
button.
3. Select the setting location (month, day,
year or distance) by operating the “”or
“” switch. Then push thebutton.
3-76
Page 228 of 634
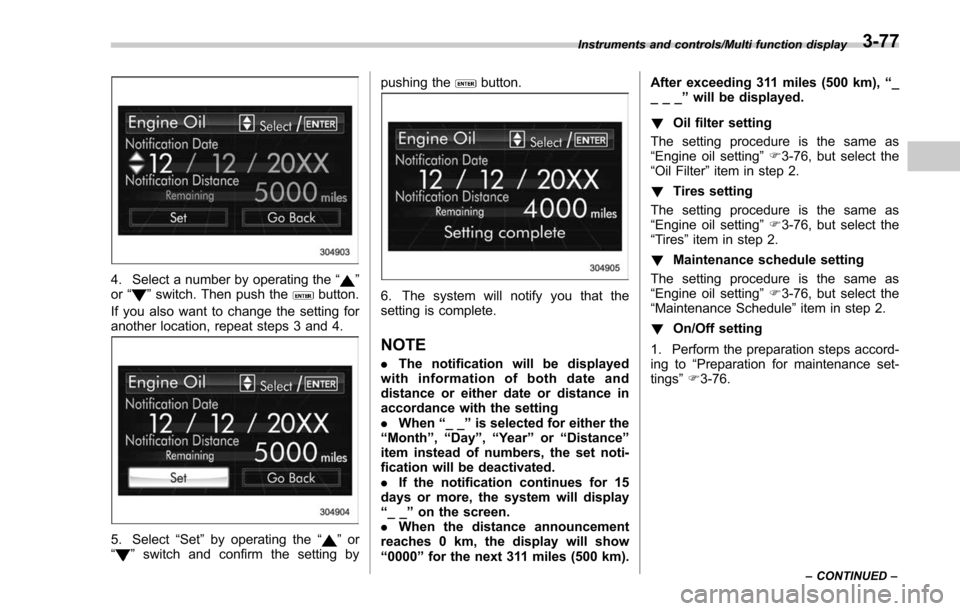
4. Select a number by operating the“”
or “”switch. Then push thebutton.
If you also want to change the setting for
another location, repeat steps 3 and 4.
5. Select “Set”by operating the “”or
“” switch and confirm the setting by pushing the
button.
6. The system will notify you that the
setting is complete.
NOTE
.
The notification will be displayed
with information of both date and
distance or either date or distance in
accordance with the setting
. When “__”is selected for either the
“ Month ”, “Day ”,“Year ”or “Distance”
item instead of numbers, the set noti-
fication will be deactivated.
. If the notification continues for 15
days or more, the system will display
“ __ ”on the screen.
. When the distance announcement
reaches 0 km, the display will show
“ 0000 ”for the next 311 miles (500 km). After exceeding 311 miles (500 km),
“_
___ ”will be displayed.
! Oil filter setting
The setting procedure is the same as
“Engine oil setting ”F 3-76, but select the
“Oil Filter ”item in step 2.
! Tires setting
The setting procedure is the same as
“Engine oil setting ”F 3-76, but select the
“Tires ”item in step 2.
! Maintenance schedule setting
The setting procedure is the same as
“Engine oil setting ”F 3-76, but select the
“Maintenance Schedule ”item in step 2.
! On/Off setting
1. Perform the preparation steps accord-
ing to “Preparation for maintenance set-
tings ”F 3-76.
Instruments and controls/Multi function display
–CONTINUED –3-77