2017 SUBARU FORESTER X mode
[x] Cancel search: X modePage 502 of 634
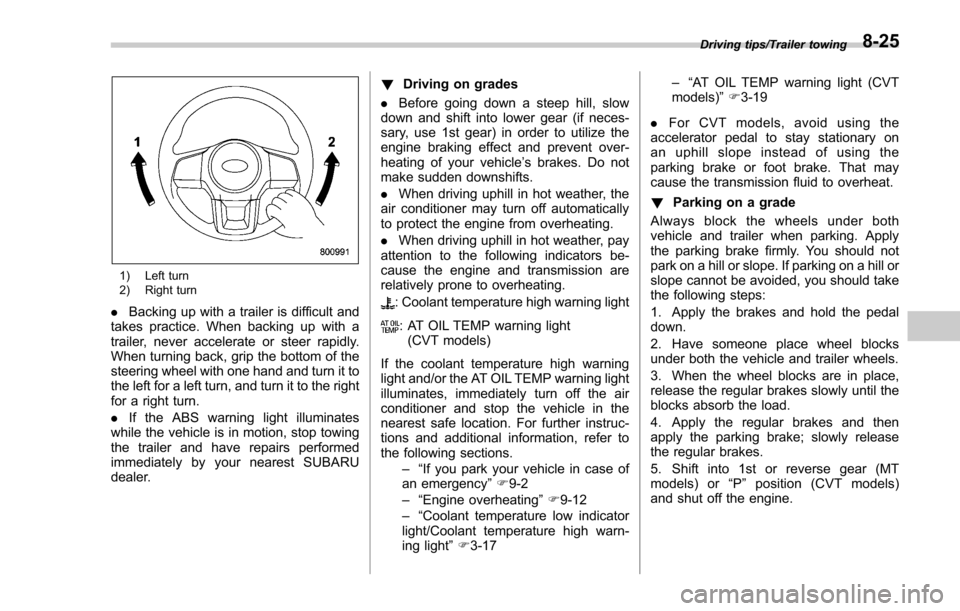
1) Left turn
2) Right turn
.Backing up with a trailer is difficult and
takes practice. When backing up with a
trailer, never accelerate or steer rapidly.
When turning back, grip the bottom of the
steering wheel with one hand and turn it to
the left for a left turn, and turn it to the right
for a right turn.
. If the ABS warning light illuminates
while the vehicle is in motion, stop towing
the trailer and have repairs performed
immediately by your nearest SUBARU
dealer. !
Driving on grades
. Before going down a steep hill, slow
down and shift into lower gear (if neces-
sary, use 1st gear) in order to utilize the
engine braking effect and prevent over-
heating of your vehicle’ s brakes. Do not
make sudden downshifts.
. When driving uphill in hot weather, the
air conditioner may turn off automatically
to protect the engine from overheating.
. When driving uphill in hot weather, pay
attention to the following indicators be-
cause the engine and transmission are
relatively prone to overheating.: Coolant temperature high warning light
: AT OIL TEMP warning light (CVT models)
If the coolant temperature high warning
light and/or the AT OIL TEMP warning light
illuminates, immediately turn off the air
conditioner and stop the vehicle in the
nearest safe location. For further instruc-
tions and additional information, refer to
the following sections. –“If you park your vehicle in case of
an emergency ”F 9-2
–“ Engine overheating ”F 9-12
–“ Coolant temperature low indicator
light/Coolant temperature high warn-
ing light ”F 3-17 –“
AT OIL TEMP warning light (CVT
models) ”F 3-19
. For CVT models, avoid using the
accelerator pedal to stay stationary on
an uphill slope instead of using the
parking brake or foot brake. That may
cause the transmission fluid to overheat.
! Parking on a grade
Always block the wheels under both
vehicle and trailer when parking. Apply
the parking brake firmly. You should not
park on a hill or slope. If parking on a hill or
slope cannot be avoided, you should take
the following steps:
1. Apply the brakes and hold the pedal
down.
2. Have someone place wheel blocks
under both the vehicle and trailer wheels.
3. When the wheel blocks are in place,
release the regular brakes slowly until the
blocks absorb the load.
4. Apply the regular brakes and then
apply the parking brake; slowly release
the regular brakes.
5. Shift into 1st or reverse gear (MT
models) or “P ” position (CVT models)
and shut off the engine.
Driving tips/Trailer towing8-25
Page 504 of 634
If you park your vehicle in case of anemergency ........................................................ 9-2
Temporary spare tire ........................................... 9-2
Maintenance tools ............................................... 9-3
Screwdriver and wheel nut wrench ...................... 9-4
Under the rear floor ............................................. 9-4
Flat tires............................................................... 9-5Changing a flat tire .............................................. 9-5
Tire pressure monitoring system (TPMS) (U.S.-spec. models) ........................................... 9-8
Jump starting...................................................... 9-9How to jump start ............................................... 9-10
Engine overheating ............................................ 9-12If steam is coming from the engine
compartment .................................................... 9-12
If no steam is coming from the engine compartment .................................................... 9-12
Towing................................................................ 9-13Towing and tie-down hooks. ............................... 9-13
Using a flat-bed truck. ........................................ 9-15
Towing with all wheels on the ground ................. 9-16
Access key–if access key does not
operate properly ............................................. 9-17
Locking and unlocking ....................................... 9-17
Switching power status ...................................... 9-17
Starting engine .................................................. 9-18
Rear gate–if the rear gate cannot be
opened ............................................................. 9-18
Power rear gate - if power rear gate does not operate properly ....................................... 9-19
When the power rear gate is deactivated ............ 9-19
When the rear gate cannot be unlocked ............. 9-20
When the rear gate cannot be closed ................. 9-20
If your vehicle is involved in an accident ........ 9-21
In case of emergency
9
Page 505 of 634

In case of emergency/If you park your vehicle in case of an emergency
If you park your vehicle in
case of an emergency
1) Models with multi function display
2) Models without multi function display
The hazard warning flasher should beused in day or night to warn other drivers
when you have to park your vehicle under
emergency conditions.
Avoid stopping on the road. It is best to
safely pull off the road if a problem occurs.
The hazard warning flasher can be acti-
vated regardless of the ignition switch
position.
Turn on the hazard warning by pushing
the hazard warning flasher switch. Turn it
off by pushing the switch again.
NOTE
When the hazard warning flasher is on,
the turn signals do not work.
Temporary spare tire
WARNING
.
Never tow a trailer when the
temporary spare tire is used.
The temporary spare tire is not
designed to sustain the towing
load. Use of the temporary spare
tire when towing can result in
failure of the spare tire and/or
less stability of the vehicle and
may lead to an accident.
. When a spare tire is mounted or a
wheel rim is replaced without the
original pressure sensor/trans-
mitter being transferred, the low
tire pressure warning light will
illuminate steadily after blinking
for approximately one minute.
This indicates the tire pressure
monitoring system (TPMS) is un-
able to monitor all four road
wheels. Contact your SUBARU
dealer as soon as possible for
tire and sensor replacement and/
or system resetting.
9-2
Page 507 of 634
In case of emergency/Maintenance tools
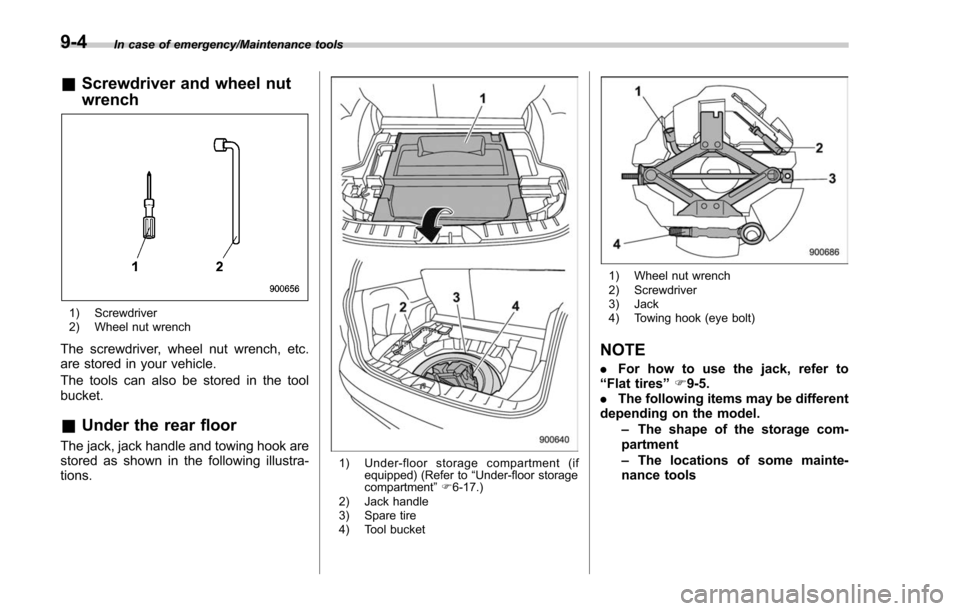
&Screwdriver and wheel nut
wrench
1) Screwdriver
2) Wheel nut wrench
The screwdriver, wheel nut wrench, etc.
are stored in your vehicle.
The tools can also be stored in the tool
bucket.
&Under the rear floor
The jack, jack handle and towing hook are
stored as shown in the following illustra-
tions.
1) Under-floor storage compartment (if
equipped) (Refer to “Under-floor storage
compartment ”F 6-17.)
2) Jack handle
3) Spare tire
4) Tool bucket
1) Wheel nut wrench
2) Screwdriver
3) Jack
4) Towing hook (eye bolt)
NOTE
. For how to use the jack, refer to
“ Flat tires ”F 9-5.
. The following items may be different
depending on the model.
–The shape of the storage com-
partment
– The locations of some mainte-
nance tools
9-4
Page 508 of 634
Flat tires
If you have a flat tire while driving, never
brake suddenly; keep driving straight
ahead while gradually reducing speed.
Then slowly pull off the road to a safe
place.
&Changing a flat tire
WARNING
. Do not jack up the vehicle on an
incline or a loose road surface.
The jack can come out of the
jacking point or sink into the
ground and this can result in a
severe accident.
. Use only the jack provided with
your vehicle. The jack supplied
with the vehicle is designed only
for changing a tire. Never get
under the vehicle while support-
ing the vehicle with this jack.
. Before using the jack, be sure
that there are no occupants or
cargo in the vehicle.
. Always turn off the engine before
raising the flat tire off the ground
using the jack. Never swing or
push the vehicle supported with the jack. The jack can come out
of the jacking point due to a jolt
and this can result in a severe
accident.
1. Park on a hard, level surface, when-
ever possible, then stop the engine.
2. Apply the parking brake securely and
shift the shift lever in reverse (MT models)
or the select lever to the “P ” (Park)
position (CVT models).
3. Turn on the hazard warning flasher
and have everyone get out of the vehicle.
4. Put wheel blocks at the front and rear
of the tire diagonally opposite the flat tire.
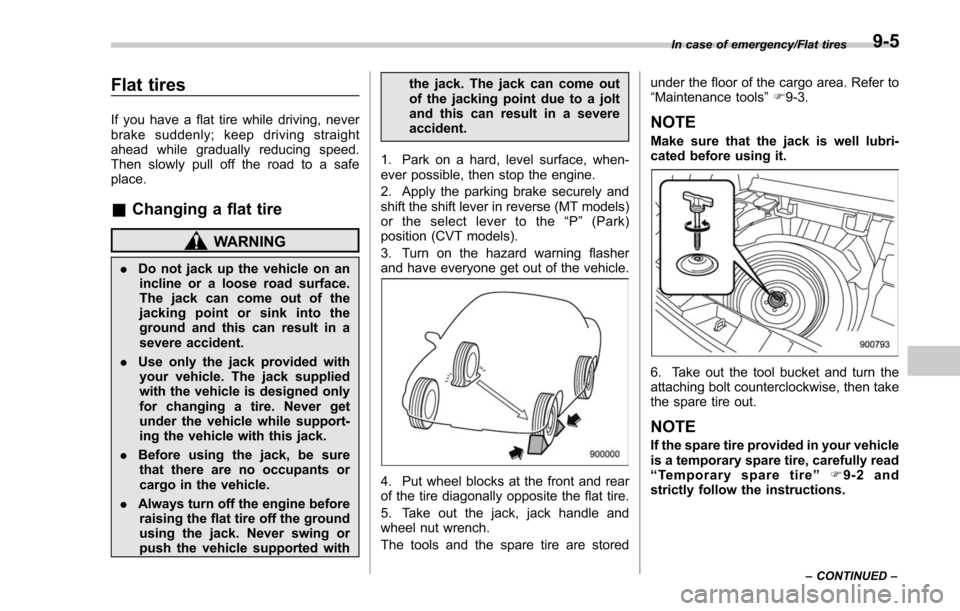
5. Take out the jack, jack handle and
wheel nut wrench.
The tools and the spare tire are stored under the floor of the cargo area. Refer to
“Maintenance tools
”F 9-3.
NOTE
Make sure that the jack is well lubri-
cated before using it.
6. Take out the tool bucket and turn the
attaching bolt counterclockwise, then take
the spare tire out.
NOTE
If the spare tire provided in your vehicle
is a temporary spare tire, carefully read
“Temporary spare tire ”F9-2 and
strictly follow the instructions.
In case of emergency/Flat tires
–CONTINUED –9-5
Page 511 of 634

In case of emergency/Flat tires
17. When storing the spare tire after
repairing a flat tire, be sure to place the
spacer in the manner shown in the
illustration, and then tighten the bolt in
the rear side of the bracket.
WARNING
Never place a tire or tire changing
tools in the passenger compartment
after changing wheels. In a sudden
stop or collision, loose equipment
could strike occupants and cause
injury. Store the tire and all tools in
the proper place.
&Tire pressure monitoring
system (TPMS) (U.S.-spec.
models)
Low tire pressure warning light (type A)
Low tire pressure warning light (type B)
The tire pressure monitoring system pro-
vides the driver with a warning message
by sending a signal from a sensor that is
installed in each wheel when a tire
pressure is severely low relative to the
selected TPMS mode.
The tire pressure monitoring system will
activate only when the vehicle is driven at
speeds above 25 mph (40 km/h). Also,
this system may not react immediately to a
sudden drop in tire pressure (for example,
a blow-out caused by running over a
sharp object).
WARNING
If the low tire pressure warning light
illuminates while driving, never
brake suddenly and keep driving
straight ahead while gradually redu-
cing speed. Then slowly pull off the
road to a safe place. Otherwise an
accident involving serious vehicle
damage and serious personal injury
could occur.
Check the pressure for all four tires
and adjust the pressure to the COLD
tire pressure shown on the vehicle
placard on the door pillar on the
driver ’s side. If this light still illumi-
nates while driving after adjusting
the tire pressure, a tire may have
9-8
Page 514 of 634
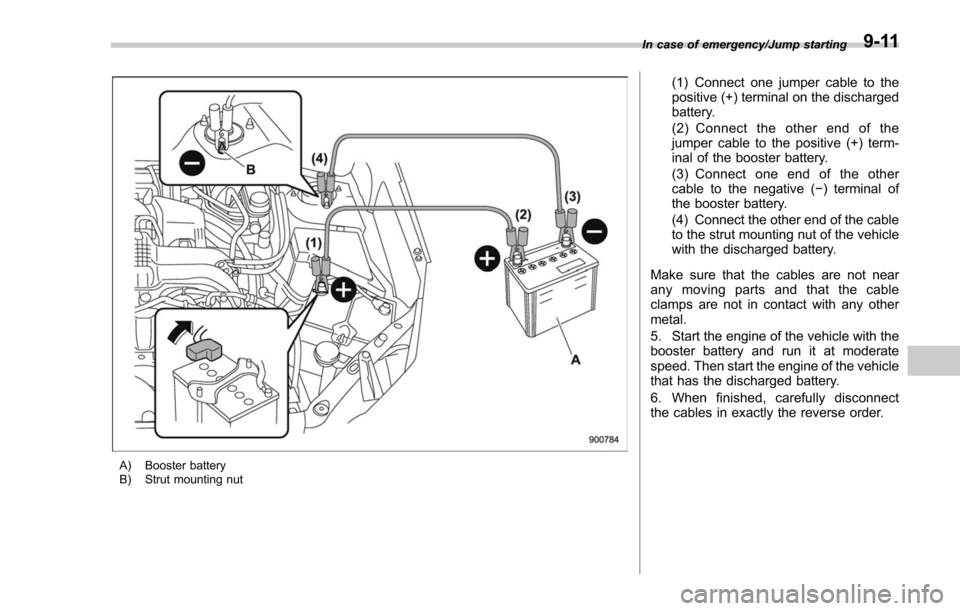
A) Booster battery
B) Strut mounting nut
(1) Connect one jumper cable to the
positive (+) terminal on the discharged
battery.
(2) Connect the other end of the
jumper cable to the positive (+) term-
inal of the booster battery.
(3) Connect one end of the other
cable to the negative (−) terminal of
the booster battery.
(4) Connect the other end of the cable
to the strut mounting nut of the vehicle
with the discharged battery.
Make sure that the cables are not near
any moving parts and that the cable
clamps are not in contact with any other
metal.
5. Start the engine of the vehicle with the
booster battery and run it at moderate
speed. Then start the engine of the vehicle
that has the discharged battery.
6. When finished, carefully disconnect
the cables in exactly the reverse order.
In case of emergency/Jump starting9-11
Page 516 of 634

Towing
If towing is necessary, it is best done by
your SUBARU dealer or a commercial
towing service. Observe the following
procedures for safety.
WARNING
Never tow AWD models (both CVT
and MT models) with the front
wheels raised off the ground while
the rear wheels are on the ground,
or with the rear wheels raised off the
ground while the front wheels are on
the ground. This will cause the
vehicle to spin away due to the
operation or deterioration of the
center differential.
&Towing and tie-down hooks
The towing hooks should be used only in
an emergency (e.g., to free a stuck vehicle
from mud, sand or snow).
CAUTION
. Use only the specified towing
hook and tie-down hook. Never
use suspension parts or other
parts of the body for towing or
tie-down purposes.
. To prevent deformation to the
front bumper and the towing
hook, do not apply excessive
lateral load to the towing hook. Front towing hook:
1. Take the towing hook, screwdriver and
jack handle out of the cargo area.
2. Cover the tip of a flat-head screwdriver
with vinyl tape or cloth so that it will not
scratch the bumper. Insert the flat-head
screwdriver into the cutout of the cover
and pry open the cover.
In case of emergency/Towing
–CONTINUED –9-13