2017 SUBARU FORESTER towing
[x] Cancel search: towingPage 456 of 634

Cruise control (if equipped)
NOTE
For models with the EyeSight system:
Refer to the Owner’s Manual supple-
ment for the EyeSight system.
Cruise control enables you to maintain a
constant vehicle speed without holding
your foot on the accelerator pedal and it is
operative when the vehicle speed is 25
mph (40 km/h) or more.
WARNING
Do not use the cruise control under
any of the following conditions.
These may cause loss of vehicle
control.
. driving up or down a steep grade
. driving on slippery or winding
roads
. driving in heavy traffic
. towing a trailer
NOTE
.On uphill and downhill slopes, de-
pending on the degree of the slope and
the load of the vehicle, there may be
cases when a constant speed cannot
be guaranteed.
. If the cruise control indicator light
does not illuminate even after pressing
the cruise control main button, it is
possible that there is a malfunction in
the system. We recommend that you
contact your SUBARU dealer for an
inspection.
. Make sure the cruise control system
is turned off when the cruise control is
not in use to avoid unintentionally
setting the cruise control.& To set cruise control
Cruise control main button
1. Press the cruise control main button.
Cruise control indicator light (type A)
Starting and operating/Cruise control
–CONTINUED –
7-53
Page 467 of 634

Starting and operating/BSD/RCTA
!System malfunction indicator
System malfunction indicator (type A)
System malfunction indicator (type B)
1) At first, this message will appear
2) Then this message will appear
This indicator appears when a malfunction occurs in the system. Contact a SUBARU
dealer and have the system inspected.
&
BSD/RCTA OFF switch
BSD/RCTA OFF switch
BSD/RCTA OFF indicator (type A)
BSD/RCTA OFF indicator (type B)
If the BSD/RCTA OFF switch is pressed,
the BSD/RCTA OFF indicator appears on
the multi information display of the combi-
nation meter, and the BSD/RCTA is
deactivated.
Press the switch again to activate the
BSD/RCTA. The BSD/RCTA OFF indica-
tor will disappear.
NOTE
. In the following cases, the system
may not operate properly due to
blocked radar waves. Press the BSD/
RCTA OFF switch to deactivate the
system.
–When towing a trailer
– When a bicycle carrier or other
item is fitted to the rear of the
7-64
Page 478 of 634
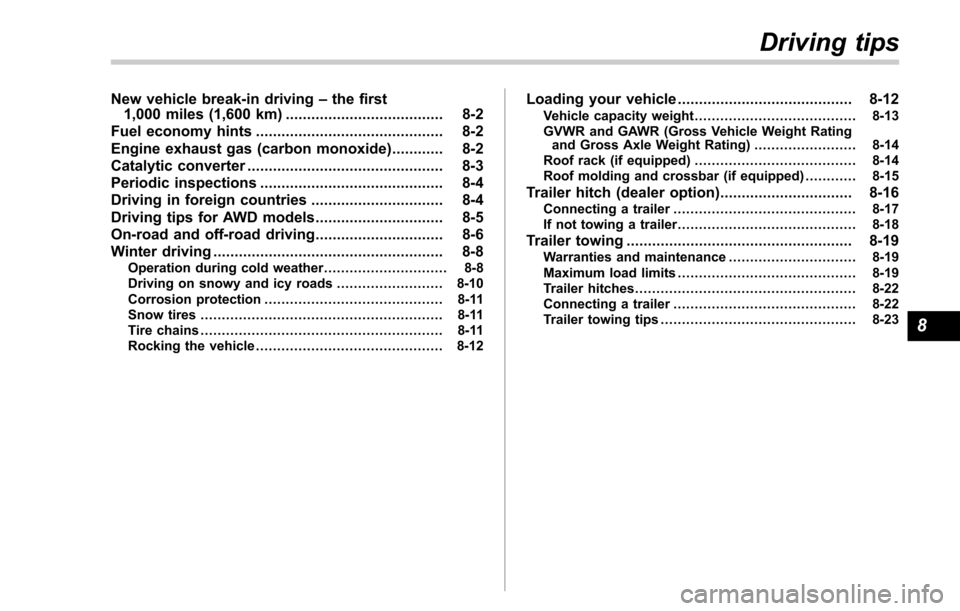
New vehicle break-in driving–the first
1,000 miles (1,600 km) ..................................... 8-2
Fuel economy hints ............................................ 8-2
Engine exhaust gas (carbon monoxide) ............ 8-2
Catalytic converter .............................................. 8-3
Periodic inspections ........................................... 8-4
Driving in foreign countries ............................... 8-4
Driving tips for AWD models .............................. 8-5
On-road and off-road driving .............................. 8-6
Winter driving ...................................................... 8-8
Operation during cold weather ............................. 8-8
Driving on snowy and icy roads ......................... 8-10
Corrosion protection .......................................... 8-11
Snow tires ......................................................... 8-11
Tire chains ......................................................... 8-11
Rocking the vehicle ............................................ 8-12
Loading your vehicle ......................................... 8-12Vehicle capacity weight ...................................... 8-13
GVWR and GAWR (Gross Vehicle Weight Rating and Gross Axle Weight Rating) ........................ 8-14
Roof rack (if equipped) ...................................... 8-14
Roof molding and crossbar (if equipped) ............ 8-15
Trailer hitch (dealer option)............................... 8-16Connecting a trailer........................................... 8-17
If not towing a trailer .......................................... 8-18
Trailer towing..................................................... 8-19Warranties and maintenance .............................. 8-19
Maximum load limits .......................................... 8-19
Trailer hitches .................................................... 8-22
Connecting a trailer ........................................... 8-22
Trailer towing tips .............................................. 8-23
Driving tips
8
Page 483 of 634
Driving tips/On–road and off –road driving
conditions than a two wheel drive vehicle.
There is little difference in handling,
however, during extremely sharp turns or
sudden braking. Therefore, when driving
down a slope or turning corners, be sure
to reduce your speed and maintain an
ample distance from other vehicles.
. Always check the cold tire pressure
before starting to drive. The recom-
mended tire pressure is provided on the
tire placard, which is located under the
door latch on the driver ’s side.
. Frequent driving of an AWD vehicle
under hard-driving conditions such as
steep hills or dusty roads will necessitate
more frequent replacement of the follow-
ing items than that specified in the
“Warranty and Maintenance Booklet ”.
– Engine oil
– Brake fluid
– Rear differential gear oil
– Manual transmission oil (MT mod-
els)
– Continuously variable transmission
fluid (CVT models)
– Front differential gear oil (CVT
models)
. There are some precautions that you
must observe when towing your vehicle.
For detailed information, refer to “Towing ”
F 9-13.On-road and off-road driving
WARNING
. In a rollover crash, an unbelted
person is significantly more
likely to die than a person wear-
ing a seat belt. You the driver and
all your passengers should fas-
ten the seatbelts before starting
to drive in order to minimize the
chance of serious injury or death.
. Do not make sharp turns and
quick maneuvers unless abso-
lutely unavoidable. Such actions
are dangerous as you may lose
control, possibly resulting in a
rollover which could cause death
or serious injury.
. Always maintain a safe driving
speed according to the road and
weather conditions in order to
avoid having an accident on a
sharp turn, during sudden brak-
ing or under other similar condi-
tions.
. Whenever strong crosswinds are
present, slow down sufficiently
to maintain control of your vehi-
cle. Remember that your vehicle,
with its higher profile and center of gravity, is more likely to be
affected by crosswinds than or-
dinary passenger cars.
. Always use the utmost care in
driving –overconfidence be-
cause you are driving an All-
Wheel Drive model could easily
lead to a serious accident.
Your vehicle is classified as a utility
vehicle. Utility vehicles feature a higher
ground clearance which enables them to
be used for wide applications including off-
road driving. But please keep in mind that
your vehicle is neither a conventional off-
road vehicle nor an all-terrain vehicle. A
higher center of gravity in relation to the
tread width as compared with ordinary
passenger cars makes vehicles of this
type more likely to roll over. In reality, utility
vehicles have a significantly higher roll-
over rate than other types of vehicles. The
high ground clearance of this vehicle is a
real advantage, giving you a better view of
the road and allowing you to anticipate
problems earlier. However, remember that
your utility vehicle is not designed for high-
speed cornering comparable to ordinary
passenger cars and that your vehicle
could roll over if you make a sharp turn
at high speed.
If you take your SUBARU off-road, certain
8-6
Page 484 of 634

common sense precautions such as those
in the following list should be taken.
.Make certain that you and all of your
passengers are wearing seatbelts.
. Carry some emergency equipment,
such as a towing rope or chain, a shovel,
wheel blocks, first aid kit and cell phone or
citizens band radio.
. Drive carefully. Do not take unneces-
sary risks by driving in dangerous areas or
over rough terrain.
. Slow down and employ extra caution at
all times. When driving off-road, you will
not have the benefit of marked traffic
lanes, banked curves, traffic signs and
the like.
. Do not drive across steep slopes.
Instead, drive either straight up or straight
down the slopes. A vehicle can much
more easily tip over sideways than it can
end over end. Avoid driving straight up or
down slopes that are too steep.
. Avoid sharp turning maneuvers, espe-
cially at higher speeds.
. Do not grip the inside or spokes of the
steering wheel. A bad bump could jerk the
wheel and injure your hands. Instead drive
with your fingers and thumbs on the
outside of the rim.
. If driving through water, such as when
crossing shallow streams, first check the depth of the water and the bottom of the
stream bed for firmness and ensure that
the bed of the stream is flat. Drive slowly
and cross the stream without stopping.
The water should be shallow enough that
it does not reach the vehicle’
s under-
carriage. Water entering the engine air
intake or the exhaust pipe or water
splashing onto electrical parts may da-
mage your vehicle and may cause it to
stall. Never attempt to drive through
rushing water; regardless of its depth, it
can wash away the ground from under
your tires, resulting in possible loss of
traction and even vehicle rollover.
. Always check your brakes for effec-
tiveness immediately after driving in sand,
mud or water. Do this by driving slowly
and stepping on the brake pedal. Repeat
that process several times to dry out the
brake discs and brake pads.
. Do not drive or park over or near
flammable materials such as dry grass or
fallen leaves, as they may burn easily. The
exhaust system is very hot while the
engine is running and right after engine
stops. This could create a fire hazard.
. After driving through tall grass, mud,
rocks, sand, rivers, etc., check that there
is no grass, bush, paper, rags, stones,
sand, etc. adhering to or trapped on the
underbody. Clear off any such matter from the underbody. If the vehicle is used with
these materials trapped or adhering to the
underbody, a mechanical breakdown or
fire could occur.
.
Secure all cargo carried inside the
vehicle and make certain that it is not
piled higher than the seatbacks. During
sudden stops or jolts, unsecured cargo
could be thrown around in the vehicle and
cause injury. Do not pile heavy loads on
the roof. Those loads raise the vehicle’ s
center of gravity and make it more prone
to tip over.
. If you must rock the vehicle to free it
from sand or mud, depress the accelerator
pedal slightly and move the shift lever/
select lever back and forth between “1”/
“D ”and “R”repeatedly. Do not race the
engine. For the best possible traction,
avoid spinning the wheels when trying to
free the vehicle.
. When the road surface is extremely
slippery, you can obtain better traction by
starting the vehicle with the transmission
in 2nd than 1st. For CVT models with
manual mode, refer to “Selection of
manual mode ”F 7-27.
. Never equip your vehicle with tires
larger than those specified in this manual.
. Wash the vehicle’ s underbody after off-
road driving. Suspension components are
particularly prone to dirt buildup, so they
Driving tips/On –road and off –road driving
–CONTINUED –8-7
Page 493 of 634
Driving tips/Trailer hitch (dealer option)
!Installing carrying attachments on
the crossbars
When installing any carrying attachment
such as a bike carrier, ski carrier, kayak
carrier, cargo basket, etc. on the cross-
bars, follow the manufacturer ’s instruc-
tions and make sure that the attachment is
securely fixed to the crossbars. Use only
attachments designed specifically for the
crossbars. A set of the crossbars is
designed to carry loads (cargo and attach-
ment) of not more than 165 lbs (75 kg).
Before operating the vehicle, make sure
that the cargo is properly secured on the
attachment.
NOTE
Remember that the vehicle ’s center of
gravity is altered with the weight of the
load on the roof, thus affecting the
driving characteristics.
Drive carefully. Avoid rapid starts, hard
cornering and abrupt stops. Crosswind
effects will be increased. !
Removal and installation of the
crossbars
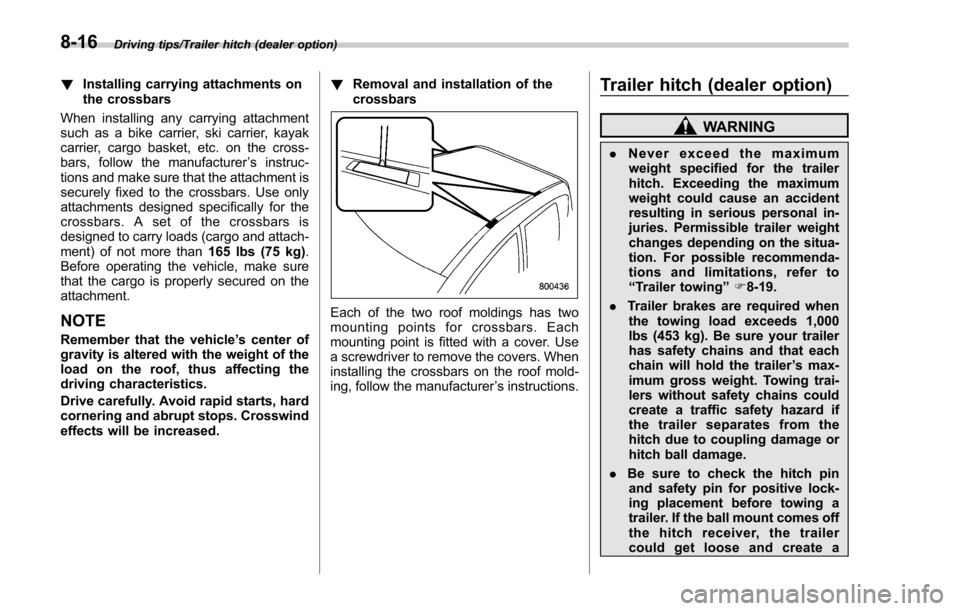
Each of the two roof moldings has two
mounting points for crossbars. Each
mounting point is fitted with a cover. Use
a screwdriver to remove the covers. When
installing the crossbars on the roof mold-
ing, follow the manufacturer ’s instructions.
Trailer hitch (dealer option)
WARNING
. Never exceed the maximum
weight specified for the trailer
hitch. Exceeding the maximum
weight could cause an accident
resulting in serious personal in-
juries. Permissible trailer weight
changes depending on the situa-
tion. For possible recommenda-
tions and limitations, refer to
“ Trailer towing” F8-19.
. Trailer brakes are required when
the towing load exceeds 1,000
lbs (453 kg). Be sure your trailer
has safety chains and that each
chain will hold the trailer ’s max-
imum gross weight. Towing trai-
lers without safety chains could
create a traffic safety hazard if
the trailer separates from the
hitch due to coupling damage or
hitch ball damage.
. Be sure to check the hitch pin
and safety pin for positive lock-
ing placement before towing a
trailer. If the ball mount comes off
the hitch receiver, the trailer
could get loose and create a
8-16
Page 494 of 634
traffic safety hazard.
. Although towing regulations for
trailer or caravan vehicles vary
by state/region, all regulations
agree that specifications such
as the maximum gross trailer
weight must not exceed the les-
ser of the following:
– Maximum gross trailer weight
– Maximum gross tongue
weight
– GVWR
– GAWR
. Failure to comply with the proce-
dures set forth will not only
compromise your safety, but will
also negate your insurance cov-
erage and/or may violate the
state road and traffic acts and
regulations.
. Use only the ball mount supplied
with this hitch. Use the hitch only
as a weight carrying hitch. Do not
use with any type of weight
distributing hitch.
. The standard bumper beam must
be installed after you remove the
trailer hitch. Consult a SUBARU
dealer for purchase of a standard
bumper beam if you do not have the original.
. Safety performance is decreased
and there is increased risk of
injury to passengers in the case
of an accident if the trailer hitch
or a standard bumper beam is
not installed. One of them must
always be installed on the vehi-
cle.
. If a trailer hitch is installed, it is
not possible to install the rear
towing hook.
When towing a trailer, refer to “Trailer
towing ”F 8-19.& Connecting a trailer
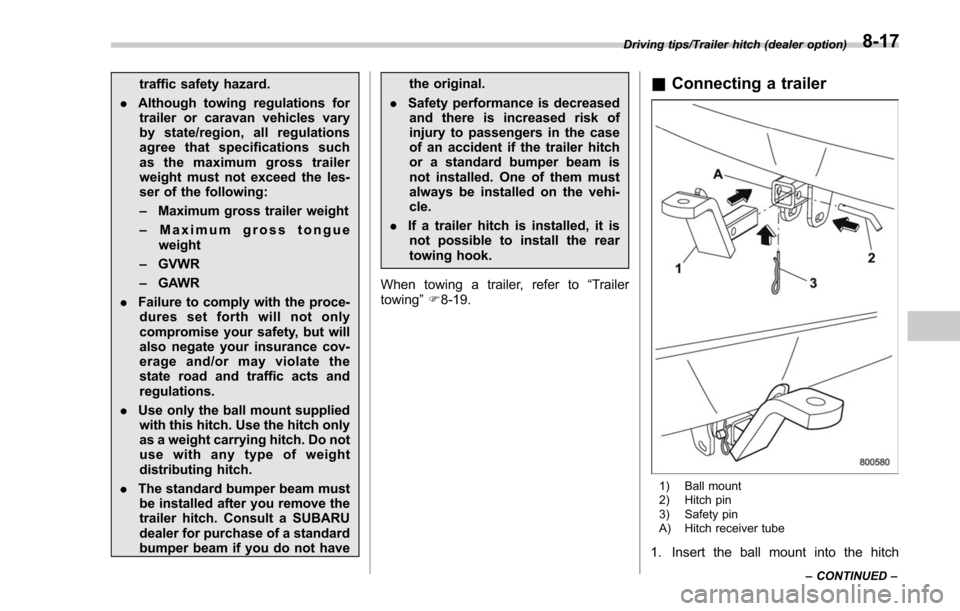
1) Ball mount
2) Hitch pin
3) Safety pin
A) Hitch receiver tube
1. Insert the ball mount into the hitch
Driving tips/Trailer hitch (dealer option)
–CONTINUED –8-17
Page 495 of 634
Driving tips/Trailer hitch (dealer option)
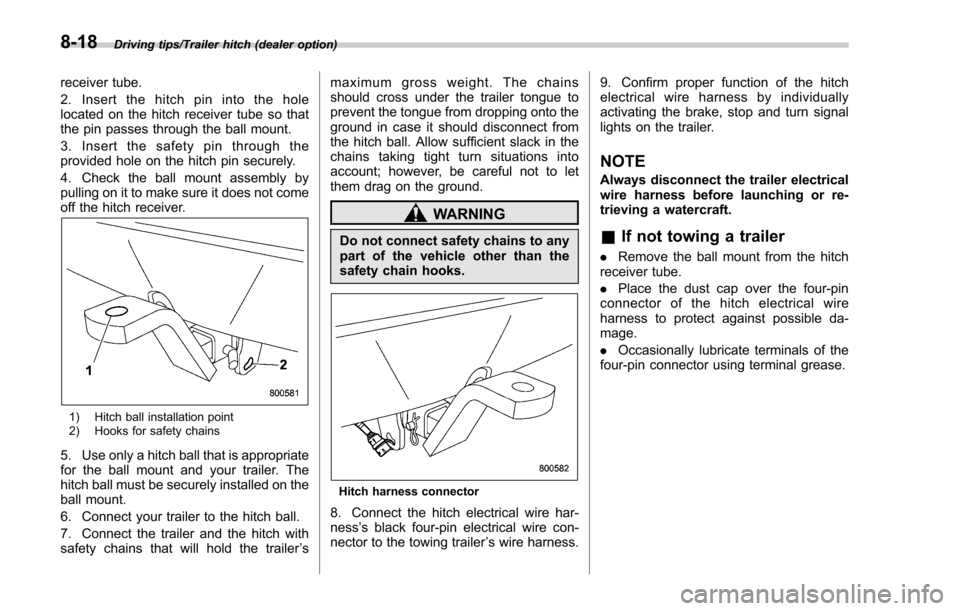
receiver tube.
2. Insert the hitch pin into the hole
located on the hitch receiver tube so that
the pin passes through the ball mount.
3. Insert the safety pin through the
provided hole on the hitch pin securely.
4. Check the ball mount assembly by
pulling on it to make sure it does not come
off the hitch receiver.
1) Hitch ball installation point
2) Hooks for safety chains
5. Use only a hitch ball that is appropriate
for the ball mount and your trailer. The
hitch ball must be securely installed on the
ball mount.
6. Connect your trailer to the hitch ball.
7. Connect the trailer and the hitch with
safety chains that will hold the trailer’s maximum gross weight. The chains
should cross under the trailer tongue to
prevent the tongue from dropping onto the
ground in case it should disconnect from
the hitch ball. Allow sufficient slack in the
chains taking tight turn situations into
account; however, be careful not to let
them drag on the ground.
WARNING
Do not connect safety chains to any
part of the vehicle other than the
safety chain hooks.
Hitch harness connector
8. Connect the hitch electrical wire har-
ness
’s black four-pin electrical wire con-
nector to the towing trailer ’s wire harness. 9. Confirm proper function of the hitch
electrical wire harness by individually
activating the brake, stop and turn signal
lights on the trailer.
NOTE
Always disconnect the trailer electrical
wire harness before launching or re-
trieving a watercraft.
&
If not towing a trailer
. Remove the ball mount from the hitch
receiver tube.
. Place the dust cap over the four-pin
connector of the hitch electrical wire
harness to protect against possible da-
mage.
. Occasionally lubricate terminals of the
four-pin connector using terminal grease.
8-18