2017 SUBARU FORESTER radio
[x] Cancel search: radioPage 122 of 634
&Certification for keyless ac-
cess with push-button start
system
! U.S.-spec. models
FCC ID: HYQ14AHC
FCC ID: HYQ13CZZ
FCC ID: Y8PSSPIMB02
FCC ID: Y8PSSPLF02
CAUTION
FCC WARNING
Changes or modifications not ex-
pressly approved by the party re-
sponsible for compliance could void
the user ’s authority to operate the
equipment.
NOTE
This device complies with Part 15 of
the FCC Rules. Operation is subject to
the following two conditions: (1) This
device may not cause harmful inter-
ference, and (2) this device must
accept any interference received, in-
cluding interference that may cause
undesired operation. !
Canada-spec. models
NOTE
This device complies with Industry
Canada licence-exempt RSS standard
(s). Operation is subject to the follow-
ing two conditions: (1) this device may
not cause interference, and (2) this
device must accept any interference,
including interference that may cause
undesired operation of the device.
NOTE
Le présent appareil est conforme aux
CNR d’ Industrie Canada applicables
aux appareils radio exempts de licence.
L ’exploitation est autorisée aux deux
conditions suivantes: (1) l ’appareil ne
doit pas produire de brouillage, et (2)
l ’ utilisateur de l ’appareil doit accepter
tout brouillage radioélectrique subi,
même si le brouillage est susceptible
d ’en compromettre le fonctionnement.
PIN Code Access (models
with “keyless access with
push-button start system ”)
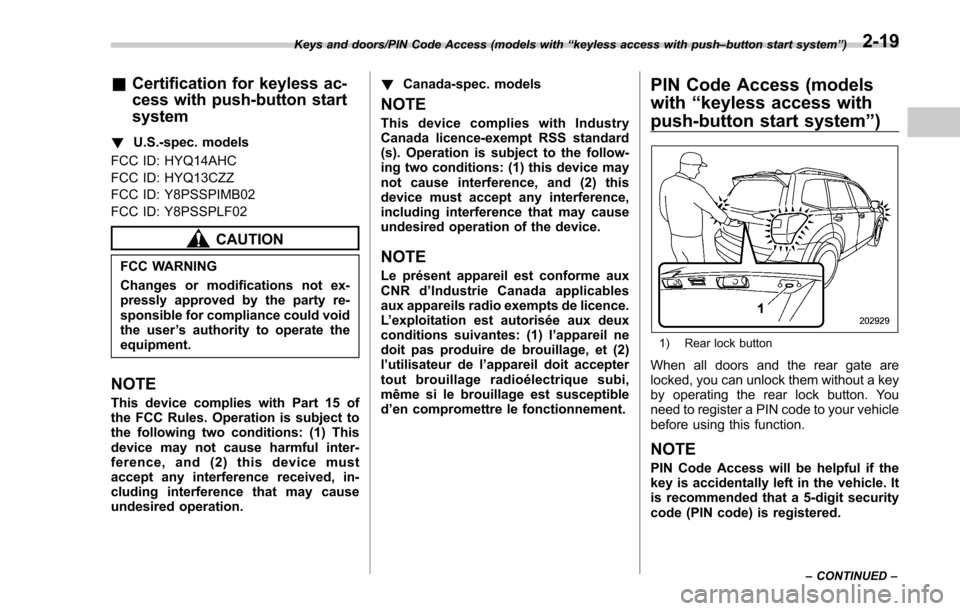
1) Rear lock button
When all doors and the rear gate are
locked, you can unlock them without a key
by operating the rear lock button. You
need to register a PIN code to your vehicle
before using this function.
NOTE
PIN Code Access will be helpful if the
key is accidentally left in the vehicle. It
is recommended that a 5-digit security
code (PIN code) is registered.
Keys and doors/PIN Code Access (models with “keyless access with push –button start system ”)
– CONTINUED –2-19
Page 124 of 634
&Unlocking
Perform steps 1 to 5 described in “Regis-
tration ”.
NOTE
. You cannot unlock by PIN Code
Access in the following cases.
–when the access key is within the
operating ranges
– when the ignition switch is in the
“ ACC ”or “ON ”position
. If you make an operation error
during the unlocking procedure, start
over with the unlocking procedure after
waiting for 5 seconds or longer.
. To protect your vehicle from theft, a
buzzer will sound if incorrect PIN codes
are entered five times continuously. If
this occurs, you cannot unlock the
doors by PIN Code Access for 5
minutes.
Remote keyless entry system
CAUTION
. Do not expose the remote trans-
mitter to severe shocks, such as
those experienced as a result of
dropping or throwing.
. Do not take the remote transmit-
ter apart except when replacing
the battery.
. Do not get the remote transmitter
wet. If it gets wet, wipe it dry with
a cloth immediately.
. When you carry the remote trans-
mitteronanairplane,donot
press the button of the remote
transmitter while in the airplane.
When any button of the remote
transmitter is pressed, radio
waves are sent and may affect
the operation of the airplane.
When you carry the remote trans-
mitter in a bag on an airplane,
take measures to prevent the
buttons of the remote transmitter
from being pressed.
. FCC WARNING
Changes or modifications not
expressly approved by the party responsible for compliance
could void the user
’s authority
to operate the equipment.
FCC ID: CWTWB1U811
FCC ID: CWTWD1U781
This device complies with Part 15 of
the FCC Rules. Operation is subject to
the following two conditions: (1) This
device may not cause harmful inter-
ference, and (2) this device must
accept any interference received, in-
cluding interference that may cause
undesired operation.
NOTE
This device complies with Industry
Canada licence-exempt RSS standard
(s). Operation is subject to the follow-
ing two conditions: (1) this device may
not cause interference, and (2) this
device must accept any interference,
including interference that may cause
undesired operation of the device.
NOTE
Le présent appareil est conforme aux
CNR d’ Industrie Canada applicables
aux appareils radio exempts de licence.
L ’exploitation est autorisée aux deux
conditions suivantes: (1) l ’appareil ne
doit pas produire de brouillage, et (2)
Keys and doors/Remote keyless entry system
–CONTINUED –2-21
Page 125 of 634
Keys and doors/Remote keyless entry system
l’utilisateur de l ’appareil doit accepter
tout brouillage radioélectrique subi,
même si le brouillage est susceptible
d ’en compromettre le fonctionnement.
For models with “keyless access with
push-button start system ”, the access
key is used as the transmitter for the
remote keyless entry system. For models
without “keyless access with push-button
start system” , the transmitter for the
remote keyless entry system is located
inside the key head.
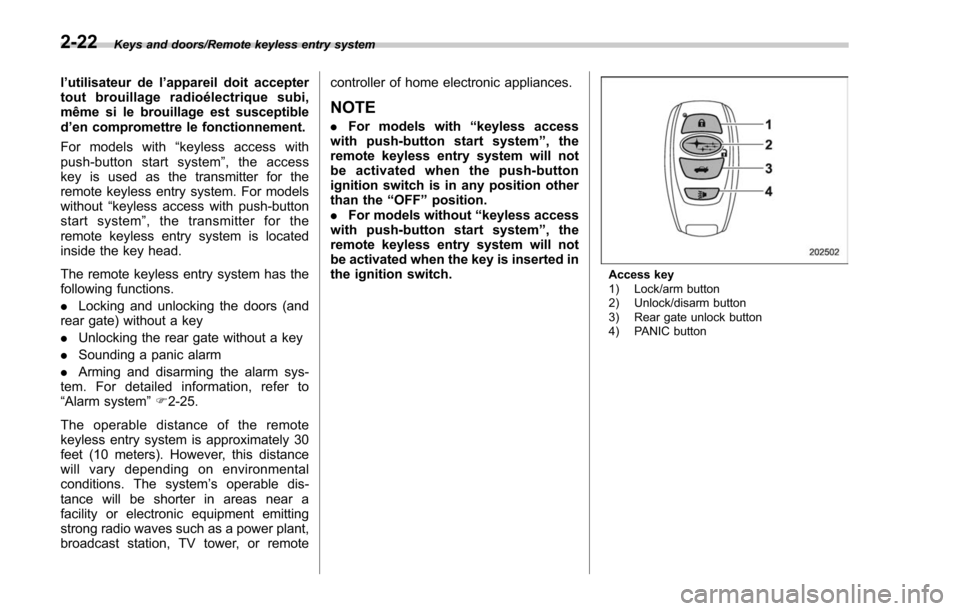
The remote keyless entry system has the
following functions.
. Locking and unlocking the doors (and
rear gate) without a key
. Unlocking the rear gate without a key
. Sounding a panic alarm
. Arming and disarming the alarm sys-
tem. For detailed information, refer to
“Alarm system ”F 2-25.
The operable distance of the remote
keyless entry system is approximately 30
feet (10 meters). However, this distance
will vary depending on environmental
conditions. The system ’s operable dis-
tance will be shorter in areas near a
facility or electronic equipment emitting
strong radio waves such as a power plant,
broadcast station, TV tower, or remote controller of home electronic appliances.
NOTE
.
For models with “keyless access
with push-button start system ”,the
remote keyless entry system will not
be activated when the push-button
ignition switch is in any position other
than the “OFF ”position.
. For models without “keyless access
with push-button start system ”,the
remote keyless entry system will not
be activated when the key is inserted in
the ignition switch.
Access key
1) Lock/arm button
2) Unlock/disarm button
3) Rear gate unlock button
4) PANIC button
2-22
Page 261 of 634
Instruments and controls/Mirrors
until a“C”appears in the display. Once a
“C ”appears in the display, slowly drive the
vehicle in circles until compass is cali-
brated.
! HomeLink
®Wireless Control Sys-
tem
The HomeLink
®Wireless Control System
provides a convenient way to replace up
to three hand-held radio-frequency re-
motes used to activate devices such as
gate operators, garage door openers,
entry door locks, security systems, even
home lighting. The below steps are
generic programming instructions; for
Genie and Sommer garage door openers
please go directly to the HomeLink web-
site. Additional information and program-
ming videos can be found at
www.HomeLink.com and
www.youtube.com/HomeLinkGentex.
CAUTION
. Before programming HomeLink
to a garage door opener or gate
operator, make sure that people
and objects are out of the way of
the device to prevent potential
harm or damage.
. When programming a garage
door opener, it is advised to park outside of the garage.
. Do not use HomeLink with any
garage door opener that lacks
safety stop and reverse features
as required by U.S. federal safety
standards (this includes any gar-
age door opener model manufac-
tured before April 1, 1982). A
garage door that cannot detect
an object signaling the door to
stop and reverse does not meet
current U.S. federal safety stan-
dards.
. It is also recommended that a
new battery be placed in the
hand-held remote (garage door
opener remote) of the device for
quicker and more accurate train-
ing.
. Some vehicles may require the
ignition switch to be turned to the
“ON ”or “ACC ”position for pro-
gramming and/or operation of
HomeLink.
. Keep the hand-held remote (gar-
age door opener remote) of the
device you are programming for
use in other vehicles as well as
for future HomeLink program-
ming. It is also suggested that
upon the sale of the vehicle, the programmed HomeLink buttons
be erased for security purposes.
Refer to
“Erasing HomeLink But-
tons ”F 3-113.
! Programming a New HomeLink
Button
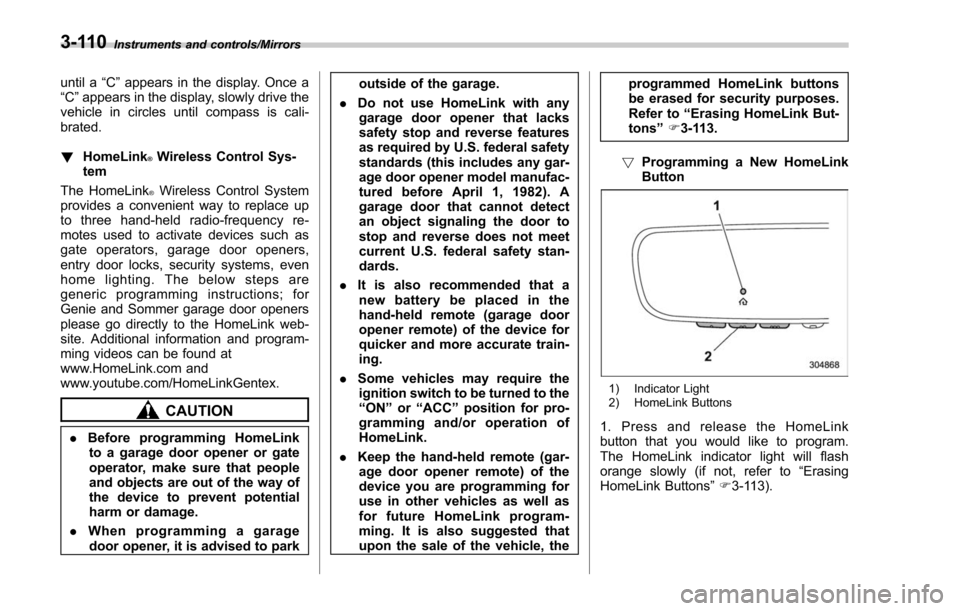
1) Indicator Light
2) HomeLink Buttons
1. Press and release the HomeLink
button that you would like to program.
The HomeLink indicator light will flash
orange slowly (if not, refer to “Erasing
HomeLink Buttons ”F 3-113).
3-110
Page 264 of 634
!Gate Operator / Canadian Pro-
gramming
Canadian radio-frequency laws require
transmitter remote signals to “time-out ”
(or quit) after several seconds of transmis-
sion, which may not be long enough for
HomeLink to pick up the signal during
programming. Similar to this Canadian
law, some U.S. gate operators are de-
signed to “time-out”in the same manner.
The indicator LED on the hand-held
remote will go off when the device times
out, indicating that it has finished transmit-
ting.
If you live in Canada or you are having
difficulties programming a gate operator or
garage door opener by using the program-
ming procedures, replace “Programming a
New HomeLink Button ”step 3 with the
following:
While the HomeLink indicator light is
flashing orange, press and release (“cy-
cle ”) your device ’s hand-held remote
every two seconds until the HomeLink
indicator light changes from orange to
green. You may now release the hand-
held remote button.
NOTE
If programming a garage door opener
or gate operator, it is advised to unplug the device during the
“cycling ”pro-
cess to prevent possible overheating.
Proceed with “Programming a New
HomeLink Button ”step 4 to complete.
! Using HomeLink
To operate, simply press and release the
programmed HomeLink button. Activation
will now occur for the trained device (i.e.
garage door opener, gate operator, secur-
ity system, entry door lock, home/office
lighting, etc.). For convenience, the hand-
held remote of the device may also be
used at any time.
!Erasing HomeLink Buttons
To erase programming from the three
buttons (individual buttons cannot be
erased but can be “reprogrammed”as
outlined below), follow the step noted:
Press and hold the two outer HomeLink
buttons for at least 10 seconds. The LED
indicator will change from continuously lit
to rapidly flashing. Release both buttons.
Do not hold for longer than 20 seconds.
HomeLink is now ready to be programmed
at any time beginning with “Programming
a New HomeLink Button ”- step 1. !
Reprogramming a Single
HomeLink Button
To program a previously trained button,
follow these steps:
1. Press and hold the desired HomeLink
button. DO NOT release the button.
2. The indicator light will begin to slowly
flash orange after 20 seconds. The
HomeLink button can be released at this
point. Proceed with “Programming a New
HomeLink Button ”- step 3.
3. If you do not complete the program-
ming of a new device to the button, it will
revert to the previously stored program-
ming.
!Garage Door Two-Way Commu-
nication
HomeLink has the capability of commu-
nicating with your garage door opener.
HomeLink can receive and display “clos-
ing ”or “opening ”status messages from
compatible garage door opener systems.
At any time, HomeLink can also recall and
display the last recorded status commu-
nicated by the garage door opener to
indicate your garage door being “closed”
or “opened ”.
HomeLink has the capability of receiving
this communication from the garage door
opener at a range up to 820 feet (250 m).
Instruments and controls/Mirrors
–CONTINUED –3-113
Page 288 of 634

Antenna................................................................ 5-2Roof antenna ...................................................... 5-2
Audio set............................................................. 5-2Base display audio set (if equipped) .................... 5-3
STARLINKTM7.0 Multimedia Plus audio set
(U.S. spec. models only, if equipped) ................. 5-5
Tips for operating the audio/visual system ........... 5-6
Basic information before use .............................. 5-14
Basic operation .................................................. 5-17
Unit settings ...................................................... 5-18
SUBARU STARLINK (if equipped) ....................... 5-25
AM/FM radio ....................................................... 5-27
SiriusXM Satellite Radio (if equipped) ................. 5-36
aha
TMby HARMAN ............................................. 5-43
Pandora®(if equipped) ....................................... 5-49
CD ..................................................................... 5-52
USB memory ...................................................... 5-54
iPod ................................................................... 5-55
Bluetooth audio .................................................. 5-57
AUX ................................................................... 5-60
Steering switches for audio .............................. 5-62
Bluetooth®settings ............................................ 5-65Regulatory information ....................................... 5-65 Registering/connecting Bluetooth
®device
.......... 5-65
Setting Bluetooth details .................................... 5-68
Hands-free phone system ................................. 5-70Control screen................................................... 5-71
Registering/connecting a Bluetooth phone ......... 5-72
Using the phone switch/microphone ................... 5-72
How to change the hands-free phone system ..... 5-72
Making a call ..................................................... 5-73
Receiving a call ................................................. 5-76
Talking on the phone ......................................... 5-77
Phone settings .................................................. 5-78
Voice command system .................................... 5-80Using the voice command system ...................... 5-81
Voice command system operation ...................... 5-82
Command list .................................................... 5-84
What to do if.... ................................................... 5-88Troubleshooting ................................................. 5-88
Appendix............................................................ 5-92Certification ....................................................... 5-92
Certification for the Hands-free system ............... 5-92
Certification for Mexico models .......................... 5-93
Audio
5
Page 289 of 634
Audio/Antenna
Antenna
&Roof antenna
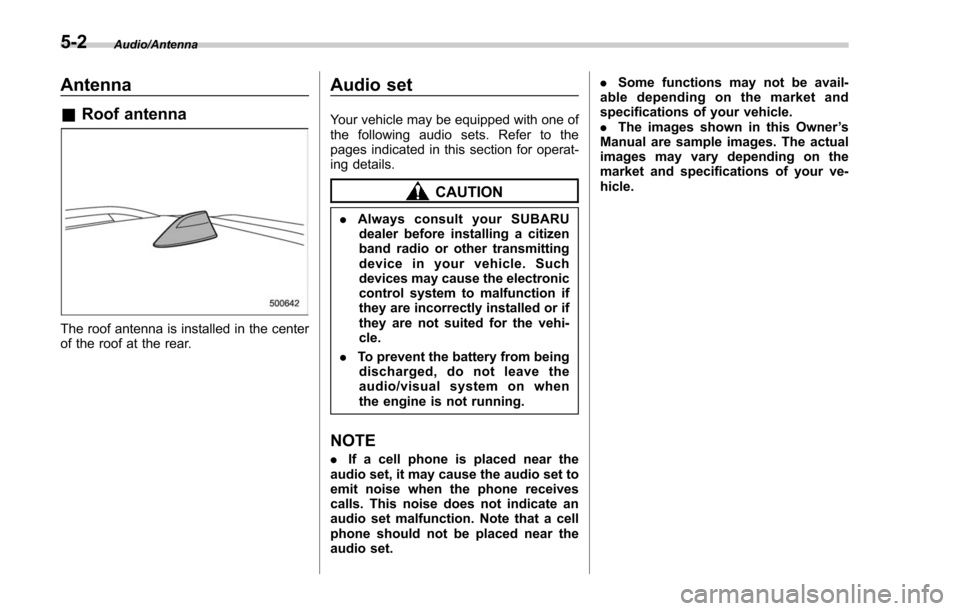
The roof antenna is installed in the center
of the roof at the rear.
Audio set
Your vehicle may be equipped with one of
the following audio sets. Refer to the
pages indicated in this section for operat-
ing details.
CAUTION
. Always consult your SUBARU
dealer before installing a citizen
band radio or other transmitting
device in your vehicle. Such
devices may cause the electronic
control system to malfunction if
they are incorrectly installed or if
they are not suited for the vehi-
cle.
. To prevent the battery from being
discharged, do not leave the
audio/visual system on when
the engine is not running.
NOTE
. If a cell phone is placed near the
audio set, it may cause the audio set to
emit noise when the phone receives
calls. This noise does not indicate an
audio set malfunction. Note that a cell
phone should not be placed near the
audio set. .
Some functions may not be avail-
able depending on the market and
specifications of your vehicle.
. The images shown in this Owner ’s
Manual are sample images. The actual
images may vary depending on the
market and specifications of your ve-
hicle.
5-2
Page 290 of 634
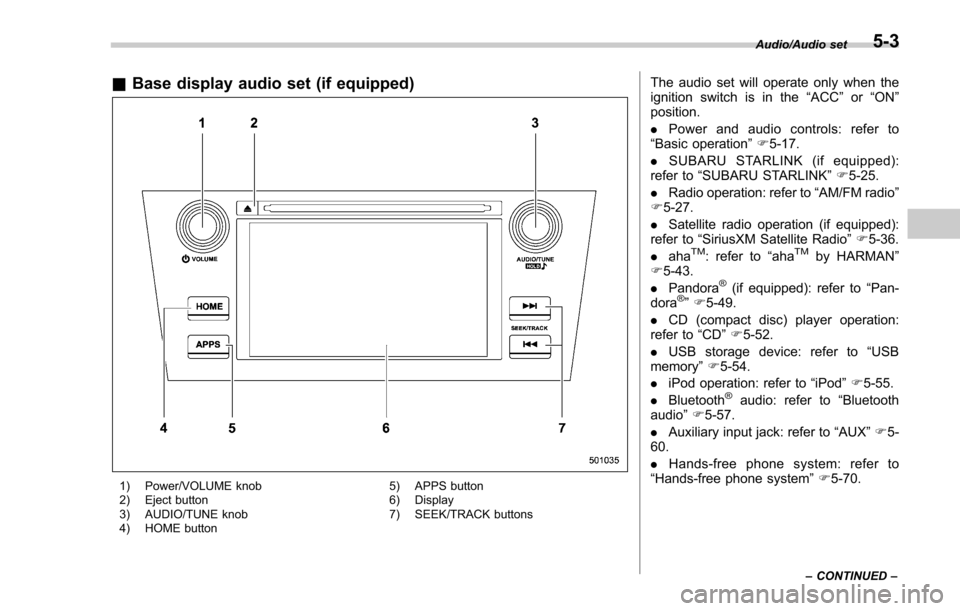
&Base display audio set (if equipped)
1) Power/VOLUME knob
2) Eject button
3) AUDIO/TUNE knob
4) HOME button 5) APPS button
6) Display
7) SEEK/TRACK buttons
The audio set will operate only when the
ignition switch is in the
“ACC”or “ON ”
position.
. Power and audio controls: refer to
“Basic operation ”F 5-17.
. SUBARU STARLINK (if equipped):
refer to “SUBARU STARLINK ”F 5-25.
. Radio operation: refer to “AM/FM radio ”
F 5-27.
. Satellite radio operation (if equipped):
refer to “SiriusXM Satellite Radio” F5-36.
. aha
TM: refer to “ahaTMby HARMAN ”
F 5-43.
. Pandora
®(if equipped): refer to “Pan-
dora®” F 5-49.
. CD (compact disc) player operation:
refer to “CD”F 5-52.
. USB storage device: refer to “USB
memory ”F 5-54.
. iPod operation: refer to “iPod”F 5-55.
. Bluetooth
®audio: refer to “Bluetooth
audio ”F 5-57.
. Auxiliary input jack: refer to “AUX”F 5-
60.
. Hands-free phone system: refer to
“Hands-free phone system ”F 5-70.
Audio/Audio set
–CONTINUED –5-3