2017 SUBARU FORESTER power steering
[x] Cancel search: power steeringPage 175 of 634

Instruments and controls/Warning and indicator lights
At this time, there will be more resis-
tance when steering. However this is
not a malfunction. Normal steering
force will be restored after the steering
wheel is not operated for a while and
the power steering control system has
an opportunity to cool down. However,
if the power steering is operated in a
non-standard way which causes power
assist limitation to occur too fre-
quently, that may result in a malfunc-
tion of the power steering control
system.
&Vehicle Dynamics
Control warning light/
Vehicle Dynamics Con-
trol operation indicator
light
!Vehicle Dynamics Control warning
light
CAUTION
The Vehicle Dynamics Control sys-
tem provides its ABS control
through the electrical circuit of the
ABS. Accordingly, if the ABS is
inoperative, the Vehicle Dynamics
Control system becomes unable to provide ABS control. As a result, the
Vehicle Dynamics Control system
also becomes inoperative, causing
the warning light to illuminate.
Although both the Vehicle Dynamics
Control system and ABS are inop-
erative in this case, the ordinary
functions of the brake system are
still available. You will be safe while
driving with this condition, but drive
carefully and have your vehicle
checked at a SUBARU dealer as
soon as possible.
NOTE
.
If the electrical circuit of the Vehicle
Dynamics Control system itself mal-
functions, the warning light only illumi-
nates. At this time, the ABS (Anti-lock
Brake System) remains fully opera-
tional.
. The warning light illuminates when
the electronic control system of the
ABS/Vehicle Dynamics Control system
malfunctions.
The Vehicle Dynamics Control system is
probably inoperative under any of the
following conditions. Have your vehicle
checked at a SUBARU dealer immedi-
ately.
. The warning light does not illuminate when the ignition switch is turned to the
“ON
”position.
. The warning light illuminates while the
vehicle is running.
NOTE
If the warning light behavior is as
described in the following examples,
the Vehicle Dynamics Control system
may be considered normal.
. The warning light illuminates when
the ignition switch is turned to the
“ ON ”position and turns off approxi-
mately 2 seconds after the engine has
started.
. The warning light illuminates right
after the engine is started but turns off
immediately, remaining off.
. The warning light illuminates after
the engine has started and turns off
while the vehicle is subsequently being
driven.
. The warning light illuminates during
driving, but it turns off immediately and
remains off.
. The warning light illuminates when
the engine has stalled and continues to
illuminate after the engine has been
restarted. However, it will turn off once
the vehicle starts moving.
3-24
Page 180 of 634

Inside warningchime Outside warning
chime Access key
warning light on
meter Operation indica-
tor on push-button
ignition switch Status Action
Long beep
(continuous) —— — Select lever position warning:
The engine is turned off by press-
ing the push-button ignition switch
and the select lever is in a position
other than the
“P ”position. Start the engine, shift the select
lever to the
“P ”position, switch the
push-button ignition switch to “OFF ”
and exit the vehicle.
Long beep
(continuous) —— — Select lever position warning:
The driver
’s door was opened while
the push-button ignition switch is in
a position other than “OFF ”and the
select lever is in a position other
than the “P ”position. Shift the select lever to the
“P ”
position, switch the push-button
ignition switch to “OFF ”and exit the
vehicle.
Ding —— — The battery of the access key is
low.Replace the battery of the access
key.
Ding —— Flashes in green
(15 seconds max.) Steering lock warning:
The engine start procedure was
performed, but the steering is still
locked. While turning the steering wheel
right and left lightly, depress the
brake pedal and press the push-
button ignition switch.
Ding —— Flashes in orangeSystem malfunction warning:
A malfunction was detected in the
power system or steering lock. Contact a SUBARU dealer imme-
diately and have the vehicle in-
spected.
NOTEAn electronic chirp will sound while the select lever is in the
“R ” position. In this case, the select lever position warning chime
will not sound.
Instruments and controls/Warning and indicator lights
–CONTINUED –3-29
Page 202 of 634

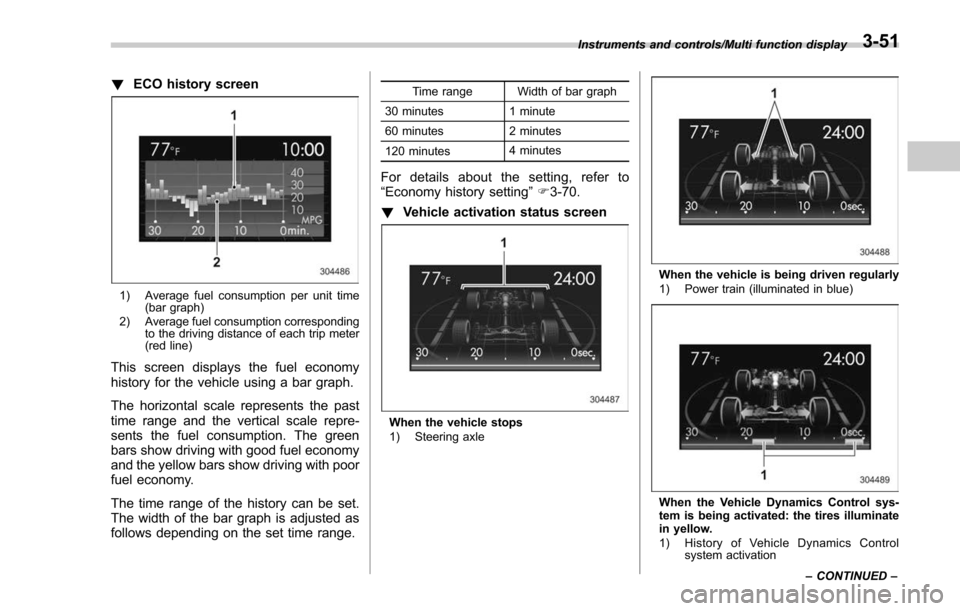
!ECO history screen
1) Average fuel consumption per unit time
(bar graph)
2) Average fuel consumption corresponding to the driving distance of each trip meter
(red line)
This screen displays the fuel economy
history for the vehicle using a bar graph.
The horizontal scale represents the past
time range and the vertical scale repre-
sents the fuel consumption. The green
bars show driving with good fuel economy
and the yellow bars show driving with poor
fuel economy.
The time range of the history can be set.
The width of the bar graph is adjusted as
follows depending on the set time range.
Time range Width of bar graph
30 minutes 1 minute
60 minutes 2 minutes
120 minutes 4 minutes
For details about the setting, refer to
“Economy history setting
”F 3-70.
! Vehicle activation status screen
When the vehicle stops
1) Steering axle
When the vehicle is being driven regularly
1) Power train (illuminated in blue)
When the Vehicle Dynamics Control sys-
tem is being activated: the tires illuminate
in yellow.
1) History of Vehicle Dynamics Control
system activation
Instruments and controls/Multi function display
–CONTINUED –
3-51
Page 365 of 634

Audio/Hands–free phone system
No. Function
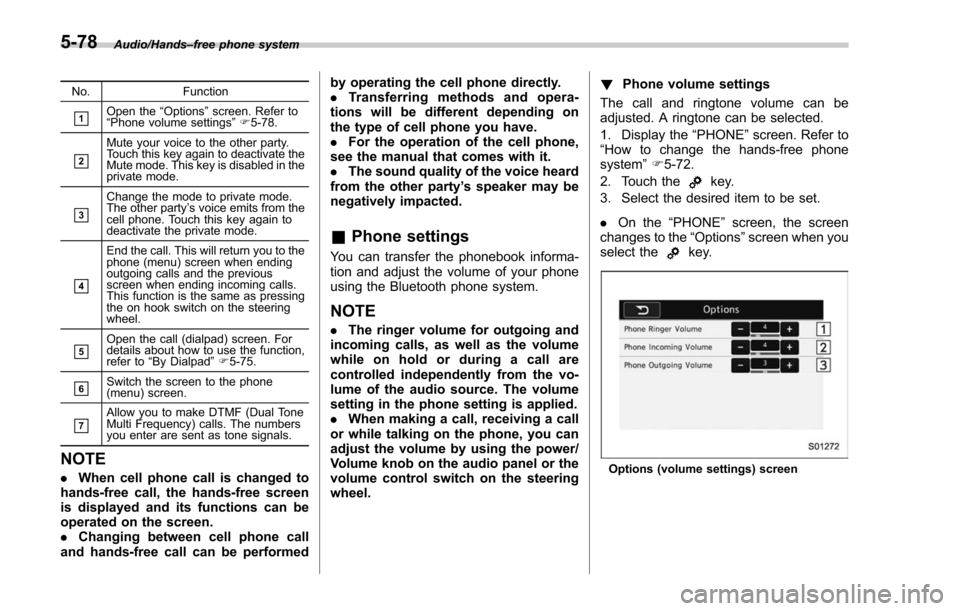
&1Open the“Options ”screen. Refer to
“ Phone volume settings ”F 5-78.
&2
Mute your voice to the other party.
Touch this key again to deactivate the
Mute mode. This key is disabled in the
private mode.
&3
Change the mode to private mode.
The other party ’s voice emits from the
cell phone. Touch this key again to
deactivate the private mode.
&4
End the call. This will return you to the
phone (menu) screen when ending
outgoing calls and the previous
screen when ending incoming calls.
This function is the same as pressing
the on hook switch on the steering
wheel.
&5Open the call (dialpad) screen. For
details about how to use the function,
refer to “By Dialpad ”F 5-75.
&6Switch the screen to the phone
(menu) screen.
&7Allow you to make DTMF (Dual Tone
Multi Frequency) calls. The numbers
you enter are sent as tone signals.
NOTE
. When cell phone call is changed to
hands-free call, the hands-free screen
is displayed and its functions can be
operated on the screen.
. Changing between cell phone call
and hands-free call can be performed by operating the cell phone directly.
.
Transferring methods and opera-
tions will be different depending on
the type of cell phone you have.
. For the operation of the cell phone,
see the manual that comes with it.
. The sound quality of the voice heard
from the other party’ s speaker may be
negatively impacted.
& Phone settings
You can transfer the phonebook informa-
tion and adjust the volume of your phone
using the Bluetooth phone system.
NOTE
. The ringer volume for outgoing and
incoming calls, as well as the volume
while on hold or during a call are
controlled independently from the vo-
lume of the audio source. The volume
setting in the phone setting is applied.
. When making a call, receiving a call
or while talking on the phone, you can
adjust the volume by using the power/
Volume knob on the audio panel or the
volume control switch on the steering
wheel. !
Phone volume settings
The call and ringtone volume can be
adjusted. A ringtone can be selected.
1. Display the “PHONE ”screen. Refer to
“How to change the hands-free phone
system ”F 5-72.
2. Touch the
key.
3. Select the desired item to be set.
. On the “PHONE ”screen, the screen
changes to the “Options ”screen when you
select the
key.
Options (volume settings) screen
5-78
Page 404 of 634

Fuel...................................................................... 7-3Fuel requirements ............................................... 7-3
Fuel filler lid and cap ........................................... 7-5
State emission testing (U.S. only) ...................... 7-7
Preparing to drive ............................................... 7-8
Starting and stopping the engine (models without push-button start system) .................. 7-9
Starting engine.................................................... 7-9
Stopping the engine ........................................... 7-11
Starting and stopping engine (models with
push-button start system) .............................. 7-12
Safety precautions............................................. 7-12
Operating range for push-button start system ............................................................. 7-12
Starting engine ................................................... 7-12
Stopping engine ................................................. 7-13
When access key does not operate properly ....... 7-14
Remote engine start system (dealer
option) .............................................................. 7-14
Models with “keyless access with push-button
start system ”................................................... 7-14
Models without “keyless access with push-button
start system ”................................................... 7-15
Entering the vehicle while it is running via remote start ................................................................. 7-19
Entering the vehicle following remote engine start shutdown ......................................................... 7-19
Pre-heating or pre-cooling the interior of the vehicle ............................................................. 7-19
Service mode (models without “keyless access
with push-button start system ”)........................ 7-19 Remote transmitter program (models without
“keyless access with push-button start
system ”).......................................................... 7-20
System maintenance .......................................... 7-20
Manual transmission ......................................... 7-22Shifting speeds.................................................. 7-23
Driving tips ........................................................ 7-24
Continuously variable transmission ................. 7-24Select lever....................................................... 7-25
Selection of manual mode (if equipped) .............. 7-27
Selection of “L ” (if equipped) ... .......................... 7-29
Shift lock function ............................................. 7-30
Driving tips ........................................................ 7-31
SI-DRIVE (if equipped) ....................................... 7-32Intelligent (I) mode............................................. 7-32
Sport (S) mode .................................................. 7-32
Sport Sharp (S#) mode. ...................................... 7-33
SI-DRIVE switches ............................................. 7-34
Power steering................................................... 7-34
Braking ............................................................... 7-35
Braking tips ....................................................... 7-35
Brake system .................................................... 7-36
Disc brake pad wear warning indicators ............. 7-36
ABS (Anti-lock Brake System).......................... 7-37ABS self-check.................................................. 7-37
ABS warning light .............................................. 7-37
Electronic Brake Force Distribution (EBD)
system ............................................................. 7-38
Steps to take if EBD system malfunctions .......... 7-38
Vehicle Dynamics Control system.................... 7-39Vehicle Dynamics Control system monitor .......... 7-41
Starting and operating
7
Page 414 of 634

position and check the operation of the
warning and indicator lights. Refer to
“Warning and indicator lights”F 3-13.
5. Turn the ignition switch to the “START”
position without depressing the accelera-
tor pedal. Release the key immediately
after the engine has started.
If the engine does not start, try the
following procedure.
(1) Turn the ignition switch to the
“OFF ”position and wait for at least
10 seconds. After checking that the
parking brake is firmly set, turn the
ignition switch to the “START”position
while depressing the accelerator pedal
slightly (approximately a quarter of the
full stroke). Release the accelerator
pedal as soon as the engine starts.
(2) If this fails to start the engine, turn
the ignition switch back to the “OFF”
position and wait for at least 10
seconds. Then fully depress the accel-
erator pedal and turn the ignition
switch to the “START ”position. If the
engine starts, quickly release the
accelerator pedal.
(3) If this fails to start the engine, turn
the ignition switch again to the “OFF”
position. After waiting for 10 seconds
or longer, turn the ignition switch to the
“START ”position without depressing
the accelerator pedal. (4) If the engine still does not start,
contact your nearest SUBARU dealer
for assistance.
6. Confirm that all warning and indicator
lights have turned off after the engine has
started. The fuel injection system auto-
matically lowers the idle speed as the
engine warms up.
While the engine is warming up, make
sure that the select lever is at the “P ” or
“N ”position and that the parking brake is
applied.
CAUTION
If you restart the engine while the
vehicle is moving, shift the select
lever into the “N ” position. Do not
attempt to place the select lever of a
moving vehicle into the “P ” posi-
tion.
& Stopping the engine
The ignition switch should be turned off
only when the vehicle is stopped and the
engine is idling.
WARNING
Do not stop the engine when the
vehicle is moving. This will cause
loss of power to the power steering and the brake booster, making steer-
ing and braking more difficult. It
could also result in accidental acti-
vation of the
“LOCK ”position on the
ignition switch, causing the steering
wheel to lock.
Starting and operating/Starting and stopping the engine (models without push –button start system)7-11
Page 415 of 634

Starting and operating/Starting and stopping engine (models with push–button start system)
Starting and stopping engine
(models with push-button
start system)
& Safety precautions
Refer to “Safety precautions ”F 2-10.
& Operating range for push-
button start system
Refer to “Operating range for push-button
start system ”F 3-6.
& Starting engine
WARNING
. There are some general precau-
tions when starting the engine.
Carefully read the precautions
described in “Starting engine ”
F 7-9.
. If the indicator on the push-
button ignition switch flashes in
green after the engine has
started, never drive the vehicle.
The steering is still locked, and it
may result in an accident.
CAUTION
. When the operation indicator on
the push-button ignition switch is
flashing in orange, there may be
a malfunction with the vehicle.
Contact a SUBARU dealer imme-
diately.
. If the indicator on the push-
button ignition switch is flashing
in green after the engine has
started, it means that the steering
is still locked. Depress the brake
pedal while moving the steering
wheel to the right and left, and
press the push-button ignition
switch.
. Do not continue pressing the
push-button ignition switch for
more than 10 seconds. Doing so
could cause a malfunction. If the
engine does not start, stop
pressing the push-button ignition
switch. Instead, press the push-
button ignition switch without
depressing the brake pedal to
switch the power status to
“ OFF ”. Wait 10 seconds, and
then press the push-button igni-
tion switch to start the engine.
NOTE
. When the push-button ignition
switch is pressed while depressing
the brake pedal, the engine starter
operates for a maximum of 10 seconds
and after starting the engine, the starter
stops automatically.
. When the push-button ignition
switch is pressed while depressing
the brake pedal, the engine can be
started regardless of the status of the
push-button ignition switch.
. If the security indicator light illumi-
nates when you attempt to start the
engine but the engine does not start,
press the push-button ignition switch
to switch the power to “OFF”and then
try to start the engine again.
. If the engine does not start, press
the push-button ignition switch without
depressing the brake pedal to switch
the power to “OFF ”. Then, while de-
pressing the brake pedal more force-
fully, press the push-button ignition
switch.
. The engine start procedures may
not function depending on the radio
wave conditions around the vehicle. In
such a case, refer to “Starting engine ”
F 9-18.
. If the vehicle battery is discharged,
the steering cannot be unlocked.
7-12
Page 416 of 634

Charge the battery.
.After the engine starts, the engine
speed will be kept high until the engine
has warmed up sufficiently.
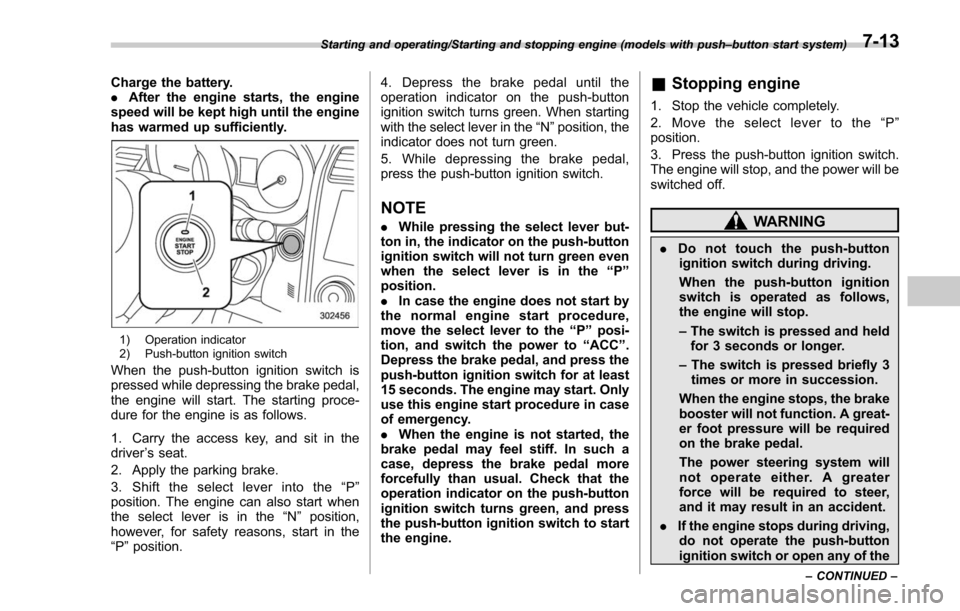
1) Operation indicator
2) Push-button ignition switch
When the push-button ignition switch is
pressed while depressing the brake pedal,
the engine will start. The starting proce-
dure for the engine is as follows.
1. Carry the access key, and sit in the
driver ’s seat.
2. Apply the parking brake.
3. Shift the select lever into the “P ”
position. The engine can also start when
the select lever is in the “N”position,
however, for safety reasons, start in the
“P ”position. 4. Depress the brake pedal until the
operation indicator on the push-button
ignition switch turns green. When starting
with the select lever in the
“N”position, the
indicator does not turn green.
5. While depressing the brake pedal,
press the push-button ignition switch.
NOTE
. While pressing the select lever but-
ton in, the indicator on the push-button
ignition switch will not turn green even
when the select lever is in the “P”
position.
. In case the engine does not start by
the normal engine start procedure,
move the select lever to the “P”posi-
tion, and switch the power to “ACC ”.
Depress the brake pedal, and press the
push-button ignition switch for at least
15 seconds. The engine may start. Only
use this engine start procedure in case
of emergency.
. When the engine is not started, the
brake pedal may feel stiff. In such a
case, depress the brake pedal more
forcefully than usual. Check that the
operation indicator on the push-button
ignition switch turns green, and press
the push-button ignition switch to start
the engine.
& Stopping engine
1. Stop the vehicle completely.
2. Move the select lever to the “P ”
position.
3. Press the push-button ignition switch.
The engine will stop, and the power will be
switched off.
WARNING
. Do not touch the push-button
ignition switch during driving.
When the push-button ignition
switch is operated as follows,
the engine will stop.
– The switch is pressed and held
for 3 seconds or longer.
– The switch is pressed briefly 3
times or more in succession.
When the engine stops, the brake
booster will not function. A great-
er foot pressure will be required
on the brake pedal.
The power steering system will
not operate either. A greater
force will be required to steer,
and it may result in an accident.
. If the engine stops during driving,
do not operate the push-button
ignition switch or open any of the
Starting and operating/Starting and stopping engine (models with push –button start system)
–CONTINUED –7-13