2017 SUBARU FORESTER fuel cap
[x] Cancel search: fuel capPage 491 of 634

Driving tips/Loading your vehicle
vehicle placard attached to the driver’s
side door pillar. It includes the total weight
of the driver and all passengers and their
belongings, any optional equipment such
as a trailer hitch, roof rack or bike carrier,
etc., and the tongue load of a trailer.
& GVWR and GAWR (Gross
Vehicle Weight Rating and
Gross Axle Weight Rating)
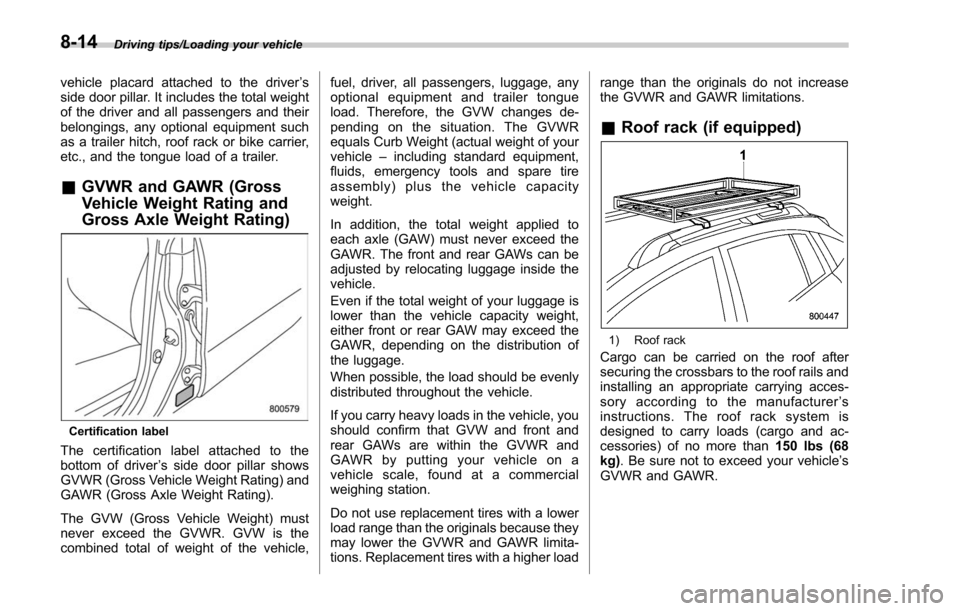
Certification label
The certification label attached to the
bottom of driver ’s side door pillar shows
GVWR (Gross Vehicle Weight Rating) and
GAWR (Gross Axle Weight Rating).
The GVW (Gross Vehicle Weight) must
never exceed the GVWR. GVW is the
combined total of weight of the vehicle, fuel, driver, all passengers, luggage, any
optional equipment and trailer tongue
load. Therefore, the GVW changes de-
pending on the situation. The GVWR
equals Curb Weight (actual weight of your
vehicle
–including standard equipment,
fluids, emergency tools and spare tire
assembly) plus the vehicle capacity
weight.
In addition, the total weight applied to
each axle (GAW) must never exceed the
GAWR. The front and rear GAWs can be
adjusted by relocating luggage inside the
vehicle.
Even if the total weight of your luggage is
lower than the vehicle capacity weight,
either front or rear GAW may exceed the
GAWR, depending on the distribution of
the luggage.
When possible, the load should be evenly
distributed throughout the vehicle.
If you carry heavy loads in the vehicle, you
should confirm that GVW and front and
rear GAWs are within the GVWR and
GAWR by putting your vehicle on a
vehicle scale, found at a commercial
weighing station.
Do not use replacement tires with a lower
load range than the originals because they
may lower the GVWR and GAWR limita-
tions. Replacement tires with a higher load range than the originals do not increase
the GVWR and GAWR limitations.
&
Roof rack (if equipped)
1) Roof rack
Cargo can be carried on the roof after
securing the crossbars to the roof rails and
installing an appropriate carrying acces-
sory according to the manufacturer ’s
instructions. The roof rack system is
designed to carry loads (cargo and ac-
cessories) of no more than 150 lbs (68
kg) . Be sure not to exceed your vehicle’ s
GVWR and GAWR.
8-14
Page 541 of 634

Maintenance and service/Engine oil
Engine oil
CAUTION
.If the level gauge cannot be
pulled out easily, twist the level
gauge right and left, then gently
pull it out. Otherwise, you may be
injured accidentally straining
yourself.
. Use only engine oil with the
recommended grade and vis-
cosity.
. Be careful not to spill engine oil
when adding it. If oil touches the
exhaust pipe, it may cause a bad
smell, smoke, and/or a fire. If
engine oil gets on the exhaust
pipe, be sure to wipe it off.
& Engine oil consumption
Some engine oil will be consumed while
driving. The rate of consumption can be
affected by such factors as transmission
type, driving style, terrain and tempera-
ture. Under the following conditions, oil
consumption can be increased and thus
require refilling between maintenance
intervals:
. When the engine is new and within the break-in period
.
When the engine oil is of lower quality
. When the incorrect oil viscosity is used
. When engine brakin g is employed
(repeatedly)
. When the engine is operated at high
engine speeds (for extended periods of
time)
. When the engine is operated under
heavy loads (for extended periods of time)
. When towing a trailer
. When the engine idles for extended
periods of time
. When the vehicle is operated in stop
and go and/or heavy traffic situations
. When the vehicle is used under severe
thermal conditions
. When the vehicle accelerates and
decelerates frequently
Under these or similar conditions, you
should check your oil at least every 2nd
fuel fill-up and change your engine oil
more frequently. Different drivers in the
same car may experience different results.
If your oil consumption rate is greater than
expected, contact your authorized
SUBARU retailer who may perform a test
under controlled conditions.
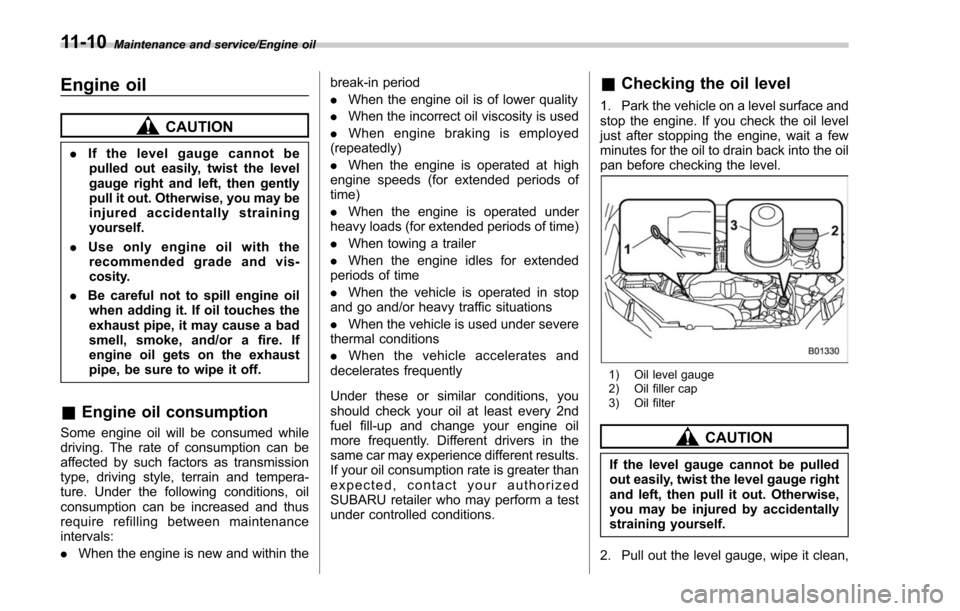
& Checking the oil level
1. Park the vehicle on a level surface and
stop the engine. If you check the oil level
just after stopping the engine, wait a few
minutes for the oil to drain back into the oil
pan before checking the level.
1) Oil level gauge
2) Oil filler cap
3) Oil filter
CAUTION
If the level gauge cannot be pulled
out easily, twist the level gauge right
and left, then pull it out. Otherwise,
you may be injured by accidentally
straining yourself.
2. Pull out the level gauge, wipe it clean,
11-10
Page 542 of 634

and insert it again.
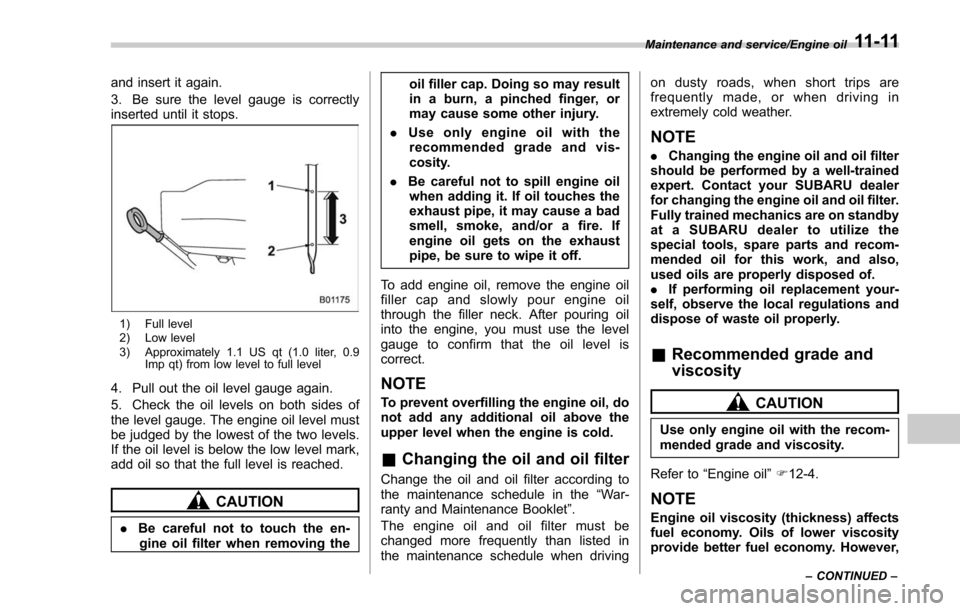
3. Be sure the level gauge is correctly
inserted until it stops.
1) Full level
2) Low level
3) Approximately 1.1 US qt (1.0 liter, 0.9Imp qt) from low level to full level
4. Pull out the oil level gauge again.
5. Check the oil levels on both sides of
the level gauge. The engine oil level must
be judged by the lowest of the two levels.
If the oil level is below the low level mark,
add oil so that the full level is reached.
CAUTION
.Be careful not to touch the en-
gine oil filter when removing the oil filler cap. Doing so may result
in a burn, a pinched finger, or
may cause some other injury.
. Use only engine oil with the
recommended grade and vis-
cosity.
. Be careful not to spill engine oil
when adding it. If oil touches the
exhaust pipe, it may cause a bad
smell, smoke, and/or a fire. If
engine oil gets on the exhaust
pipe, be sure to wipe it off.
To add engine oil, remove the engine oil
filler cap and slowly pour engine oil
through the filler neck. After pouring oil
into the engine, you must use the level
gauge to confirm that the oil level is
correct.
NOTE
To prevent overfilling the engine oil, do
not add any additional oil above the
upper level when the engine is cold.
& Changing the oil and oil filter
Change the oil and oil filter according to
the maintenance schedule in the “War-
ranty and Maintenance Booklet ”.
The engine oil and oil filter must be
changed more frequently than listed in
the maintenance schedule when driving on dusty roads, when short trips are
frequently made, or when driving in
extremely cold weather.
NOTE
.
Changing the engine oil and oil filter
should be performed by a well-trained
expert. Contact your SUBARU dealer
for changing the engine oil and oil filter.
Fully trained mechanics are on standby
at a SUBARU dealer to utilize the
special tools, spare parts and recom-
mended oil for this work, and also,
used oils are properly disposed of.
. If performing oil replacement your-
self, observe the local regulations and
dispose of waste oil properly.
& Recommended grade and
viscosity
CAUTION
Use only engine oil with the recom-
mended grade and viscosity.
Refer to “Engine oil ”F 12-4.
NOTE
Engine oil viscosity (thickness) affects
fuel economy. Oils of lower viscosity
provide better fuel economy. However,
Maintenance and service/Engine oil
–CONTINUED –11-11
Page 544 of 634

the cooling system and connections be
checked for leaks, damage, or looseness.
&Engine coolant
! Checking the coolant level
WARNING
Never attempt to remove the radia-
tor cap until the engine has been
shut off and has cooled down
completely. Since the coolant is
under pressure, you may suffer
serious burns from a spray of boil-
ing hot coolant when the cap is
removed.
1) “FULL ”level mark
2) “LOW ”level mark
Check the coolant level at each fuel stop.
1. Check the coolant level on the outside
of the reservoir while the engine is cool.
2. If the level is close to or lower than the
“LOW ”level mark, add coolant up to the
“FULL ”level mark. If the reserve tank is
empty, remove the radiator cap and refill
coolant up to just below the filler neck as
shown in the following illustration.
1) Fill up to this level
3. After refilling the reserve tank and the
radiator, reinstall the cap and check that
the rubber gaskets inside the radiator cap
are in the proper position.
Maintenance and service/Cooling system
–CONTINUED –11-13
Page 582 of 634

&Engine
Engine model
FB25
(2.5 L, DOHC, non-turbo) FA20
(2.0 L, DOHC, turbo)
Engine type Horizontally opposed, liquid cooled 4 cylinder, 4-stroke petrol engine
Displacement cu-in (cc) 152 (2,498) 122 (1,998)
Bore 6Stroke in (mm) 3.70 63.54 (94.0 690.0) 3.39 63.39 (86.0 686.0)
Compression ratio 10.3 : 1 10.6 : 1
Firing order 1
–3 –2–4
& Fuel
Model Fuel Fuel tank capacity
Non-turbo models Unleaded gasolinewith87 AKI (90 RON) or higher
15.9 US gal (60 liters, 13.2 Imp gal)
Turbo models Unleaded gasolinewith91 AKI (95 RON) or higher
For more details, refer to “Fuel ”F 7-3. Specifications/Specifications
–CONTINUED –
12-3
Page 586 of 634

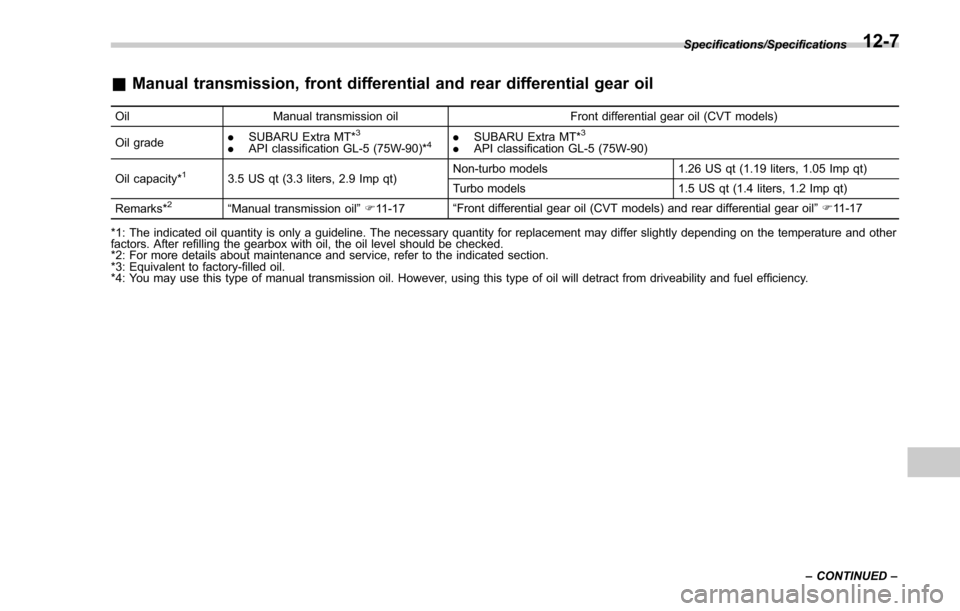
&Manual transmission, front differential and rear differential gear oil
Oil Manual transmission oil Front differential gear oil (CVT models)
Oil grade .
SUBARU Extra MT*3
.API classification GL-5 (75W-90)*4.SUBARU Extra MT*3
.API classification GL-5 (75W-90)
Oil capacity*
13.5 US qt (3.3 liters, 2.9 Imp qt) Non-turbo models 1.26 US qt (1.19 liters, 1.05 Imp qt)
Turbo models 1.5 US qt (1.4 liters, 1.2 Imp qt)
Remarks*
2“ Manual transmission oil ”F 11-17 “
Front differential gear oil (CVT models) and rear differential gear oil ”F 11-17
*1: The indicated oil quantity is only a guideline. The necessary quantity for replacement may differ slightly depending on the temperature and other
factors. After refilling the gearbox with oil, the oil level should be checked.
*2: For more details about maintenance and service, refer to the indicated section.
*3: Equivalent to factory-filled oil.
*4: You may use this type of manual transmission oil. However, using this type of oil will detract from driveability and fuel efficiency. Specifications/Specifications
–CONTINUED –
12-7
Page 604 of 634

crease in temperature could cause
tread separation, and failure of the
tire(s). Possible resulting loss of
vehicle control could lead to an
accident.
!Measuring and adjusting air
pressure to achieve proper in-
flation
Check and, if necessary, adjust the
pressure of each tire (including the
spare) at least once a month and
before any long journey. Check the
tire pressures when the tires are
cold. Use a pressure gauge to
adjust the tire pressures to the
specific values. Driving even a
short distance warms up the tires
and increases the tire pressures.
Also, the tire pressures are affected
by the outside temperature. It is
best to check tire pressure out-
doors before driving the vehicle.
When a tire becomes warm, the air
inside it expands, causing the tire
pressure to increase. Be careful not
to mistakenly release air from a
warm tire to reduce its pressure.
&Glossary of tire terminology
.Accessory weight
The combined weight (in excess of
those standard items which may be
replaced) of automatic transmis-
sion, power steering, power brakes,
power windows, power seats, radio,
and heater, to the extent that these
items are available as factory-in-
stalled equipment (whether in-
stalled or not).
.Bead
The part of the tire that is made of
steel wires, wrapped or reinforced
by ply cords and that is shaped to fit
the rim.
.Bead separation
A breakdown of the bond between
components in the bead.
.Bias ply tire
A pneumatic tire in which the ply
cords that extend to the beads are
laid at alternate angles substantially
less than 90 degrees to the center-
line of the tread.
.Carcass
The tire structure, except tread and sidewall rubber which, when in-
flated, bears the load.
.Chunking
The breaking away of pieces of the
tread or sidewall.
.Cold tire pressure
The pressure in a tire that has been
driven less than 1 mile or has been
standing for three hours or more.
.Cord
The strands forming the plies in the
tire.
.Cord separation
The parting of cords from adjacent
rubber compounds.
.Cracking
Any parting within the tread, side-
wall, or inner liner of the tire
extending to cord material.
.Curb weight
The weight of a motor vehicle with
standard equipment including the
maximum capacity of fuel, oil and
coolant, and if so equipped, air
conditioning and additional weight
optional engine.
Consumer information and Reporting safety defects/Tire information
–CONTINUED –13-5
Page 620 of 634

Warning................................................................ 3-22
Emergency Locking Retractor (ELR) ............................. 1-17
Engine
Compartment overview ........................................... 11-8
Coolant ........................................................ 11-13, 12-9
Exhaust gas (carbon monoxide) ............................. 5, 8-2
Hood .................................................................... 11-7
Low oil level warning light ....................................... 3-18
Oil............................................................... 11-10, 12-4
Overheating .......................................................... 9-12
Starting & stopping ........................................... 7-9, 7-12
Event data recorder ......................................................... 9
Exterior care .............................................................. 10-2
F
Flat tires ..................................................................... 9-5
Floor mat .................................................................. 6-12
Fluid level Brake .................................................................. 11-18
Clutch .................................................................. 11-19
Continuously variable transmission (CVT) ................ 11-17
Fog light ................................................................. 3-102
Bulb .......................................................... 11-42, 12-16
Indicator light ......................................................... 3-33
Switch ................................................................ 3-102
Front Differential gear oil ........................................ 11-17, 12-7
Seatbelt pretensioners ............................................ 1-25
Side marker light ................................................... 11-41
Turn signal/Parking and front side marker light ......... 11-41
Front fog light ................................................. 3- 102, 11-42Bulb
.......................................................... 11-42, 12-16
Indicator light ......................................................... 3-33
Switch ................................................................. 3-102
Front seats ................................................................. 1-2
Forward and backward adjustment ............................ 1-4
Head restraint adjustment ......................................... 1-8
Memory function ...................................................... 1-5
Power seat ............................................................. 1-5
Reclining ................................................................ 1-4
Seat height adjustment (driver ’s seat) ........................ 1-4
Front side marker ..................................................... 11-41
Front turn signal/Parking and front side marker ............ 11-41
Fuel ........................................................................\
... 7-3
Consumption indicator ............................ 3-34, 3-41, 3-48
Economy hints ........................................................ 8-2
Filler lid and cap ...................................................... 7-5
Gauge ................................................................... 3-12
Requirements ................................................. 7-3, 12-3
Fuses ..................................................................... 11-37
Fuses and circuits .................................................... 12-12
G
GAWR (Gross Axle Weight Rating) ............................... 8-14
Glove box ...................................................................
6-6
GVWR (Gross Vehicle Weight Rating) ........................... 8-14
H
Hands-free phone system ............................................ 5-70
Hazard warning flasher .......................................... 3-8, 9-2
Head restraint adjustment Front seat ............................................................... 1-8
Index14-5