2017 SUBARU FORESTER Door handle
[x] Cancel search: Door handlePage 132 of 634

Security indicator light (type B)
6. Carry the access key and touch the
door lock sensor. All doors (and the rear
gate) will lock, an electronic chirp will
sound once, the hazard warning flashers
will flash once, and the security indicator
light will start flashing rapidly. After rapid
flashing for 30 seconds (standby time), the
security indicator light will then flash
slowly (twice approximately every 2 sec-
onds), indicating that the system has been
armed for surveillance.
If any of the doors or the rear gate is not
fully closed, an electronic chirp sounds
five times, the hazard warning flashers
flash five times to alert you that the doors
(or the rear gate) are not properly closed.
When you close the door, the system will
automatically arm and doors will automa-tically lock.
&
Disarming the system
Perform either of the following procedures.
. Briefly press the disarm button (for less
than 2 seconds) on the access key/remote
transmitter.
. Carry the access key and perform
either of the following procedures (models
with “keyless access with push-button
start system ”).
– Grip the front door handle.
– Press the rear gate opener button.
The flashing of the security indicator light
will then change slowly (once approxi-
mately every 3 seconds from twice ap-
proximately every 2 seconds), indicating
that the alarm system has been disarmed.
! Emergency disarming
If you cannot disarm the system using the
access key/transmitter (i.e. the transmitter
is lost, broken or the transmitter battery is
too weak), you can disarm the system
without using the access key/remote
transmitter.
The system can be disarmed if you turn
the ignition switch from the “LOCK”/“OFF ”
to the “ON”position with a registered key/
access key.
NOTE
For models with “keyless access with
push-button start system ”, if the ac-
cess key battery is discharged, perform
the procedure described in “Switching
power status ”F9-17. In such a case,
replace the battery immediately. Refer
to “Replacing battery of access key ”
F 11-45.
& Valet mode
When you choose the valet mode, the
alarm system does not operate. In valet
mode, the access key/remote transmitter
is used only for locking and unlocking the
doors and rear gate and for panic activa-
tion.
To enter the valet mode, change the
setting of your vehicle’ s alarm system for
deactivation mode. Refer to “Activating
and deactivating the alarm system ”F 2-
25. The security indicator light will con-
tinue to flash once every 3 seconds
indicating that the system is in the valet
mode.
To exit valet mode, change the setting of
your vehicle’ s alarm system for activation
mode. Refer to “Activating and deactivat-
ing the alarm system ”F 2-25.
Keys and doors/Alarm system
–CONTINUED –2-29
Page 408 of 634

&Fuel filler lid and cap
! Refueling
Only one person should be involved in
refueling. Do not allow others to approach
the area of the vehicle near the fuel filler
pipe while refueling is in progress.
Be sure to observe any other precautions
that are posted at the service station.
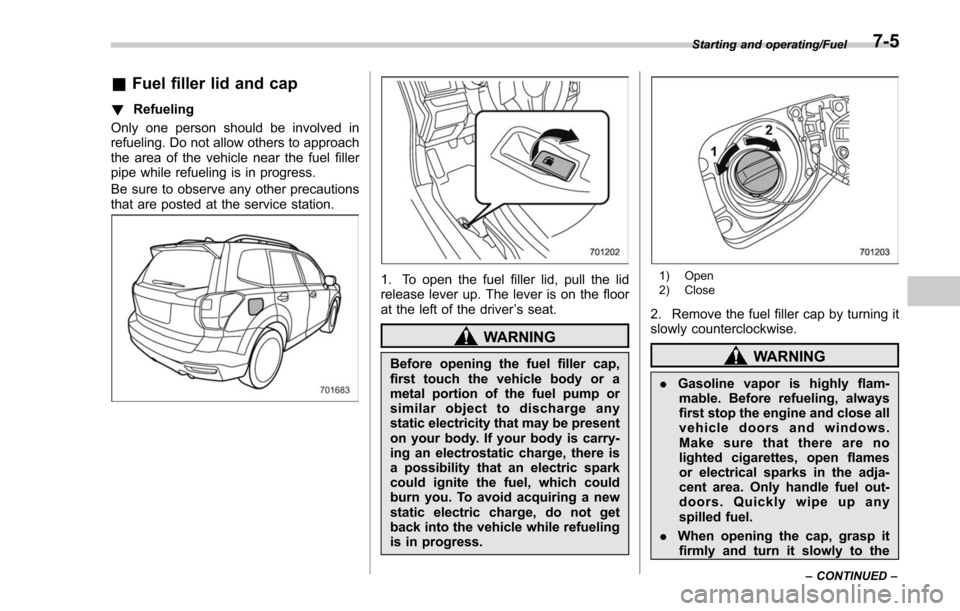
1. To open the fuel filler lid, pull the lid
release lever up. The lever is on the floor
at the left of the driver ’s seat.
WARNING
Before opening the fuel filler cap,
first touch the vehicle body or a
metal portion of the fuel pump or
similar object to discharge any
static electricity that may be present
on your body. If your body is carry-
ing an electrostatic charge, there is
a possibility that an electric spark
could ignite the fuel, which could
burn you. To avoid acquiring a new
static electric charge, do not get
back into the vehicle while refueling
is in progress.
1) Open
2) Close
2. Remove the fuel filler cap by turning it
slowly counterclockwise.
WARNING
. Gasoline vapor is highly flam-
mable. Before refueling, always
first stop the engine and close all
vehicle doors and windows.
Make sure that there are no
lighted cigarettes, open flames
or electrical sparks in the adja-
cent area. Only handle fuel out-
doors. Quickly wipe up any
spilled fuel.
. When opening the cap, grasp it
firmly and turn it slowly to the
Starting and operating/Fuel
–CONTINUED –7-5
Page 479 of 634

Driving tips/New vehicle break–in driving –the first 1,000 miles (1,600 km)
New vehicle break-in driving
– the first 1,000 miles (1,600
km)
The performance and long life of your
vehicle are dependent on how you handle
and care for your vehicle while it is new.
Follow these instructions during the first
1,000 miles (1,600 km):
. Do not race the engine. And do not
allow engine speed to exceed 4,000 rpm
except in an emergency.
. Do not drive at one constant engine or
vehicle speed for a long time, either fast or
slow.
. Avoid starting suddenly and rapid
acceleration, except in an emergency.
. Avoid hard braking, except in an
emergency.
The same break-in procedures should be
applied to an overhauled engine, newly
mounted engine or when brake pads or
brake linings are replaced with new ones.
Fuel economy hints
The following suggestions will help to save
fuel.
. Select the proper gear position for the
speed and road conditions.
. Avoid sudden acceleration or decelera-
tion. Always accelerate gently until you
reach the desired speed. Then try to
maintain that speed for as long as
possible.
. Do not pump the accelerator and avoid
racing the engine.
. Avoid unnecessary engine idling.
. Keep the engine properly tuned.
. Keep the tires inflated to the correct
pressure shown on the tire placard, which
is located under the door latch on the
driver ’s side. Low pressure will increase
tire wear and fuel consumption.
. Use the air conditioner only when
necessary.
. Keep the front and rear wheels in
proper alignment.
. Avoid carrying unnecessary luggage or
cargo.
Engine exhaust gas (carbon
monoxide)
WARNING
. Never inhale engine exhaust gas.
Engine exhaust gas contains
carbon monoxide, a colorless
and odorless gas which is dan-
gerous, or even lethal, if inhaled.
. Always properly maintain the en-
gine exhaust system to prevent
engine exhaust gas from enter-
ing the vehicle.
. Never run the engine in a closed
space, such as a garage, except
for the brief time needed to drive
the vehicle in or out of it.
. Avoid remaining in a parked
vehicle for a lengthy time while
the engine is running. If that is
unavoidable, then use the venti-
lation fan to force fresh air into
the vehicle.
. Always keep the front ventilator
inlet grille free from snow, leaves
or other obstructions to ensure
that the ventilation system al-
ways works properly.
. If at any time you suspect that
8-2
Page 482 of 634

Driving tips for AWD models
WARNING
.Always maintain a safe driving
speed according to the road and
weather conditions in order to
avoid having an accident on a
sharp turn, during sudden brak-
ing or under other similar condi-
tions.
. Always use the utmost care in
driving –overconfidence be-
cause you are driving an All-
Wheel Drive vehicle could easily
lead to a serious accident.
. When replacing or installing tire
(s), all four tires must be the
same for the following items.
(a) Size
(b) Circumference
(c) Speed symbol
(d) Load index
(e) Construction
(f) Manufacturer
(g) Brand (tread pattern)
(h) Degrees of wear
For the items (a) to (d), you must
obey the specification that is printed on the tire placard. The
tire placard is located on the
bottom of driver
’s door pillar.
If all of four tires are not the same
in items (a) to (h), it may lead to
serious mechanical damage to
the drive train of your car and
affect the following factors.
— Ride
— Handling
— Braking
— Speedometer/Odometer
calibration
— Clearance between the body
and tires
It also may be dangerous and
lead to loss of vehicle control,
and it can lead to an accident.
CAUTION
If you use a temporary spare tire to
replace a flat tire, be sure to use the
original temporary spare tire stored
in the vehicle. Using other sizes may
result in severe mechanical damage
to the drive train of your vehicle.
All-Wheel Drive distributes the engine
power to all four wheels. AWD models
provide better traction when driving on
slippery, wet or snow-covered roads and
when moving out of mud, dirt and sand.
By shifting power between the front and
rear wheels, SUBARU AWD can also
provide added traction during acceleration
and added engine braking force during
deceleration.
Therefore, your SUBARU AWD vehicle
may handle differently than an ordinary
two wheel drive vehicle and it contains
some features unique to AWD. For safety
purposes as well as to avoid damaging
the AWD system, you should keep the
following tips in mind.
. An AWD model is better able to climb
steeper roads under snowy or slippery
Driving tips/Driving tips for AWD models
–CONTINUED –8-5
Page 622 of 634

J
Jack and jack handle.................................................... 9-4
Jack-up point ............................................................... 9-5
Jump starting. .............................................................. 9-9
K
Key ........................................................................\
.... 2-3 Number plate ........................................................... 2-3
Reminder chime. ...................................................... 3-5
Replacement ........................................................... 2-4
Keyless access entry function ...................................... 2-13
Keyless access with push-button start system .. ............... 2-9
Disabling keyless access functions ........................... 2-17
Locking and unlocking doors ................................... 2-13
Opening rear gate .................................................. 2-15
Warning chimes and warning light ............................ 3-25
When access key does not operate properly ............. 9-17
Keyless entry system ................................................. 2-21
L
Lap belt pretensioner .................................................. 1-26
LCA ........................................................................\
. 7-59
Leather seat materials ................................................ 10-5
License plate light ..................................................... 11-44
Light Backup ................................................................ 11-42
Cargo area .............................................................. 6-2
Control switch ........................................................ 3-93
Daytime running. .................................................... 3-98
Dome ..................................................................... 6-2
Front fog .................................................... 3- 102, 11-42Front side marker
....................................... 11-41, 12-16
Ignition switch ......................................................... 3-6
License plate ....................................................... 11-44
Map ....................................................................... 6-3
Rear combination ................................................. 11-42
Stop .................................................................... 11-42
Tail ..................................................................... 11-42
Turn signal ....................................... 3- 100, 11-41, 11-42
Vanity mirror ........................................................... 6-5
Loading your vehicle ................................................... 8-12
Low fuel warning light ................................................. 3-22
Low tire pressure warning light ..................................... 3-19
Lower and tether anchorage ........................................ 1-37
M
Maintenance Precautions ........................................................... 11-3
Schedule ............................................................... 11-3
Seatbelt. ................................................................ 1-24
Tips ...................................................................... 11-5
Tools ...................................................................... 9-3
Malfunction indicator light (check engine warning light) .... 3-16
Manual Climate control ........................................................ 4-7
Mode (continuously variable transmission) ................. 7-27
Seat ....................................................................... 1-4
Transmission ......................................................... 7-22
Transmission oil ........................................... 11-17, 12-7
Map light .................................................................... 6-3
Maximum load limits ................................................... 8-19
Meters and gauges ......................................................
3-9
Index14-7