2017 SUBARU FORESTER Mode
[x] Cancel search: ModePage 261 of 634
Instruments and controls/Mirrors
until a“C”appears in the display. Once a
“C ”appears in the display, slowly drive the
vehicle in circles until compass is cali-
brated.
! HomeLink
®Wireless Control Sys-
tem
The HomeLink
®Wireless Control System
provides a convenient way to replace up
to three hand-held radio-frequency re-
motes used to activate devices such as
gate operators, garage door openers,
entry door locks, security systems, even
home lighting. The below steps are
generic programming instructions; for
Genie and Sommer garage door openers
please go directly to the HomeLink web-
site. Additional information and program-
ming videos can be found at
www.HomeLink.com and
www.youtube.com/HomeLinkGentex.
CAUTION
. Before programming HomeLink
to a garage door opener or gate
operator, make sure that people
and objects are out of the way of
the device to prevent potential
harm or damage.
. When programming a garage
door opener, it is advised to park outside of the garage.
. Do not use HomeLink with any
garage door opener that lacks
safety stop and reverse features
as required by U.S. federal safety
standards (this includes any gar-
age door opener model manufac-
tured before April 1, 1982). A
garage door that cannot detect
an object signaling the door to
stop and reverse does not meet
current U.S. federal safety stan-
dards.
. It is also recommended that a
new battery be placed in the
hand-held remote (garage door
opener remote) of the device for
quicker and more accurate train-
ing.
. Some vehicles may require the
ignition switch to be turned to the
“ON ”or “ACC ”position for pro-
gramming and/or operation of
HomeLink.
. Keep the hand-held remote (gar-
age door opener remote) of the
device you are programming for
use in other vehicles as well as
for future HomeLink program-
ming. It is also suggested that
upon the sale of the vehicle, the programmed HomeLink buttons
be erased for security purposes.
Refer to
“Erasing HomeLink But-
tons ”F 3-113.
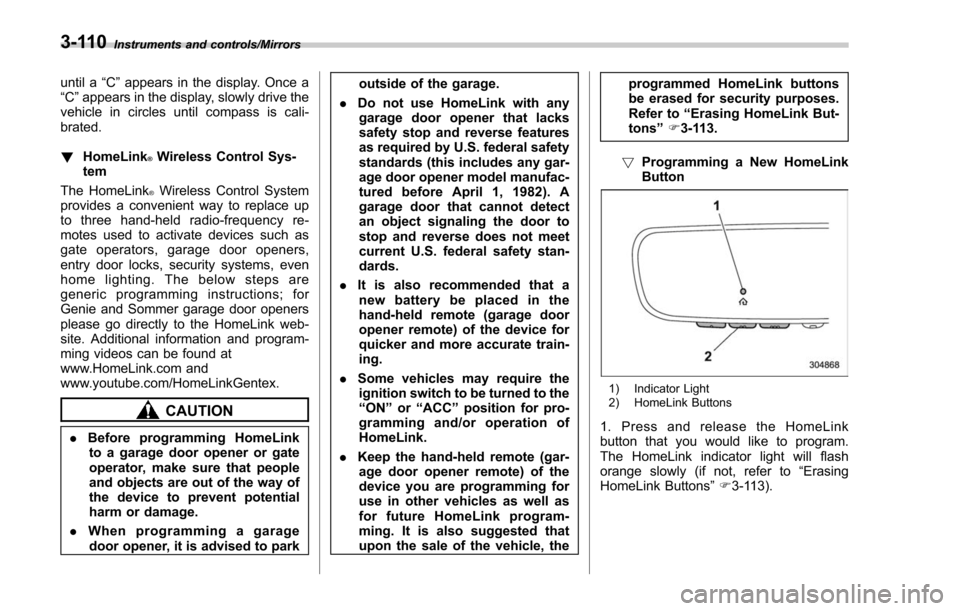
! Programming a New HomeLink
Button
1) Indicator Light
2) HomeLink Buttons
1. Press and release the HomeLink
button that you would like to program.
The HomeLink indicator light will flash
orange slowly (if not, refer to “Erasing
HomeLink Buttons ”F 3-113).
3-110
Page 268 of 634
located on the climate control panel. The
rear window defogger, outside mirror
defogger and windshield wiper deicer are
activated simultaneously. The indicator
light on the control switch illuminates while
the defogger and deicer system is acti-
vated.
To turn them off, press the control switch
again. They also turn off when the ignition
switch is turned to the“ACC”or “LOCK” /
“ OFF ”position.
The defogger and deicer system will
automatically shut off after approximately
15 minutes. If the rear window and the
outside mirrors have been cleared and the
windshield wiper blades have been deiced
completely before that time, press the
control switch to turn them off. If defrost-
ing, defogging or deicing is not complete,
you have to press the control switch to
turn them on again.
For models with the automatic climate
control system (type B, C and D), it is
possible for the defogger and deicer
system to be set to continuous operation
mode by a SUBARU dealer. Consult your
SUBARU dealer for details. Also, for
models with a multi function display, the
setting can be changed using the display.
For details, refer to “Multi function display ”
F 3-44. If the battery voltage drops below the
permissible level, continuous operation of
the defogger and deicer system is can-
celed and the system stops operating.
CAUTION
.
To prevent the battery from being
discharged, do not operate the
defogger and deicer system con-
tinuously for any longer than
necessary.
. Do not use sharp instruments or
window cleaner containing abra-
sives to clean the inner surface
of the rear window. They may
damage the conductors printed
on the window.
NOTE
. Turn on the defogger and deicer
system if the wipers are frozen to the
windshield.
. If the windshield is covered with
snow, remove the snow so that the
windshield wiper deicer works effec-
tively.
. While the defogger and deicer sys-
tem is in the continuous operation
mode, if the vehicle speed remains at
9 mph (15 km/h) or lower for 15
minutes, the windshield wiper deicer automatically stops operating, though
the rear window defogger and outside
mirror defogger maintain continuous
operation in this condition.
.
While the defogger and deicer sys-
tem is in the continuous operation
mode, if the battery voltage drops
below the permissible level, continu-
ous operation of the defogger and
deicer system is canceled and the
system stops operating.
Instruments and controls/Defogger and deicer3-117
Page 272 of 634

Ventilator control................................................. 4-2Center and side ventilators .................................. 4-2
Climate control panel.......................................... 4-3Type A ................................................................ 4-3
Type B ................................................................ 4-4
Type C ................................................................ 4-5
Type D ................................................................ 4-6
Automatic climate control operation (type
B, C and D) ....................................................... 4-7
Type B ................................................................ 4-7
Type C and D ...................................................... 4-7
Sensors .............................................................. 4-8
Manual climate control operation ...................... 4-8Airflow mode selection........................................ 4-8
Temperature control ............................................ 4-9
Fan speed control .............................................. 4-10
Air conditioner control ....................................... 4-10
Air inlet selection ............................................... 4-10
Defrosting........................................................... 4-11Type A and B..................................................... 4-11
Type C............................................................... 4-11
Type D............................................................... 4-11
Operating tips for heater and air
conditioner ...................................................... 4-12
Cleaning ventilation grille ................................... 4-12
Efficient cooling after parking in direct sunlight ........................................................... 4-12
Lubrication oil circulation in the refrigerant circuit .............................................................. 4-12
Checking air conditioning system before summer season ............................................................ 4-12
Cooling and dehumidifying in high humidity and low temperature weather conditions ................. 4-12
Air conditioner compressor shut-off when engine is heavily loaded .............................................. 4-12
Refrigerant for your climate control system ... ..... 4-12
Air filtration system........................................... 4-13Replacing an air filter ......................................... 4-13
Climate control
4
Page 274 of 634
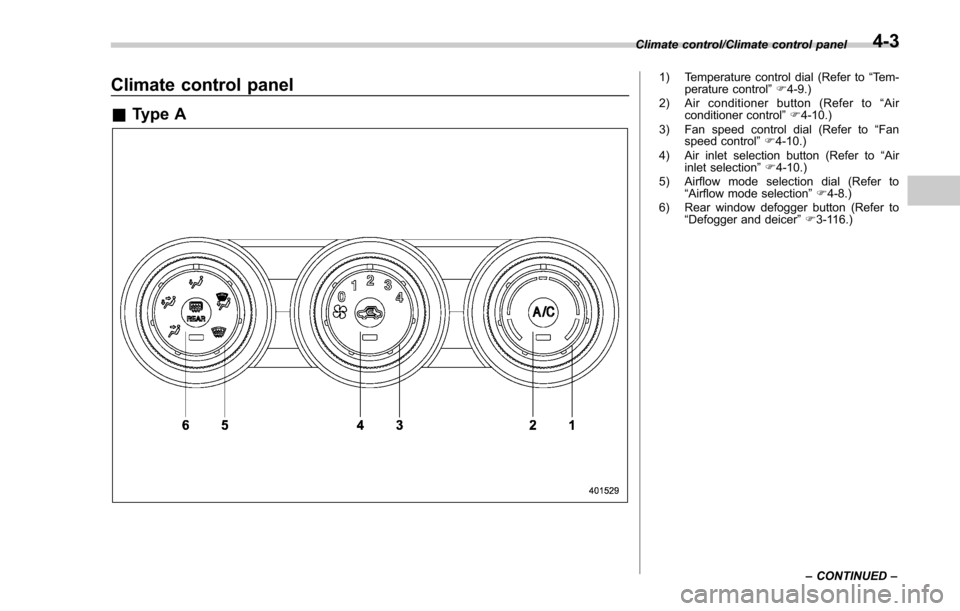
Climate control panel
&Type A
1) Temperature control dial (Refer to “Tem-
perature control ”F 4-9.)
2) Air conditioner button (Refer to “Air
conditioner control ”F 4-10.)
3) Fan speed control dial (Refer to “Fan
speed control ”F 4-10.)
4) Air inlet selection button (Refer to “Air
inlet selection ”F 4-10.)
5) Airflow mode selection dial (Refer to “Airflow mode selection ”F 4-8.)
6) Rear window defogger button (Refer to “Defogger and deicer” F3-116.)
Climate control/Climate control panel
–CONTINUED –
4-3
Page 275 of 634
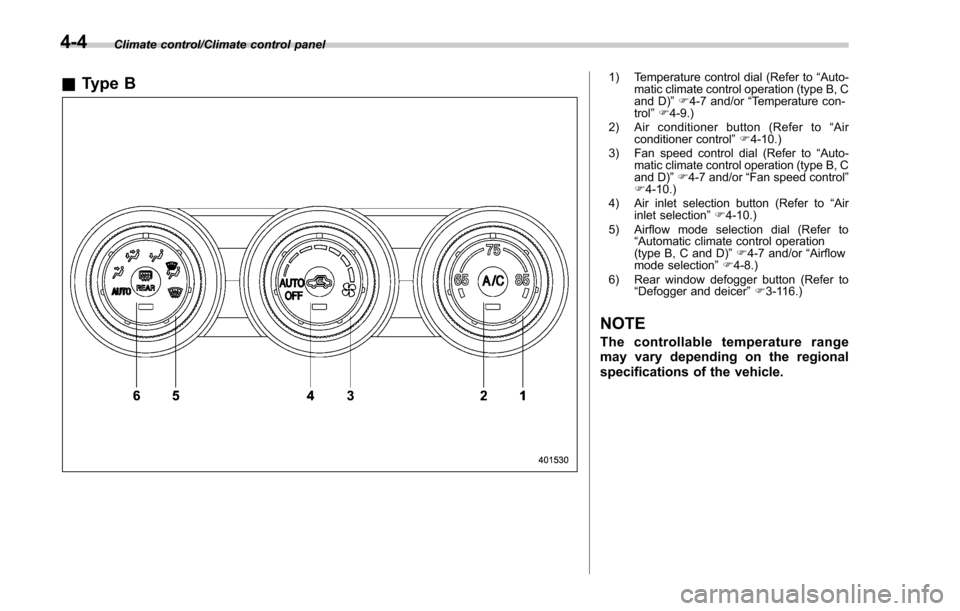
Climate control/Climate control panel
&Type B1) Temperature control dial (Refer to “Auto-
matic climate control operation (type B, C
and D) ”F 4-7 and/or “Temperature con-
trol ”F 4-9.)
2) Air conditioner button (Refer to “Air
conditioner control ”F 4-10.)
3) Fan speed control dial (Refer to “Auto-
matic climate control operation (type B, C
and D) ”F 4-7 and/or “Fan speed control ”
F 4-10.)
4) Air inlet selection button (Refer to “Air
inlet selection ”F 4-10.)
5) Airflow mode selection dial (Refer to “Automatic climate control operation
(type B, C and D) ”F 4-7 and/or “Airflow
mode selection ”F 4-8.)
6) Rear window defogger button (Refer to “Defogger and deicer” F3-116.)
NOTE
The controllable temperature range
may vary depending on the regional
specifications of the vehicle.
4-4
Page 276 of 634
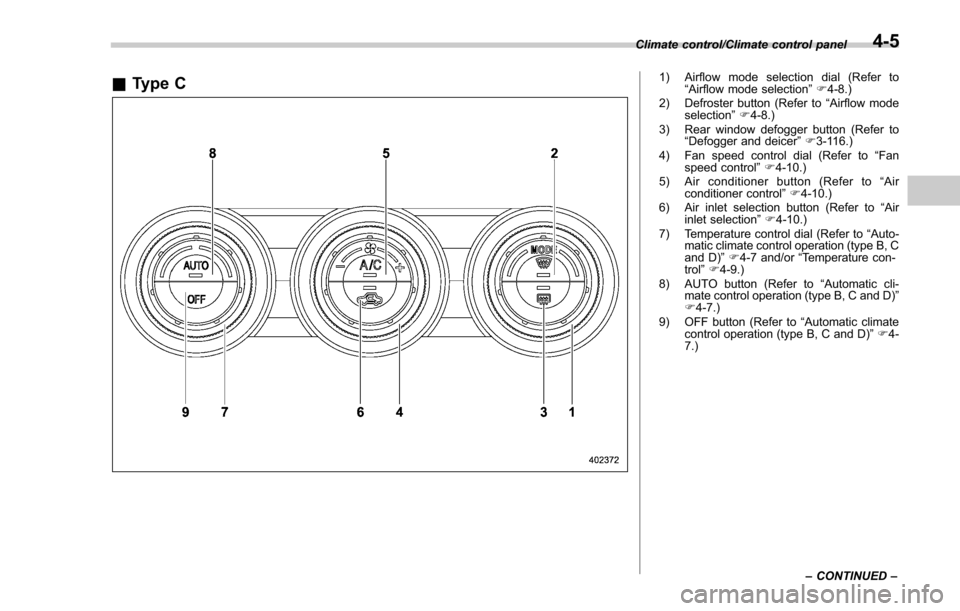
&Type C1) Airflow mode selection dial (Refer to
“Airflow mode selection ”F 4-8.)
2) Defroster button (Refer to “Airflow mode
selection ”F 4-8.)
3) Rear window defogger button (Refer to “Defogger and deicer” F3-116.)
4) Fan speed control dial (Refer to “Fan
speed control ”F 4-10.)
5) Air conditioner button (Refer to “Air
conditioner control ”F 4-10.)
6) Air inlet selection button (Refer to “Air
inlet selection ”F 4-10.)
7) Temperature control dial (Refer to “Auto-
matic climate control operation (type B, C
and D) ”F 4-7 and/or “Temperature con-
trol ”F 4-9.)
8) AUTO button (Refer to “Automatic cli-
mate control operation (type B, C and D) ”
F 4-7.)
9) OFF button (Refer to “Automatic climate
control operation (type B, C and D) ”F 4-
7.)
Climate control/Climate control panel
–CONTINUED –
4-5
Page 277 of 634
Climate control/Climate control panel
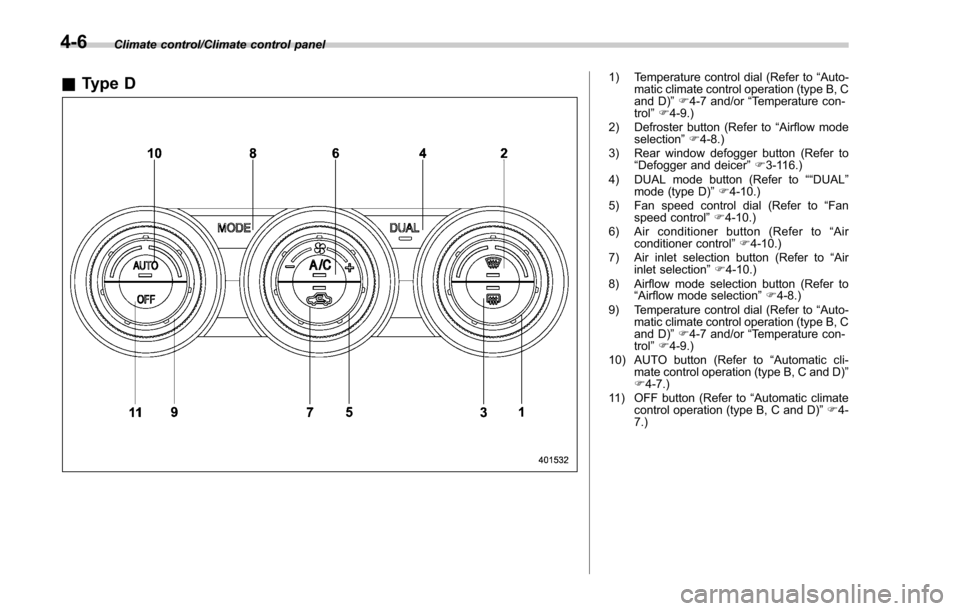
&Type D1) Temperature control dial (Refer to “Auto-
matic climate control operation (type B, C
and D) ”F 4-7 and/or “Temperature con-
trol ”F 4-9.)
2) Defroster button (Refer to “Airflow mode
selection ”F 4-8.)
3) Rear window defogger button (Refer to “Defogger and deicer” F3-116.)
4) DUAL mode button (Refer to ““DUAL”
mode (type D) ”F 4-10.)
5) Fan speed control dial (Refer to “Fan
speed control ”F 4-10.)
6) Air conditioner button (Refer to “Air
conditioner control ”F 4-10.)
7) Air inlet selection button (Refer to “Air
inlet selection ”F 4-10.)
8) Airflow mode selection button (Refer to “Airflow mode selection ”F 4-8.)
9) Temperature control dial (Refer to “Auto-
matic climate control operation (type B, C
and D) ”F 4-7 and/or “Temperature con-
trol ”F 4-9.)
10) AUTO button (Refer to “Automatic cli-
mate control operation (type B, C and D) ”
F 4-7.)
11) OFF button (Refer to “Automatic climate
control operation (type B, C and D) ”F 4-
7.)
4-6
Page 278 of 634
Automatic climate control
operation (type B, C and D)
When this mode is selected, the fan
speed, airflow distribution, air-inlet control,
and air conditioner compressor operation
are automatically controlled. To activate
this mode, perform the following.
NOTE
.Operate the automatic climate con-
trol system when the engine is running.
. Even when cooling is not necessary,
setting the temperature much lower
than the current outlet air temperature
turns on the air conditioner compres-
sor automatically and the “A/C ”indi-
cator light on the control panel illumi-
nates.
& Type B
1. Turn the airflow mode selection dial
and fan speed control dial to the “AUTO”
position.
2. Set the preferred temperature using
the temperature control dial.
NOTE
. Each function can be individually
set to the AUTO mode independently of
the other functions. Any function set to the AUTO mode is controlled automa-
tically. Any function not set to the
AUTO mode can be manually adjusted
as desired.
.
The controllable temperature range
may vary depending on the regional
specifications of the vehicle.
3. To turn off the climate control system,
turn the fan speed control dial to the “OFF”
position. Then the air inlet selection will be
set as follows.
. when the AUTO mode is selected: OFF
(outside air)
. when the AUTO mode is not selected:
the mode that was selected when turning
off the climate system will be selected.
& Type C and D
1. Depress the “AUTO ”button. The
indicator light “FULL AUTO ”on the display
illuminates.
2. Set the preferred temperature using
the temperature control dial.
NOTE
. The controllable temperature range
may vary depending on the regional
specifications of the vehicle.
. During FULL AUTO mode operation,
a small amount of air may flow from the
foot outlets when ventilation mode is displayed.
.
If you operate any of the buttons on
the control panel other than the “OFF ”
button, rear window defogger button
and temperature control dial(s) during
FULL AUTO mode operation, the
“ FULL ”indicator light on the control
panel will turn off and the “AUTO ”
indicator light will remain illuminated.
You can then manually control the
system as desired using the button
you operated. To change the system
back to the FULL AUTO mode, press
the “AUTO ”button.
3. To turn off the climate control system,
press the “OFF ”button. Then the air inlet
selection will be set to OFF (outside air).
Climate control/Automatic climate control operation (type B, C and D)
–CONTINUED –4-7