2017 SUBARU FORESTER key
[x] Cancel search: keyPage 232 of 634
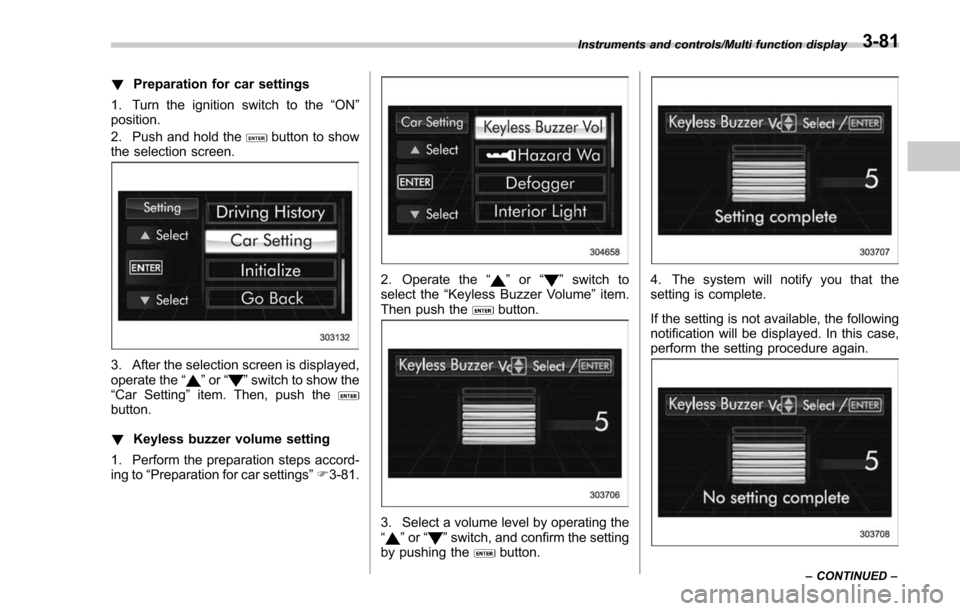
!Preparation for car settings
1. Turn the ignition switch to the “ON”
position.
2. Push and hold the
button to show
the selection screen.
3. After the selection screen is displayed,
operate the “”or “”switch to show the
“Car Setting ”item. Then, push the
button.
! Keyless buzzer volume setting
1. Perform the preparation steps accord-
ing to “Preparation for car settings” F3-81.
2. Operate the “”or “”switch to
select the “Keyless Buzzer Volume ”item.
Then push the
button.
3. Select a volume level by operating the
“” or “”switch, and confirm the setting
by pushing thebutton.
4. The system will notify you that the
setting is complete.
If the setting is not available, the following
notification will be displayed. In this case,
perform the setting procedure again.
Instruments and controls/Multi function display
–CONTINUED –3-81
Page 237 of 634
Instruments and controls/Multi function display
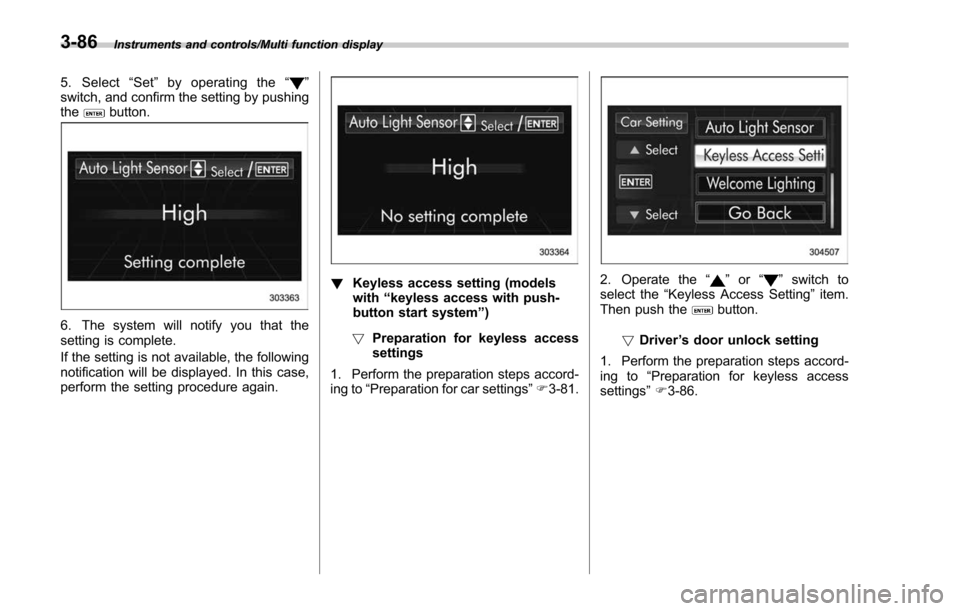
5. Select“Set ”by operating the “”
switch, and confirm the setting by pushing
the
button.
6. The system will notify you that the
setting is complete.
If the setting is not available, the following
notification will be displayed. In this case,
perform the setting procedure again.
! Keyless access setting (models
with “keyless access with push-
button start system ”)
! Preparation for keyless access
settings
1. Perform the preparation steps accord-
ing to “Preparation for car settings” F3-81.2. Operate the “”or “”switch to
select the “Keyless Access Setting ”item.
Then push the
button.
! Driver ’s door unlock setting
1. Perform the preparation steps accord-
ing to “Preparation for keyless access
settings ”F 3-86.
3-86
Page 239 of 634
Instruments and controls/Multi function display
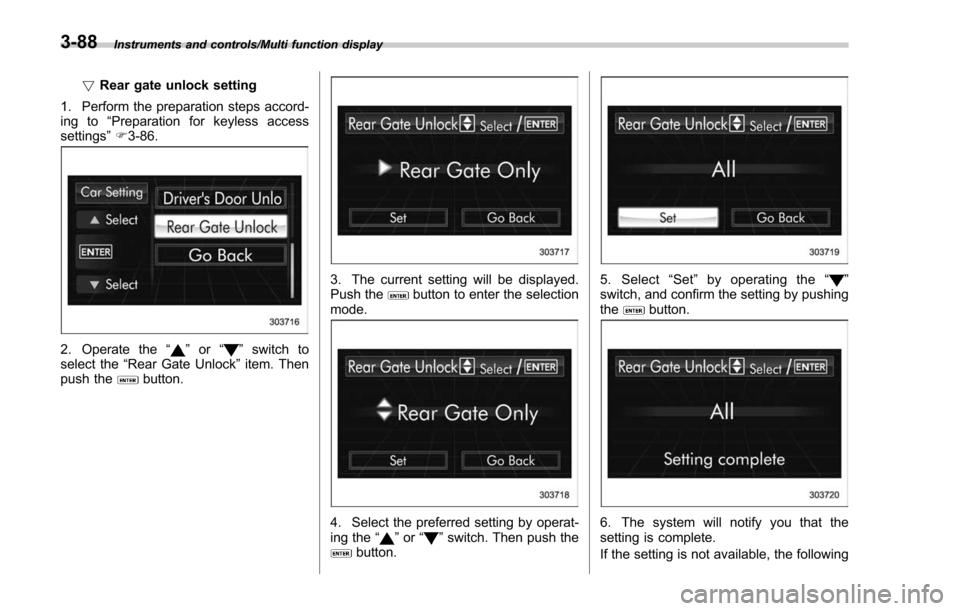
!Rear gate unlock setting
1. Perform the preparation steps accord-
ing to “Preparation for keyless access
settings” F3-86.
2. Operate the “”or “”switch to
select the “Rear Gate Unlock ”item. Then
push the
button.
3. The current setting will be displayed.
Push thebutton to enter the selection
mode.
4. Select the preferred setting by operat-
ing the “”or “”switch. Then push thebutton.
5. Select “Set ”by operating the “”
switch, and confirm the setting by pushing
the
button.
6. The system will notify you that the
setting is complete.
If the setting is not available, the following
3-88
Page 244 of 634
Light control switch
CAUTION
.Use of any lights for a long period
of time while the engine is not
running can cause the battery to
discharge.
. Before leaving the vehicle, make
sure that the lights are turned off.
If the vehicle is left unattended
for a long time with the lights
illuminated, the battery may be
discharged.
Models with “keyless access with
push-button start system ”:
The light control switch operates when the
push-button ignition switch is in the “ACC”
or “ON ”position.
Regardless of the position of the light
control switch, the illuminated lights are
turned off when the push-button ignition
switch is turned off.
Models without “keyless access with
push-button start system ”:
The light control switch operates when the
key is inserted in the ignition switch.
Regardless of the position of the light
control switch, the illuminated lights are turned off when the key is removed from
the ignition switch.
NOTE
The light control switch can be oper-
ated (except auto on/off headlights),
even under the following conditions.
.
when the key is not inserted into the
ignition switch (models without “key-
less access with push-button start
system ”)
. when the push-button ignition
switch is turned off (models with “key-
less access with push-button start
system ”)
If the driver ’s door is opened while the
headlights are illuminated under such
conditions, the chirp sound will inform
the driver that the lights are illumi-
nated.
& Headlights
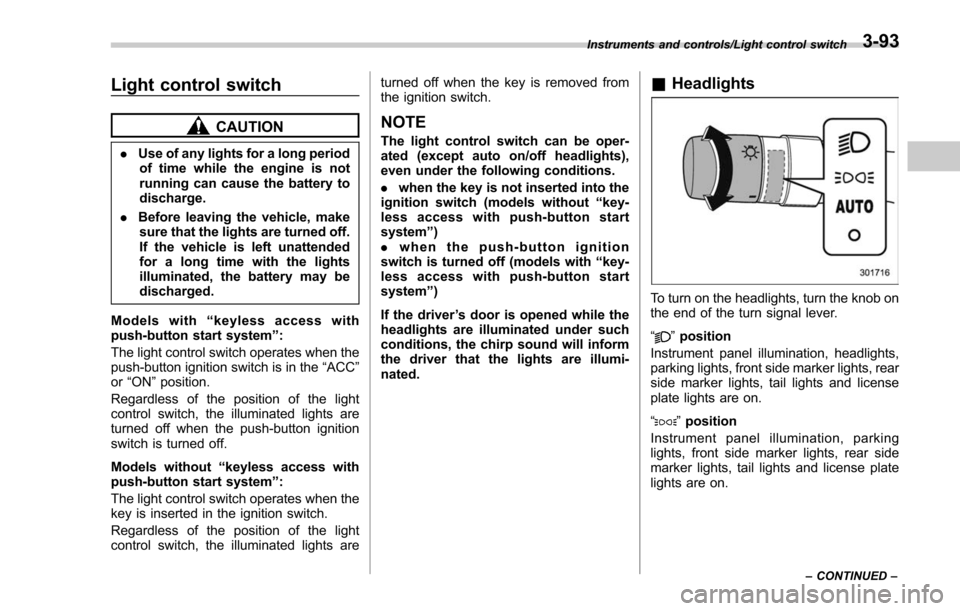
To turn on the headlights, turn the knob on
the end of the turn signal lever.
“
”position
Instrument panel illumination, headlights,
parking lights, front side marker lights, rear
side marker lights, tail lights and license
plate lights are on.
“
” position
Instrument panel illumination, parking
lights, front side marker lights, rear side
marker lights, tail lights and license plate
lights are on.
Instruments and controls/Light control switch
–CONTINUED –3-93
Page 245 of 634

Instruments and controls/Light control switch
“”position: auto on/off headlights (if
equipped)
When the ignition switch is in the “ON ”
position, the instrument panel illumination,
headlights, parking lights, front side mar-
ker lights, rear side marker lights, tail lights
and license plate lights are automatically
on or off depending on the level of the
ambient light.
“
” position
The headlights are all off.
NOTE
The sensitivity of the auto on/off head-
lights can be changed by a SUBARU
dealer. Consult your SUBARU dealer
for details. Also, for models with a multi
function display, the setting can be
changed using the display. For details,
refer to “Auto light sensor sensitivity
setting ”F 3-85.
! Welcome lighting function (if
equipped)
The welcome lighting function turns on the
low beam headlights for smooth ap-
proaching to or exiting from the vehicle
at night or in a dark place.
The function is activated while all of the
following conditions are met.
. The light control switch is in the “AUTO
”position
. It is dark enough to turn on the auto on/
off headlights
When approaching:
While the welcome lighting function is
activated, the low beam headlights will
automatically illuminate when unlocking
the doors (including the rear gate) by
using the remote keyless entry system.
The low beam headlights will remain
illuminated for 30 seconds
*1and then turn
off. However, if any of the following
operations is performed, the low beam
headlights will turn off.
. The doors are locked.
. The light control switch is turned to a
position other than “AUTO”.
. The ignition switch is turned to the “ON”
position.
When exiting:
While the welcome lighting function is
activated, the low beam headlights will
remain illuminated even when either of the
following operations is performed.
. Thepush-buttonignitionswitchis
turned to the “OFF”status (models with
“keyless access with push-button start
system ”)
. The key is pulled out from the ignition switch (models without
“keyless access
with push-button start system ”)
The low beam headlights will turn off
under any of the following conditions.
. 3 minutes have passed since the low
beam headlights were illuminated by the
welcome lighting function.
. 30 seconds have passed since the
door is opened and closed.
*1
. The light control switch is turned to a
position other than “AUTO”.
. The locking procedure is performed
twice. When performing the unlocking
procedure after performing the locking
procedure, perform the locking procedure
twice again.
*1: The setting for the period of time in which
the low beam headlights remain on by the
welcome lighting function can be changed by a
SUBARU dealer. Contact your SUBARU dealer
for details.
3-94
Page 301 of 634
Audio/Audio set
&Basic information before use
WARNING
When the vehicle is stopped with the
engine running, always apply the
parking brake for safety. Failure to
do so may result in loss of control of
your vehicle and cause an accident
or serious injury.
CAUTION
. To prevent damaging the screen,
touch the screen keys with your
finger lightly.
. Wipe off fingerprints using a
glass cleaning cloth. Do not use
chemical cleaners to clean the
screen, as they may damage the
touch screen. !
Touch screen gestures
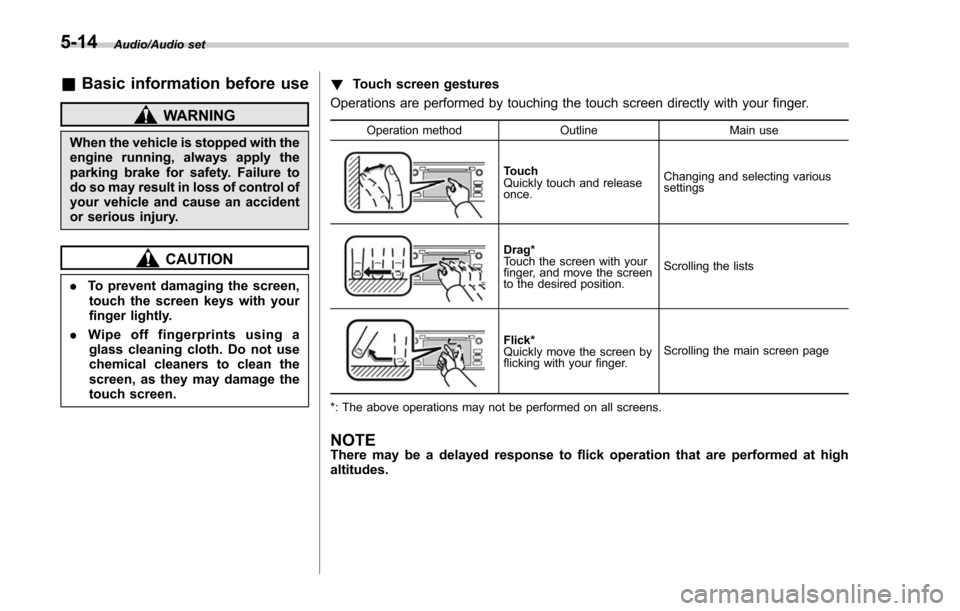
Operations are performed by touching the touch screen directly with your finger.
Operation method OutlineMain use
Touch
Quickly touch and release
once.Changing and selecting various
settings
Drag*
Touch the screen with your
finger, and move the screen
to the desired position.
Scrolling the lists
Flick*
Quickly move the screen by
flicking with your finger.
Scrolling the main screen page
*: The above operations may not be performed on all screens.
NOTEThere may be a delayed response to flick operation that are performed at high
altitudes.
5-14
Page 302 of 634
!Touch screen operation
This system is operated mainly by the
keys on the screen.
When a screen key is touched, a beep
sounds. You can set the beep sound.
Refer to “Unit settings” F5-18.
NOTE
. If the system does not respond to
touching a screen key, move your
finger away from the screen and touch
it again.
. Grayed-out screen keys cannot be
operated.
. The displayed image may become
darker and moving images may be
slightly distorted when the screen is
cold.
. In extremely cold conditions, the
screen may not be displayed correctly.
Also, the screen keys may be less
responsive than usual when pressed.
. When you look at the screen
through polarized material such as
polarized sunglasses, the screen may
be dark and difficult to see. If so, look at
the screen from different angles, adjust
the screen settings or take off your
sunglasses. Refer to “Unit settings ”
F 5-18. !
Entering letters and numbers/list
screen operation
! Entering letters and numbers
When entering the Bluetooth device name
or PIN-code, or the phone number, letters
and numbers can be entered via the
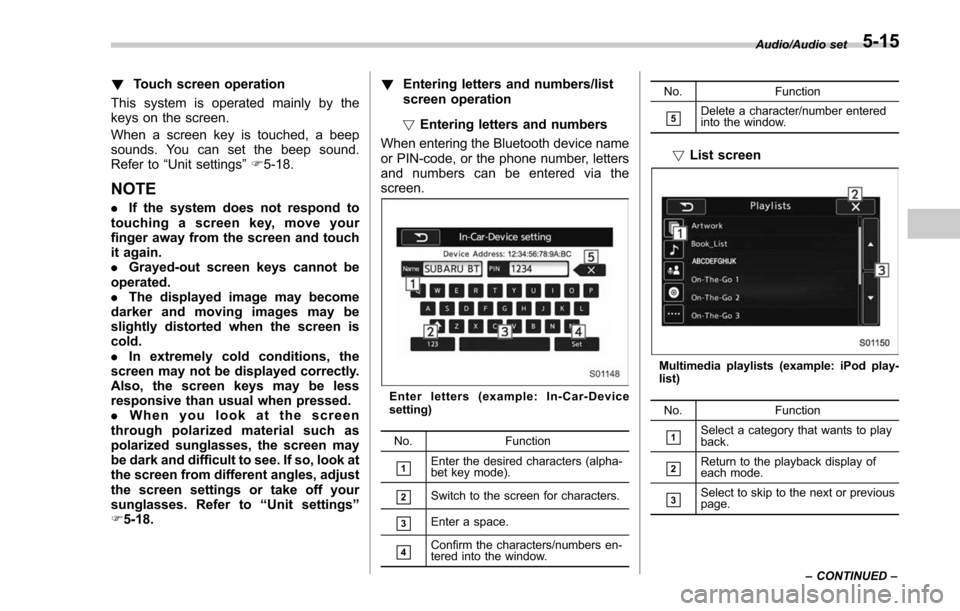
screen.
Enter letters (example: In-Car-Device
setting)
No. Function
&1Enter the desired characters (alpha-
bet key mode).
&2Switch to the screen for characters.
&3Enter a space.
&4Confirm the characters/numbers en-
tered into the window. No. Function
&5Delete a character/number entered
into the window.
!
List screen
Multimedia playlists (example: iPod play-
list)
No. Function
&1Select a category that wants to play
back.
&2Return to the playback display of
each mode.
&3Select to skip to the next or previous
page. Audio/Audio set
–CONTINUED –
5-15
Page 305 of 634
Audio/Audio set
NOTE
.If the audio control screen appears,
select the “Source ”key on the audio
screen or press the AUDIO/TUNE knob
again.
. When you push the AUDIO/TUNE
knob while any screen other than the
audio control screen is displayed, the
display will return to the audio control
screen.
. When the AUDIO/TUNE knob is
pushed and held, the graphic equalizer
screen will be displayed. Refer to
““Graphic Equalizer ””F5-22.
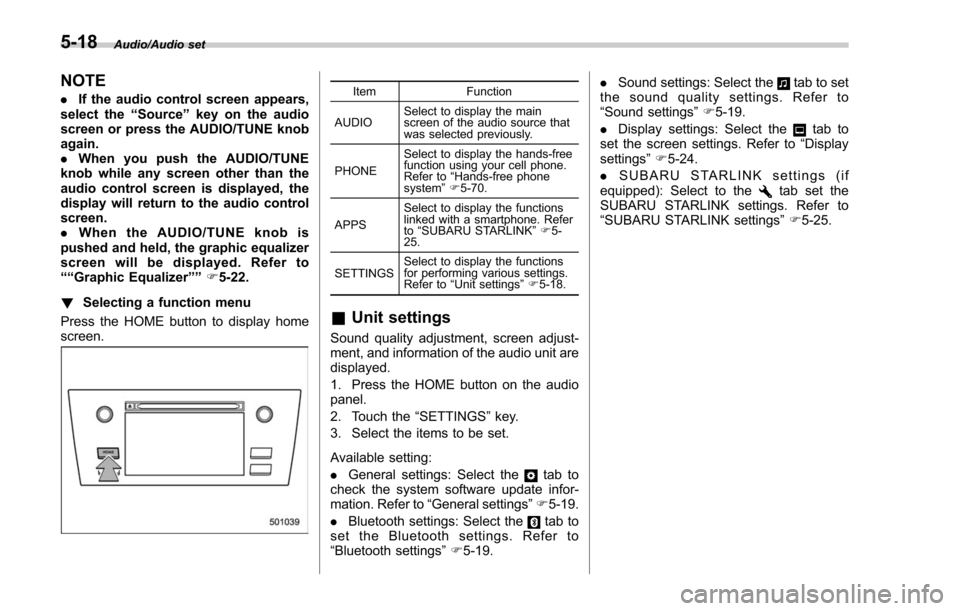
! Selecting a function menu
Press the HOME button to display home
screen.Item Function
AUDIO Select to display the main
screen of the audio source that
was selected previously.
PHONE Select to display the hands-free
function using your cell phone.
Refer to
“Hands-free phone
system ”F 5-70.
APPS Select to display the functions
linked with a smartphone. Refer
to
“SUBARU STARLINK ”F 5-
25.
SETTINGS Select to display the functions
for performing various settings.
Refer to
“Unit settings ”F 5-18.
& Unit settings
Sound quality adjustment, screen adjust-
ment, and information of the audio unit are
displayed.
1. Press the HOME button on the audio
panel.
2. Touch the “SETTINGS”key.
3. Select the items to be set.
Available setting:
. General settings: Select the
tab to
check the system software update infor-
mation. Refer to “General settings” F5-19.
. Bluetooth settings: Select the
tab to
set the Bluetooth settings. Refer to
“Bluetooth settings” F5-19. .
Sound settings: Select the
tab to set
the sound quality settings. Refer to
“Sound settings” F5-19.
. Display settings: Select the
tab to
set the screen settings. Refer to “Display
settings ”F 5-24.
. SUBARU STARLINK settings (if
equipped): Select to the
tab set the
SUBARU STARLINK settings. Refer to
“ SUBARU STARLINK settings” F5-25.
5-18