Page 194 of 334
192 Audio and Visual
Basic Operation
* When the external unit is connected, can be displayed and screen.
AUX
Page 195 of 334
Audio and Visual 193
Basic Operation
Volume Control
Main Volume Control
(1) POWER/VOL button
1Turn (POWER/VOL).
• Turn to right:
Volume up
Turn to lef t:
Volume downNOTE
•Adjust to a volume level that will not prevent safe driving.
•You can adjust the level from 0 to 63. Max is displayed when the volume is 63.
•The volume may change when you switch the audio source. Adjust the
volume to a level appropriate for the audio source you select.
(1)
Page 196 of 334
194 Audio and Visual
Basic Operation
Displaying the Sound Settings Screen
When you switch to the Sound Settings screen from any of the Audio
operations screens, you can perform the sound adjustment.
The available functions of the Sound Settings may vary depending on
the type of audio system, and the following operations are available.
Audio system: Type A
•Adjusting the sound quality
•Adjusting the audio balance*
•Setting the source volume control
Audio system: Type B
•Adjusting the sound quality
•Adjusting the audio balance*
•Setting the source volume control
•Adjusting the automatic sound levelizer
* The functions may vary depending on the type of audio system.
1Touch (Sound) on any of the audio operations
screens.
2Touch the button that you want to set.
Sound
Page 202 of 334
200 Audio and Visual
Audio Operations
Using the Radio
Using the Radio
(1) Preset button
(2) Settings button
(3) HD Radio button
(4) Title button
(5) Tune up/down buttons
(6) AUDIO button
(7) Tag button
(8) Sub Ch button
*
* Displayed only in FM radio mode.
NOTE•Station names on the preset buttons are displayed only when the information
is received. Otherwise, the frequencies are displayed.
•About HD Radio�¥ Technology
HD Radio Technology manufactured under license from iBiquity Digital
Corporation. U.S. and Foreign Patents. HD Radio�¥ and the HD, HD Radio, and
“Arc” logos are proprietary trademarks of iBiquity Digital Corp.
(1)
(2) (4) (3) (5) (6)(8) (7)
Page 203 of 334
Audio and Visual 201
Audio Operations
■Listening to the radio
1Press .
2Touch (AM) or (FM).
NOTE
Digital, CD-quality sound. HD Radio Technology enables local radio stations to
broadcast a clean digital signal. AM sounds like today’s FM and FM sounds like a
CD.
■Tuning a station
Manual selection
1Touch or .
•:
Move up 1 step.
:
Move down 1 step.
• AM: 10 kHz/1 step
FM: 0.2 MHz/1 step
Auto tuning
1Touch or for 1 second or more.
• The tuner moves automatically to the station closest to the
frequency currently displayed on the screen and stops. To
cancel auto tuning while it is operating, touch the button again.
AMFM
Page 204 of 334

202 Audio and Visual
Audio Operations
NOTE•In some cases, it is difficult to maintain the optimum reception because the
position of the antenna on the vehicle is always changing (relative to the
station antenna), and so the strength of the received wireless signal changes
continuously. Also, obstructions such as the natural topography or the pillars
of signboards may affect the reception.
•Auto tuning may not be possible in areas where the received signal is weak.
Selecting from a preset button
1Touch a preset button saved in the memory.
• The saved preset channel is selected and the corresponding
station is received.
■Selecting a radio band
In FM radio mode only, you can select the reception band.
1Press .
2Touch (FM).
• Touch (FM) to change the reception band in the
following order.
• The band currently being received is displayed at the top left of
the screen.
■Saving a station
You can save radio stations manually or automatically.
Manual saving
1Select the station that you want to save using manual
tuning or auto tuning.
2Touch the preset button that you want to use for
2 seconds or more.
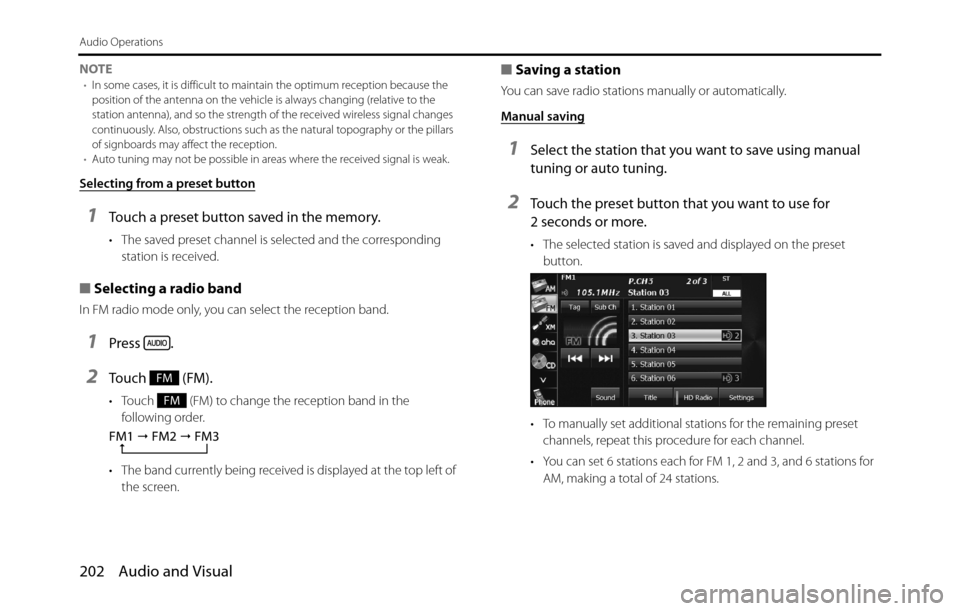
• The selected station is saved and displayed on the preset
button.
• To manually set additional stations for the remaining preset
channels, repeat this procedure for each channel.
• You can set 6 stations each for FM 1, 2 and 3, and 6 stations for
AM, making a total of 24 stations.
FM
FM
FM1
� FM2
� FM3
Page 205 of 334

Audio and Visual 203
Audio Operations
Automatic saving
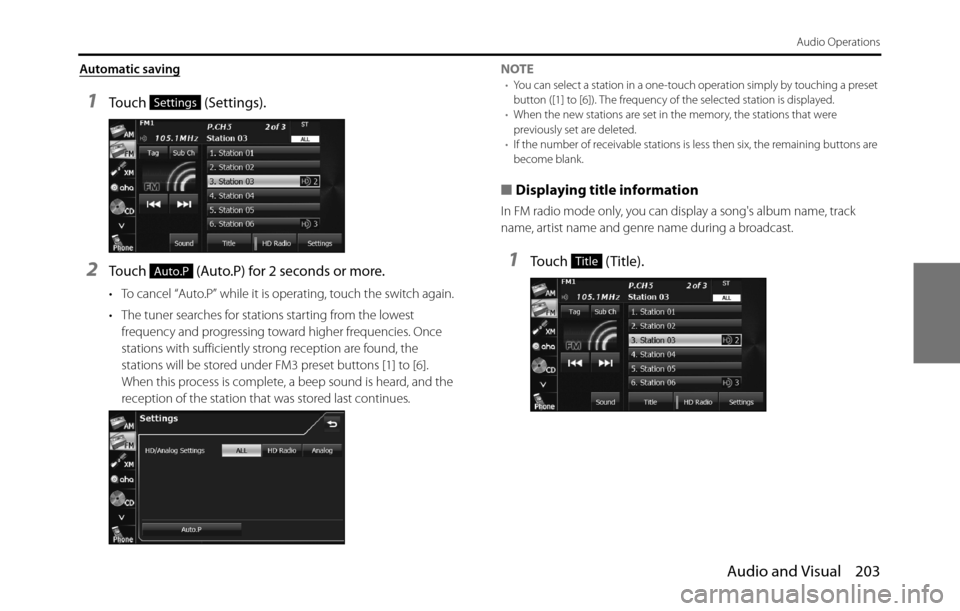
1Touch (Settings).
2Touch (Auto.P) for 2 seconds or more.
• To cancel “Auto.P” while it is operating, touch the switch again.
• The tuner searches for stations starting from the lowest
frequency and progressing toward higher frequencies. Once
stations with sufficiently strong reception are found, the
stations will be stored under FM3 preset buttons [1] to [6].
When this process is complete, a beep sound is heard, and the
reception of the station that was stored last continues.NOTE
•You can select a station in a one-touch operation simply by touching a preset
button ([1] to [6]). The frequency of the selected station is displayed.
•When the new stations are set in the memory, the stations that were
previously set are deleted.
•If the number of receivable stations is less then six, the remaining buttons are
become blank.
■Displaying title information
In FM radio mode only, you can display a song's album name, track
name, artist name and genre name during a broadcast.
1Touch (Title).
Settings
Auto.PTitle
Page 206 of 334
204 Audio and Visual
Audio Operations
2Touch (Preset Ch) to return to the previous
screen.
NOTE
Program Service Data: Presents song name, artist, station IDs, and other relevant
data streams.
■Scrolling title information
If the Album, Title, Artist or Genre information cannot be fully displayed
because it is too long, you can scroll the display.
1Touch on the item that you want to scroll.
• The selected title information scrolls to the left.
• Touch to stop the scrolling and return to the start of the
title.
• If driving is detected while the display is being scrolled, the
scrolling stops and returns to the start of the title.
• When the end of the title information is displayed, the scrolling
stops.
Preset Ch