Page 17 of 52
 When the scan function is running, all availa-
bl
e s
tations on the current frequency band
are played in sequence for about 5 seconds
each.
Starting and stopping the scan f")
Radio
Scan function (SCAN) When the scan function is running, all availa-
bl
e s
tations on the current frequency band
are played in sequence for about 5 seconds
each.
Starting and stopping the scan function
Starting the
scan functionPress the SETTINGS function button
and then select SCAN.
Stopping the
scan functionPress the function button to
stop the scan function at the station
that is currently playing.
OR: Briefly press the adjustment
knob.
Manually selecting a station with the
memory buttons or changing the
screen also stops the scan function. Traffic information (TP)
Traffic information tracking with the TP func-
tion i
s
on
ly possible if the station is availa-
ble. The stations with the traffic information
function are indicated in the Radio main
menu and in the list of stations by the TP
symbol ›››
Fig. 8 and ›››
Fig. 9.
Some stations that do not have their own
traffic news support the TP function by broad-
casting traffic announcements from other
stations (EON). Switching the TP function on and off
● In the menu Setup (FM, AM and
DAB), pres
s the function button
Traffic programme (TP) to activate or de
acti-
v at
e this function ››› page 15.
Active TP function and station selection
Traffic warnings are played in Audio mode.
In FM mode, the station tuned in must have
the TP function. If a station without the TP
function is selected, this will be indicated
half way up the left of the screen .
In AM mode or media mode, the unit will al-
ways automatically tune to a traffic news sta-
tion in the background, provided that one is
available. Depending on your location, this
process can take some time.
Incoming traffic information
In active Audio mode, an incoming traffic an-
nouncement will play automatically.
During the traffic announcement, a pop-up
window is displayed and the radio changes,
depending on the case, to the traffic news
station (EON).
The media mode is paused and the volume is
adjusted to the preset level ›››
page 41.
The volume of the traffic announcement can
be adjusted with the volume control. The ad- justed volume setting will be applied to sub-
sequent announc
ements.
● Press the function button Cancel to end the
c urr
ent
traffic announcement. The TP function
remains activated.
● OR: Press the function button De
activate to
end the c urr
ent
traffic announcement and
permanently deactivate the TP function. This
can be reactivated in the setup menu.
Setup (FM, AM, DAB) FM setup
● Select the frequency band FM by
pr
essing
the infotainment button RADIO .
● Press the function button Settin
g
s to open
the menu FM setup .
Function button: function
SCAN: Scan function. When the scan function is active,
all available stations on the current frequency band are
played in sequence for approximately 5 seconds each
››› page 15.
Seek mode: determines the setup of the buttons with ar-
rows and . This setting applies to all frequency
bands (FM, AM and DAB).
Preset list: All stored stations on the selected frequen-
cy band can be selected with the arrow buttons.
Station list: All available stations on the selected fre-
quency band can be selected with the arrow buttons.» 15
Page 18 of 52

.
Group: sort by station group.
Alphabet: sort by alphabetical order.
Traffic programme (TP)")
RadioFunction button: function
Sort by: to choose the mode in which the stations will be
arranged a)
.
Group: sort by station group.
Alphabet: sort by alphabetical order.
Traffic programme (TP): The TP function (traffic news sta-
tion tracking) is active ››› page 15 a)
.
Delete presets: to delete all or some of the stored sta-
tions.
Advanced settingsa) :
Radio Data System (RDS)a)
: radio data system (RDS) ac-
tivated ››› page 12. With the checkbox deselected ,
the functions depending on the RDS system will not
be available. The function buttons depending on the
RDS system will remain inactive (in grey).
Alternative frequency (AF): the automatic station track-
ing is active. With the checkbox deselected the
function button Regional RDS remains inactive (grey). a)
RDS Regional: determines the setup for the regional au-
tomatic station tracking via the RDS ››› page 12 a)
.
Fixed: the unit only switches to alternative frequen-
cies for the selected station if the same regional
service is being broadcast.
Automatic: the unit always switches to the station's
frequency that currently offers the best reception. As
a result, regional programmes may be interrupted.
a) This depends on the country and unit in question.
AM setup
● Select the AM frequency b
and by pressing
the RADIO infotainment button.
● Press the function button Settin
g
s to open
the menu AM setup .
Function button: function
SCAN: Scan function. When the scan function is active,
all available stations on the current frequency band are
played in sequence for approximately 5 seconds each
››› page 15.
Traffic programme (TP): the TP function (traffic news sta-
tion tracking) is active ››› page 15.
Seek mode: determines the setup of the buttons with ar-
rows and . This setting applies to all frequency
bands (FM, AM and DAB).
Preset list: all stored stations on the selected frequen-
cy band can be selected with the arrow buttons.
Station list: all available stations on the selected fre-
quency band can be selected with the arrow buttons.
Delete presets: to delete all or some of the stored sta-
tions. DAB setup
● Select the DAB
fr
equency band by pressing
the RADIO infotainment button.
● Press the function button Settin
g
s to open
the menu DAB setup .
Function button: function
SCAN: Scan function. When the scan function is active,
all available stations on the current frequency band are
played in sequence for approximately 5 seconds each
››› page 15.
Seek mode: determines the setup of the buttons with ar-
rows and . This setting applies to all frequency
bands (FM, AM and DAB).
Preset list: all stored stations on the selected frequen-
cy band can be selected with the arrow buttons.
Station list: all available stations on the selected fre-
quency band can be selected with the arrow buttons.
VIEW: to select the type of view of the DAB station list.
Ensemble: hierarchical view of stations and ensembles
in alphabetical order.
Station list: overall view of stations in alphabetical or-
der.
Traffic programme (TP): the TP function (traffic news station
tracking) is active ››› page 15.
Delete presets: to delete all or some of the stored sta-
tions.
Advanced settings: DAB services setup.
DAB traffic announcements: DAB traffic announcements
are played in the same way as TP traffic announce-
ments in all operating modes.
Other DAB announcements: DAB announcements
(news, sport, weather, warnings etc.) will interrupt the
current DAB radio mode. 16
Page 19 of 52
RadioFunction button: function
DAB-DAB station tracking: automatic station tracking
within the DAB frequency band has been activated.
Automatic DAB - FM switching: switching to FM frequen-
cy band is allowed for automatic station tracking. 17
Page 20 of 52
. These")
Media
Media
M edi
a mode
Intr
oduction Media sources are audio sour
c
es containing
audio files on various different data storage
devices (e.g. SD memory card, USB, external
MP3 player, etc.). These audio files can be
played by the infotainment system from its
corresponding drives or audio input sockets
(memory card slot, AUX-IN multi-media sock-
et etc.) Note
● The audio coding technology MPEG-4 HE-
AAC and p
atents have a Fraunhofer IIS li-
cence.
● This product is protected by copyright and
property
rights of Microsoft Corporation. Us-
ing or distributing similar technology outside
of this product without a licence from Micro-
soft or any of its authorised subsidiaries is
prohibited.
● The infotainment system only plays undam-
aged comp
atible audio files; other files are
ignored.
● Consult the list of supported devices on the
web
. Requirements for the media sources
and audio fi
l
e
s The supported file formats listed are collec-
tively
r
eferred to below as "audio files".
Media sourcesRequirements for playing
in the unit
SD and MMC Mem-
ory cards compatible
with the FAT12, FAT16,
FAT32, XFAT or VFAT file
system (max. 2GB), as
well as SDHC and
SDXC memory cards.– MP3 files (.mp3) with a rate
of 8 to 320 kbit/s or variable.
– WMA files (.wma) of up to
9.2 mono/stereo with no copy
protection.
– Playlists in PLS, M3U, WPL
and ASX formats.
– Playlists no larger than
1000 elements or 20 kB.
– Filenames and addresses
no larger than 256 characters.
– On memory cards: a maxi-
mum of 1000 folders and a
maximum of 2048 files.
USB data storage
device with 2.0 specifi-
cation, compatible
with the FAT12, FAT16,
FAT32, or VFAT file sys-
tem (max. 2GB).
Audio file playback
via Bluetooth ®a)
.– The external media player
must support the Bluetooth
profile A2DP.
a)Bluetooth ®
is a registered trademark of Bluetooth SIG, Inc.
Restrictions and instructions
Contamination, exposure to high tempera-
tures and mechanical damage may render a data medium unusable. Please observe the
manufact
urer's instructions.
Variations in the quality of data media pro-
duced by different manufacturers may lead to
anomalies during playback.
Please observe copyright laws.
The unit may be unable to read individual
tracks or the entire data medium due to the
data medium configuration or the devices
and programs used for recording. Informa-
tion can be found on the internet regarding
the best ways to create audio files and data
media (compression rate, ID3 tag etc.).
Depending on the size, its condition due to
use (copy and delete processes), the folder
structure and file type, the read time of the
data media used can vary considerably.
Playlists only determine a certain playing or-
der. There are no files stored in a playlist. The
unit will not play a playlist if the files are not
on the data medium at the locations referred
to by the playlist (relative file paths). Note
● Do not u se a
daptors for memory cards.
● We will not accept any responsibility for
file
s damaged or lost on the data medium. 18
Page 21 of 52

Media
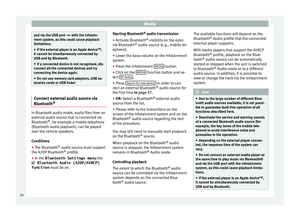
Playing order of files and folders Fig. 14
Possible structure of an audio data
s t
or
age device. Audio files on data media
ar e of
t
en organ-
ised by means of folders and playlists ,
to determine a certain playing order.
Tracks, folders and playlists on a data medi-
um are sorted by name in alphabetic or nu-
meric order.
The diagram shows an example of a conven-
tional audio data storage device containing tracks
, folders and s
ubfolders ››› Fig. 14
that are played in the following way: 1)
Track 1 and
2 in the root directory of
the d at
a s
torage device
Track 3 and
4 in the fir
st folder F1 of
the r oot
directory of the data storage de-
vice
Track 5 in the fir
st subfolder F1.1 of the
f o
lder F1
Track 6 in the fir
st subfolder F1.1.1 of
the s ubf
older F1.1
Track 7 in the sec
ond subfolder F1.2 of
the f o
lder F1
Tracks 8 and
9 in the sec
ond folder F2 Note
● The pl a
y order can be modified by selecting
between the different playback modes
››› page 19.
● The playlists are not activated automatical-
ly; they mus
t be selected from the track se-
lection menu ››› page 21. 1.
2.
3.
4.
5.
6.
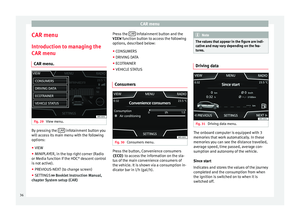
MEDIA main menu Fig. 15
MEDIA main menu. Through the main menu MEDIA y
ou c
an se-
l
ect and play different Media sources.
● Press the MEDIA infotainment button
› ›
›
Fig. 1 to open the ››› Fig. 2 MEDIA main
menu ››› Fig. 15.
It will continue playing the last media source
selected from the same point.
The media source being played is indicated
on the dropdown list when the MEDIA func-
tion button is pressed ››› Fig. 16.
If there is no Media source available, the ME-
DIA main menu is displayed. »1)
In the Media settings menu the function
, Mix/R epe
at incl. subfolders must be activated.
19
Page 22 of 52

Media
Function buttons of the main menu MediaFunction button: Function
MEDIA
Press to select another media source
››› page 20.
SD card
: SD memory card ››› page 22.
Bluetooth audio: Bluetooth audio
››› page 24.
USB
: USB data medium ››› page 22.
AUX: external audio source ››› page 25.
SELECTIONOpens the track list ››› page 21.
or Changes track in Media mode or fast for-
ward/rewind
››› page 21.
Playback will stop. The function button changes to
››› page 21.
Playback will continue. The function but-
ton changes to
››› page 21.
SETTINGSOpens the menu Media settings
››› page 25.
Repeat all tracks. Repeats all the tracks
that are on the same memory level as the
track being played at that moment. If
Mix/Repeat/Scan including subfolders
is
active in the Media Settings menu , the
sub-folders will also be included.
The current track will be repeated.
Random play. Information and possible icons
Display: Meaning
A›››
Fig. 15
Displays track information (ID3 tag in
MP3 files).
Audio files: displays the artist's name,
album title and song title.
B››› Fig. 15
Playing time so far.
The time bar allows you to select the de-
sired playing time.
RDS radio data service deactivated. The
RDS can be activated in the menu
Setup
(FM, AM) ››› page 15.
TPThe TP is active and receiving ››› page 15.
No traffic announcement station can be
received.
Note
When the media source is inserted, playing
wi l
l not start automatically; it is necessary for
the user to select the source. Nor will the me-
dia source change when it is ejected. Changing the media source
Fig. 16
Changing media source. ●
In the MEDIA m ain menu, pr
e
ss the info-
tainment MEDIA button several times to skip
thr ough the av
ai
lable Media sources.
● OR: In the main menu, pre
ss the MEDIA
button ››› Fig. 16 and select the required me-
dia source.
In the pop-up window, the media sources not
selected are shown as deactivated (in grey).
When a media source that has already been
played is selected again, playback is re-
sumed from the point at which it was stop-
ped.
Media sources that can optionally be selec-
ted
Function button: media source
SD card: SD memory card ››› page 22. 20
Page 23 of 52

MediaFunction button: media source
USB: USB data medium
››› page 22.
BT audio: playing audio files via Bluetooth ®
››› page 24.
AUX: external audio source connected to the AUX-IN
multimedia socket ››› page 25. Change the track in the MEDIA main
menu
Fig. 17
MEDIA main menu. It is possible to browse through the tracks of
the medi
a sour
c
e that is currently playing us-
ing the or buttons.
It is not possible to exit a playlist or start the
playback of a playlist using the or but-
tons. Both actions must be performed man-
ually from the track selection menu. Controlling playback via the MEDIA main
menu
UseEffect
Briefly pressing the
function button once.
Goes to the start of the cur-
rent track. If the track has
been playing for less than 3
seconds, it skips to the be-
ginning of the previous track.
Briefly pressing the
function button two
consecutive times.If the track has been playing
for more than 3 seconds, it
skips to the beginning of the
previous track. And, where
applicable, it skips from the
first track to the last one on
the data storage device be-
ing played.
Briefly pressing the
function button once.
Goes to the next track. It
changes from the previous
track to the first track of the
data storage device being
played.
Keeping the function
button pressed.Fast rewind.
Keeping the function
button pressed.Fast forward. Select a track from the list
Fig. 18
Folder list. Fig. 19
List of audio files. Open the audio/folder file list.
● In the MEDIA m ain menu, pr
e
ss the SELEC-
TION button ››› Fig. 18 to open the track list.
The track being played appears highlighted
››› Fig. 19. »
21
Page 24 of 52
 or the name of the file (MP3)
instea")
Media
Search and press on the track/folder list or
on the de s
ir
ed track/folder. If there is infor-
mation available, the track name is displayed
(for audio CDs) or the name of the file (MP3)
instead of Track + number .
Function button: Function
A››› Fig. 18Open the Source menu. Press to select oth-
er media sources.
B››› Fig. 19
Indicates the media source being browsed.
If pressed it goes to the root folder of the
device indicated on the icon.
SD card: SD memory card ››› page 22.
USB: USB data medium ››› page 22.
BT audio: playing audio files via Bluetooth ®
››› page 24.
AUX: external audio source connected to
the AUX-IN multimedia socket ››› page 25.
C››› Fig. 19
Press the function button to open the top
folder in the hierarchy of the media source.
After being pressed several times the cur-
rently selected media source appears;
press to check the source contents. The
number appearing on the folder indicates
the level in the directory ››› Fig. 19.
Start playback with the first track.
Function button: Function
Repeat all tracks. Repeats all the tracks that
are on the same memory level as the track
being played at that moment. If in the
Me-
dia Settings menu the
Mix/Re‐
peat including subfolders option is
enabled, it also includes the subfolders.
Repeat the current track.
Random play. Includes all the tracks that
are on the same memory level as the track
being played at that moment. If in the
Me-
dia Settings menu the
Mix/Re‐
peat including subfolders option is
enabled, it also includes the subfolders. Note
The tracks, folders and playlists can also be
select ed b
y turning the right-hand setup but-
ton, and can be played or opened by pressing
it. Inserting and removing memory cards
Inserting a memory card
In
ser
t
a compatible memory card into the
memory card slot with the bevelled edge first
and facing right until the card clicks into
place ››› Fig. 1, ››› Fig. 2 9 .
If a memor
y
card cannot be inserted, make
sure it is positioned correctly and is compati-
ble with the unit. Removing a memory card
The insert
ed memory card must be prepared
for removal.
● In the Media main menu, press the
SETTINGS button to open the Media Set-
tings menu. A lt
ern
atively: Press the info-
tainment MENU button and then press
S ET
TINGS to open the System settings
menu.
● Press the function button
R emo
v
e SD card safely . After the system closes
the memor y
c
ard, a message will appear on
the screen indicating that the card can be re-
moved.
● Press the inserted memory card. The mem-
ory c
ard “jumps” to the eject position.
● Remove the memory card.
Unrea
dable memory card
If a memory card is inserted and the data
cannot be read, the relevant warning ap-
pears.
External data storage device connec-
ted to USB por
t Depending on the the features and the coun-
tr
y
, the
vehicle may have a USB - AUX-IN con-
nection. For their location, consult the
››› Booklet Instruction Manual.
22