Page 89 of 104
Possible functions
Dialling with
speed dial but-
tonsBriefly press
an assigned speed di-
al button from the PHONE main
menu to call the telephone number
that has b")
Telephone management system (PHONE)Possible functions
Dialling with
speed dial but-
tonsBriefly press
an assigned speed di-
al button from the PHONE main
menu to call the telephone number
that has been stored on it. Note
The contacts stored on the speed dial buttons
DO NOT upd at
e automatically. If a contact
stored on a speed dial button is modified on
the mobile telephone, the speed dial button
will need to be reassigned. Telephone settings
Press the
S
ET
TINGS function button from the
PHONE m ain menu.
Function button: function
Select mobile phone: From the list, select the mobile tele-
phone to be connected to the hands-free profile with the
Infotainment system.
OR: Press Find telephone to connect a new mobile tele-
phone.
Bluetooth: Open the Bluetooth settings menu
››› page 87.
User profile: Open the User profile settings menu
››› page 87. Bluetooth
®
settin g
s In the PHONE main menu, pr
e
ss the SETTINGS function button and then the
Bluetooth func-
tion butt on.
Function button: function
Bluetooth: Press to deactivate Bluetooth
®
. Discon-
nects all active connections.
Visibility: Activation and deactivation of Bluetooth ®
visi-
bility.
Visible: Bluetooth ®
visibility is active.
Hidden: Bluetooth ®
visibility is deactivated. Blue-
tooth ®
visibility must be active for the external
pairing of a Bluetooth ®
device with the Infotain-
ment system. If you have a Bluetooth audio device
active and playing, the visibility is automatically
set to Hidden .
Name: Viewing and changing the name the Bluetooth ®
of the Infotainment system. This will be the name dis-
played to other Bluetooth ®
devices.
Paired devices: Displays paired devices. To disconnect
and connect Bluetooth ®
devices and Bluetooth ®
pro-
files.
Find devices: Search for visible Bluetooth ®
devices within
the range of the Infotainment system. The maximum
range is approx. 10 metres.
Bluetooth audio (A2DP/AVRCP): This function must be ac-
tive if it is necessary to connect an external audio source
via Bluetooth ®
to the Infotainment system. ››› page 48. User profile settings
In the PHONE main menu, pr
e
ss the SETTINGS function button and then the
User pr
ofi le func-
tion butt on.
Function button: function
Manage favourites: Editing speed dial buttons.
Speed dial button in use : Press to delete the stored
number.
Speed dial button free : Press to assign a number
from the phonebook to the speed dial button in
question.
Mailbox number: To enter or edit the voicemail number.
Sort by: To set the order of appearance of the entries in
the phonebook ( Forename and surname or vice-versa).
Import contacts: Press to import the phonebook of the
connected telephone, or to update the imported phone-
book.
Reminder: remember your mobile phone: If there is already
an active Bluetooth ®
connection with another mobile
telephone when turning off the ignition, the following
message appears: “Remember your mobile
phone ”.
Show pictures for contactsa)
: If phonebook contacts have
been stored with a photograph, it can be displayed on
the speed dial buttons, on the call lists and in the pho-
nebook.
a) Depending on the mobile phone.»
87
Page 90 of 104

Note
Some telephones need to be restarted to re-
down lo
ad the most recent contacts added. Connectivity Box* / Wireless Charger*
Fig. 75
In the centre console: pa")
Telephone management system (PHONE)
Note
Some telephones need to be restarted to re-
down lo
ad the most recent contacts added. Connectivity Box* / Wireless Charger*
Fig. 75
In the centre console: pad for con-
nectin g a mo
b
ile phone. The Connectivity Box includes different func-
tion
s
th
at will help to use your mobile device.
They are the “Wireless Charger ” and the “Mo-
bile Signal Amplifier”.
The Wireless Charger only features the “Wire-
less Charger ” function. “Wireless Charger”
The “Wire
less Charger ” allows mobile devi-
ces with Qi 1)
technology to be charged with-
out a cable.
To charge your mobile phone wirelessly:
● Place your mobile device with Qi technolo-
gy 1)
in the middl
e of the pad with the screen
facing up ››› Fig. 75.
When you do so, make sure there are no ob-
jects between the pad and the mobile phone.
The mobile phone will start charging auto-
matically. For further information about
whether your mobile device uses Qi technolo-
gy, please check your mobile phone's user
manual or visit the SEAT website.
“Mobile Signal Amplifier”
The “Mobile Signal Amplifier” allows you to
reduce the radiation in your vehicle and en-
joy better reception.
For safety reasons, it is recommended that
you pair the radio and the mobile device us-
ing Bluetooth ®
and place the mobile phone
on the Connectivity Box pad, so as to have
better reception without having to handle the
mobile phone. To establish a connection with the vehicle's
extern
al aerial:
● Place your mobile device in the middle of
the pad w
ith the screen facing up ››› Fig. 75.
When you do so, make sure there are no ob-
jects between the pad and the mobile phone.
Your mobile phone will automatically be
ready to make use of the external aerial. WARNING
The mobile phone may heat up due to the
wir el
ess charging. Think about the tempera-
ture of your device before you pick it up, and
take care when removing it. Note
● Your mo b
ile device must support the Qi
wireless inductive charging interface stand-
ard for proper operation.
● If your mobile phone has a cover or a pro-
tective c
asing, this may affect the Connectivi-
ty Box functions.
● There must be no metallic objects between
the pad and the mo
bile device that might af-
fect the wireless charging or the connection
with the external aerial. 1)
Qi technology allows you to charge your mobile
phone wir el
essly.
88
Page 91 of 104
Telephone management system (PHONE)
●
The ch ar
ging time and the temperature
vary in accordance with the device used.
● To avoid malfunction, ensure that the mo-
bil
e phone is correctly placed on the pad.
● The maximum charging capacity is 5 W.
● Qi technology does not allow you to charge
more than one mo
bile device simultaneously.
● No improvement in the transmission quali-
ty can be guar
anteed if there is more than
one mobile phone on the pad.
● You are advised to keep the engine running
to guarant
ee proper wireless charging of your
device.
● When a telephone with Qi technology is
connected b
y USB, the charging will be per-
formed through the medium specified by
each mobile device manufacturer. 89
Page 92 of 104

Setup
Setup
M enu and sy
s
tem settings
Main menu System settings The selection of possible settings will de-
pend on the cou
ntr
y, the unit in question and
the vehicle equipment.
● Press the Infotainment MENU button
›› ›
Fig. 1 1 and then select the
Settings con-
text.
● To adjust the settings for a certain function,
pre s
s the appropriate function button in the
main menu. Changes are automatically stor-
ed when a menu is closed.
Function button: function
Screen: To perform screen setup.
Select display mode: Grid or Carousel.
Switch off screen (in 10 seconds): If this function is ac-
tive and the Infotainment system is not in use, the
screen will switch off after approximately 10 sec-
onds. Pressing the screen or pressing one of the Info-
tainment system buttons will switch the screen back
on.
Brightness: To select the brightness level of the
screen.
Day/Night: To select the display type ( Day, Night or
Automatic ).
Function button: function
Touchscreen tone: Confirmation tone for pressing a
function button is activated.
Show clock in standby mode: In standby mode, the cur-
rent time is shown on the Infotainment system dis-
play.
Date and time: To alter the time and date.
Clock time source: To select the time source (GPS or
manual).
GPS: The date and time can be selected using the
Time zone function button. In this case, the Dateand Time function buttons for manually entering
the data will not be active.
Manually: The date and time can be manually ad-
justed using the Date and Time function buttons.
Time: To manually alter the time.
Time zone: To change to the desired time zone.
Time format: To select the time display format (12- or
24-hour clock).
Date: To adjust the current time.
Date format: To select the display format for the date
(DD.MM.YYYY , YY-MM-DD or MM-DD-YY ).
Language: To select the desired language for the texts
and announcements in the voice control system.
Additional keypad languages: To select the additional key-
pad languages.
Function button: function
Units: To set the measurement units for the vehicle dis-
plays.
Distance , vehicle speed , temperature, volume,
consumption and pressure .
Mobile device data transfer
Data transfer for SEAT apps: Allows the exchange of infor-
mation between the vehicle and SEAT applications.
These are not personal data.
Operation via apps: Changes the level of interaction
with the applications.
Deactivate: Limits specific functions that require a
higher level of security. Confirm
: Allows 100% functionality of the App but
with certain actions relating to the Infotainment
system requiring confirmation. Allow
: Allows the execution of all the available
functions from the App.
Voice control: To perform the voice control setup
››› page 13.
Remove safely: To eject the data storage device (SD card
1/SD card 2/USB) from the system. After correctly eject-
ing the data storage device from the system, the func-
tion button becomes inactive (grey colour).
Factory settings: When resetting factory settings, all en-
tries and changes made are deleted, depending on the
selected setup.
Bluetooth: To perform Bluetooth ®
settings ››› page 87.
WLANa)
: To adjust the WLAN mobile hotspot settings
››› page 51. 90
Page 93 of 104
.
Update: To update navigation data ››› page 56 Do not
remove the m")
SetupFunction button: function
System information: Viewing system information (device
number, hardware and software versions).
Update: To update navigation data ››› page 56 Do not
remove the memory card while the navigation data is
being installed.
Copyright: Copyright information.
Configuration wizard: Open the wizard to configure the ini-
tial setup of the Infotainment system.
a) Only available for the model: “Navi System Plus”. Note
For the proper functioning of the Infotain-
ment sy s
tem it is important that the date and
time set in the vehicle are correct. Sound and volume settings
M ak
in
g settings The selection of possible settings will de-
pend on the c
ou
ntr
y, the unit in question and
the vehicle equipment.
● Press the infotainment MENU button
› ›
›
Fig. 1 1 and then press the
Sound
c on-
text to open the Sound settings main
menu.
● Press the function button on the main
menu corre
sponding to one where changes are to be made. All settings are applied in-
stant
aneously.
Overview of screen and function buttons
Function button: function
Volume: To adjust the volume settings.
Radio announcements: To set the playback volume of
announcements, for example traffic announce-
ments.
Navigation announcements: To adjust the playback vol-
ume of audible driving recommendations.
Voice control: To set the volume for voice control
playback.
Maximum switch-on volume: To set the maximum
switch-on volume of the equipment.
Speed-dependent volume adjustment (GALA): To deter-
mine the level of adjustment for speed-dependent
volume. The audio volume will increase automati-
cally as vehicle speed increases.
Entertainment fading while parking: To adjust the desired
decrease in volume with ParkPilot activated.
Entertainment fading (nav. announcements): Adjusts the
playback volume during a navigation announce-
ment.
AUX volume: To set the playback volume of the au-
dio sources connected via the AUX-IN multi-media
socket ( Low, Medium or High). Also see
››› page 91, Overview of screen and function but-
tons.
Function button: function
Bluetooth audio: To set the playback volume of the
audio sources connected via Bluetooth ®
(Low , Me-
dium or High ). Also see ››› page 91, Overview of
screen and function buttons.
Equaliser: To adjust the characteristics of the sound.
Balance - Fader: To adjust the distribution of the sound.
The cursor indicates the current distribution of the
sound inside the passenger compartment. To modify the
distribution of the sound, briefly press the passenger
compartment view for the desired position or use the ar-
row keys to change it gradually. To focus the distribution
of sound in the centre of the passenger compartment,
press the central function button located between the
arrows.
Sound focus: Optimises the sound in the passenger com-
partment.
Subwoofer: To adjust the intensity of the subwoofer.
Touchscreen tone: Confirmation tone for pressing a func-
tion button is activated.
No voice guidance during call: No audible driving instruc-
tions will be given during a telephone conversation. Adjust the playback volume for external au-
dio sour
c
e
s
If you need to increase the playback volume
for the external audio source, first lower the
base volume on the Infotainment system.
If the sound from the external audio source is
too low, increase the output volume on the»
91
Page 94 of 104
Setup
external audio source. If this is not enough,
c h
an
ge the input volume to medium or high.
If the sound from the connected external au-
dio source is too loud or distorted, lower the
output volume on the external audio source.
If this is not sufficient, set the input volume
to Medium or Quiet .92
Page 95 of 104

Other important information
Other important information Le
g
al information ECE
SEA
T her
eby declares that the unit is in com-
pliance with the essential requirements and
other relevant provisions of Directive
1999/5/EC (CE 0700).
Abbreviations
A2DPTechnology included by many manufactur-
ers to transmit audio signals via Bluetooth
(Advanced Audio Distribution Profile).
AMModulation of the wave amplitude (medium
wave, MW)
AUX-INAdditional audio input (Auxiliary Input)
AVRCPTechnology included by many manufactur-
ers for the remote management of audio
sources via Bluetooth (Audio Video Remote
Control Profile).
DABDigital transmission standard for digital ra-
dio (Digital Audio Broadcasting)
DINDeutsches Institut fur Normung (German in-
dustry standard).
DRMDigital Rights Management
DTMFDial tone with dual tone multiple frequency
EONAssistance for other radio transmission net-
works (Enhanced Other Network)
FMFrequency modulation (ultra-short wave,
UKW)
GPSGlobal Positioning System.
GSMGlobal System for Mobile Communications
HFPHands-Free Profile.
IMEISerial number for univocally identifying GSM
devices (International Mobile Station Equip-
ment Identity).
LEDLight Emitting Diode
MP3Audio file compression format.
PINPersonal identification number.
RDSRadio data system.
SMSShort Message Service.
SSDJukebox (SSD Solid-State-Drive).
TMCTraffic reports for dynamic navigation (Traffic
Message Channel)
TPTraffic reports function in Radio mode (Traf-
fic programme).
USBUniversal Serial Bus
VBRVariable bit rate.
WLANWireless Local Area Network
WMAAudio file compression format. 93
Page 96 of 104
 1
1 2
2 3
3 4
4 5
5 6
6 7
7 8
8 9
9 10
10 11
11 12
12 13
13 14
14 15
15 16
16 17
17 18
18 19
19 20
20 21
21 22
22 23
23 24
24 25
25 26
26 27
27 28
28 29
29 30
30 31
31 32
32 33
33 34
34 35
35 36
36 37
37 38
38 39
39 40
40 41
41 42
42 43
43 44
44 45
45 46
46 47
47 48
48 49
49 50
50 51
51 52
52 53
53 54
54 55
55 56
56 57
57 58
58 59
59 60
60 61
61 62
62 63
63 64
64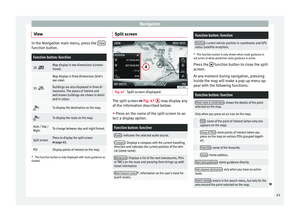 65
65 66
66 67
67 68
68 69
69 70
70 71
71 72
72 73
73 74
74 75
75 76
76 77
77 78
78 79
79 80
80 81
81 82
82 83
83 84
84 85
85 86
86 87
87 88
88 89
89 90
90 91
91 92
92 93
93 94
94 95
95 96
96 97
97 98
98 99
99 100
100 101
101 102
102 103
103
●
The ch ar
ging time and the temperature
vary in accordance with the device used.
● To avoid malfunction, ensure that the mo-
bil
e phone is correctly placed")

