2017 SEAT IBIZA ST change wheel
[x] Cancel search: change wheelPage 78 of 248

Emergencies
changed with the temporary spare wheel
fr om another
v
ehicle.
No other type of tyre (normal summer or win-
ter tyre) may be fitted on the compact tempo-
rary spare wheel rim.
Snow chains
For technical reasons, snow chains must not
be used on the temporary spare wheel.
If you have a puncture on one of the front
wheels when using snow chains, fit the tem-
porary spare wheel in place of one of the rear
wheels. Fit the snow chains on the rear wheel
that you have removed and replace the punc-
tured front wheel with this wheel.
Extraction of the spare wheel in vehicles
with SEAT SOUND 6 speakers (with subwoof-
er)*
● Disassemble the subwoofer's
floor panel
(carpet) as follows:
● Pull the carpet upwards to remove it.
● Disconnect the subwoofer's
speaker cable.
● Turn the securing wheel anti-clockwise.
● Remove the subwoofer
speaker and the
spare wheel.
● When replacing the spare wheel, place the
subwoofer
speaker in the direction indicated
by the arrow and with the word “FRONT” fac-
ing forward. ●
Reconnect
the speaker cable and firmly ro-
tate the securing wheel clockwise so that the
subwoofer system and wheel are firmly in
place. WARNING
● Aft er fittin
g the temporary spare wheel,
check the tyre pressures as soon as possible.
Failure to do so may cause an accident. The
tyre pressures are listed on the inside of the
fuel tank flap.
● Do not drive at over 80 km/h (50 mph)
when the temporar
y spare wheel is fitted on
the vehicle: risk of accident!
● Avoid heavy acceleration, hard braking and
fas
t cornering: risk of accident!
● Never use more than one temporary spare
wheel at the s
ame time, risk of accident.
● No other type of tyre (normal summer or
winter ty
re) may be fitted on the compact
temporary spare wheel rim. Tyre repair
TM S
(T
yre Mobility System)* Read the additional information carefully
› ›
›
page 46
The Anti-puncture kit* (Tyre Mobility System)
will reliably seal punctures caused by the
penetration of a foreign body of up to about 4 mm in diameter. Do not remove foreign ob-
ject
s, e.g. screws or nails, from the tyre.
After inserting the sealant residue in the tyre,
you must again check the tyre pressure about
10 minutes after starting the engine.
You should only use the tyre mobility set if
the vehicle is parked in a safe place, you are
familiar with the procedure and you have the
necessary tyre mobility set! Otherwise, you
should seek professional assistance.
Do not use the tyre sealant in the following
cases:
● If the wheel rim has been damaged.
● In outside temperatures below -20°C (-4°F).
● In the event of cuts or perforations in the
tyre gr
eater than 4 mm.
● If you have been driving with very low pres-
sure or a c
ompletely flat tyre.
● If the sealant bottle has passed its use by
date. WARNING
Using the tyre mobility system can be dan-
ger ou
s, especially when filling the tyre at the
roadside. Please observe the following rules
to minimise the risk of injury:
● Stop the vehicle safely as soon as possible.
Park it
at a safe distance from surrounding
traffic to fill the tyre. 76
Page 80 of 248
Emergencies
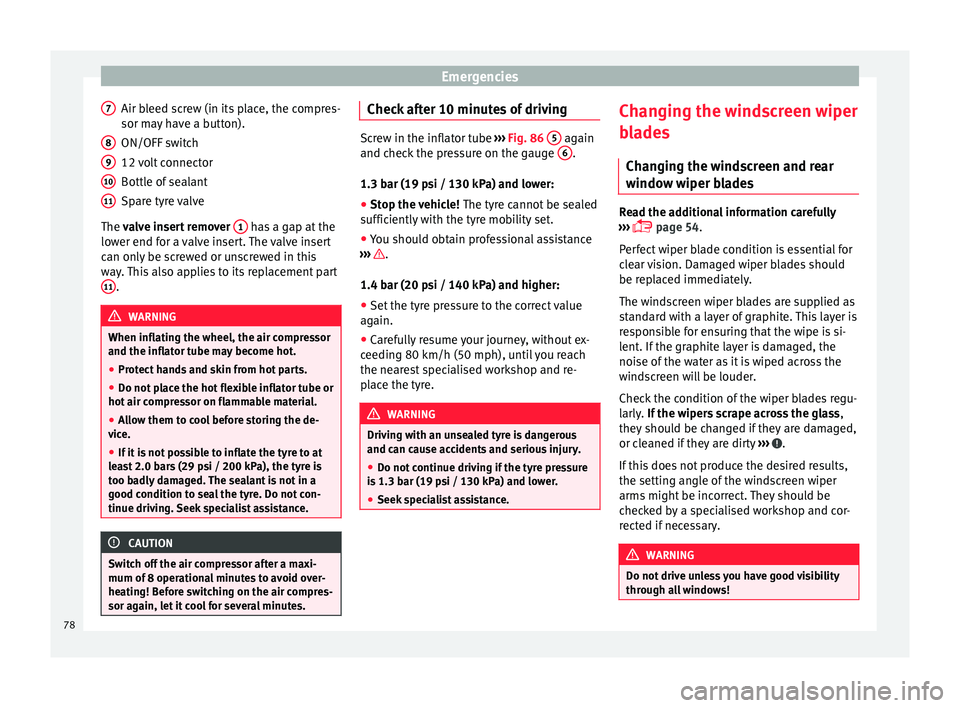
Air bleed screw (in its place, the compres-
sor m a
y
have a button).
ON/OFF switch
12 volt connector
Bottle of sealant
Spare tyre valve
The valve insert remover 1 has a gap at the
lo w
er end f
or a valve insert. The valve insert
can only be screwed or unscrewed in this
way. This also applies to its replacement part 11 .
WARNING
When inflating the wheel, the air compressor
and the inflat or t
ube may become hot.
● Protect hands and skin from hot parts.
● Do not place the hot flexible inflator tube or
hot air compr
essor on flammable material.
● Allow them to cool before storing the de-
vice.
● If
it is not possible to inflate the tyre to at
lea
st 2.0 bars (29 psi / 200 kPa), the tyre is
too badly damaged. The sealant is not in a
good condition to seal the tyre. Do not con-
tinue driving. Seek specialist assistance. CAUTION
Switch off the air compressor after a maxi-
mum of 8 oper ation
al minutes to avoid over-
heating! Before switching on the air compres-
sor again, let it cool for several minutes. 7
8
9
10
11 Check after 10 minutes of driving
Screw in the inflator tube
›››
Fig. 86 5 again
and chec k
the pressure on the gauge 6 .
1.3 bar (19 p s
i / 130 kPa) and lower:
● Stop the vehicle! The tyre c
annot be sealed
sufficiently with the tyre mobility set.
● You should obtain professional assistance
›››
.
1.4 bar (20 p s
i / 140 kPa) and higher:
● Set the tyre pressure to the correct value
again.
● Car
efully resume your journey, without ex-
ceeding 80 km/h (50 mph), u
ntil you reach
the nearest specialised workshop and re-
place the tyre. WARNING
Driving with an unsealed tyre is dangerous
and can c au
se accidents and serious injury.
● Do not continue driving if the tyre pressure
is 1.3
bar (19 psi / 130 kPa) and lower.
● Seek specialist assistance. Changing the windscreen wiper
b
l
a
des
Changing the windscreen and rear
window wiper blades Read the additional information carefully
›› ›
page 54.
Perfect wiper blade condition is essential for
clear vision. Damaged wiper blades should
be replaced immediately.
The windscreen wiper blades are supplied as
standard with a layer of graphite. This layer is
responsible for ensuring that the wipe is si-
lent. If the graphite layer is damaged, the
noise of the water as it is wiped across the
windscreen will be louder.
Check the condition of the wiper blades regu-
larly. If the wipers scrape across the glass ,
they should be changed if they are damaged,
or cleaned if they are dirty ››› .
If thi
s
does not produce the desired results,
the setting angle of the windscreen wiper
arms might be incorrect. They should be
checked by a specialised workshop and cor-
rected if necessary. WARNING
Do not drive unless you have good visibility
through a l
l windows!78
Page 81 of 248
Self-help
●
Cle
an the windscreen wiper blades and all
windows regularly.
● The wiper blades should be changed once
or twice a
year. CAUTION
● Dam aged or dir
ty windscreen wipers could
scratch the glass.
● Never use fuel, nail varnish remover, paint
thinner or simil
ar products to clean the win-
dows. This could damage the windscreen
wiper blades.
● Never move any windscreen wiper by hand.
This c
ould cause damage.
● To prevent damage to the bonnet and the
winds
creen wiper arms, the latter should only
be lifted off the windscreen when in service
position. Note
● The wind s
creen wiper arms can be moved
to the service position only when the bonnet
is properly closed.
● You can also use the service position, for
examp
le, if you want to fix a cover over the
windscreen in the winter to keep it clear of
ice. Towing or tow-starting
Not e
s Read the additional information carefully
›› ›
page 51
Please observe the following points if you
use a tow rope:
Notes for the driver of the towing vehicle
– Move the vehicle slowly until the cable is
taut.
Then accelerate gradually.
– Begin and change gears cautiously. If you
are driv in
g an automatic vehicle, accelerate
gently.
– Remember that the brake servo and power
steerin
g are not working in the vehicle you
are towing. Brake sooner than normal and
pressing the pedal gently.
Notes for the driver of the towed vehicle
– Ensure that the tow rope remains taut at all
times when t
owing.
Towing vehicles with an automatic gearbox
● Put the selector lever into position “N”.
● Do not drive faster than 50 km/h (31 mph).
● Do not tow further than 50 km.
● If a breakdown vehicle is used, the vehicle
must
be towed with the front wheels raised. WARNING
If the vehicle has no electrical power, the
brak e light
s, turn signals and all other lights
will no longer function. Do not have the vehi-
cle towed away. Failure to follow this instruc-
tion could result in an accident. WARNING
Vehicle handling and braking capacity
ch an
ge considerably during towing. Please
observe the following instructions to mini-
mise the risk of serious accidents and injury:
● As the driver of the vehicle being towed:
– You shoul
d depress the brake much hard-
er as the brake servo does not operate.
Pay the utmost attention to avoid crash-
ing into the towing vehicle.
– More strength is required at the steering
wheel as the power steering does not op-
erate when the engine is switched off.
● As the driver of the towing vehicle:
– Acc
elerate with particular care and cau-
tion.
– Avoid sudden braking and manoeuvres.
– Brake earlier than usual and more
smoothly. CAUTION
When tow-starting, fuel could enter the cata-
lytic c on
verter and damage it. » 79
Technical data
Advice
Operation
Emergencies
Safety
Page 104 of 248
Operation
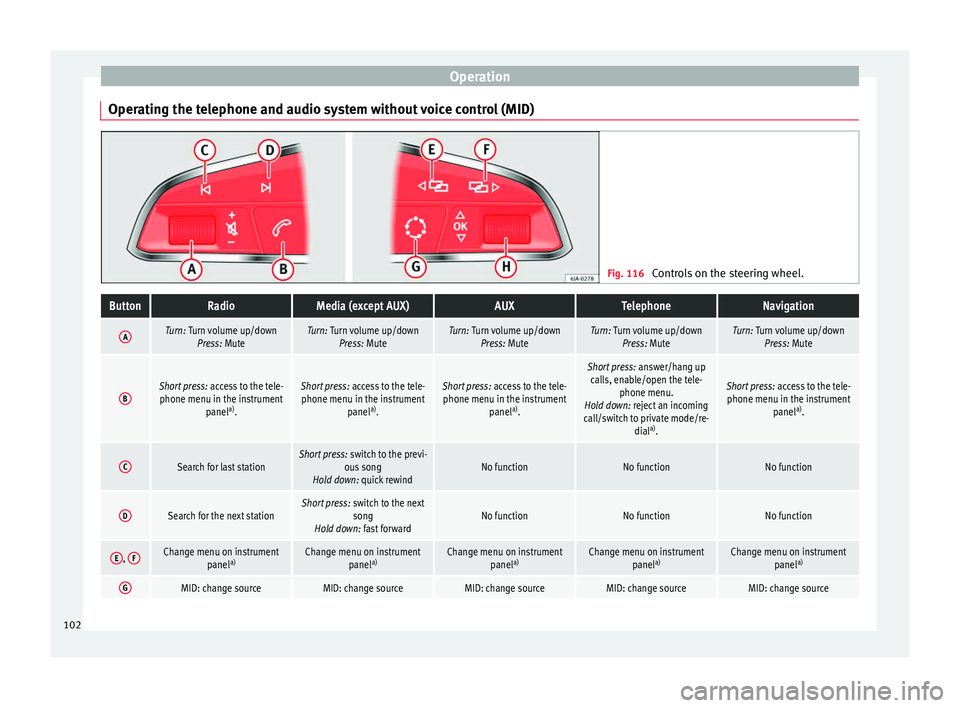
Operating the telephone and audio system without voice control (MID) Fig. 116
Controls on the steering wheel.ButtonRadioMedia (except AUX)AUXTelephoneNavigation
ATurn: Turn volume up/down
Press: MuteTurn: Turn volume up/downPress: MuteTurn: Turn volume up/downPress: MuteTurn: Turn volume up/downPress: MuteTurn: Turn volume up/downPress: Mute
BShort press: access to the tele-
phone menu in the instrument panela)
.Short press: access to the tele-
phone menu in the instrument panela)
.Short press: access to the tele-
phone menu in the instrument panela)
.
Short press: answer/hang up
calls, enable/open the tele- phone menu.
Hold down: reject an incoming
call/switch to private mode/re- diala)
.
Short press: access to the tele-
phone menu in the instrument panela)
.
CSearch for last stationShort press: switch to the previ-
ous song
Hold down: quick rewindNo functionNo functionNo function
DSearch for the next stationShort press: switch to the next
song
Hold down: fast forwardNo functionNo functionNo function
E, FChange menu on instrument
panela)Change menu on instrument
panela)Change menu on instrument
panela)Change menu on instrument
panela)Change menu on instrument
panela)
GMID: change sourceMID: change sourceMID: change sourceMID: change sourceMID: change source102
Page 105 of 248
Communications and multimediaButtonRadioMedia (except AUX)AUXTelephoneNavigation
HTurn: Next/previous preset
b)
Press: Acts on the MFDTurn: Next/previous song b)
Press: Acts on the MFDTurn: No function
Press: Acts on the MFDTurn: Acts on the MFD Press: ConfirmTurn: Changes menu or memory on instrument panel
Press: Operates on instrument panel
a)According to the vehicle's equipment package.
b) Only if the dash panel is in audio menu.
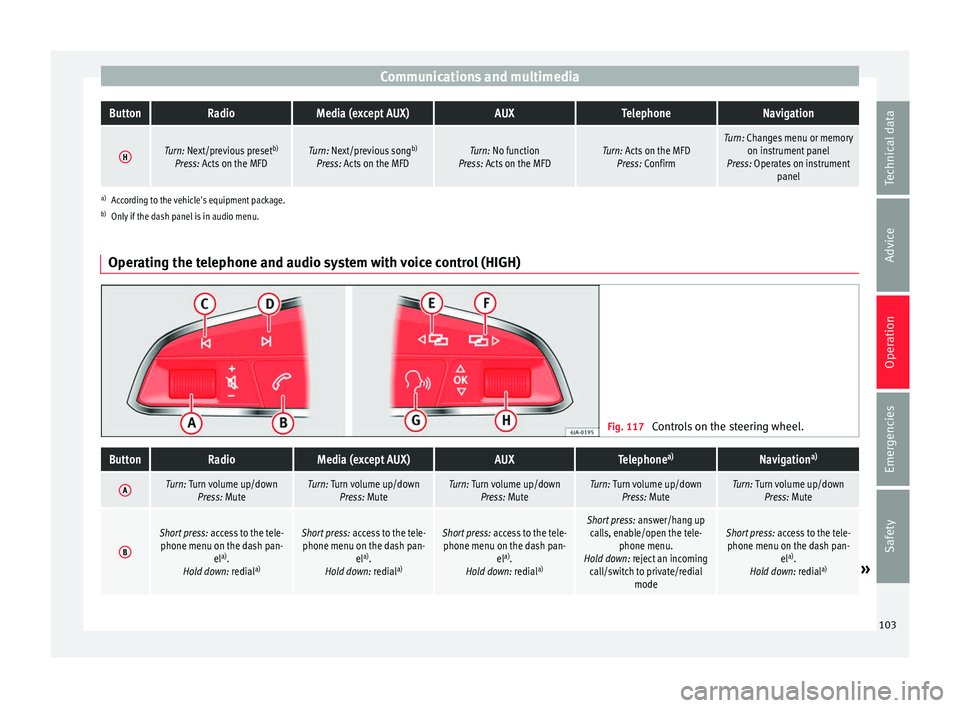
Operating the telephone and audio system with voice control (HIGH) Fig. 117
Controls on the steering wheel.
ButtonRadioMedia (except AUX)AUXTelephone a)Navigation a)
ATurn: Turn volume up/down
Press: MuteTurn: Turn volume up/downPress: MuteTurn: Turn volume up/downPress: MuteTurn: Turn volume up/downPress: MuteTurn: Turn volume up/downPress: Mute
B
Short press: access to the tele-
phone menu on the dash pan- ela)
.
Hold down: redial a)Short press:
access to the tele-
phone menu on the dash pan- ela)
.
Hold down: redial a)Short press:
access to the tele-
phone menu on the dash pan- ela)
.
Hold down: redial a)Short press:
answer/hang up
calls, enable/open the tele- phone menu.
Hold down: reject an incoming call/switch to private/redial modeShort press: access to the tele-
phone menu on the dash pan- ela)
.
Hold down: redial a)
» 103
Technical data
Advice
Operation
Emergencies
Safety
Page 126 of 248

Operation
WARNING
The rain sensor* may not detect enough rain
to sw it
ch on the wipers.
● If necessary, switch on the wipers manually
when water on the w
indscreen obstructs visi-
bility. CAUTION
In icy conditions, always check that the wiper
bl a
des are not frozen to the glass before us-
ing the wipers for the first time. If you switch
on the windscreen wipers when the wiper
blades are frozen to the windscreen, you
could damage both the wiper blades and the
wiper motor. Note
● The wind s
creen wipers will only work when
the ignition is switched on.
● The heat output of the heated jets* is con-
trol
led automatically when the ignition is
switched on, depending upon the outside
temperature.
● In certain versions of vehicles with alarms,
the winds
creen wiper will only work in inter-
val/rain sensor mode when the ignition is on
and the bonnet closed.
● When the interval wipe function is on, the
interv
als are directly proportional to the
speed. This way, the higher the vehicle speed
the shorter the intervals. ●
If y
ou stop the vehicle with the windscreen
wiper in position 1 or 2, it will automatically
change to a lower position speed. The set
speed will be resumed when the vehicle pulls
away.
● The windscreen will be wiped again after
appro
ximately five seconds once the “auto-
matic wash/wipe system” has been activa-
ted, provided the vehicle is moving (drip func-
tion). If you activate the wipers less than 3
seconds after the drip function, a new wash
sequence will begin without performing the
last wipe. For the “drip” function to work
again, you have to turn the ignition off and
then on again.
● Do not put stickers on the windscreen in
front of
the rain sensor*. This may cause sen-
sor disruption or faults. Rear window wiper
Fig. 130
Windscreen wiper lever: rear window
w iper
. Switching on the interval wipe
– Press the lever forward to position 6 ›››
Fig. 130. The w
iper w
ill wipe the window
approximately every 6 seconds.
Switching off the interval wipe function
– Pull the lever back from position 6 toward
the s t
eerin
g wheel. The wiper will continue
to function for a short period if you switch
off whilst the wipers are in motion.
Switching on the window wiper and washer
system – Press the lever fully forwards to position 7 ›››
Fig. 130 . The w iper and w
asher operate
at the same time. The rear window wash
system will function as long as you hold the
lever in this position.
– Release the lever. The washer system stops
and the wiper s
continue until the end of
the cycle.
– Move the lever towards the steering wheel
to swit
ch off. WARNING
● Worn and dir ty
wiper blades reduce visibili-
ty and safety levels while driving.
● Always note the corresponding warnings
›››
page 54.124
Page 152 of 248
Operation
of your brake pads checked by technical serv-
ic e
s
more frequently than recommended in
the Maintenance Programme.
If you drive with wet brakes, for example, af-
ter crossing areas of water, on days of heavy
rainfall or even after washing the car, the ef-
fect of the brakes is reduced as the brake
discs are wet or even frozen (in winter): in
this case, the brakes should be “dried” by
pressing the brake pedal several times. WARNING
Longer braking distances and faults in the
brak e sy
stem increase the risk of accidents.
● New brake pads must be run in and do not
have the c
orrect friction during the first
200 km. This reduced braking capacity may
be compensated for by pressing on the brake
pedal a little harder, which also applies when
the brake pads have to be changed further
on.
● If brakes are wet or frozen, or if you are
driving on r
oads which have been salted,
braking power may be lower than normal.
● On steep slopes, if brakes are excessively
used, they w
ill overheat. Before driving down
a long steep slope, it is advisable to reduce
speed and change down into a lower gear or
range (depending on the type of transmis-
sion). Thus, make use of engine braking and
relieve the brakes.
● Never let the brakes “drag” by applying
light pre
ssure. Continuous braking will cause the brakes to overheat and the braking dis-
tanc
e w
ill increase. Apply and then release
the brakes alternately.
● Never let the vehicle run with the engine
switc
hed off. The braking distance is in-
creased considerably when the brake servo is
not active.
● If the brake fluid loses its viscosity and is
subj
ected to heavy use, vapour bubbles can
form in the brake system. This reduces the ef-
ficiency of the brakes.
● Non-standard or damaged front spoilers
coul
d restrict the airflow to the brakes and
cause them to overheat. Before purchasing
accessories please observe the relevant in-
structions ››› page 187, Modifications.
● If a brake system circuit fails, the braking
dist
ance will be increased considerably. Con-
tact a specialised workshop immediately and
avoid unnecessary journeys. Control lamp
Situations in which the warning lamp lights
up *
●
the brake fluid level is too low
› ›
›
page 206.
● there is a fault in the brake system.
This w
arning lamp can light up together with
the ABS system warning lamp. WARNING
● If the br ak
e warning lamp does not go out
or if it lights up when driving, the brake fluid
level in the reservoir is too low so there is a
risk of an accident ››› page 206, Brake fluid.
Stop the vehicle and do not drive on. Obtain
technical assistance.
● If the brake warning lamp lights up to-
gether w
ith the ABS lamp this could be
due to an ABS fault. This could cause the rear
wheels to lock quickly when you brake. This
could cause the rear to break away. Risk of
skidding. Stop the vehicle and seek technical
assistance. Handbrake
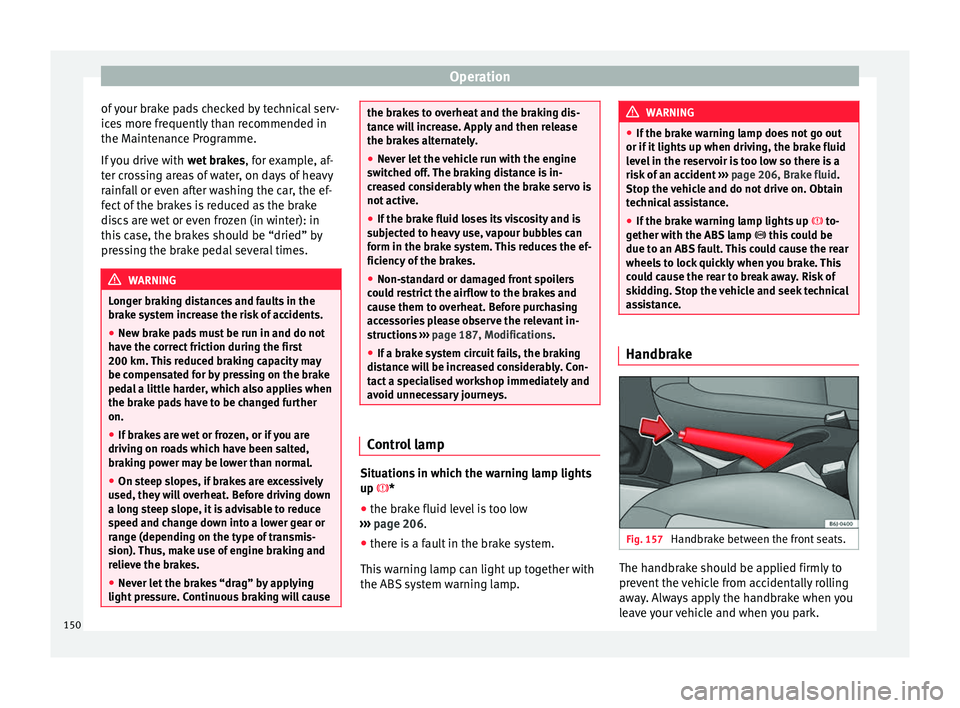
Fig. 157
Handbrake between the front seats. The handbrake should be applied firmly to
pr
ev
ent
the vehicle from accidentally rolling
away. Always apply the handbrake when you
leave your vehicle and when you park.
150
Page 154 of 248

Operation
Braking and stability systems El ectr
onic
Stability Control (ESC)*This Electronic Stability System reduces the
risk
of
skidding and improves the vehicle's
stability and ability to hold the road.
The Electronic Stability Control (ESC) contains
the electronic differential lock (EDL) and the
traction control system (ASR). The ESC works
together with the ABS. Both control lamps
will light up if the ESC or ABS systems are
faulty.
The ESC system is started automatically
when the engine is started.
The ESC system is always active and cannot
be switched off. With the Easy Connect sys-
tem it is only possible to deactivate the ASR
or else select Sport mode.
The ASR can be deactivated when wheel spin
is desirable ›››
page 153.
For example:
● When driving with snow chains.
● When driving in deep snow or on loose sur-
fac e
s.
● When the vehicle is stuck, to rock it back-
ward
s and forwards.
Press the button to switch the ASR back on
when you no longer need wheel spin. Electronic Stability Control (ESC)*
The ESC r
educes the risk of skidding by brak-
ing the wheels individually.
The system uses the steering wheel angle
and road speed to calculate the changes of
direction desired by the driver, and constant-
ly compares them with the actual behaviour
of the vehicle. When irregularities occur, for
example, if the vehicle begins to skid, the
ESC brakes the appropriate wheel automati-
cally.
The forces acting on the braked wheel bring
the vehicle back to a stable condition. If the
vehicle tends to oversteer (the rear end
slides out), the system will act on the front
wheel on the outside of the turn.
Control lamp
There are two control lamps for the electronic
stability control. The lamp provides infor-
mation concerning function and disconnec-
tion status.
Both control lamps light up together when
the ignition is switched on and should turn
off after approximately 2 seconds. This is the
time taken for the function check.
This programme includes the ABS, EDL and
ASR. It also includes emergency braking as-
sistance (BAS). The control lamp
has the following func-
tions:
● It flashes whilst driving when the ASR/ESC
is activ
ated.
● It will light up if there is a fault in the ESC.
● As the ESC operates in conjunction with the
ABS, the ESC light
will also come on if a fault
should occur in the ABS.
If the ESC control lamp lights up and stays
on after the engine is started, this may mean
that the control system has temporarily
switched off the ESC. In this case the ESC can
be reactivated by switching the ignition off
and then on again. If the control lamp goes
out, this means the system is fully functional.
The lamp provides information about the
disconnection status of the system:
● It stays lit when the ASR is disconnected on
pres
sing the switch or if we select ESC
Sport mode, only by means of Easy Connect. WARNING
● Do not f or
get that the electronic stability
control ESC cannot defy the laws of physics.
This should be kept in mind, particularly on
slippery and wet roads and when towing a
trailer.
● Always adapt your driving style to suit the
condition of the r
oads and the traffic situa-
tion. The greater safety provided by the ESC
should not encourage you to run any risks. 152