Page 57 of 228

1.51
ON-BOARD COMPUTER: general information (2/2)
Resetting the trip mileage
With “trip mileage recorder” selected on
the display, press button 2 or 3 until the
mileage recorder resets to zero.
Resetting the journey
parameters (reset button)
With one of the trip parameters selected
as the display, press and hold button 2
or 3 until the display resets.
Interpreting some of the
values displayed after
resetting
The values showing average fuel con-
sumption, range and average speed
will become more stable and reliable
the further you travel after pressing the
reset button.
For the first few miles after pressing
the reset key you will notice that the
range increases as you travel. This
range takes into account the average
fuel consumption since the last time the
reset button was pressed. Therefore,
the average fuel consumption may de-
crease when:
– the vehicle stops accelerating;
– the engine reaches its operating
temperature (if the engine was cold
when the reset key was pressed);
– when driving from an urban area
onto the open road.
Automatic resetting of the
journey parameters
Resetting occurs automatically when
the maximum value of any of the pa-
rameters is exceeded.2
3
Page 58 of 228
1.52
ON-BOARD COMPUTER: trip settings (1/4)
The display of information shown below DEPENDS ON THE VEHICLE EQUIPMENT \
AND COUNTRY.
Examples of selectionsInterpreting the display selected
a) Total mileage recorder.
101778 km
b) Trip mileage recorder.
112.4 km
c) Trip settings.
Fuel used.
Fuel consumed since the last reset.
5.8 L/100
d) Average fuel consumption
since the last reset.
The value is displayed after having travelled at least 400 metres since \
the last
reset.
5.8 L/100
Page 59 of 228
1.53
ON-BOARD COMPUTER: trip settings (2/4)
The display of information shown below DEPENDS ON THE VEHICLE EQUIPMENT \
AND COUNTRY.
Examples of selectionsInterpreting the display selected
e) Current fuel consumption.
This value is displayed after a speed of approximately 20 mph (30 km/h)\
is
reached.
7.4 L/100
f) Estimated range with remaining fuel.
The value is displayed after driving 400 metres.
541 km
g) Distance travelled since last reset.
522 km
h) Average speed since the last reset.
The value is displayed after driving 400 metres.
123.4 km/H
Page 60 of 228
1.54
ON-BOARD COMPUTER: trip settings (3/4)
The display of information shown below DEPENDS ON THE VEHICLE EQUIPMENT \
AND COUNTRY.
Examples of selectionsInterpreting the display selected
i) Mileage before service or oil change.
Distance remaining until the next service (displayed in miles
(kilometres) or days), then when the service nears, the
warning light
© is displayed on the instrument panel.
The vehicle requires a service as soon as possible.
Resetting: To reset the mileage before the next service/oil change, press and hold b\
utton 2 or 3 for approximately 10 seconds
until the display shows the mileage before service/oil change without fl\
ashing.
Page 61 of 228
1.55
The display of information shown below DEPENDS ON THE VEHICLE EQUIPMENT \
AND COUNTRY.
ON-BOARD COMPUTER: trip settings (4/4)
Examples of selectionsInterpreting the display selected
\b SET
j) Reset the tyre pressure.
Please refer to the information on the “Tyre pressure loss
warning” in Section 2.
90 km/H
k) Cruise control and speed limiter programmed speed. Refer to the information on the “Speed limiter” and “Cruise con\
trol” in Section 2.
16:30
l) Time. Please refer to the information on the “Clock and exterior temperatur\
e” in Section 1.
Page 62 of 228
1.56
Wait a few seconds, the minutes will
flash: repeatedly press or press and
hold button 3 or 4 to set the time.
When setting is complete, the hours
and minutes remain displayed continu-
ously for 5 seconds: your setting is reg-
istered.
You may change the display.Display A
To access the display 2 for setting the
time, press button 3 or 4 on the stalk 1.
Wait a few seconds; the hours and min-
utes will begin to flash. You are now in
setting mode, press and hold button 3
or 4 to set the hour.
Once the minutes flash, repeatedly
press or press and hold button 3 ou 4
to set the time.
CLOCK AND EXTERIOR TEMPERATURE (1/2)
3
4
If the power supply is cut (battery
disconnected, supply wire cut, etc.),
the clock must be reset.
We recommend that you do not
adjust these settings while driving.
12:00
2
11
A
Page 63 of 228
1.57
Display B
Vehicles fitted with touch-screen
multimedia, navigation aid systems,
telephones, etc.
Refer to the separate instructions for
the function to understand the special
features of this equipment.
External temperature
indicator
Special note:
When the exterior temperature is - 3°C
to + 3°C, the °C characters flash (sig-
nalling a risk of ice on the road).
External temperature in-
dicator
As ice formation is related
to climatic exposure, local
air humidity and temperature, the
external temperature alone is not
sufficient to detect ice.
CLOCK AND EXTERIOR TEMPERATURE (2/2)
If the power supply is cut (battery disconnected, supply wire cut, etc.\
), the clock
must be reset.
We recommend that you do not adjust these settings while driving.
B
Page 64 of 228

1.58
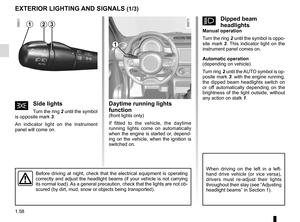
Daytime running lights
function
(front lights only)
If fitted to the vehicle, the daytime
running lights come on automatically
when the engine is started or, depend-
ing on the vehicle, when the ignition is
switched on.
EXTERIOR LIGHTING AND SIGNALS (1/3)
šSide lights
Turn the ring 2 until the symbol
is opposite mark 3.
An indicator light on the instrument
panel will come on.
1
Before driving at night, check that the electrical equipment is operatin\
g
correctly and adjust the headlight beams (if your vehicle is not carryi\
ng
its normal load). As a general precaution, check that the lights are not ob-
scured (by dirt, mud, snow or objects being transported).
kDipped beam
headlights
Manual operation
Turn the ring 2 until the symbol is oppo-
site mark 3. This indicator light on the
instrument panel comes on.
Automatic operation
(depending on vehicle)
Turn ring 2 until the AUTO symbol is op-
posite mark 3: with the engine running,
the dipped beam headlights switch on
or off automatically depending on the
brightness of the light outside, without
any action on stalk 1.
When driving on the left in a left-
hand drive vehicle (or vice versa),
drivers must re-adjust their lights
throughout their stay (see “Adjusting
headlight beams” in Section 1).
312