2017 RENAULT TRAFIC light
[x] Cancel search: lightPage 221 of 294

4.15
Glass instrument panel(e.g.: instrument panel, clock, exterior
temperature display, radio display, mul-
timedia or multifunction display etc.)
Use a soft cloth (or cotton wool).
If this does not clean them properly,
use a soft cloth (or cotton wool) slightly
moistened with soapy water and then
wipe clean with another soft damp cloth
or cotton wool.
Finally, carefully dry off with a soft dry
cloth.
Do not use products containing alco-
hol and/or spray fluids on the area.
Seat belts
These must be kept clean.
Use products selected by our Technical
Department (Approved outlets) or
warm, soapy water and a sponge and
wipe with a dry cloth.
Detergents or dyes must not be used
under any circumstances.
INTERIOR TRIM MAINTENANCE (1/2)
Textiles (seats, door trim, etc)
Vacuum-clean the textiles regularly.
Liquid stain
Use soapy water.
Dab lightly (never rub) with a soft cloth,
rinse and remove the excess.
Solid or pasty stain
Carefully remove the excess solid or
pasty material immediately with a
spatula (working from the edges to the
centre to avoid spreading the stain).
Clean as for a liquid stain.
Special instructions for sweets or
chewing gum
Put an ice cube on the stain to solidify
it, then proceed as for a solid stain.
A well-maintained vehicle will last
longer. It is therefore recommended to
maintain the interior of the vehicle regu-
larly.
A stain should always be dealt with
swiftly.
Whatever type of stain is on the trim,
use
cold (or warm) soapy water with
natural soap.
Detergents (washing-up liquid, pow-
dered products, alcohol-based prod-
ucts) should not be used.
Use a soft cloth.
Rinse and soak up the excess.
For further recommendations for
maintaining the interior, and/or for
any unsatisfactory results, please
see an authorised dealer.
Page 223 of 294

5.1
Section 5: Practical advice
Puncture, emergency spare wheel . . . . . . . . . . . . . . . . . . . . . . . . . . . . . . . . . . . .\
. . . . . . . . . . . . . . 5.2
Tyre inflation kit . . . . . . . . . . . . . . . . . . . . . . . . . . . . . . . . . . . .\
. . . . . . . . . . . . . . . . . . . . . . . . . . . . . 5.4
Tools . . . . . . . . . . . . . . . . . . . . . . . . . . . . . . . . . . . .\
. . . . . . . . . . . . . . . . . . . . . . . . . . . . . . . . . . . . . 5.7
Wheel trims . . . . . . . . . . . . . . . . . . . . . . . . . . . . . . \
. . . . . . . . . . . . . . . . . . . . . . . . . . . . . . . . . . . . . . 5.8
Changing a wheel . . . . . . . . . . . . . . . . . . . . . . . . . . . . . . . . . . . .\
. . . . . . . . . . . . . . . . . . . . . . . . . . . 5.9
Tyres (tyre and wheel safety, use in winter) . . . . . . . . . . . . . . . . . . . . . . . . . . . . . . . . . . . .\
. . . . . . . 5.11
Headlights (changing bulbs) . . . . . . . . . . . . . . . . . . . . . . . . . . . . . . . . . . . .\
. . . . . . . . . . . . . . . . . . . 5.14
Side lights . . . . . . . . . . . . . . . . . . . . . . . . . . . . . . . . . . . .\
. . . . . . . . . . . . . . . . . . . . . . . . . . . . . . . . . 5.15
Rear lights (changing bulbs) . . . . . . . . . . . . . . . . . . . . . . . . . . . . . . . . . . . .\
. . . . . . . . . . . . . . . . . . . 5.16
Indicator lights (changing bulbs) . . . . . . . . . . . . . . . . . . . . . . . . . . . . . . . . . . . .\
. . . . . . . . . . . . . . . . 5.19
Interior lighting (changing bulbs) . . . . . . . . . . . . . . . . . . . . . . . . . . . . . . . . . . . . \
. . . . . . . . . . . . . . . . 5.20
Key, radio frequency remote control: battery . . . . . . . . . . . . . . . . . . . . . . . . . . . . . . . . . . . . \
. . . . . . . 5.22
RENAULT card: battery . . . . . . . . . . . . . . . . . . . . . . . . . . . . . . . . . . . . \
. . . . . . . . . . . . . . . . . . . . . . . 5.23
Battery . . . . . . . . . . . . . . . . . . . . . . . . . . . . . . . . . . . . \
. . . . . . . . . . . . . . . . . . . . . . . . . . . . . . . . . . . . 5.24
Fitting a radio . . . . . . . . . . . . . . . . . . . . . . . . . . . . . . . . . . . . \
. . . . . . . . . . . . . . . . . . . . . . . . . . . . . . . 5.26
Fuses . . . . . . . . . . . . . . . . . . . . . . . . . . . . . . . . . . . . \
. . . . . . . . . . . . . . . . . . . . . . . . . . . . . . . . . . . . . 5.27
Accessories . . . . . . . . . . . . . . . . . . . . . . . . . . . . . . . . . . . . \
. . . . . . . . . . . . . . . . . . . . . . . . . . . . . . . . 5.30
Wipers (replacing blades) . . . . . . . . . . . . . . . . . . . . . . . . . . . . . . . . . . . .\
. . . . . . . . . . . . . . . . . . . . . 5.31
Towing . . . . . . . . . . . . . . . . . . . . . . . . . . . . . . . . . . . . \
. . . . . . . . . . . . . . . . . . . . . . . . . . . . . . . . . . . . 5.33
Operating faults . . . . . . . . . . . . . . . . . . . . . . . . . . . . . . . . . . . . \
. . . . . . . . . . . . . . . . . . . . . . . . . . . . . 5.35
Page 227 of 294

5.5
TYRE PRESSURE KIT (2/3)
Before using this kit, park
the vehicle at a sufficient
distance from traffic, switch
on the hazard warning
lights, apply the handbrake, ask all
passengers to leave the vehicle and
keep them away from traffic.
Nothing should be placed
around the driver’s feet
as such objects may slide
under the pedals during
sudden braking manoeuvres and
obstruct their use.
Please be aware that a
poorly tightened or miss-
ing valve cap can make the
tyres less airtight and may
lead to pressure loss.
Always use valve caps identical to
those fitted originally and tighten
them fully.
If the vehicle is parked on
the hard shoulder, you must
warn other road users of
your vehicle’s presence
with a warning triangle or with other
devices as per the legislation apply-
ing to the country you are in.
Following repair with the kit,
do not travel further than
120 miles (200 km). In addi-
tion, reduce your speed and
under no circumstances exceed
48 mph (80 km/h). The sticker,
which you must affix in a prominent
position on the dashboard, reminds
you of this.
Depending on the country or local
legislation, a tyre repaired with the
inflation kit may need to be replaced.
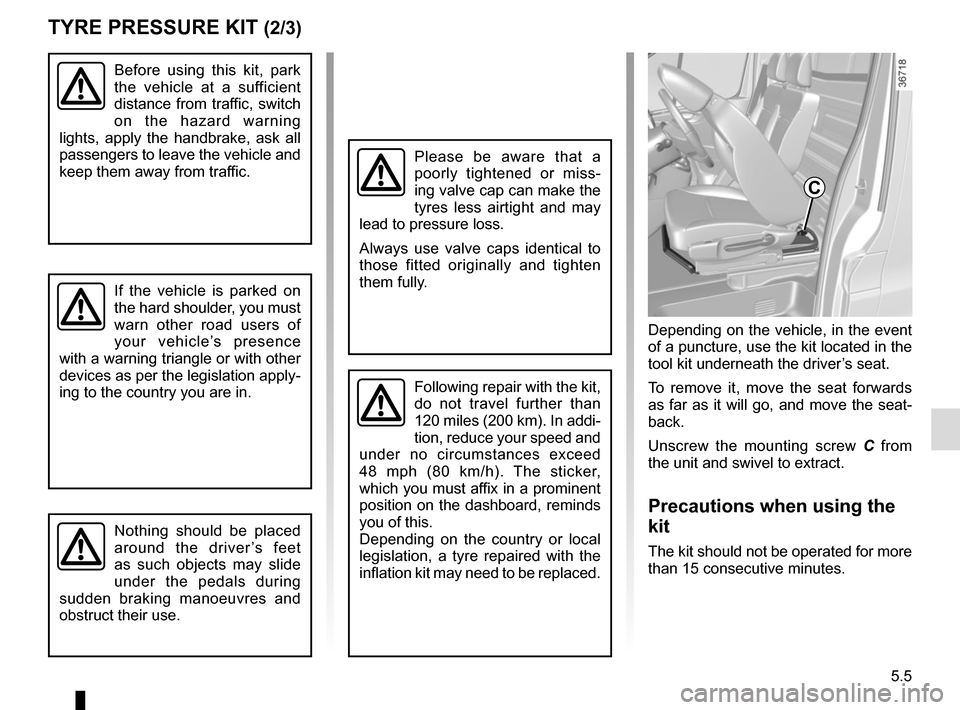
Depending on the vehicle, in the event
of a puncture, use the kit located in the
tool kit underneath the driver’s seat.
To remove it, move the seat forwards
as far as it will go, and move the seat-
back.
Unscrew the mounting screw C from
the unit and swivel to extract.
Precautions when using the
kit
The kit should not be operated for more
than 15 consecutive minutes.
C
Page 231 of 294

5.9
CHANGING A WHEEL (1/2)
Switch on the hazard warn-
ing lights.
Keep the vehicle away from
traffic and on a level surface
where it will not slip.
Apply the hand brake and engage a
gear (first or reverse, or P for auto-
matic transmissions).
Ask all the passengers to leave the
vehicle and keep them away from
traffic.
If the vehicle is parked on
the hard shoulder, you must
warn other road users of
your vehicle’s presence
with a warning triangle or with other
devices as per the legislation apply-
ing to the country you are in.
If you have a puncture, re-
place the wheel as soon as
possible.
A tyre which has been punc-
tured should always be inspected
(and repaired, where possible) by a
specialist.
Do not leave the tools un-
secured inside the vehicle
as they may come loose
under braking. After use,
check that all the tools are correctly
clipped into the tool kit, then position
it correctly in its housing: there is a
risk of injury.
The jack is designed for wheel
changing purposes only. Under no
circumstances should it be used for
carrying out repairs underneath the
vehicle or to gain access to the un-
derside of the vehicle.
Page 234 of 294

5.12
TYRES (2/3)
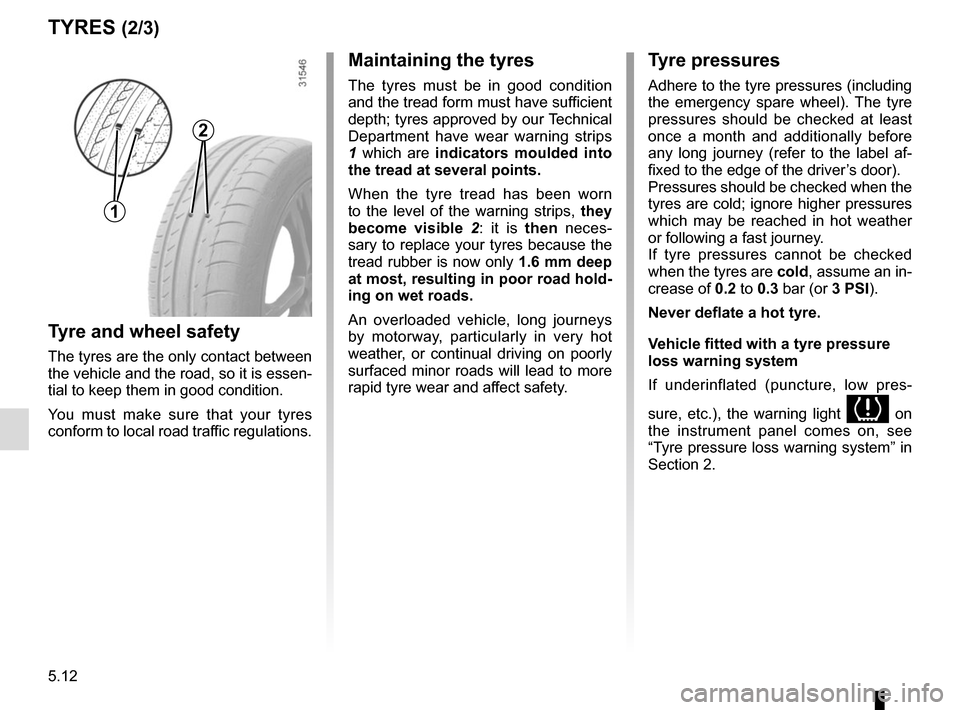
1
2
Maintaining the tyres
The tyres must be in good condition
and the tread form must have sufficient
depth; tyres approved by our Technical
Department have wear warning strips
1 which are indicators moulded into
the tread at several points.
When the tyre tread has been worn
to the level of the warning strips, they
become visible 2: it is then neces-
sary to replace your tyres because the
tread rubber is now only 1.6 mm deep
at most, resulting in poor road hold-
ing on wet roads.
An overloaded vehicle, long journeys
by motorway, particularly in very hot
weather, or continual driving on poorly
surfaced minor roads will lead to more
rapid tyre wear and affect safety.
Tyre and wheel safety
The tyres are the only contact between
the vehicle and the road, so it is essen-
tial to keep them in good condition.
You must make sure that your tyres
conform to local road traffic regulations.
Tyre pressures
Adhere to the tyre pressures (including
the emergency spare wheel). The tyre
pressures should be checked at least
once a month and additionally before
any long journey (refer to the label af-
fixed to the edge of the driver’s door).
Pressures should be checked when the
tyres are cold; ignore higher pressures
which may be reached in hot weather
or following a fast journey.
If tyre pressures cannot be checked
when the tyres are cold, assume an in-
crease of 0.2 to 0.3 bar (or 3 PSI).
Never deflate a hot tyre.
Vehicle fitted with a tyre pressure
loss warning system
If underinflated (puncture, low pres-
sure, etc.), the warning light
on
the instrument panel comes on, see
“Tyre pressure loss warning system” in
Section 2.
Page 236 of 294

5.14
FRONT HEADLIGHTS: changing bulbs (1/2)
Take care when working in
the engine compartment
as the engine cooling fan
may start to operate at any
moment without warning.
Risk of injury.
Main headlight and dipped
beam headlight
Turn the cover B a quarter turn.
Disconnect the wiring 2.
Unclip spring 1 and remove the bulb.
Bulb type: H4.
Do not touch the bulb glass. Hold it
by its base.
Replace the bulb, replace the connec-
tors and check that the cover B is re-
placed correctly.
B
A
2
1Any operation on (or modi-
fication to) the electrical
system must be performed
by an approved dealer
since an incorrect connection might
damage the electrical equipment
(harness, components and in partic-
ular the alternator). In addition, your
Dealer has all the parts required for
fitting these units.
The bulbs are under pres-
sure and can break when
replaced.
Risk of injury.
The engine must be
stopped before any action
(and not on standby): stop
the engine (please refer
to the information on “Starting and
stopping the engine” in Section 2).
Daytime running lights
Turn the bulb holder A a quarter of a
turn and remove.
Bulb type: W21W/5W.
Change the bulb and replace the bulb
holder.
Page 237 of 294

5.15
FRONT HEADLIGHTS: changing bulbs (2/2)/SIDE LIGHTS
Front fog lights 3
– Access the bulb holder via the un-
derneath of the vehicle;
– unclip the flap;
– turn the bulb holder a quarter turn.
Bulb type: H16LL. Type of bulb for vehicles fitted with
cornering lights: H11LL.
3
Side indicator lights
Unclip the side mounted indicator
light 5 (using a flat-blade screwdriver or
similar).
Turn the bulb holder 4 a quarter of a
turn and take out the bulb.
Type of bulb: W5W or WY5 W, de-
pending on the vehicle.
Additional lights
If you wish to fit fog lights or long range
headlights to your vehicle, consult an
approved dealer.
4
5
C
To comply with local legislation, or
as a precaution, you can obtain an
emergency kit containing a set of
spare bulbs and fuses from an ap-
proved dealer.
Direction indicators
Turn the bulb holder C a quarter of a
turn and take out the bulb.
Bulb type: PY21W (orange bulb).
Page 238 of 294

5.16
REAR LIGHTS: changing bulbs (1/4)
Rear light unit A
Remove bolt 1.
Turn the light unit slightly and release it
to access the bulb holder 2.
Unclip the bulb holders by rotating them
a quarter of a turn.
Unclip the bulbs by pressing them
slightly and rotating them a quarter of
a turn.
The bulbs are under pres-
sure and can break when
replaced.
Risk of injury.
A
A
2
2
1
3
4
Direction indicator lights 3
Pear-shaped, bayonet type PY 21W
bulb .
Side lights and brake lights 4
Pear-shaped, bayonet type P 21/5W
bulb .