2017 RENAULT MEGANE Jack
[x] Cancel search: JackPage 30 of 346

1.24
Always wear your seat belt when trav-
elling in your vehicle. You must also
comply with the legislation of the par-
ticular country you are in.
SEAT BELTS (1/4)
1
2
Incorrectly adjusted or
twisted seat belts may
cause injuries in the event
of an accident.
Use one seat belt per person,
whether child or adult.
Even pregnant women should wear
a seat belt. In this case, ensure that
the lap belt is not exerting too much
pressure on the abdomen, but do
not allow any slack.
Before starting, first adjust your driv-
ing position, then ask all occupants
to adjust their seat belts to ensure
optimum protection.
Adjusting your driving
position
– Sit well back in your seat (having
first removed your coat or jacket).
This is essential to ensure your back
is positioned correctly;
– adjust the distance between the seat and the pedals. Your seat
should be as far back as possible
while still allowing you to depress
the clutch pedal fully. The seatback
should be adjusted so that your arms
are slightly bent when you hold the
steering wheel;
– adjust the position of your head- rest. For the maximum safety, your
head must be as close as possible to
the headrest;
– adjust the height of the seat. This
adjustment allows you to select the
seat position which offers you the
best possible view ;
– adjust the position of the steering
wheel.
Adjusting the seat belts
Sit with your back firmly against the
seatback.
Shoulder strap 1 should be as close as
possible to the base of the neck but not
on it.
Lap belt 2 should be worn flat over the
thighs and against the pelvis.
The belt should be worn so that it is
as close as possible to your body, i.e.:
avoid wearing heavy clothing or keep-
ing bulky objects under the belts, etc.
Page 251 of 346

3.57
Multimedia sockets 5
You can use the USB ports or, de-
pending on the vehicle, the SD card
reader to access the multimedia con-
tent of your accessories and the system
update (please refer to the equipment
instructions).
The various sources can be selected
from the multifunction screen and from
the steering column controls.
MULTIMEDIA EQUIPMENT (2/2)
The sockets USB can also recharge ac-
cessories with a maximum power rating
of 12 Watts (voltage: 5V) per socket,
which have been approved by our
Technical Department.
The JACK socket enables the radio to
be used with an auxiliary cable.
Connect accessories with a
maximum power of 12 watts
only.
Fire hazard.
5
Page 273 of 346

5.3
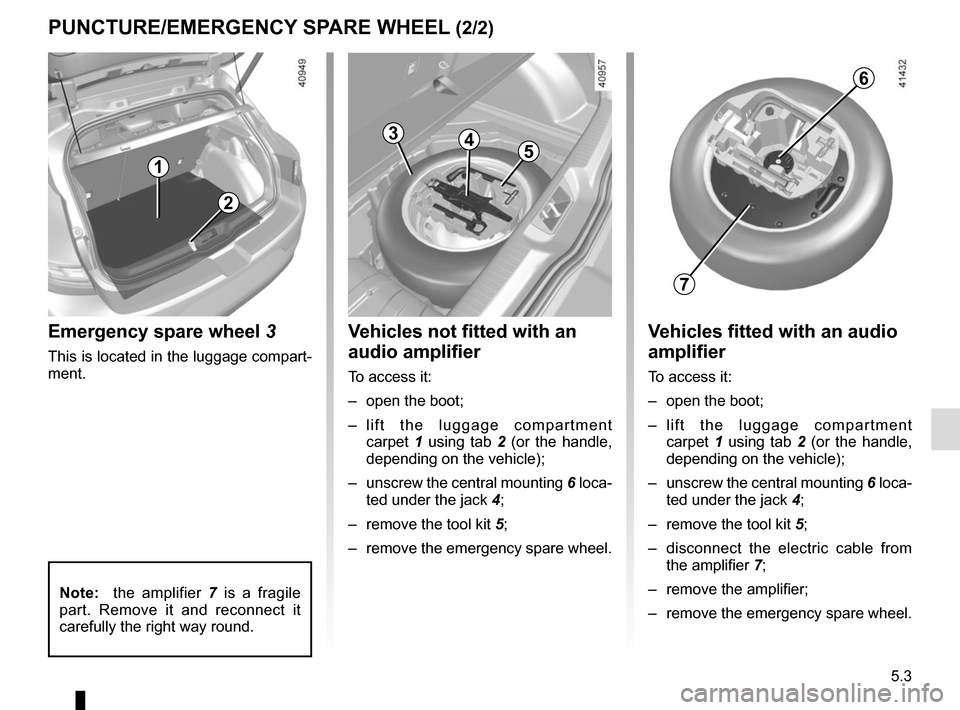
PUNCTURE/EMERGENCY SPARE WHEEL (2/2)
Emergency spare wheel 3
This is located in the luggage compart-
ment.
2
1
43
5
Vehicles not fitted with an
audio amplifier
To access it:
– open the boot;
– lift the luggage compartment carpet 1 using tab 2 (or the handle,
depending on the vehicle);
– unscrew the central mounting 6 loca-
ted under the jack 4;
– remove the tool kit 5;
– remove the emergency spare wheel.
Vehicles fitted with an audio
amplifier
To access it:
– open the boot;
– lift the luggage compartment carpet 1 using tab 2 (or the handle,
depending on the vehicle);
– unscrew the central mounting 6 loca-
ted under the jack 4;
– remove the tool kit 5;
– disconnect the electric cable from the amplifier 7;
– remove the amplifier;
– remove the emergency spare wheel.
6
7
Note: the amplifier 7 is a fragile
part. Remove it and reconnect it
carefully the right way round.
Page 277 of 346

5.7
TOOLS
Tool kit storage
The presence of the tools depends on
the vehicle.
The tool kit A is located in the boot,
under the carpet.
Lift the cover, then remove it.
Jack 1
Fold it correctly before refitting it in its
housing (ensure that the wheelbrace is
correctly positioned 2).
Hubcap tool 3
This tool is used to remove the wheel
trims.
Screw guide 4
For tightening/loosening wheel bolts on
vehicles fitted with alloy wheels
Towing hitch 5
Refer to the information on “Towing” in
Section 5.
Wheelbrace 6
Locks or unlocks the wheel bolts and
tow eye 5.
1
6
3
5
2
4
Do not leave the tools unsecured inside the vehicle as they may come loo\
se under braking. After use, check that all
the tools are correctly clipped into the tool kit, then position it corr\
ectly in its housing: risk of injury.
If wheel bolts are supplied in the tool kit, only use these bolts for th\
e emergency spare wheel: refer to the label affixed
to the emergency spare wheel.
The jack is designed for wheel changing purposes only. Under no circumstances should it be used for carrying out repairs un-
derneath the vehicle or to gain access to the underside of the vehicle.
A
Page 279 of 346

5.9
CHANGING A WHEEL (1/2)
Place the jack 3 horizontally; the jack
head must be lined up with the sill clos-
est to the wheel concerned, as shown
by an arrow 1.
Crank up the jack by hand at first to
align the base plate (which should be
inclined further inwards than the jack
head).
Turn the wheelbrace until the wheel lifts
off the ground.
Switch on the hazard warn-
ing lights.
Keep the vehicle away from
traffic and on a level surface
where it will not slip.
Apply the parking brake and engage
a gear (first or reverse, or P for auto-
matic transmissions).
Ask all the passengers to leave the
vehicle and keep them away from
traffic.
If the vehicle is parked on
the hard shoulder, you must
warn other road users of
your vehicle’s presence
with a warning triangle or with other
devices as per the legislation apply-
ing to the country you are in.
If the vehicle is not equipped with a
jack or wheelbrace, you can obtain
these from your approved dealer.
Vehicles equipped with a jack
and wheelbrace
If necessary, remove the wheel trim.
Use the wheelbrace 2 to slacken off the
wheel bolts. Position it so as to be able
to push from above.
3
2
1
Page 280 of 346

5.10
Undo the bolts and take off the wheel.
Fit the emergency spare wheel onto
the hub and rotate it until the mounting
holes in the wheel coincide with those
of the hub.
If bolts are supplied with the emergency
spare wheel, only use these bolts for
the emergency spare wheel. Tighten
the bolts, checking that the wheel is
correctly positioned on its hub and un-
screw the jack.
With the wheel on the ground, tighten
the bolts fully and have the tightness of
the bolts checked and the emergency
spare wheel pressure checked as soon
as possible.
Anti-theft bolt
If you use anti-theft bolts, fit these
nearest the valve (wheel embel-
lisher may not be able to fit).
If you have a puncture, re-
place the wheel as soon as
possible.
A tyre which has been punc-
tured should always be inspected
(and repaired, where possible) by a
specialist.
CHANGING A WHEEL (2/2)
Page 341 of 346

7.3
ALPHABETICAL INDEX (3/5)
hazard warning lights signal .............................................. 1.53
headlight beam adjustment .................................... 1.87 – 1.88
headlight flashers .............................................................. 1.53
headlight washer .................................................1.97 → 1.100
headrest.................................................................. 3.35 – 3.36
heated steering wheel ....................................................... 1.82
heating and air conditioning system .................3.6 → 3.8, 3.19
heating system ........................................................3.6 → 3.19
Hill Start Assist.......................................................2.30 → 2.39
horn ...................................................................\
................ 1.53
horn: flash ..................................................................\
........... 1.53
sounding the horn ........................................................ 1.53
hubcap tool ................................................................. 5.7 – 5.8
I
ignition switch ...................................................................... 2.3
indicators ......................................................1.53, 5.16 → 5.24
indicators: direction indicators ....................................................... 1.53
exterior temperature indicator ...................................... 1.84
instrument panel ........................ 1.58 → 1.69, 1.66 → 1.71
instrument panel .............................. 1.58 → 1.69, 1.66 → 1.79
instrument panel messages...................................1.72 → 1.79
interior trim maintenance ..................................................... 4.17 – 4.18
Isofix .................................................................\
.....1.47 → 1.49
J
jack ...................................................................\
................... 5.7
K
keys ...................................................................\
........1.2 → 1.5
L
lane departure warning ..........................................2.40 → 2.42levels:
brake fluid ...................................................................... 4.9
coolant ................................................................\
........... 4.8
engine oil ....................................................................... 4.4
windscreen washer reservoir ....................................... 4.10
lifting the vehicle changing a wheel ................................................ 5.9 – 5.10
lighting: exterior ......................................................1.7, 1.87 → 1.94
instrument panel .......................................................... 1.89
interior ......................3.26 – 3.27, 5.25 → 5.27, 5.26 – 5.27
lights adjustment ........................................................ 1.87 – 1.88
changing bulbs .................................................. 5.14 – 5.15
front ................................................................... 5.14 – 5.15
lights: adjusting ........................................................... 1.87 – 1.88
brake lights ......................................................5.16 → 5.24
dipped beam headlights ........................... 1.89, 5.14 – 5.15
direction indicators ..................................1.53, 5.14 → 5.16
fog lights ............................................................. 1.91, 5.18
hazard warning ............................................................ 1.53
main beam headlights .............................. 1.89, 5.14 – 5.15
reversing lights ............................................................. 5.18
side lights ................................................1.89, 5.14 → 5.16
locking the doors ........................ 1.4, 1.6 → 1.12, 1.16 → 1.19
luggage compartment cover .............................................. 3.44
luggage retaining net .............................................. 3.45 – 3.46
M
maintenance ............................................................\
.......... 2.25
maintenance: bodywork .......................................................... 4.15 – 4.16
interior trim ........................................................ 4.17 – 4.18
mechanical ....................................... 4.2 – 4.3, 6.11 → 6.16
map reading lights ......................................... 3.26 – 3.27, 3.27