Page 24 of 34
GB.22
MAKING, RECEIVING A CALL (2/2)
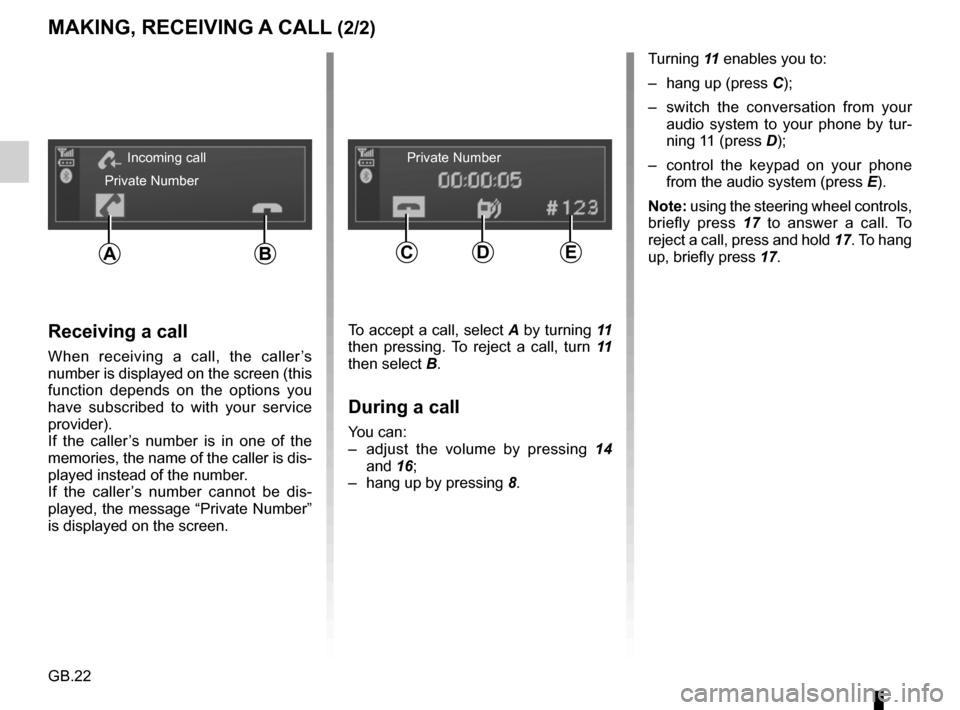
Turning 11 enables you to:
– hang up (press C);
– switch the conversation from your audio system to your phone by tur-
ning 11 (press D);
– control the keypad on your phone from the audio system (press E).
Note: using the steering wheel controls,
briefly press 17 to answer a call. To
reject a call, press and hold 17. To hang
up, briefly press 17.
Receiving a call
When receiving a call, the caller’s
number is displayed on the screen (this
function depends on the options you
have subscribed to with your service
provider).
If the caller’s number is in one of the
memories, the name of the caller is dis-
played instead of the number.
If the caller’s number cannot be dis-
played, the message “Private Number”
is displayed on the screen.
To accept a call, select A by turning 11
then pressing. To reject a call, turn 11
then select B.
During a call
You can:
– adjust the volume by pressing 14
and 16;
– hang up by pressing 8.
Incoming call
Private Number Private Number
CDEAB
Page 25 of 34
GB.23
SYSTEM SETTINGS (1/2)
You can modify the value of each set-
ting by turning wheel 11. Press 11 to
confirm and return to the previous se-
lection.
The display indicates the type of setting
(Bass, Treble, Fader, Balance).
The system automatically exits the
menu if there is no activity for a few
seconds. You can also exit the menu by
pressing 9.
Settings AUX
From the “parameters” menu, turn 11
then select “Aux In” to access the vari-
ous headings in the following order:
– HI (high);
– MID (middle);
– LO (low).
The values for each setting are as fol-
lows:
– HI (300 mV);
– MID (600 mV);
– LO (1200 mV).
Choosing the language
Access “Language” in the “parame-
ters” menu, and select the required lan-
guage.
Default settings
Display the settings menu by press-
ing 12. Select “parameters” then
press 11 to display the settings menu
and select “Default audio”. A message
is displayed on the screen requesting
confirmation of your selection. After se-
lecting this item, all the system settings
return to their default values.
Display of radio texts
Display the radio text menu by press-
ing 12. Select “Radio” then press 11.
The radio texts display may contain a
maximum of 64 characters.
Note: if no information is provided, the
screen shows “No message”.
Audio settings
Display the settings menu by press-
ing 12. Select “parameters” then
press 11 to display the audio settings
menu. Select “Audio” to access the dif-
ferent sections in the following order:
– Bass;
– Treble;
– Fader (front/rear balance);
– Balance (left/right balance).
Page 26 of 34
GB.24
SYSTEM SETTINGS (2/2)Security code
Your audio system is protected by a
security code (supplied by the manu-
facturer’s dealer). This is used to elec-
tronically lock the audio system when
the power is cut (battery disconnected,
system disconnected, fuse blown etc.).
To operate the audio system, you must
enter the secret four-digit code.
Make a note of the code and keep it in
a safe place. Contact one of the manu-
facturer’s agents if you lose it.
Entering the code
Press 1 to switch on the audio system.
The message CODE followed by 0000
is displayed. Set the value of the first flashing figure,
by pressing button 1 on keypad
7 until
the desired number is reached. Adjust
the subsequent figures using buttons 2,
3, and 4 on keypad 7 in the same way.
After selecting the fourth figure, press
and hold button 6 on keypad 7.
The system is unlocked automatically
once the full code has been entered.
Entering the code incorrectly
If an error is made whilst entering the
code, the message “CODE ERROR...
WAIT” is displayed.
Wait 60 minutes and then re-enter the
code.
Each time the code is entered incor-
rectly, the time required before the code
can be re-entered is doubled.
Phone settings
Display the settings menu by press-
ing 8.
After a few seconds, the previous
screen will be displayed automatically,
without any action on your part.
You can also exit the settings mode by
pressing 8 or 9.
Page 27 of 34
GB.25
OPERATING FAULTS (1/3)
DescriptionPossible causes Solutions
No sound can be heard. The volume is set to minimum or pause. Increase the volume or deactivate pause.
The audio system does not work and
the display does not light up. The audio system is not switched on. Switch the audio system on.
The audio system fuse has blown. Replace the fuse (see “fuses” in the vehicle’s
driver’s handbook).
The audio system does not work but
the display lights up. The volume is set to minimum.
Press 16.
Speaker short circuit. Contact a representative from the manufac-
turer.
No sound comes out of the left- or
right-hand speakers when using the
radio or a CD. The sound balance setting (left/right) is
incorrect.
Correct the sound balance setting.
Speaker disconnected. Contact a representative from the manufac-
turer.
Poor radio reception or no reception. The vehicle is too far from the transmitter to which the radio is tuned (background
noise and interference). Find another transmitter with better reception
in your area or deactivate the “RDS-AF” func-
tion.
The reception is disrupted by interfer-
ence from the engine. Contact a representative from the manufac-
turer.
The aerial is damaged or not connected. Contact a representative from the manufac-
turer.
Page 28 of 34
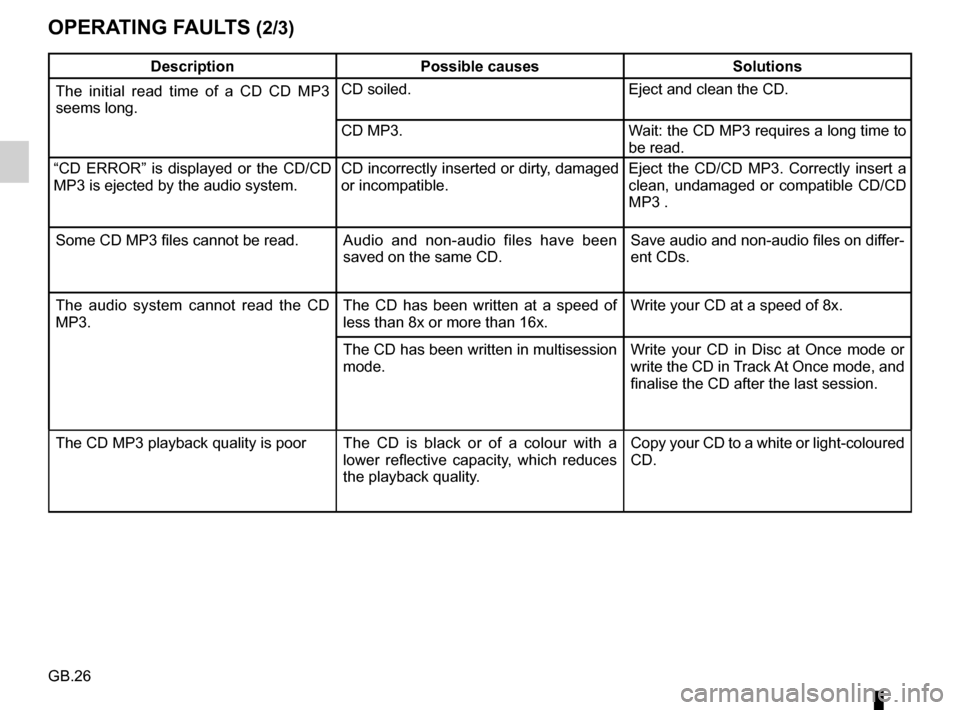
GB.26
OPERATING FAULTS (2/3)
DescriptionPossible causes Solutions
The initial read time of a CD CD MP3
seems long. CD soiled.
Eject and clean the CD.
CD MP3. Wait: the CD MP3 requires a long time to
be read.
“CD ERROR” is displayed or the CD/CD
MP3 is ejected by the audio system. CD incorrectly inserted or dirty, damaged
or incompatible.Eject the CD/CD MP3. Correctly insert a
clean, undamaged or compatible CD/CD
MP3 .
Some CD MP3 files cannot be read. Audio and non-audio files have been
saved on the same CD.Save audio and non-audio files on differ-
ent CDs.
The audio system cannot read the CD
MP3. The CD has been written at a speed of
less than 8x or more than 16x.Write your CD at a speed of 8x.
The CD has been written in multisession
mode. Write your CD in Disc at Once mode or
write the CD in Track At Once mode, and
finalise the CD after the last session.
The CD MP3 playback quality is poor The CD is black or of a colour with a
lower reflective capacity, which reduces
the playback quality.Copy your CD to a white or light-coloured
CD.
Page:
< prev 1-8 9-16 17-24