Page 9 of 130
1.3
M
Menu
Phone Multimedia
Apps
Navigation
Vehicle System
Log In
NPQ
GENERAL DESCRIPTION (2/2)
Menu screen
Depending on the menu, the M bar dis-
plays two or three buttons:
N “Back” (always shown):
– pressing this button briefly takes you back to the previous screen;
– a long press on this button takes you straight back to the home page.
P “Function”: this button is dedicated to the screen’s main action (it disap-
pears or is greyed out if not active).
Menu
Phone
Multimedia
Apps
Navigation
Vehicle SystemLog In
M
NPQ
For more information, see the user
manual available in your system by
pressing the pop-up menu button
from the main menu screen, then
“User manual”.
Q “Options” (button is greyed out if it is not active): this is used for accessing
the pop-up menu.
Page 34 of 130
2.2
MAP (1/4)
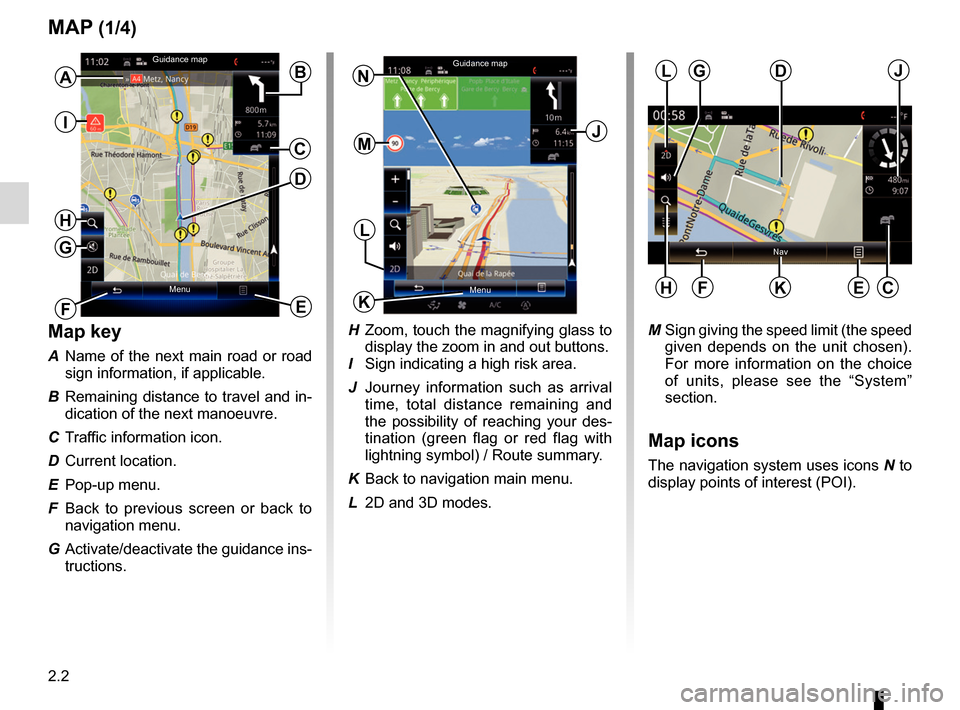
Map key
A Name of the next main road or road sign information, if applicable.
B Remaining distance to travel and in- dication of the next manoeuvre.
C Traffic information icon.
D Current location.
E Pop-up menu.
F Back to previous screen or back to navigation menu.
G Activate/deactivate the guidance ins- tructions.
E
B
M Sign giving the speed limit (the speed given depends on the unit chosen).
For more information on the choice
of units, please see the “System”
section.
Map icons
The navigation system uses icons N to
display points of interest (POI).
D
H Zoom, touch the magnifying glass to display the zoom in and out buttons.
I Sign indicating a high risk area.
J Journey information such as arrival time, total distance remaining and
the possibility of reaching your des-
tination (green flag or red flag with
lightning symbol) / Route summary.
K Back to navigation main menu.
L 2D and 3D modes.
J
L
Menu MenuK
N
H
Nav
L
KEF
DJ
C
Guidance map
Guidance map
F
MC
G
H
I
GA
Page 48 of 130
2.16
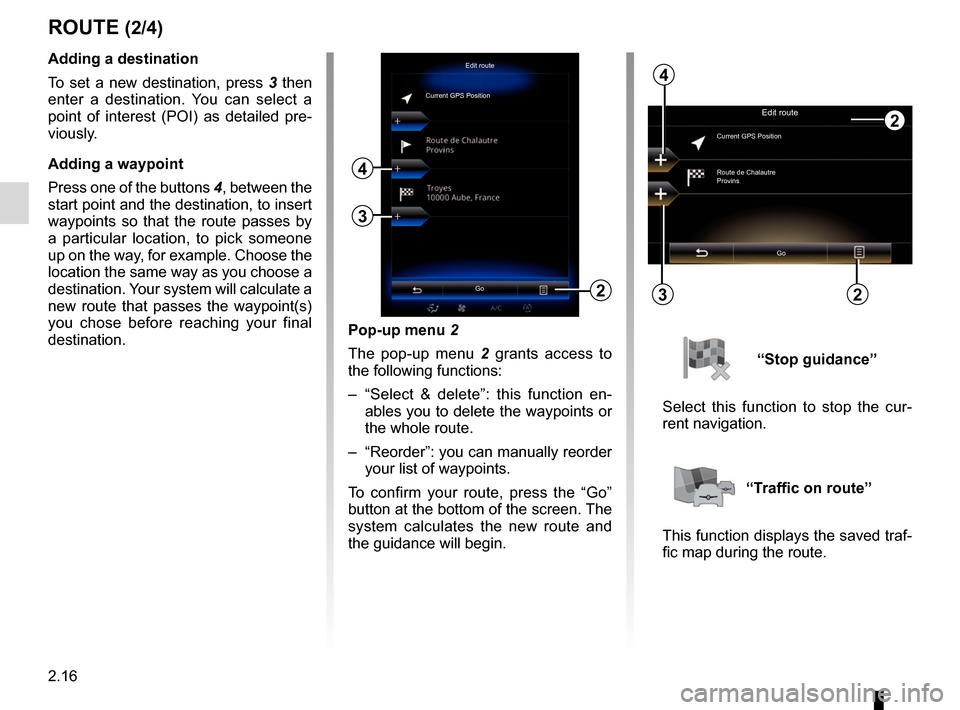
Pop-up menu 2
The pop-up menu 2 grants access to
the following functions:
– “Select & delete”: this function en- ables you to delete the waypoints or
the whole route.
– “Reorder”: you can manually reorder your list of waypoints.
To confirm your route, press the “Go”
button at the bottom of the screen. The
system calculates the new route and
the guidance will begin.
ROUTE (2/4)
2
Edit route
Current GPS PositionAdding a destination
To set a new destination, press 3 then
enter a destination. You can select a
point of interest (POI) as detailed pre-
viously.
Adding a waypoint
Press one of the buttons 4, between the
start point and the destination, to insert
waypoints so that the route passes by
a particular location, to pick someone
up on the way, for example. Choose the
location the same way as you choose a
destination. Your system will calculate a
new route that passes the waypoint(s)
you chose before reaching your final
destination.
3
4
Edit route
Current GPS Position
Route de Chalautre
Provins
Go
3
4
“Stop guidance”
Select this function to stop the cur-
rent navigation.
“Traffic on route”
This function displays the saved traf-
fic map during the route.
Go22
Page 58 of 130
3.4
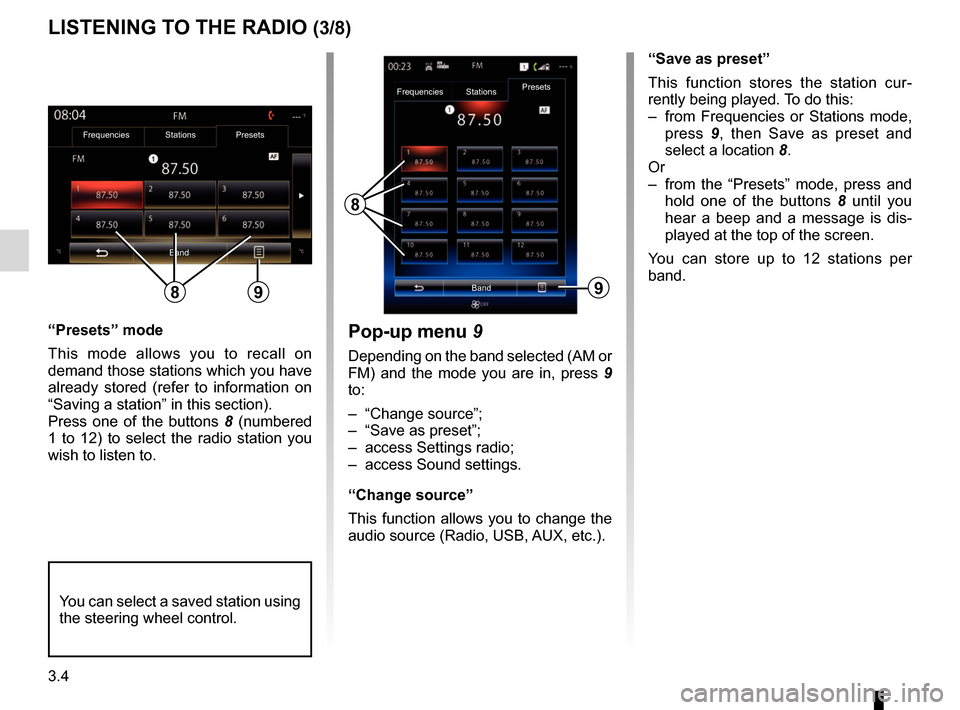
“Presets” mode
This mode allows you to recall on
demand those stations which you have
already stored (refer to information on
“Saving a station” in this section).
Press one of the buttons 8 (numbered
1 to 12) to select the radio station you
wish to listen to.
LISTENING TO THE RADIO (3/8)
“Save as preset”
This function stores the station cur-
rently being played. To do this:
– from Frequencies or Stations mode, press 9, then Save as preset and
select a location 8.
Or
– from the “Presets” mode, press and hold one of the buttons 8 until you
hear a beep and a message is dis-
played at the top of the screen.
You can store up to 12 stations per
band.
8
Band
Frequencies
StationsPresets
You can select a saved station using
the steering wheel control.
9
Pop-up menu
9
Depending on the band selected (AM or
FM) and the mode you are in, press 9
to:
– “Change source”;
– “Save as preset”;
– access Settings radio;
– access Sound settings.
“Change source”
This function allows you to change the
audio source (Radio, USB, AUX, etc.).
Frequencies Stations Presets
Band
89
Page 60 of 130
3.6
LISTENING TO THE RADIO (5/8)
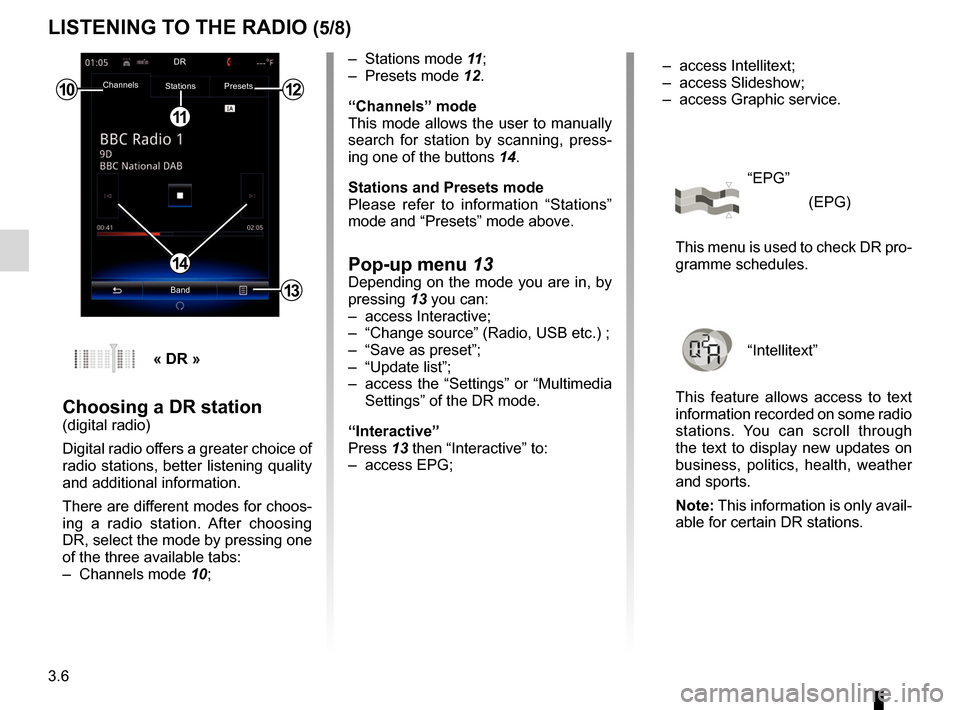
– Stations mode 11;
– Presets mode 12.
“Channels” mode
This mode allows the user to manually
search for station by scanning, press-
ing one of the buttons 14.
Stations and Presets mode
Please refer to information “Stations”
mode and “Presets” mode above.
Pop-up menu 13Depending on the mode you are in, by
pressing 13 you can:
– access Interactive;
– “Change source” (Radio, USB etc.) ;
– “Save as preset”;
– “Update list”;
– access the “Settings” or “Multimedia Settings” of the DR mode.
“Interactive”
Press 13 then “Interactive” to:
– access EPG;
10
11
12
14
13
Channels Stations Presets
BandDR
« DR »
Choosing a DR station(digital radio)
Digital radio offers a greater choice of
radio stations, better listening quality
and additional information.
There are different modes for choos-
ing a radio station. After choosing
DR, select the mode by pressing one
of the three available tabs:
– Channels mode
10; – access Intellitext;
– access Slideshow;
– access Graphic service.
“EPG”
(EPG)
This menu is used to check DR pro-
gramme schedules.
“Intellitext”
This feature allows access to text
information recorded on some radio
stations. You can scroll through
the text to display new updates on
business, politics, health, weather
and sports.
Note: This information is only avail-
able for certain DR stations.
Page 61 of 130
3.7
“Graphic service”
This menu is used to see the web-
site provided by the current station
when you have a connection.
“Slideshow”
This menu is used to see images
provided by the station in slide-
show.
Storing a station
From “Channels” mode or “Stations”
mode, press 13 then “Save as preset”.
You can also give a long press on one
of the preset buttons until you hear a
beep.
You can store up to 12 stations per
band.
“Update list”
Select this menu to update the list of
radio stations.
LISTENING TO THE RADIO (6/8)
13
Channels Stations Presets
BandDR
You can also access this menu by
pressing
15.
Note: The slideshow 15 is dis-
played when Timeshift function
(direct control) is deactivated.
“Change source”
This function allows you to change the
audio source (Radio, USB, AUX, etc.).
Channels Stations Presets
BandDR
15
Channels Stations Presets
Band
13
Page 72 of 130
3.18
MULTIMEDIA SETTINGS (3/3)
“Volume proportional to speed”
When this function is activated, the
volume of the audio system varies ac-
cording to the vehicle speed.
Press “Volume proportional to speed”
then select “On” or “OFF” to activate or
deactivate this function.
Set the intensity by increasing/decreas-
ing the value using the + and - buttons.
Note: the volume of the audio system
with Bose equipment varies automati-
cally according to the vehicle speed.“Loudness”
You can activate/deactivate bass ampli-
fication by pressing “On” or “OFF”.
“Frequency stabiliser”
This function amplifies low and high
frequencies when the volume is turned
down.
You can activate/deactivate loudness
by selecting “On” or “OFF”.
“Volume stabiliser”
You can activate/deactivate loudness
by selecting “On” or “OFF”.
Note: to reset the default settings for
each function, press the pop-up menu,
then “Reset”.
Sound settings
Bass Boost
Balance / Fader
Bass / Medium / Treble On OFF
Page 77 of 130
4.5
CONNECTING/DISCONNECTING A TELEPHONE (2/2)Disconnect a phone
From the “Phone” menu, press
“Settings” then press “Paired devices
list”.
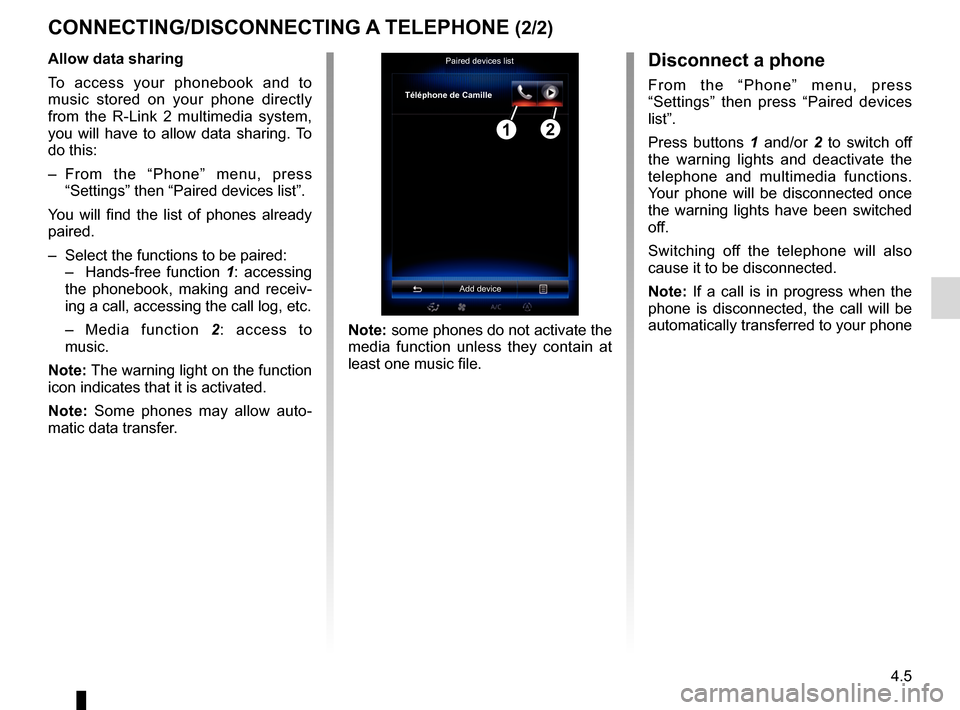
Press buttons 1 and/or 2 to switch off
the warning lights and deactivate the
telephone and multimedia functions.
Your phone will be disconnected once
the warning lights have been switched
off.
Switching off the telephone will also
cause it to be disconnected.
Note: If a call is in progress when the
phone is disconnected, the call will be
automatically transferred to your phone
Note: some phones do not activate the
media function unless they contain at
least one music file.
Allow data sharing
To access your phonebook and to
music stored on your phone directly
from the R-Link 2 multimedia system,
you will have to allow data sharing. To
do this:
– From the “Phone” menu, press
“Settings” then “Paired devices list”.
You will find the list of phones already
paired.
– Select the functions to be paired:
– Hands-free function 1: accessing
the phonebook, making and receiv-
ing a call, accessing the call log, etc.
– Media function 2: access to
music.
Note: The warning light on the function
icon indicates that it is activated.
Note: Some phones may allow auto-
matic data transfer.Paired devices list
Téléphone de Camille
Add device
12