2017 RENAULT ALASKAN wheel
[x] Cancel search: wheelPage 254 of 340

4. Snow chains may be used if desired. Make sure
they are the proper size for the tyres on your
vehicle and are installed according to the chain
manufacturer’s instructions. Use chain tension-
ers when recommended by the tyre chain manu-
facturer to ensure atight fit. Loose end links of
the tyre chains must be secured or removed to
prevent the possibility of whipping action dam-
age to the wings or underbody. In addition, drive
at ar educed speed, otherwise, your vehicle may
be damaged and/or vehicle handling and perfor-
mance may be adversely affected.
SPECIAL WINTER EQUIPMENT
It is recommended that the following items be car-
ried in the vehicle during the winter:
• As
craper and stiff-bristled brush to remove ice
and snow from the windows.
• As
turdy, flat board to be placed under the jack
to give it firm support.
• As
hovel to dig the vehicle out of snowdrifts.
PARKING BRAKE
When parking in the area where the outside tem-
perature is below 0°C (32°F), do not apply the park-
ing brake to prevent it from freezing. For safe park-
ing:
• Place the shift lever in the
P(Park) position (Au-
tomatic transmission model).
• Place the shift lever in the
1(1st) or R(Reverse)
gear (Manual transmission model). •
Securely block the wheels.
CORROSION PROTECTION
Chemicals used for road surface deicing are ex-
tremely corrosive and will accelerate corrosion and
the deterioration of underbody components such as
the exhaust system, fuel and brake lines, brake
cables, floor pan and wings.
In the winter, the underbody must be cleaned
periodically. For additional information, see
“Cleaning exterior” in the “7. Appearance and
care” section of this manual.
For additional protection against rust and corrosion,
which may be required in some areas, consult an
approved dealer or qualified workshop.
5-52 Starting and driving
Page 258 of 340

CAUTION
When storing the wheel, be sure to mount the
wheel horizontally. Securing awheel that is in a
tilted position as illustrated may cause looseness
and dropping of the wheel while driving. Lower
the wheel on to the ground again, and make sure that the hanging plate is properly set. Hang the
wheel again and make sure that the wheel is
held horizontally, then store the wheel.
Blocking wheels WARNING
Be sure to block the appropriate wheel to pre-
vent the vehicle from moving, which may cause
personal injury.
Place suitable blocks ➀at both the front and back
of the wheel diagonally opposite the flat tyre j
Ato
prevent the vehicle from moving when it is jacked
up.
Removing tyre WARNING
• Be sure to read and follow the instructions in
this section.
• DO NOT GET UNDER
AVEHICLE THAT IS
SUPPORTED BY AJACK. •
Never use
ajack which was not provided with
your vehicle.
• The jack, which is provided with your vehicle,
is designed only to lift your vehicle during a
tyre change.
• Never jack up the vehicle at
alocation other
than the jack-up point that is specified.
• Never lift the vehicle more than necessary.
• Never use blocks on or under the jack.
• Never start or run the engine while the vehicle
is on the jack. The vehicle may move sud-
denly, and this may cause an accident.
• Never allow passengers to remain in the ve-
hicle while the tyre is off the ground.
• Be sure to read the caution label attached to
the jack body before using.
Removing the wheel cap (where fitted):
Remove the centre wheel cap ➀as illustrated. SCE0982Z MCE0001DZ
SCE0139HZ
6-4 In case of emergency
Page 259 of 340

Jacking up vehicle:
j A For front wheel
j B For rear wheel
1. Place the jack directly under the jack-up points jA jBa sillustrated.
The jack should be placed on firm level
ground. 2. Loosen each wheel nut, anticlockwise, one or
two turns with the wheel nut wrench.
Do not remove the wheel nuts until the tyre is
off the ground.
3. Install the assembled jack rod into the jack as shown.
4. Carefully raise the vehicle until the clearance be- tween the tyre and ground is achieved.
5. To lift the vehicle, securely hold the jack lever and rod with both hands and turn the jack lever.
Removing tyre:
1. Remove the wheel nuts.
2. Remove the damaged tyre.
CAUTION
The tyre is heavy. Be sure that your feet are clear
from the tyre and use gloves as necessary to
avoid injury. NCE480 NCE130Z
In case of emergency
6-5
Page 260 of 340

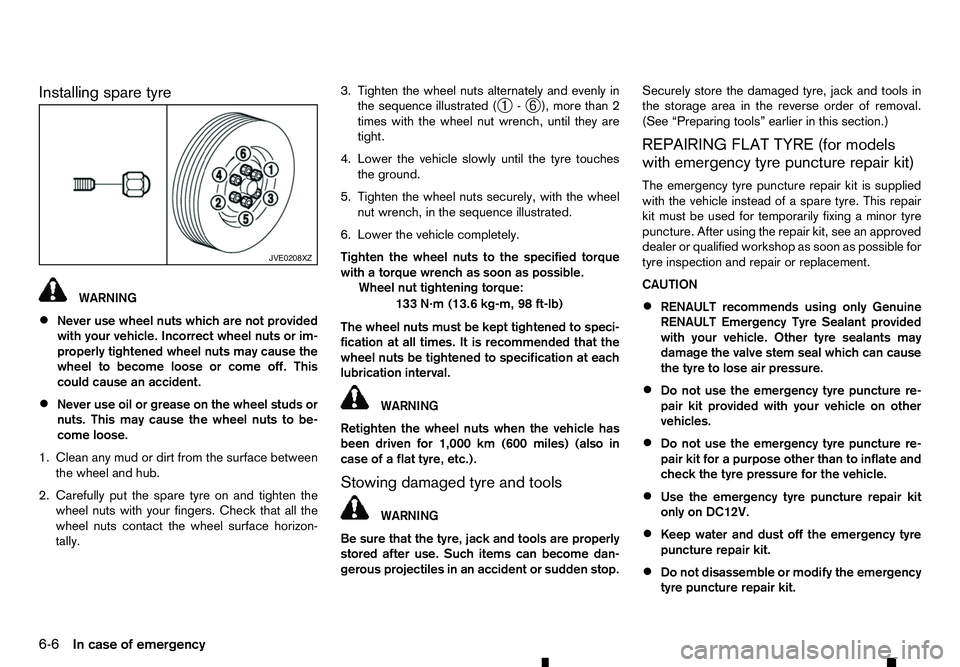
Installing spare tyre
WARNING
• Never use wheel nuts which are not provided
with your vehicle. Incorrect wheel nuts or im-
properly tightened wheel nuts may cause the
wheel to become loose or come off. This
could cause an accident.
• Never use oil or grease on the wheel studs or
nuts. This may cause the wheel nuts to be-
come loose.
1. Clean any mud or dirt from the surface between the wheel and hub.
2. Carefully put the spare tyre on and tighten the wheel nuts with your fingers. Check that all the
wheel nuts contact the wheel surface horizon-
tally. 3. Tighten the wheel nuts alternately and evenly in
the sequence illustrated ( ➀-
➅ ), more than 2
times with the wheel nut wrench, until they are
tight.
4. Lower the vehicle slowly until the tyre touches the ground.
5. Tighten the wheel nuts securely, with the wheel nut wrench, in the sequence illustrated.
6. Lower the vehicle completely.
Tighten the wheel nuts to the specified torque
with atorque wrench as soon as possible.
Wheel nut tightening torque:
133 N·m (13.6 kg-m, 98 ft-lb)
The wheel nuts must be kept tightened to speci-
fication at all times. It is recommended that the
wheel nuts be tightened to specification at each
lubrication interval. WARNING
Retighten the wheel nuts when the vehicle has
been driven for 1,000 km (600 miles) (also in
case of aflat tyre, etc.).
Stowing damaged tyre and tools WARNING
Be sure that the tyre, jack and tools are properly
stored after use. Such items can become dan-
gerous projectiles in an accident or sudden stop. Securely store the damaged tyre, jack and tools in
the storage area in the reverse order of removal.
(See “Preparing tools” earlier in this section.)
REPAIRING FLAT TYRE (for models
with emergency tyre puncture repair kit)
The emergency tyre puncture repair kit is supplied
with the vehicle instead of aspare tyre. This repair
kit must be used for temporarily fixing aminor tyre
puncture. After using the repair kit, see an approved
dealer or qualified workshop as soon as possible for
tyre inspection and repair or replacement.
CAUTION
• RENAULT recommends using only Genuine
RENAULT Emergency Tyre Sealant provided
with your vehicle. Other tyre sealants may
damage the valve stem seal which can cause
the tyre to lose air pressure.
• Do not use the emergency tyre puncture re-
pair kit provided with your vehicle on other
vehicles.
• Do not use the emergency tyre puncture re-
pair kit for
apurpose other than to inflate and
check the tyre pressure for the vehicle.
• Use the emergency tyre puncture repair kit
only on DC12V.
• Keep water and dust off the emergency tyre
puncture repair kit.
• Do not disassemble or modify the emergency
tyre puncture repair kit. JVE0208XZ
6-6 In case of emergency
Page 262 of 340

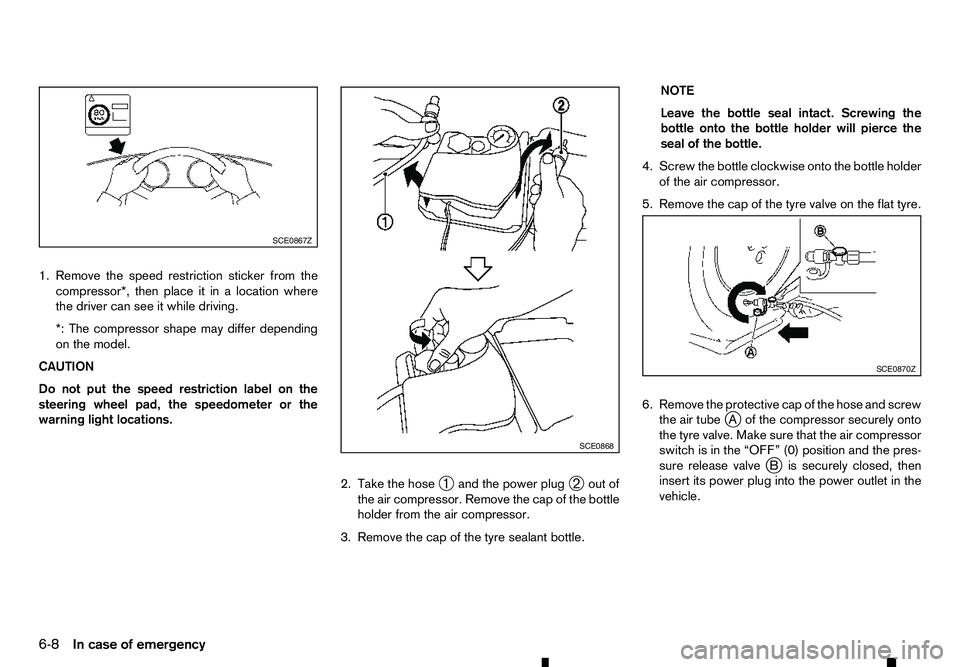
1. Remove the speed restriction sticker from the
compressor*, then place it in alocation where
the driver can see it while driving.
*: The compressor shape may differ depending
on the model.
CAUTION
Do not put the speed restriction label on the
steering wheel pad, the speedometer or the
warning light locations.
2. Take the hose➀and the power plug
➁out of
the air compressor. Remove the cap of the bottle holder from the air compressor.
3. Remove the cap of the tyre sealant bottle. NOTE
Leave the bottle seal intact. Screwing the
bottle onto the bottle holder will pierce the
seal of the bottle.
4. Screw the bottle clockwise onto the bottle holder of the air compressor.
5. Remove the cap of the tyre valve on the flat tyre.
6. Remove the protective cap of the hose and screw the air tube j
Ao fthe compressor securely onto
the tyre valve. Make sure that the air compressor
switch is in the “OFF” (0) position and the pres-
sure release valve j
Bi ssecurely closed, then
insert its power plug into the power outlet in the
vehicle. SCE0867Z
SCE0868 SCE0870Z
6-8 In case of emergency
Page 265 of 340

1. If the booster battery is in another vehicle
jA,
position the two vehicles j
Aa ndjBt obring the
batteries into close proximity to each other.
CAUTION
• Do not allow the two vehicles to touch.
• If the battery of vehicle
jBe quipped with
the Remote Control Key system is dis- charged, the steering wheel will lock and
cannot be turned with the ignition switch
in the OFF position. Supply power using
jumper cables before pushing the ignition
switch to any position other than the OFF
position and disengaging the steering lock.
2. Apply the parking brake. 3.
Automatic transmission (AT) model:
Move the shift lever to the P(Park) position.
Manual transmission (MT) model:
Move the shift lever to the N(Neutral) position.
4. Switch off all unnecessary electrical systems (headlights, heater, air conditioner, etc.).
5. Place the ignition switch in the OFFposition.
6. Remove the vent caps, where fitted, on the bat- tery.
7. Cover the battery with afirmly wrung out moist
cloth to reduce the hazard of an explosion.
8. Connect the jumper cables in the sequence as illustrated ( ➀,
➁ ,
➂ ,
➃ ).
CAUTION
• Always connect positive
j+t opositive
j +a nd negative j-t obody ground, NOT
to the battery’s negative j
-.
• Be sure that the jumper cables do not
touch moving parts in the engine compart-
ment.
• Be sure that the jumper cable’s clamps do
not contact any other metal.
9. Start the engine of the booster vehicle j
Aa nd let
it run for afew minutes.
10. Depress the accelerator pedal of the booster vehicle j
At orace the engine at about 2,000
rpm. NCE477
M9T 2.3DCI engine models
In case of emergency6-11
Page 267 of 340

4.
Automatic transmission model:
Move the shift lever to the P(Park) position.
Manual transmission model:
Move the shift lever to the N(Neutral) position.
DO NOT STOP THE ENGINE.
5. Open all the windows.
6. Turn off the air conditioner. Move the tempera- ture control to maximum hot and the fan control
to high speed.
7. Get out from the vehicle.
8. Visually inspect and listen for steam or coolant escaping from the radiator before opening the
bonnet. Wait until no steam or coolant can be
seen before proceeding.
9. Open the engine bonnet.
10. Visually inspect if the cooling fan is running.
11. Visually inspect the radiator and radiator hoses for leakage. If the cooling fan is not running or
the coolant is leaking, stop the engine.
12. After the engine cools down, check the coolant level in the reservoir with the engine running.
Do not open the radiator or coolant reservoir
cap.
13. Add coolant to the reservoir if necessary.
Have your vehicle inspected/repaired at an
approved dealer or qualified workshop. When towing your vehicle, local regulations for tow-
ing must be followed. Incorrect towing equipment
could damage your vehicle. To assure proper tow-
ing and to prevent accidental damage to your ve-
hicle, RENAULT recommends that you have profes-
sional road assistance personnel tow your vehicle. It
is advisable to have the professional road assistant
carefully read the following precautions.
TOWING PRECAUTIONS
• Be sure that the transmission, steering system
and powertrain are in working condition before
towing. If any units are damaged, the vehicle
must be towed using
adolly or flatbed tow truck.
(Two- Wheel Drive (2WD) model)
• RENAULT recommends that your vehicle be
towed with the driving wheels off the ground.
(Two- Wheel Drive (2WD) model)
• To tow
avehicle with automatic transmission,
and appropriate vehicle dolly MUSTbe placed
under the towed vehicles drive wheels. Always
follow the dolly manufacturer’s recommenda-
tions when using their product.
• Always attach safety chains before towing.
• Never tow Four-Wheel Drive (4WD) model with
any of the wheels on the ground as this may
cause serious and expensive damage to the driv-
etrain. TOWING RECOMMENDED BY
RENAULT
Towing Two-Wheel Drive (2WD) models
Front wheels on the ground:
1. Place the ignition switch in the “ON” position and
turn all accessories off. NCE482
TOWING YOUR VEHICLE
In case of emergency6-13
Page 268 of 340

2. Secure the steering wheel in
astraight ahead
position with rope or similar device.
3. Move the shift lever to the N(Neutral) position.
4. Release the parking brake.
5. Attach safety chains before towing.
Rear wheels on the ground:
RENAULT recommends that towing dollies be used
under the rear wheels when towing your vehicle or
the vehicle be placed on aflatbed tow truck as illus-
trated.
CAUTION
Never tow Automatic Transmission (AT) model
with the rear wheels on the ground. Doing so will
cause serious and expensive damage to the
transmission.
Manual Transmission (MT) model:
If you have to tow aMTvehicle with rear wheels on
the ground, perform the following procedures.
CAUTION
Observe the following restricted towing speeds
and distances.
• Speed: Below 50 km/h (30 MPH)
• Distance: Less than 65 km (40 miles)
1. Place the ignition switch in the “ON” position and turn all accessories off.
2. Move the shift lever to the N(Neutral) position.
3. Release the parking brake. 4. Attach safety chains whenever towing.
All four wheels on the ground:
RENAULT recommends that the vehicle be placed
on
aflatbed tow truck as illustrated.
CAUTION
Never tow Automatic Transmission (AT) model
with all four wheels on the ground. Doing so will
cause serious and expensive damage to the driv-
etrain.
Manual Transmission (MT) model:
If you have to tow aMTvehicle with all four wheels
on the ground, perform the following procedures.
CAUTION
• Never tow
aManual Transmission (MT) model
backward with all four wheels on the ground.
• Observe the following restricted towing
speeds and distances.
–S
peed: Below 50 km/h (30 MPH)
–D istance: Less than 65 km (40 miles)
1. Place the ignition switch in the “ON” position and turn all accessories off.
2. Move the shift lever to the N(Neutral) position.
3. Release the parking brake.
6-14 In case of emergency