Page 191 of 536

UNDERSTANDING YOUR INSTRUMENT PANELCONTENTS � INSTRUMENT PANEL FEATURES .......... .191
� INSTRUMENT CLUSTER ................. .192
� WARNING AND INDICATOR LIGHTS ....... .196
▫ Red Telltale Indicator Lights .............. .197
▫ Yellow Telltale Indicator Lights ............ .204
▫ Green Telltale Indicator Lights ............. .215
▫ Blue Telltale Indicator Lights .............. .217
▫ White Telltale Indicator Lights ............. .217
� INSTRUMENT CLUSTER DISPLAY .......... .218
▫ Instrument Cluster Display Controls ........ .218
▫ Instrument Cluster Display Screens ......... .221
▫ Oil Life Reset ......................... .223
▫ Instrument Cluster Display Selectable Menu Items . .224
▫ Instrument Cluster Display Messages ........ .230 ▫ Battery Saver On/Battery Saver Mode Message —
Electrical Load Reduction Actions —
If Equipped ......................... .232
� CYBERSECURITY ....................... .234
� UCONNECT SETTINGS .................. .236
▫ Buttons On The Faceplate ................ .237
▫ Buttons On The Touchscreen .............. .237
▫ Customer Programmable Features —
Uconnect 5.0 Personal Settings ............. .237
▫ Customer Programmable Features —
Uconnect 8.4/8.4 NAV Personal Settings ..... .255
� UCONNECT RADIOS — IF EQUIPPED ....... .273
� IPOD/USB/MP3 CONTROL — IF EQUIPPED . . . .273
� STEERING WHEEL AUDIO CONTROLS —
IF EQUIPPED ......................... .274
▫ Radio Operation ....................... .2744
Page 219 of 536
Blue Telltale Indicator Lights
High Beam Indicator Light
Blue Telltale
Light What It Means
High Beam Indicator Light
This indicator shows that the high beam headlights are on. Push the multifunction control lever
away from you to switch the headlights to high beam. Pull the lever toward you to switch the
headlights back to low beam. Pull the lever toward you for a temporary high beam on, � flash to
pass � scenario.
White Telltale Indicator Lights
Cruise Control Ready Indicator Light
White Telltale
Light What It Means
Cruise Control Ready Indicator Light
This light will turn on when the speed control is on, but not set. 4UNDERSTANDING YOUR INSTRUMENT PANEL 217
Page 240 of 536

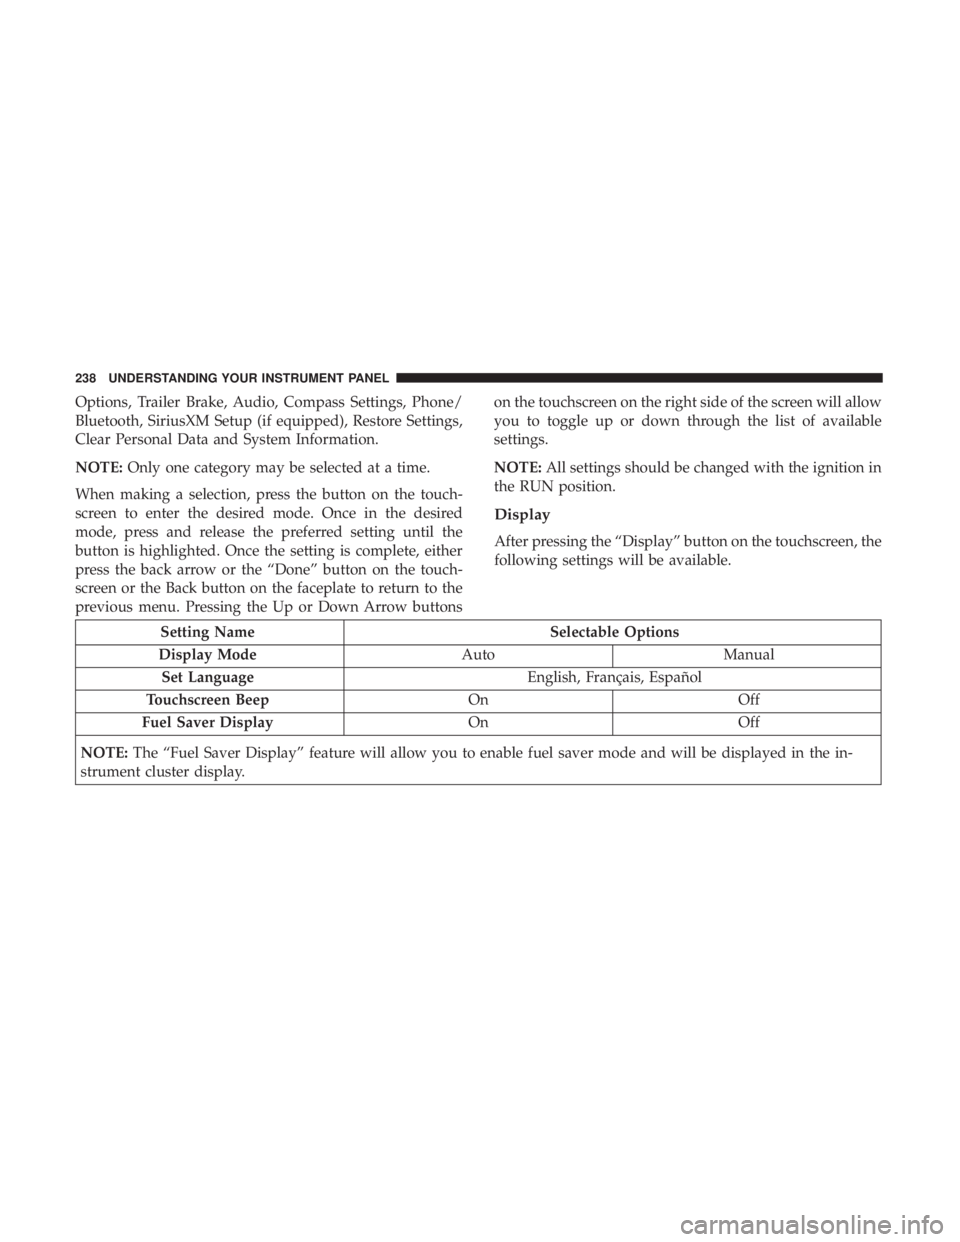
Options, Trailer Brake, Audio, Compass Settings, Phone/
Bluetooth, SiriusXM Setup (if equipped), Restore Settings,
Clear Personal Data and System Information.
NOTE: Only one category may be selected at a time.
When making a selection, press the button on the touch-
screen to enter the desired mode. Once in the desired
mode, press and release the preferred setting until the
button is highlighted. Once the setting is complete, either
press the back arrow or the “Done” button on the touch-
screen or the Back button on the faceplate to return to the
previous menu. Pressing the Up or Down Arrow buttons on the touchscreen on the right side of the screen will allow
you to toggle up or down through the list of available
settings.
NOTE: All settings should be changed with the ignition in
the RUN position.
Display
After pressing the “Display” button on the touchscreen, the
following settings will be available.
Setting Name Selectable Options
Display Mode Auto Manual
Set Language English, Français, Español
Touchscreen Beep On Off
Fuel Saver Display On Off
NOTE: The “Fuel Saver Display” feature will allow you to enable fuel saver mode and will be displayed in the in-
strument cluster display. 238 UNDERSTANDING YOUR INSTRUMENT PANEL
Page 253 of 536
Phone/Bluetooth
After pressing the “Phone/Bluetooth” button on the touch-
screen the following settings will be available:
Setting Name Selectable Options
Paired Phones List of Paired Phones
NOTE:
The “Paired Phones” feature shows which phones are paired to the Phone/Bluetooth system. For further information,
refer to the Uconnect Owner ’s Manual Supplement. Compass Variance Map 4UNDERSTANDING YOUR INSTRUMENT PANEL 251
Page 255 of 536
Restore Settings
After pressing the “Restore Settings” button on the touch-
screen the following settings will be available:
Setting Name Selectable Options
Restore Settings Yes Cancel
NOTE: When the “Restore Settings” feature is selected it will reset the Display, Clock, Audio, and Radio Settings to
their default settings. If “Yes” is selected a pop-up will appear asking � Are you sure you want to reset your settings
to default?” select “Yes” to restore, or “Cancel” to exit.
Clear Personal Data
After pressing the “Clear Personal Data Settings” button on
the touchscreen, the following settings will be available:
Setting Name Selectable Options
Clear Personal Data Yes Cancel
NOTE: When this feature is selected it will remove all personal data including Bluetooth devices and presets. If “Yes”
is selected a pop-up will appear asking � Are you sure you want to clear all personal data?” select “Yes” to Clear, or
“Cancel” to exit. 4UNDERSTANDING YOUR INSTRUMENT PANEL 253
Page 257 of 536

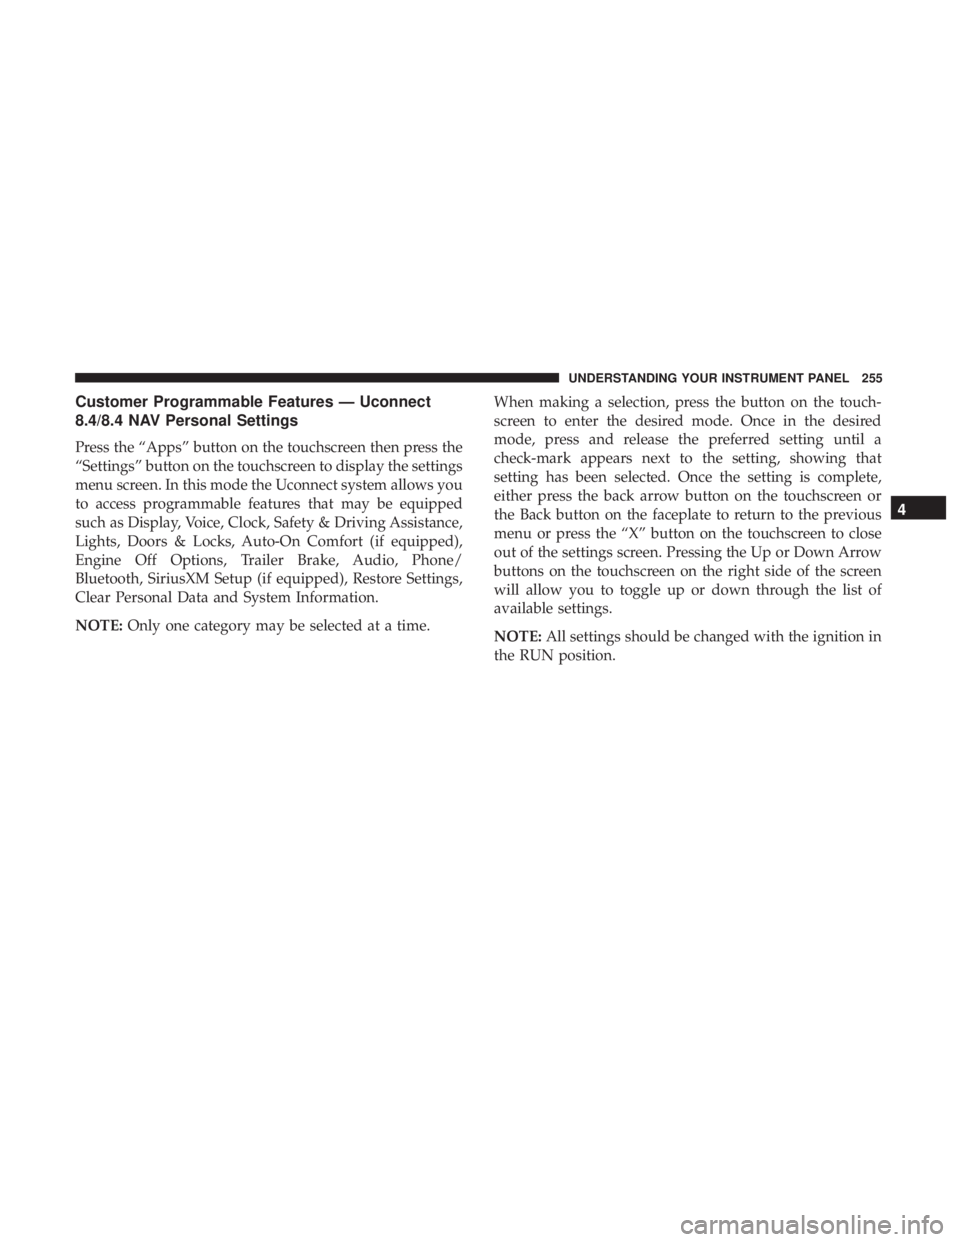
Customer Programmable Features — Uconnect
8.4/8.4 NAV Personal Settings
Press the “Apps” button on the touchscreen then press the
“Settings” button on the touchscreen to display the settings
menu screen. In this mode the Uconnect system allows you
to access programmable features that may be equipped
such as Display, Voice, Clock, Safety & Driving Assistance,
Lights, Doors & Locks, Auto-On Comfort (if equipped),
Engine Off Options, Trailer Brake, Audio, Phone/
Bluetooth, SiriusXM Setup (if equipped), Restore Settings,
Clear Personal Data and System Information.
NOTE: Only one category may be selected at a time. When making a selection, press the button on the touch-
screen to enter the desired mode. Once in the desired
mode, press and release the preferred setting until a
check-mark appears next to the setting, showing that
setting has been selected. Once the setting is complete,
either press the back arrow button on the touchscreen or
the Back button on the faceplate to return to the previous
menu or press the “X” button on the touchscreen to close
out of the settings screen. Pressing the Up or Down Arrow
buttons on the touchscreen on the right side of the screen
will allow you to toggle up or down through the list of
available settings.
NOTE: All settings should be changed with the ignition in
the RUN position. 4UNDERSTANDING YOUR INSTRUMENT PANEL 255
Page 271 of 536
Phone/Bluetooth
After pressing the “Phone/Bluetooth” button on the touch-
screen, the following settings will be available:
Setting Name Selectable Options
Paired Phones List Of Paired Phones
NOTE:
The “Paired Phones” feature shows which phones are paired to the Phone/Bluetooth system. For further information,
refer to the Uconnect Owner ’s Manual Supplement.
Paired Audio Sources List Of Paired Audio Sources
NOTE:
The “Paired Audio Sources” feature shows which Audio Sources are paired to the Phone/Bluetooth system. For fur-
ther information, refer to the Uconnect Owner ’s Manual Supplement. 4UNDERSTANDING YOUR INSTRUMENT PANEL 269
Page 274 of 536
Clear Personal Data
After pressing the “Clear Personal Data” button on the
touchscreen, the following settings will be available:
Setting Name Selectable Options
Clear Personal Data OK Cancel
NOTE:
When the “Clear Personal Data” feature is selected it will remove all personal data including Bluetooth devices and
presets.
System Information
After pressing the “System Information” button on the
touchscreen, the following settings will be available:
Setting Name Selectable Options
System Information System Software Information Screen
NOTE:
When the “System Information” feature is selected, a “System Software Information” screen will appear, displaying
the system software version. 272 UNDERSTANDING YOUR INSTRUMENT PANEL