Page 254 of 536

SiriusXM Setup — If Equipped
After pressing the “SiriusXM Setup” button on the touch-
screen, the following settings will be available:
Setting Name Selectable Options
Channel Skip List of Channels
NOTE: SiriusXM can be programmed to exclude undesirable channels while scanning. To make your selection, press
the “Channel Skip” button on the touchscreen, select the channels you would like to skip.
Subscription Info Sirius ID
NOTE:
New vehicle purchasers or lessees will receive a free limited time subscription to SiriusXM Satellite Radio with your
radio. Following the expiration of the free services, it will be necessary to access the information on the Subscription
Information screen to re-subscribe.
1. Press the “Subscription Info” button on the touchscreen to access the Subscription Information screen.
2. Write down the SIRIUS ID numbers for your receiver. To reactivate your service, either call the number listed on the
screen or visit the provider online.
SiriusXM Travel Link is a separate subscription and is available for U.S. residents only. 252 UNDERSTANDING YOUR INSTRUMENT PANEL
Page 255 of 536
Restore Settings
After pressing the “Restore Settings” button on the touch-
screen the following settings will be available:
Setting Name Selectable Options
Restore Settings Yes Cancel
NOTE: When the “Restore Settings” feature is selected it will reset the Display, Clock, Audio, and Radio Settings to
their default settings. If “Yes” is selected a pop-up will appear asking � Are you sure you want to reset your settings
to default?” select “Yes” to restore, or “Cancel” to exit.
Clear Personal Data
After pressing the “Clear Personal Data Settings” button on
the touchscreen, the following settings will be available:
Setting Name Selectable Options
Clear Personal Data Yes Cancel
NOTE: When this feature is selected it will remove all personal data including Bluetooth devices and presets. If “Yes”
is selected a pop-up will appear asking � Are you sure you want to clear all personal data?” select “Yes” to Clear, or
“Cancel” to exit. 4UNDERSTANDING YOUR INSTRUMENT PANEL 253
Page 258 of 536

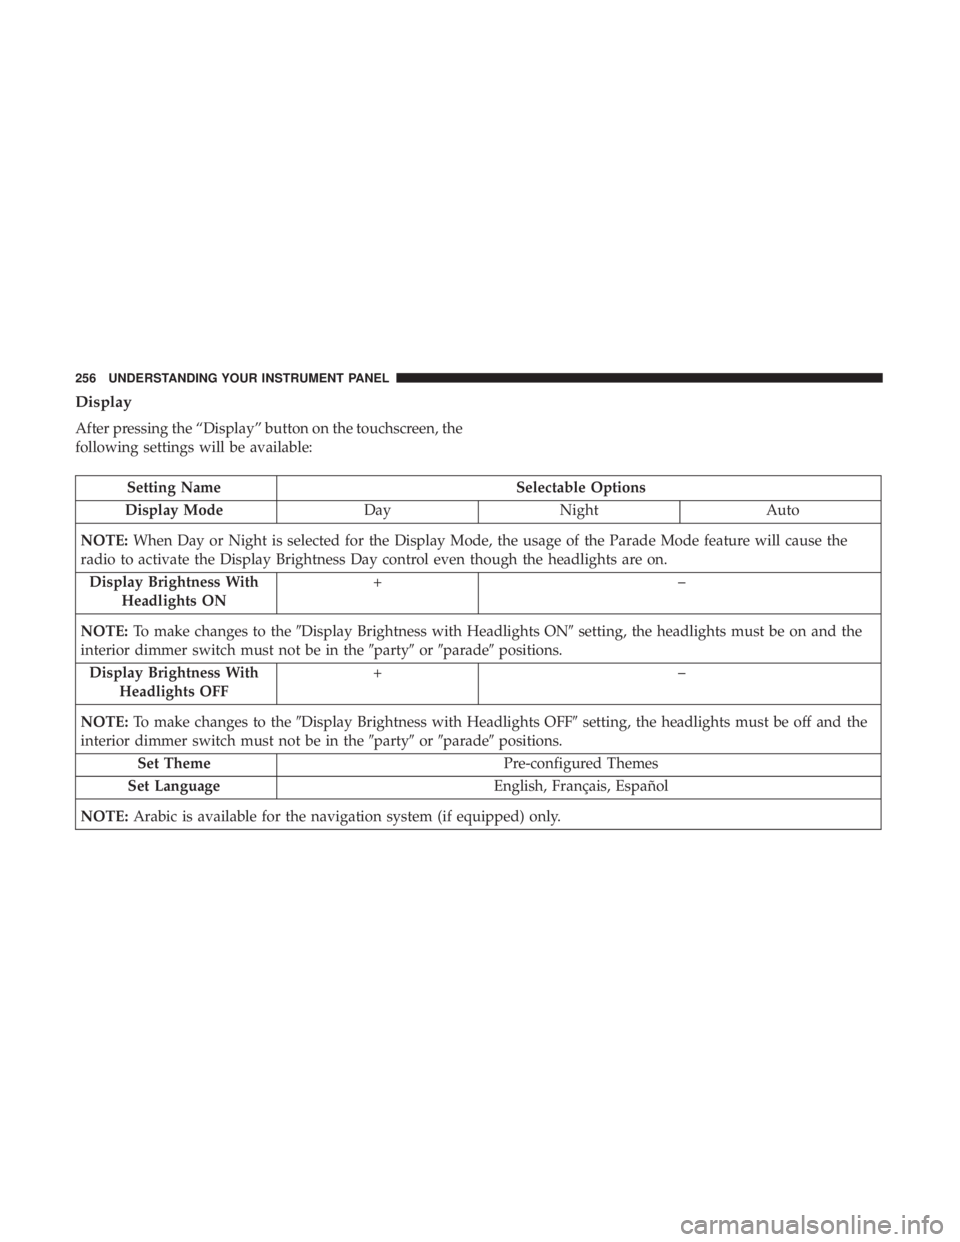
Display
After pressing the “Display” button on the touchscreen, the
following settings will be available:
Setting Name Selectable Options
Display Mode Day Night Auto
NOTE: When Day or Night is selected for the Display Mode, the usage of the Parade Mode feature will cause the
radio to activate the Display Brightness Day control even though the headlights are on.
Display Brightness With
Headlights ON +–
NOTE: To make changes to the � Display Brightness with Headlights ON � setting, the headlights must be on and the
interior dimmer switch must not be in the � party � or � parade � positions.
Display Brightness With
Headlights OFF +–
NOTE: To make changes to the � Display Brightness with Headlights OFF � setting, the headlights must be off and the
interior dimmer switch must not be in the � party � or � parade � positions.
Set Theme Pre-configured Themes
Set Language English, Français, Español
NOTE: Arabic is available for the navigation system (if equipped) only.256 UNDERSTANDING YOUR INSTRUMENT PANEL
Page 262 of 536

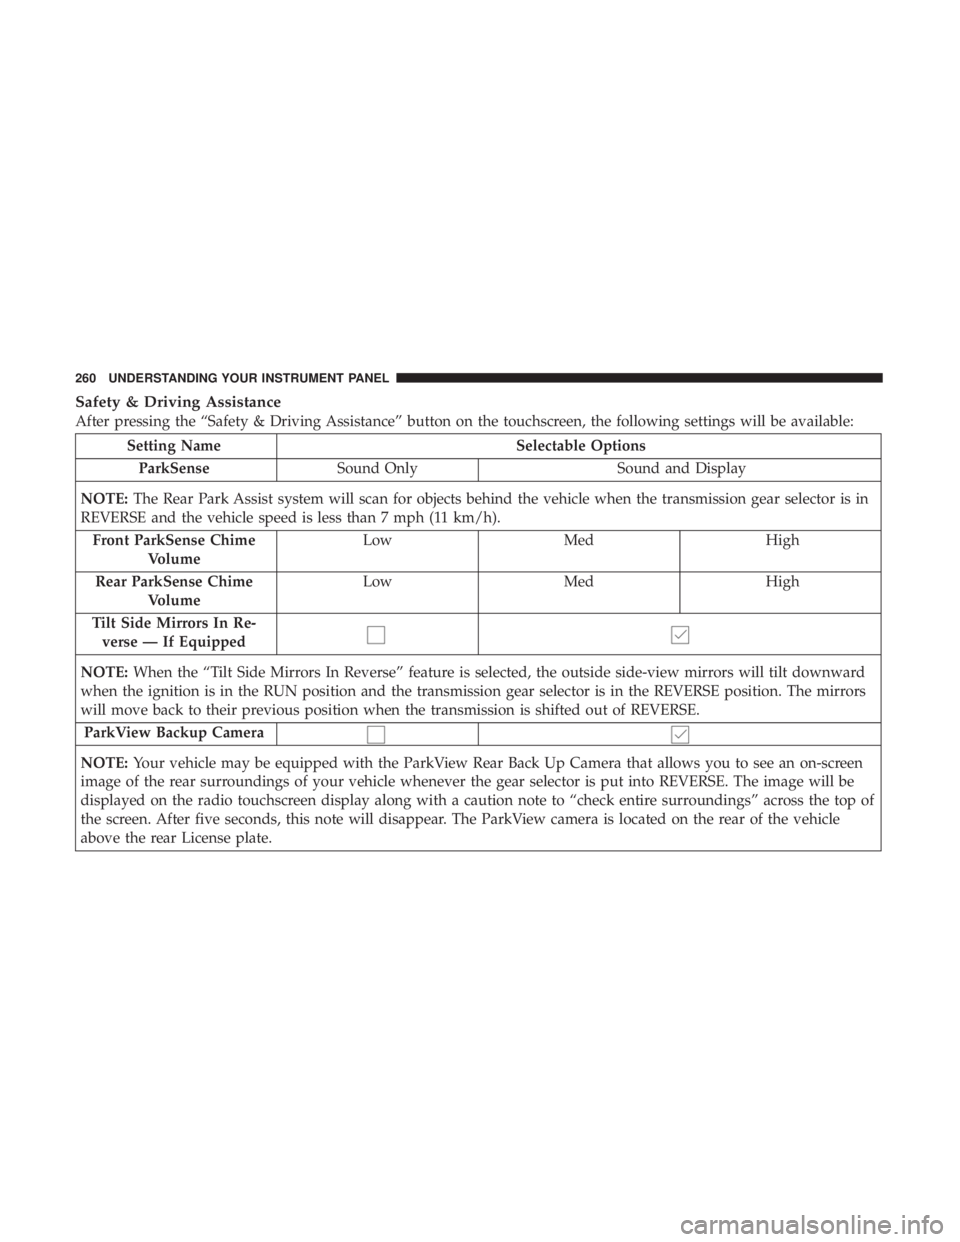
Safety & Driving Assistance
After pressing the “Safety & Driving Assistance” button on the touchscreen, the following settings will be available:
Setting Name Selectable Options
ParkSense Sound Only Sound and Display
NOTE: The Rear Park Assist system will scan for objects behind the vehicle when the transmission gear selector is in
REVERSE and the vehicle speed is less than 7 mph (11 km/h).
Front ParkSense Chime
Volume Low Med High
Rear ParkSense Chime
Volume Low Med High
Tilt Side Mirrors In Re-
verse — If Equipped
NOTE: When the “Tilt Side Mirrors In Reverse” feature is selected, the outside side-view mirrors will tilt downward
when the ignition is in the RUN position and the transmission gear selector is in the REVERSE position. The mirrors
will move back to their previous position when the transmission is shifted out of REVERSE.
ParkView Backup Camera
NOTE: Your vehicle may be equipped with the ParkView Rear Back Up Camera that allows you to see an on-screen
image of the rear surroundings of your vehicle whenever the gear selector is put into REVERSE. The image will be
displayed on the radio touchscreen display along with a caution note to “check entire surroundings” across the top of
the screen. After five seconds, this note will disappear. The ParkView camera is located on the rear of the vehicle
above the rear License plate. 260 UNDERSTANDING YOUR INSTRUMENT PANEL
Page 263 of 536

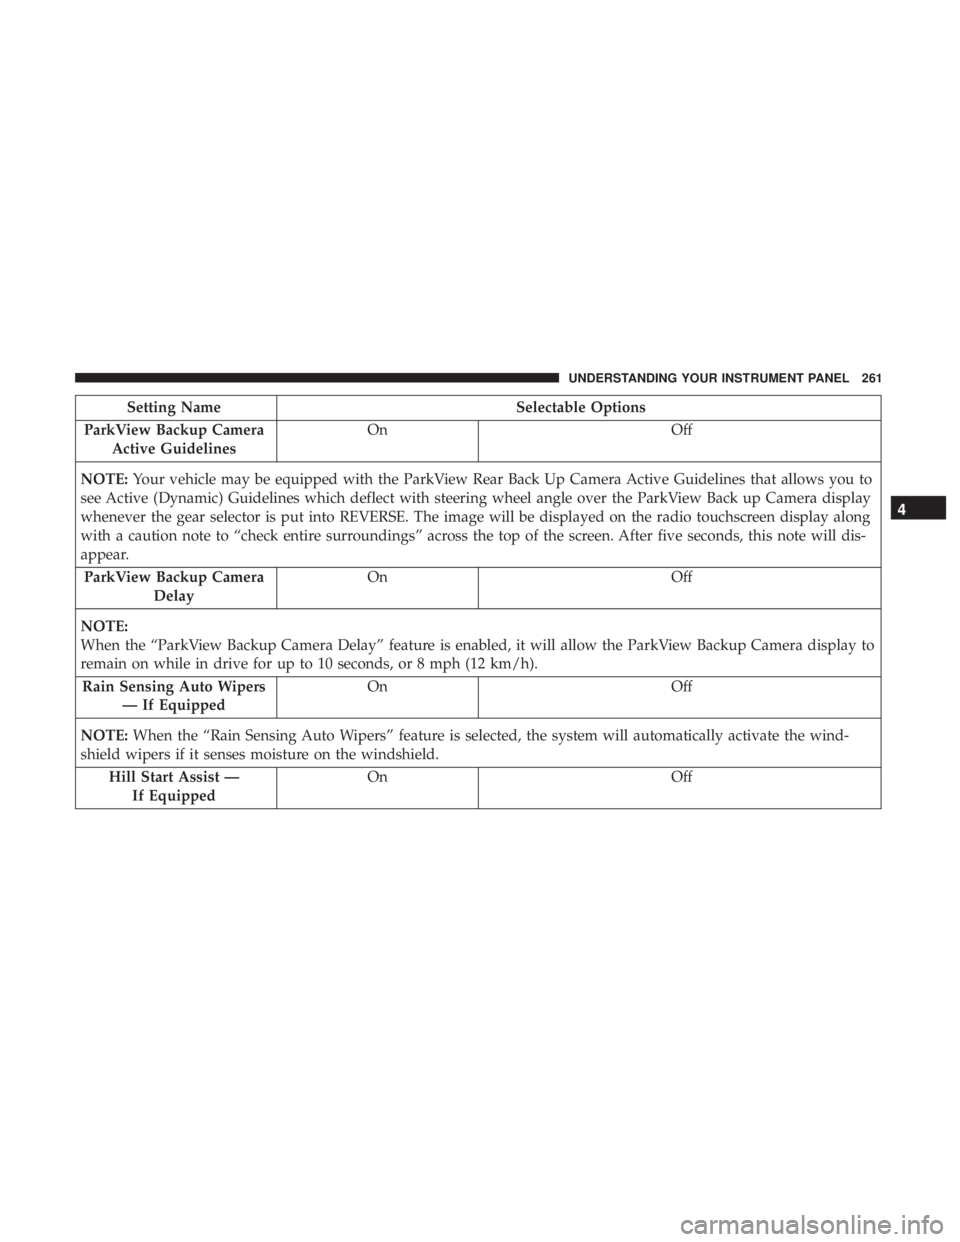
Setting Name Selectable Options
ParkView Backup Camera
Active Guidelines On Off
NOTE: Your vehicle may be equipped with the ParkView Rear Back Up Camera Active Guidelines that allows you to
see Active (Dynamic) Guidelines which deflect with steering wheel angle over the ParkView Back up Camera display
whenever the gear selector is put into REVERSE. The image will be displayed on the radio touchscreen display along
with a caution note to “check entire surroundings” across the top of the screen. After five seconds, this note will dis-
appear.
ParkView Backup Camera
Delay On Off
NOTE:
When the “ParkView Backup Camera Delay” feature is enabled, it will allow the ParkView Backup Camera display to
remain on while in drive for up to 10 seconds, or 8 mph (12 km/h).
Rain Sensing Auto Wipers
— If Equipped On Off
NOTE: When the “Rain Sensing Auto Wipers” feature is selected, the system will automatically activate the wind-
shield wipers if it senses moisture on the windshield.
Hill Start Assist —
If Equipped On Off 4UNDERSTANDING YOUR INSTRUMENT PANEL 261
Page 269 of 536

Engine Off Options
After pressing the “Engine Off Options” button on the
touchscreen, the following settings will be available:
Setting Name Selectable Options
Engine Off Power Delay +–
NOTE: When the “Engine Off Power Delay” feature is selected, the power window switches, radio, Uconnect phone
system (if equipped), DVD video system (if equipped), power sunroof (if equipped), and power outlets will remain
active for up to 10 minutes after the ignition is cycled to OFF. Opening either front door will cancel this feature.
Headlight Off Delay +“ –
NOTE: When the “Headlight Off Delay” feature is selected, the driver can choose to have the headlights remain on
for 0, 30, 60, or 90 seconds when exiting the vehicle.
Trailer Brake
After pressing the “Trailer Brake” button on the touch-
screen, the following settings will be available:
Setting Name Selectable Options
Trailer Select Trailer 1 Trailer 2 Trailer 3 Trailer 4
Trailer Brake Type Light Electric Heavy Electric Light EOH Heavy EOH 4UNDERSTANDING YOUR INSTRUMENT PANEL 267
Page 273 of 536

Setting Name Selectable Options
Subscription Info Sirius ID
NOTE:
New vehicle purchasers or lessees will receive a free limited time subscription to SiriusXM Satellite Radio with your
radio. Following the expiration of the free services, it will be necessary to access the information on the Subscription
Information screen to re-subscribe.
1. Press the “Subscription Info” button on the touchscreen to access the Subscription Information screen.
2. Write down the Sirius ID numbers for your receiver. To reactivate your service, either call the number listed on the
screen or visit the provider online.
SiriusXM Travel Link is a separate subscription and is available for U.S. residents only.
Restore Settings
After pressing the “Restore Settings” button on the touch-
screen, the following settings will be available:
Setting Name Selectable Options
Restore Settings OK Cancel
NOTE:
When the “Restore Settings” feature is selected it will reset all settings to their default settings. 4UNDERSTANDING YOUR INSTRUMENT PANEL 271
Page 275 of 536
UCONNECT RADIOS — IF EQUIPPED
For detailed information about your Uconnect radio, refer
to your Uconnect Owner ’s Manual Supplement.
IPOD/USB/MP3 CONTROL — IF EQUIPPED
Located inside the center console upper lid, this feature
allows an iPod or external USB device to be plugged into
the USB port.
iPod control supports the following: iPod/iPod classic,
iPod mini, iPod nano, iPod shuffle, iPod touch, and iPhone
devices. Some iPod software versions may not fully sup-
port the iPod control features. Please visit Apple’s website
for software updates.
For further information, refer to the Uconnect Owner ’s
Manual Supplement or visit UconnectPhone.com. Center Console USB/AUX Media Hub1 — USB Port
2— Aux Jack 4UNDERSTANDING YOUR INSTRUMENT PANEL 273