2017 RAM CHASSIS CAB oil type
[x] Cancel search: oil typePage 92 of 536

ENGINE BREAK-IN RECOMMENDATIONS
A long break-in period is not required for the engine and
drivetrain (transmission and axle) in your vehicle.
Drive moderately during the first 300 miles (500 km). After
the initial 60 miles (100 km), speeds up to 50 or 55 mph (80
or 90 km/h) are desirable.
While cruising, brief full-throttle acceleration within the
limits of local traffic laws contributes to a good break-in.
Wide-open throttle acceleration in low gear can be detri-
mental and should be avoided.
The engine oil installed in the engine at the factory is a
high-quality energy conserving type lubricant. Oil changes
should be consistent with anticipated climate conditions
under which vehicle operations will occur. For the recom-
mended viscosity and quality grades, refer to “Mainte-
nance Procedures” in “Maintaining Your Vehicle.”
CAUTION!Never use Non-Detergent Oil or Straight Mineral Oil
in the engine or damage may result. NOTE: A new engine may consume some oil during its
first few thousand miles (kilometers) of operation. This
should be considered a normal part of the break-in and not
interpreted as a problem. Please check your oil level with
the engine oil indicator often during the break in period.
Add oil as required.
Diesel Engine
The Cummins turbocharged diesel engine does not require
a break-in period due to its construction. Normal operation
is allowed, providing the following recommendations are
followed:
• Warm up the engine before placing it under load.
• Do not operate the engine at idle for prolonged periods.
• Use the appropriate transmission gear to prevent engine
lugging.
• Observe vehicle oil pressure and temperature indicators.
• Check the coolant and oil levels frequently.
• Vary throttle position at highway speeds when carrying
or towing significant weight.90 THINGS TO KNOW BEFORE STARTING YOUR VEHICLE
Page 224 of 536

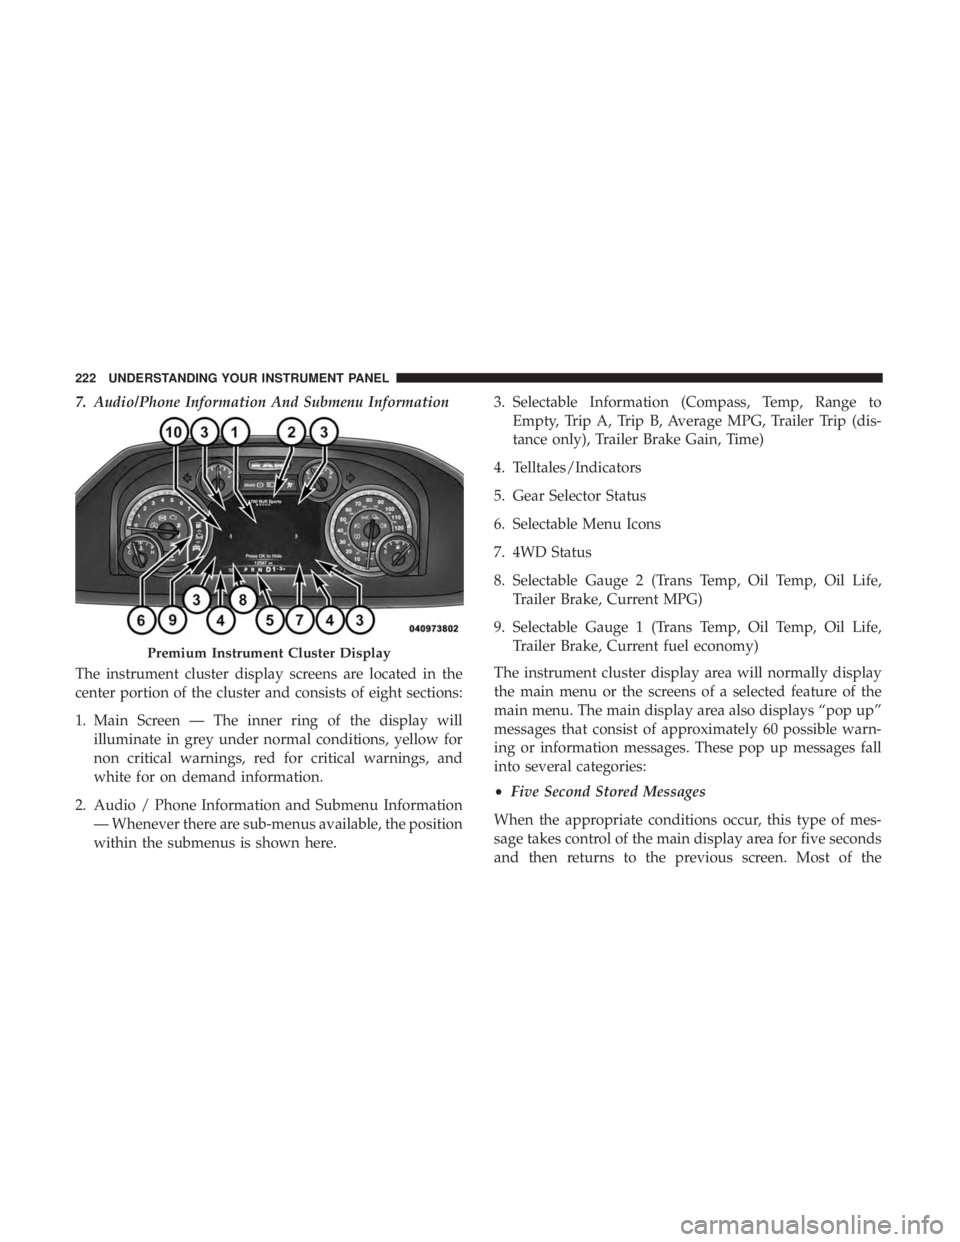
7. Audio/Phone Information And Submenu Information
The instrument cluster display screens are located in the
center portion of the cluster and consists of eight sections:
1. Main Screen — The inner ring of the display will
illuminate in grey under normal conditions, yellow for
non critical warnings, red for critical warnings, and
white for on demand information.
2. Audio / Phone Information and Submenu Information
— Whenever there are sub-menus available, the position
within the submenus is shown here. 3. Selectable Information (Compass, Temp, Range to
Empty, Trip A, Trip B, Average MPG, Trailer Trip (dis-
tance only), Trailer Brake Gain, Time)
4. Telltales/Indicators
5. Gear Selector Status
6. Selectable Menu Icons
7. 4WD Status
8. Selectable Gauge 2 (Trans Temp, Oil Temp, Oil Life,
Trailer Brake, Current MPG)
9. Selectable Gauge 1 (Trans Temp, Oil Temp, Oil Life,
Trailer Brake, Current fuel economy)
The instrument cluster display area will normally display
the main menu or the screens of a selected feature of the
main menu. The main display area also displays “pop up”
messages that consist of approximately 60 possible warn-
ing or information messages. These pop up messages fall
into several categories:
• Five Second Stored Messages
When the appropriate conditions occur, this type of mes-
sage takes control of the main display area for five seconds
and then returns to the previous screen. Most of thePremium Instrument Cluster Display222 UNDERSTANDING YOUR INSTRUMENT PANEL
Page 225 of 536

messages of this type are then stored (as long as the
condition that activated it remains active) and can be
reviewed from the “Messages” main menu item. As long as
there is a stored message, an “i” will be displayed in the
instrument cluster display’s compass/outside temp line.
Examples of this message type are “Right Front Turn Signal
Lamp Out” and “Low Tire Pressure.”
• Unstored Messages
This message type is displayed indefinitely or until the
condition that activated the message is cleared. Examples
of this message type are “Turn Signal On” (if a turn signal
is left on) and “Lights On” (if driver leaves the vehicle).
• Unstored Messages Until RUN
These messages deal primarily with the Remote Start
feature. This message type is displayed until the ignition is
in the RUN state. Examples of this message type are
“Remote Start Aborted - Door Ajar” and “Press Brake
Pedal and Push Button to Start.”
• Five Second Unstored Messages
When the appropriate conditions occur, this type of mes-
sage takes control of the main display area for five seconds
and then returns to the previous screen. An example of this
message type is “Automatic High Beams On.” Oil Life Reset
Your vehicle is equipped with an engine oil change indi-
cator system. The “Oil Change Required” message will
display in the instrument cluster display after a single
chime has sounded, to indicate the next scheduled oil
change interval. The engine oil change indicator system is
duty cycle based, which means the engine oil change
interval may fluctuate, dependent upon your personal
driving style.
NOTE: Use the steering wheel instrument cluster display
controls for the following procedure(s).
Vehicles Equipped With Passive Entry
1. Without pushing the brake pedal, push the ENGINE
START/STOP button and place the ignition to the
ON/RUN position (do not start the engine).
2. Push and release the down arrow button to scroll
downward through the main menu to “Vehicle Info.”
3. Push and release the right arrow button to access the
”Vehicle Info” screen, then scroll up or down to select
“Oil Life.”
4. Push and hold the right arrow button to select “Reset”. 4UNDERSTANDING YOUR INSTRUMENT PANEL 223
Page 227 of 536

• Oil Pressure — If Equipped
• Oil Life
• Battery Voltage — If Equipped
• Gauge Summary — If Equipped
• Engine Hours
Fuel Economy
Push and release the up or down arrow button until the
Fuel Economy menu item is highlighted in the instrument
cluster display. Push and Hold the right arrow button to
reset Average Fuel Economy.
• Current Fuel Economy Gauge
• Average Fuel Economy Value
• Range To Empty
• Dual Fuel Tank levels — If Equipped
• Push and release the right arrow button to display the
Fuel Tank Level submenu item. Your instrument cluster
display will display the fuel levels of the Front and Rear
fuel tanks. The fuel is automatically transferred from the
Rear tank to the Front tank based on both tank levels.
Fuel transfer is complete once the Front Fuel Level is
greater than the Rear Fuel Level. Trip A/Trip B
Push and release the up or down arrow button until the
Trip menu item is highlighted in the instrument cluster
display. Push and release the right arrow button to enter
the submenus of Trip A and Trip B. The Trip A or Trip B
information will display the following:
• Distance
• Average fuel economy
• Elapsed Time
Push and hold right arrow button to reset all information.
Trailer Tow
Push and release the up or down arrow button until the
Trailer Tow menu item is highlighted in the instrument
cluster display. Push and release the right arrow button
and the next screen will display the following trailer trip
information:
• Trip (trailer specific) Distance: Push and hold the right
arrow button to reset the distance.
• Trailer Brake
• Output
• Type
• Gain 4UNDERSTANDING YOUR INSTRUMENT PANEL 225
Page 429 of 536

CAUTION!Driving with a hot cooling system could damage your
vehicle. If the temperature gauge reads HOT (H), pull
over and stop the vehicle. Idle the vehicle with the air
conditioner turned off until the pointer drops back
into the normal range. If the pointer remains on HOT
(H), and you hear continuous chimes, turn the engine
off immediately and call for service.
WHEEL AND TIRE TORQUE SPECIFICATIONS
Proper lug nut/bolt torque is very important to ensure that
the wheel is properly mounted to the vehicle. Any time a
wheel has been removed and reinstalled on the vehicle, the
lug nuts/bolts should be torqued using a properly cali-
brated torque wrench. Torque Specifications
Lug Nut/Bolt
Torque Lug Nut/
Bolt Type **Lug
Nut/Bolt
Size Lug Nut/
Bolt
Socket
Size
120-150 Ft-Lbs
(160-200 N·m) Cone M14 x
1.50 22 mm
130-160 Ft-Lbs
(190-220 N·m) Flanged
**Use only your authorized dealer recommended lug nuts/
bolts and clean or remove any dirt or oil before tightening.
Inspect the wheel mounting surface prior to mounting the
tire and remove any corrosion or loose particles. 6WHAT TO DO IN EMERGENCIES 427
Page 454 of 536

Checking the oil while the vehicle is on level ground will
improve the accuracy of the oil level readings. Always
maintain the oil level within the SAFE zone on the dipstick.
Adding one quart of oil when the reading is at the bottom
of the SAFE zone will result in a reading at the top of the
safe zone on these engines.
CAUTION!Overfilling or underfilling the crankcase will cause oil
aeration or loss of oil pressure. This could damage your
engine.
Change Engine Oil
The oil change indicator system will remind you that it is
time to take your vehicle in for scheduled maintenance.
Refer to the “Maintenance Schedule” for further informa-
tion.
NOTE: Under no circumstances should oil change inter-
vals exceed 8,000 miles (13,000 km), twelve months or 350
hours of engine run time, whichever comes first. The 350
hours of engine run or idle time is generally only a concern
for fleet customers. Engine Oil Selection — 6.4L Engine
For best performance and maximum protection under all
types of operating conditions, the manufacturer only rec-
ommends engine oils that are API Certified and meet the
requirements of FCA Material Standard MS-12633.
American Petroleum Institute (API) Engine Oil
Identification Symbol
This symbol means that the oil has been
certified by the American Petroleum In-
stitute (API). The manufacturer only rec-
ommends API Certified engine oils.
This symbol certifies 0W-20, 5W-20, 0W-
30, 5W-30 and 10W-30 engine oils.
CAUTION!Do not use chemical flushes in your engine oil as the
chemicals can damage your engine. Such damage is not
covered by the New Vehicle Limited Warranty.452 MAINTAINING YOUR VEHICLE
Page 455 of 536

Engine Oil Viscosity (SAE Grade) — 6.4L Engine
Use MOPAR SAE 0W-40 engine oil approved to FCA
Material Standard MS-12633 such as Pennzoil Ultra
equivalent is recommended for all operating temperatures.
The engine oil filler cap also shows the recommended
engine oil viscosity for your engine. For information on
engine oil filler cap location, refer to the “Engine Compart-
ment” illustration in this section.
Lubricants which do not have both the engine oil certifi-
cation mark and the correct SAE viscosity grade number
should not be used.
Synthetic Engine Oils
You may use synthetic engine oils provided the recom-
mended oil quality requirements are met, and the recom-
mended maintenance intervals for oil and filter changes are
followed.
Synthetic engine oils which do not have both the engine oil
certification mark and the correct SAE viscosity grade
number should not be used. Disposing Of Used Engine Oil And Oil Filters
Care should be taken in disposing of used engine oil and
oil filters from your vehicle. Used oil and oil filters,
indiscriminately discarded, can present a problem to the
environment. Contact your authorized dealer, service sta-
tion or governmental agency for advice on how and where
used oil and oil filters can be safely discarded in your area.
Engine Oil Filter
The engine oil filter should be replaced with a new filter at
every engine oil change.
Engine Oil Filter Selection
The manufacturer’s engines have a full-flow type oil filter.
Use a filter of this type for replacement. The quality of
replacement filters varies considerably. Only high-quality
filters should be used to assure most efficient service.
MOPAR engine oil filters are a high-quality oil filter and
are recommended. 7MAINTAINING YOUR VEHICLE 453
Page 467 of 536

Front Prop Shaft Lubrication — Four-Wheel Drive
Models
Lubricate the front driveshaft grease fitting at each oil
change. The grease fitting is located at the rear of the front
driveshaft, near the centering mechanism of double cardan
joint. Refer to the “Maintenance Schedule” for the proper
maintenance intervals. Use MOPAR Type MS-6560
(lithium-based grease), or equivalent.
Front Drive Shaft Double Cardan Joint
Double Cardan Joint1 — Double Cardan Joint
2 — Grease Fitting
3 — Exploded View – Grease Fitting 7MAINTAINING YOUR VEHICLE 465