2017 PEUGEOT PARTNER TEPEE ELECTRIC roof
[x] Cancel search: roofPage 71 of 252
33
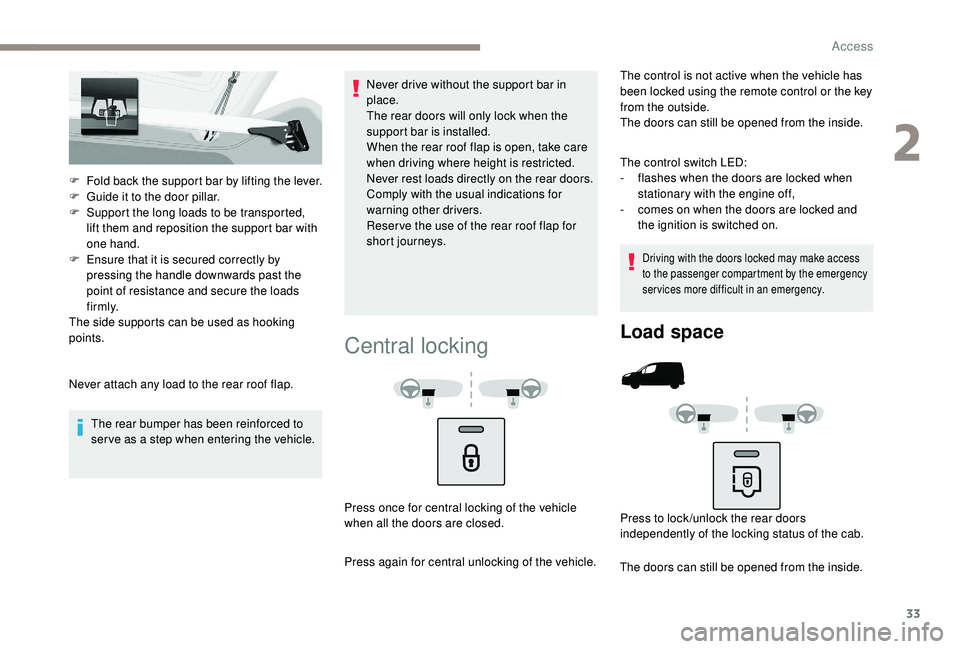
F Fold back the support bar by lifting the lever.
F G uide it to the door pillar.
F
S
upport the long loads to be transported,
lift them and reposition the support bar with
one hand.
F
E
nsure that it is secured correctly by
pressing the handle downwards past the
point of resistance and secure the loads
f i r m l y.
The side supports can be used as hooking
points.
Never attach any load to the rear roof flap.
The rear bumper has been reinforced to
serve as a step when entering the vehicle. Never drive without the support bar in
place.
The rear doors will only lock when the
support bar is installed.
When the rear roof flap is open, take care
when driving where height is restricted.
Never rest loads directly on the rear doors.
Comply with the usual indications for
warning other drivers.
Reser ve the use of the rear roof flap for
short journeys.
Central locking
The control is not active when the vehicle has
been locked using the remote control or the key
from the outside.
The doors can still be opened from the inside.
The control switch LED:
-
f
lashes when the doors are locked when
stationary with the engine off,
-
c
omes on when the doors are locked and
the ignition is switched on.
Driving with the doors locked may make access
to the passenger compartment by the emergency
services more difficult in an emergency.
Press once for central locking of the vehicle
when all the doors are closed.
Press again for central unlocking of the vehicle.
Load space
Press to lock /unlock the rear doors
independently of the locking status of the cab.
The doors can still be opened from the inside.
2
Access
Page 94 of 252
56
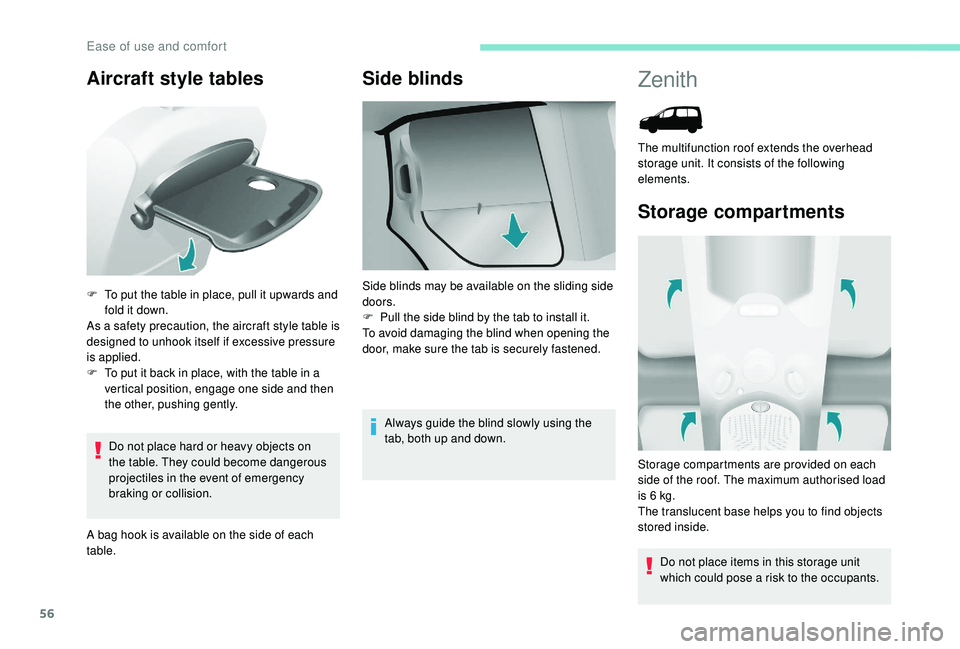
Aircraft style tables
Do not place hard or heavy objects on
the table. They could become dangerous
projectiles in the event of emergency
braking or collision.
A bag hook is available on the side of each
table.
Side blinds
F To put the table in place, pull it upwards and fold it down.
As a safety precaution, the aircraft style table is
designed to unhook itself if excessive pressure
is applied.
F
T
o put it back in place, with the table in a
vertical position, engage one side and then
the other, pushing gently.
Always guide the blind slowly using the
tab, both up and down.
Side blinds may be available on the sliding side
doors.
F
P
ull the side blind by the tab to install it.
To avoid damaging the blind when opening the
door, make sure the tab is securely fastened.
Zenith
Storage compartments
Storage compartments are provided on each
side of the roof. The maximum authorised load
is 6
kg.
The translucent base helps you to find objects
stored inside.
Do not place items in this storage unit
which could pose a risk to the occupants.
The multifunction roof extends the overhead
storage unit. It consists of the following
elements.
Ease of use and comfort
Page 95 of 252
57
Courtesy lamp
For more information on the Courtesy
lamps, refer to the corresponding section.
Rear box
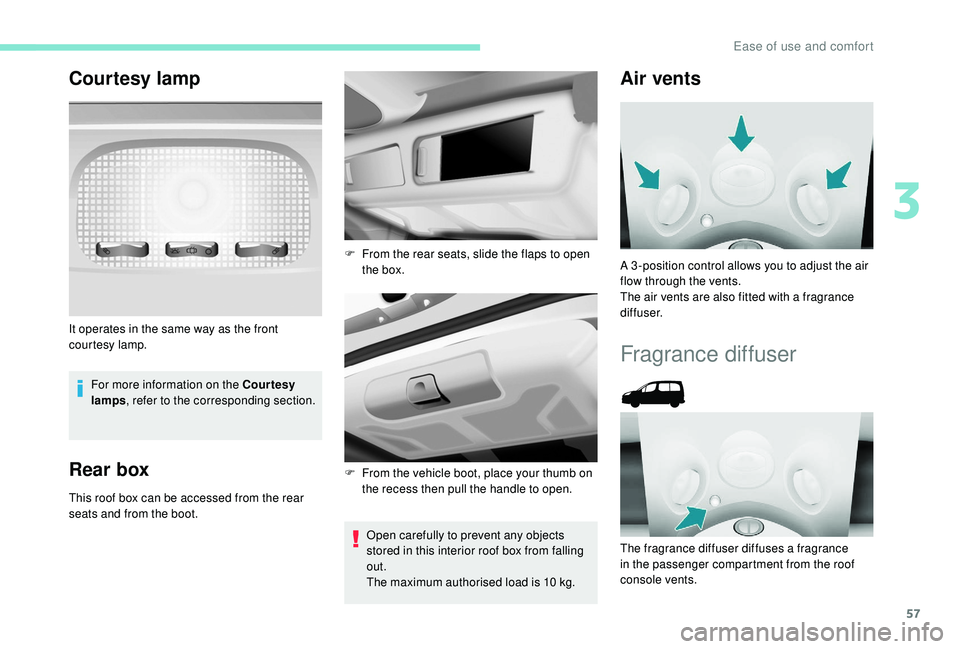
This roof box can be accessed from the rear
seats and from the boot.
Open carefully to prevent any objects
stored in this interior roof box from falling
out.
The maximum authorised load is 10
kg.
It operates in the same way as the front
courtesy lamp.
F
F
rom the rear seats, slide the flaps to open
the box.
F
F
rom the vehicle boot, place your thumb on
the recess then pull the handle to open.
Air vents
A 3 -position control allows you to adjust the air
flow through the vents.
The air vents are also fitted with a fragrance
diffuser.
Fragrance diffuser
The fragrance diffuser diffuses a fragrance
in the passenger compartment from the roof
console vents.
3
Ease of use and comfort
Page 96 of 252
58
Flow adjustment
Removing the fragrance diffuser
Replacing a cartridge
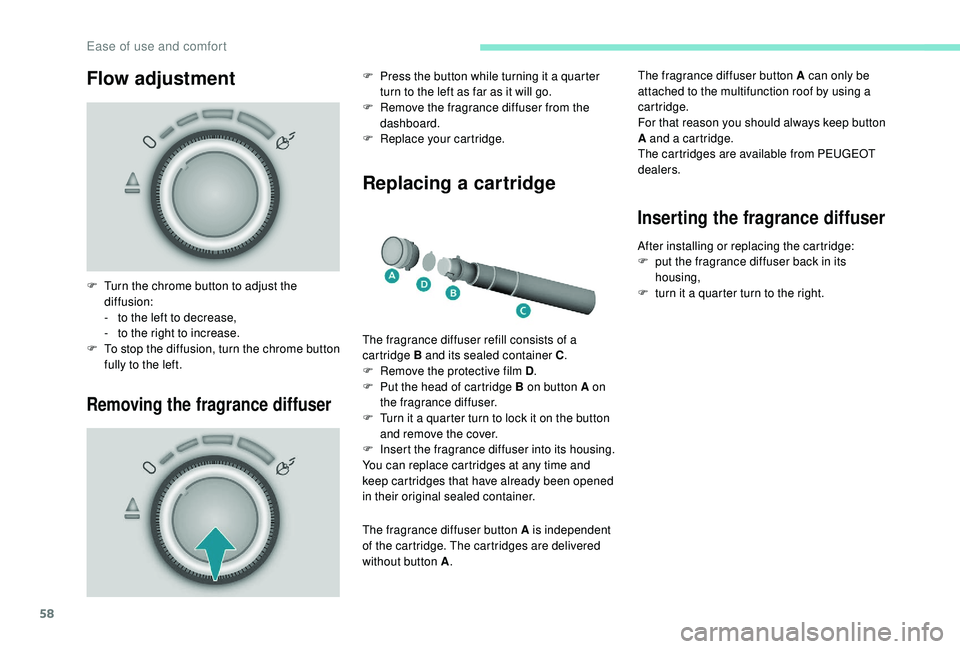
F Turn the chrome button to adjust the diffusion:
-
t
o the left to decrease,
-
t
o the right to increase.
F
T
o stop the diffusion, turn the chrome button
fully to the left. F
P
ress the button while turning it a quarter
turn to the left as far as it will go.
F
R
emove the fragrance diffuser from the
dashboard.
F
R
eplace your cartridge.
The fragrance diffuser refill consists of a
cartridge B and its sealed container C .
F
R
emove the protective film D.
F
P
ut the head of cartridge B on button A on
the fragrance diffuser.
F
T
urn it a quarter turn to lock it on the button
and remove the cover.
F
I
nsert the fragrance diffuser into its housing.
You can replace cartridges at any time and
keep cartridges that have already been opened
in their original sealed container.
The fragrance diffuser button A is independent
of the cartridge. The cartridges are delivered
without button A . The fragrance diffuser button A can only be
attached to the multifunction roof by using a
cartridge.
For that reason you should always keep button
A and a cartridge.
The cartridges are available from PEUGEOT
dealers.
Inserting the fragrance diffuser
After installing or replacing the cartridge:
F
p ut the fragrance diffuser back in its
housing,
F
t
urn it a quarter turn to the right.
Ease of use and comfort
Page 120 of 252
82
Rear seat belts (5 seat
version)
The rear seats are fitted with
three-point inertia reel seat belts.
Rear seat belts (7 seat
version)
In row 2In row 3
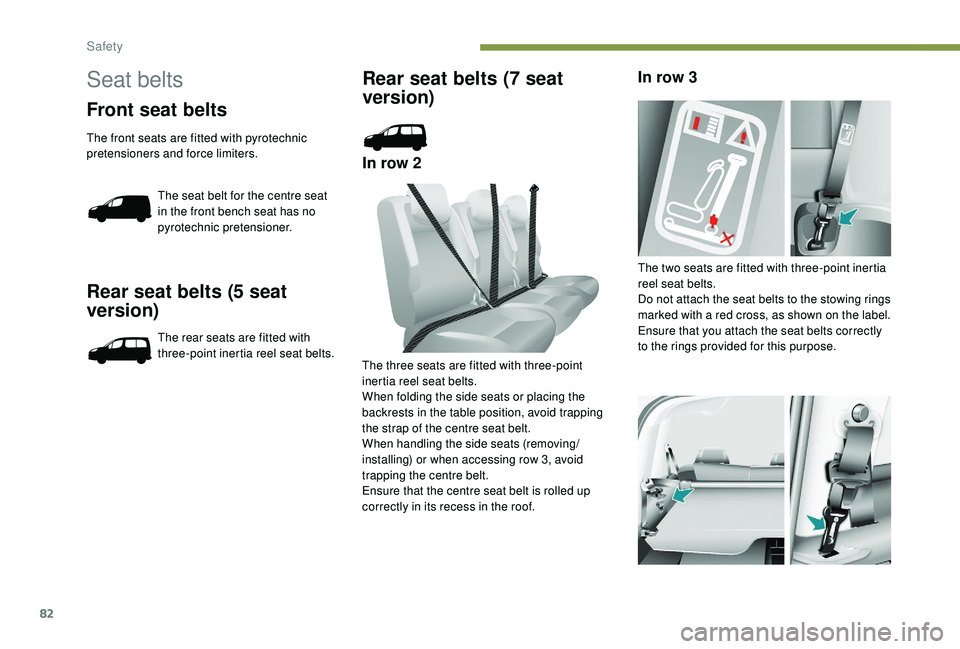
The three seats are fitted with three-point
inertia reel seat belts.
When folding the side seats or placing the
backrests in the table position, avoid trapping
the strap of the centre seat belt.
When handling the side seats (removing/
installing) or when accessing row 3, avoid
trapping the centre belt.
Ensure that the centre seat belt is rolled up
correctly in its recess in the roof. The two seats are fitted with three-point inertia
reel seat belts.
Do not attach the seat belts to the stowing rings
marked with a red cross, as shown on the label.
Ensure that you attach the seat belts correctly
to the rings provided for this purpose.
Seat belts
Front seat belts
The front seats are fitted with pyrotechnic
pretensioners and force limiters.
The seat belt for the centre seat
in the front bench seat has no
pyrotechnic pretensioner.
Safety
Page 126 of 252

88
Advice
For the airbags to be fully effective,
observe the safety recommendations
below.
Adopt a normal and upright sitting position.
Fasten your seat belt, ensuring it is positioned
c o r r e c t l y.
Do not leave anything between the occupants
and the airbags (a child, pet, object, etc.), nor
fix or attach anything close to the inflation
trajectory of the airbags; this could cause
injuries if they are deployed.
Never modify the original definition of your
vehicle, particularly in the area directly
around the airbags.
After an accident or if the vehicle has been
stolen or broken into, have the airbag systems
checked.
All work on the airbag systems must be
carried out by a PEUGEOT dealer or a
qualified workshop.
Even if all of the precautions mentioned
are obser ved, a risk of injury or of minor
burns to the head, chest or arms when an
airbag is deployed cannot be ruled out. The
bag inflates almost instantly (within a few
milliseconds) then deflates within the same
time discharging the hot gas via openings
provided for this purpose.Front airbags
Do not drive holding the steering wheel by its
spokes or resting your hands on the centre
part of the wheel.
Passengers must not place their feet on the
dashboard.
Do not smoke as deployment of the airbags
can cause burns or the risk of injury from a
cigarette or pipe.
Never remove or pierce the steering wheel or
hit it violently.
Do not fit or attach anything to the steering
wheel or dashboard, this could cause injuries
if the airbags are deployed.
Lateral airbags
Use only approved covers on the seats,
compatible with the deployment the lateral
airbags. For information on the range of seat
covers suitable for your vehicle, you can
contact a PEUGEOT
dealer.
Do not fix or attach anything to the seat
backrests (clothes, etc.) as this could cause
injuries to the chest or arm if the lateral airbag
is deployed.
Do not sit with the upper part of the body any
nearer to the door than necessary. Curtain airbags
Do not fix or attach anything to the roof, as
this could cause head injuries if the curtain
airbag is deployed.
If fitted on your vehicle, do not remove the
grab handles installed on the roof, they play a
part in securing the curtain airbags.
Safety
Page 159 of 252
121
Operation
When your vehicle is too close to or
approaches the vehicle ahead too quickly, the
system automatically applies the brakes to
avoid a collision.
You are then warned by the display of a
message.
Your vehicle's brake lamps come on to warn
other road users.The collision can be avoided if the speed
difference between your vehicle and
the one ahead is not more than 9
mph
(15
km/h).
Above this threshold, the system will do
what is possible to avoid or reduce the
accident by lowering the speed of impact.
The automatic braking can bring the vehicle to
a complete stop if the situation requires it.
In this case, the vehicle is held stationary
temporarily (for about 1.5
seconds) to allow
the driver to take back control by pressing the
brake pedal.
Unless the driver presses the clutch
quickly enough during automatic braking,
triggering of the system may cause the
engine to stall. During automatic braking, the driver can
always obtain a higher rate of deceleration
than that controlled by the system, by
pressing firmly on the brake pedal.
After an impact, the system is
automatically put out of ser vice: it no
longer operates.
You must go to a PEUGEOT dealer or a
qualified workshop to have the system
made operational again.
Operating limits
The system only detects vehicles that are
stationary or moving in the same direction as
your vehicle.
It does not detect small vehicles (bicycles,
motorcycles), pedestrians or animals, nor
non-reflective stationary objects.
This system will not trigger or will be interrupted
if the driver:
-
a
ccelerates hard
-
o
r turns the steering wheel sharply
(avoidance manoeuvre). When weather conditions are difficult
(extremely heavy rain, snow, fog, hail,
etc.), braking distances increase, which
may reduce the system’s ability to avoid a
collision.
The driver must therefore remain
particularly cautious.
Never let snow build up on the bonnet
or any object beyond the bonnet or the
front of the roof: this could enter the
field of vision of the sensor and obstruct
detection.Deactivation
The system is deactivated in the vehicle
configuration menu, accessible with the ignition
on.
Its status is stored when the ignition is switched off.
When the system is deactivated, a
message is displayed every time the
ignition is switched on, to warn you.
6
Driving
Page 171 of 252
133
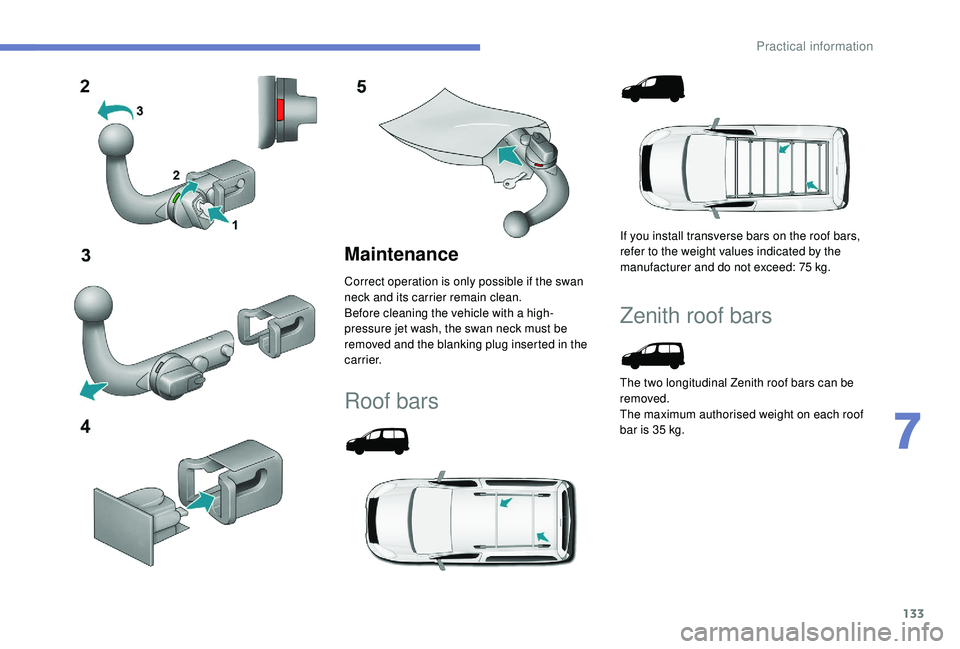
Maintenance
Correct operation is only possible if the swan
neck and its carrier remain clean.
Before cleaning the vehicle with a high-
pressure jet wash, the swan neck must be
removed and the blanking plug inserted in the
c a r r i e r.
Roof bars
If you install transverse bars on the roof bars,
refer to the weight values indicated by the
manufacturer and do not exceed: 75 kg.
Zenith roof bars
The two longitudinal Zenith roof bars can be
removed.
The maximum authorised weight on each roof
bar is 35
kg.
7
Practical information