2017 PEUGEOT 5008 brake
[x] Cancel search: brakePage 239 of 404
237
180° view
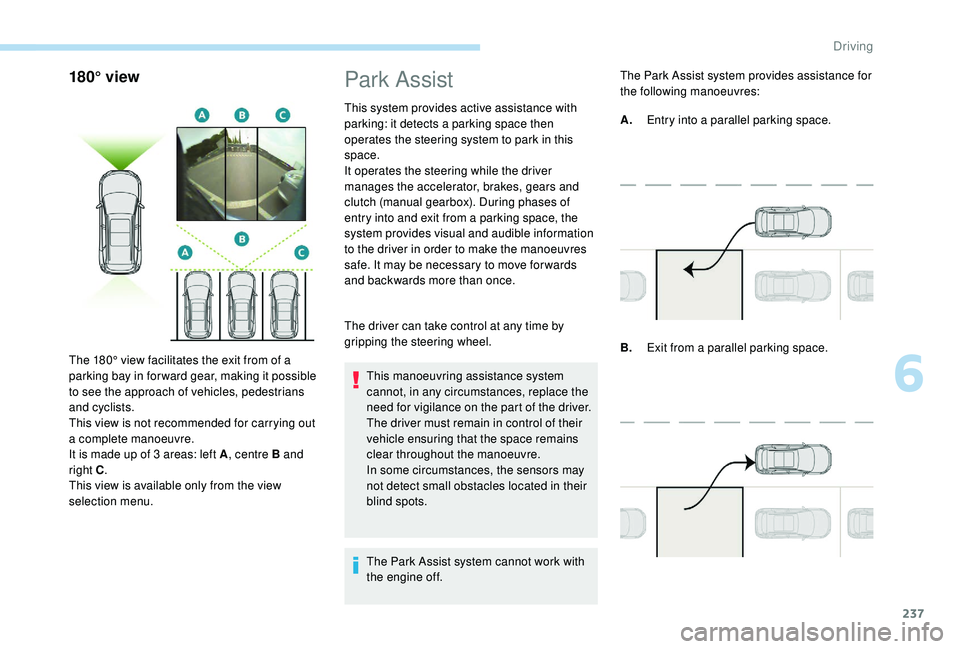
The 180° view facilitates the exit from of a
parking bay in forward gear, making it possible
to see the approach of vehicles, pedestrians
and cyclists.
This view is not recommended for carrying out
a complete manoeuvre.
It is made up of 3 areas: left A, centre B and
right C .
This view is available only from the view
selection menu.
Park Assist
This system provides active assistance with
parking: it detects a parking space then
operates the steering system to park in this
space.
It operates the steering while the driver
manages the accelerator, brakes, gears and
clutch (manual gearbox). During phases of
entry into and exit from a parking space, the
system provides visual and audible information
to the driver in order to make the manoeuvres
safe. It may be necessary to move for wards
and backwards more than once.
The driver can take control at any time by
gripping the steering wheel.
This manoeuvring assistance system
cannot, in any circumstances, replace the
need for vigilance on the part of the driver.
The driver must remain in control of their
vehicle ensuring that the space remains
clear throughout the manoeuvre.
In some circumstances, the sensors may
not detect small obstacles located in their
blind spots.
The Park Assist system cannot work with
the engine off. The Park Assist system provides assistance for
the following manoeuvres:
B.
Exit from a parallel parking space.
A.
Entry into a parallel parking space.
6
Driving
Page 256 of 404
254
Snow chains
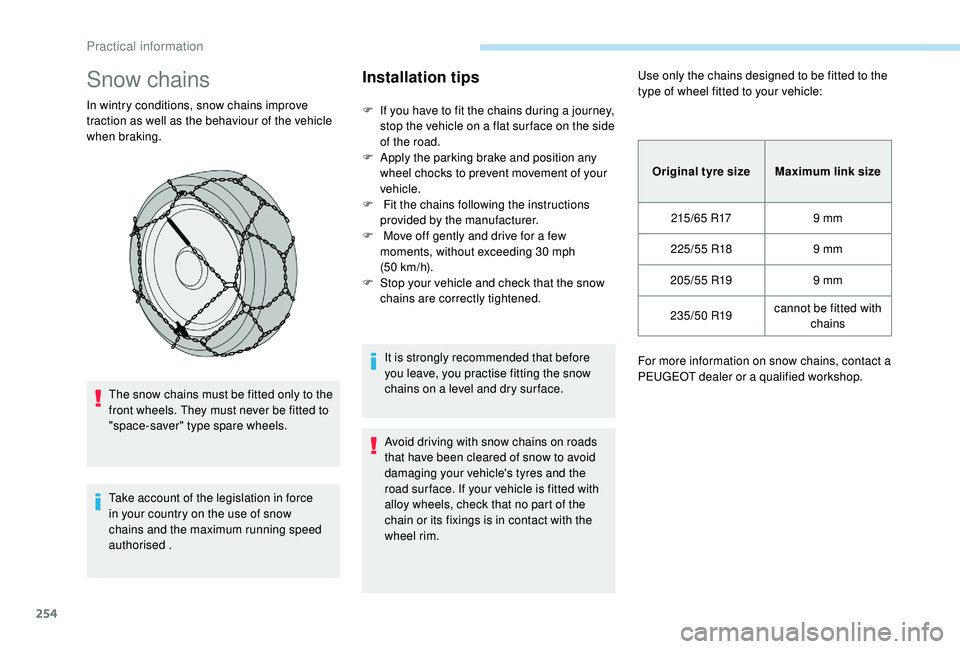
In wintry conditions, snow chains improve
traction as well as the behaviour of the vehicle
when braking.The snow chains must be fitted only to the
front wheels. They must never be fitted to
"space-saver" type spare wheels.
Take account of the legislation in force
in your country on the use of snow
chains and the maximum running speed
authorised .
Installation tips
F If you have to fit the chains during a journey, stop the vehicle on a flat sur face on the side
of the road.
F
A
pply the parking brake and position any
wheel chocks to prevent movement of your
vehicle.
F
F
it the chains following the instructions
provided by the manufacturer.
F
M
ove off gently and drive for a few
moments, without exceeding 30
mph
(50
km/h).
F
S
top your vehicle and check that the snow
chains are correctly tightened.
It is strongly recommended that before
you leave, you practise fitting the snow
chains on a level and dry sur face.
Avoid driving with snow chains on roads
that have been cleared of snow to avoid
damaging your vehicle's tyres and the
road sur face. If your vehicle is fitted with
alloy wheels, check that no part of the
chain or its fixings is in contact with the
wheel rim. Use only the chains designed to be fitted to the
type of wheel fitted to your vehicle:
Original tyre size Maximum link size
215/65
R179
mm
225/55
R189
mm
205/55
R199
mm
235/50
R19cannot be fitted with
chains
For more information on snow chains, contact a
PEUGEOT dealer or a qualified workshop.
Practical information
Page 259 of 404
257
Engine compartment
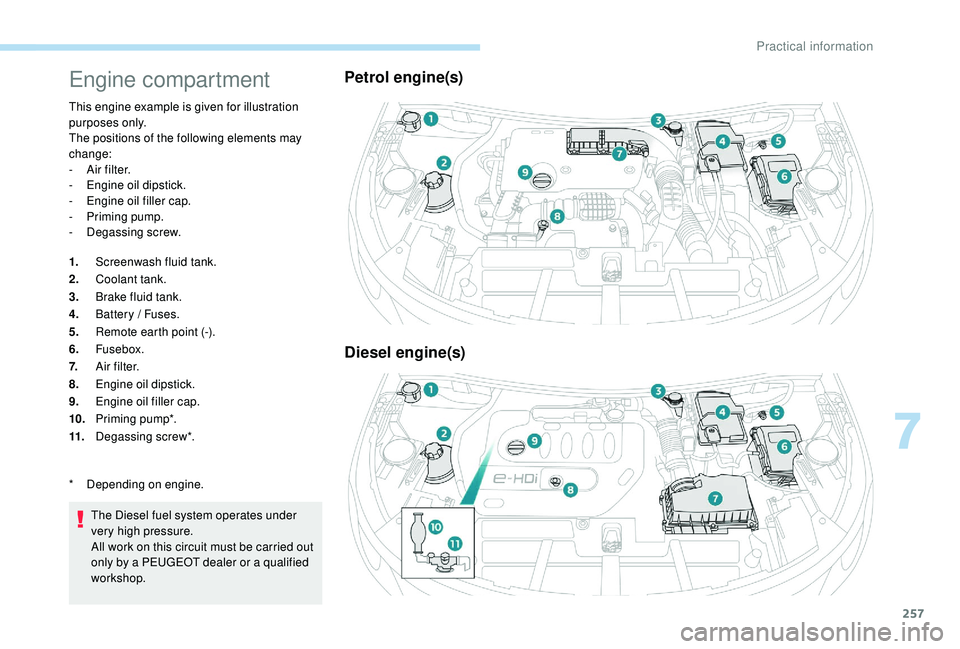
This engine example is given for illustration
purposes only.
The positions of the following elements may
change:
-
A
ir filter.
-
E
ngine oil dipstick.
-
E
ngine oil filler cap.
-
P
riming pump.
-
D
egassing screw.
1. Screenwash fluid tank.
2. Coolant tank.
3. Brake fluid tank.
4. Battery / Fuses.
5. Remote earth point (-).
6. Fusebox.
7. A i r f i l t e r.
8. Engine oil dipstick.
9. Engine oil filler cap.
10. Priming pump*.
11. Degassing screw*.
The Diesel fuel system operates under
very high pressure.
All work on this circuit must be carried out
only by a PEUGEOT dealer or a qualified
workshop.
Petrol engine(s)
Diesel engine(s)
* Depending on engine.
7
Practical information
Page 261 of 404
259
Topping up the engine oil level
The location of the oil filler cap is shown in the
corresponding underbonnet layout view.
F
U
nscrew the oil filler cap to access the filler
opening.
F
A
dd oil in small quantities, avoiding any
spills on engine components (risk of fire).
F
W
ait a few minutes before checking the
level again using the dipstick.
F
A
dd more oil if necessary.
F
A
fter checking the level, carefully refit the oil
filler cap and the dipstick in its tube.
After topping up the oil, the check when
switching on the ignition with the oil level
indicator in the instrument panel is not
valid during the 30
minutes after topping
up.
Engine oil change
Refer to the manufacturer's service schedule
for details of the inter val for this operation.
In order to maintain the reliability of the engine
and emissions control system, never use
additives in the engine oil.
Brake fluid level
The fluid level should be close to the
"MA X" mark. If it is not, check the
brake pad wear.
Changing the coolant
Refer to the manufacturer's service schedule
for details of the inter val for this operation.
Fluid specification
This fluid must conform to the manufacturer's
recommendations.
Coolant level
Check the coolant level regularly.
It is normal to top up the fluid
between two services.
The check and top-up must only be done with
the engine cold.
A low coolant level presents a risk of serious
damage to your engine.
The coolant level should be close to the "MA X"
mark but should never exceed it.
If the level is close to or below the "MIN" mark,
it is essential to top up. When the engine is hot, the temperature of the
coolant is regulated by the fan.
In addition, as the cooling system is
pressurised, wait at least one hour after
switching off the engine before carrying out any
work.
To avoid the risk of scalding when you need to
top up in an emergency, place a cloth around
the cap and unscrew the cap by two turns to
allow the pressure to drop.
Once the pressure has dropped, remove the
cap and top up to the required level.
The cooling fan may star t after
switching off the engine: take care
with articles and clothing that might be
caught by the fan blades.Fluid specification
This fluid must conform to the manufacturer's
recommendations.
Screenwash fluid level
Top up to the required level when
necessary.
7
Practical information
Page 263 of 404
261
Air filter and passenger compartment filter
Refer to the manufacturer's
ser vice schedule for details of the
replacement intervals for these
components.
Depending on the environment (e.g. dusty
atmosphere) and the use of the vehicle (e.g.
city driving), replace them twice as often if
necessary .
A clogged passenger compartment filter may
have an adverse effect on the per formance
of the air conditioning system and generate
undesirable odours.
Oil filter
Change the oil filter each time the
engine oil is changed.
Refer to the manufacturer's
ser vice schedule for details of
the replacement inter val for this
component.
Particle filter (Diesel)
The start of saturation of the particle
filter is indicated by the temporary
illumination of this warning lamp
accompanied by a message about
the risk of the filter clogging up. As soon as the traffic conditions permit,
regenerate the filter by driving at a speed
of at least 40
mph (60 km/h) until the
warning lamp goes off.
If the warning lamp stays on, this indicates
a low Diesel additive level.
For more information on Checking levels ,
refer to the corresponding section.
On a new vehicle, the first particle
filter regeneration operations may be
accompanied by a "burning" smell, which
is per fectly normal.
Following prolonged operation of the
vehicle at very low speed or at idle,
you may, in exceptional circumstances,
notice the emission of water vapour at the
exhaust on acceleration. This does not
affect the behaviour of the vehicle or the
environment.
Manual gearbox
The gearbox does not require any
maintenance (no oil change).
Refer to the manufacturer's service
schedule for the checking inter val
for this component.
Automatic gearbox
The gearbox does not require any
maintenance (no oil change).
Refer to the manufacturer’s service
schedule for the checking inter val
for this component.
Brake pads
Brake wear depends on the style
of driving, particularly in the case
of vehicles used in town, over short
distances. It may be necessary to
have the condition of the brakes
checked, even between vehicle
services.
Unless there is a leak in the circuit, a drop in
the brake fluid level indicates that the brake
pads are worn.
7
Practical information
Page 264 of 404
262
Brake disc wear
For information on checking brake
disc wear, contact a PEUGEOT
dealer or a qualified workshop.
Electric parking brake
This system does not require any
routine servicing. However, in the
event of a problem, have the system
checked by a PEUGEOT dealer or a
qualified workshop.
For more information on the Electric
parking brake , refer to the corresponding
section. Only use products recommended by
PEUGEOT or products of equivalent
quality and specification.
In order to optimise the operation of units
as important as those in the braking
system, PEUGEOT selects and offers very
specific products.
After washing the vehicle, dampness, or
in wintry conditions, ice can form on the
brake discs and pads: braking efficiency
may be reduced. Make light brake
applications to dry and defrost the brakes.
AdBlue® (BlueHDi
engines)
To respect the environment and ensure
compliance with the new Euro 6
standard,
without adversely affecting the performance or
fuel consumption of Diesel engines, PEUGEOT
has taken the decision to equip its vehicles
with system that associates SCR (Selective
Catalytic Reduction) with a particle filter (DPF)
for the treatment of exhaust gases.
SCR system
Using a liquid called AdBlue® that contains
urea, a catalytic converter turns up to 85% of
the oxides of nitrogen (NOx) into nitrogen and
water, which are harmless to health and the
environment.
The AdBlue
® is contained in a special tank with
a capacity of around 17 litres. An alert system
is triggered automatically once the reser ve
level is reached: you can then drive for a further
1,500
miles (2,400 km) before the tank is
emptied completely.
Practical information
Page 277 of 404
275
Removing a wheel
Wheel with wheel trim
When removing the wheel, first remove
the wheel trim by pulling at the valve
aperture using the wheelbrace.
When refitting the wheel , after tightening
the wheel bolts, refit the wheel trim,
starting by placing its aperture in line with
the valve and then pushing it into place all
round its edge with the palm of your hand.
*
position P for the automatic gearbox
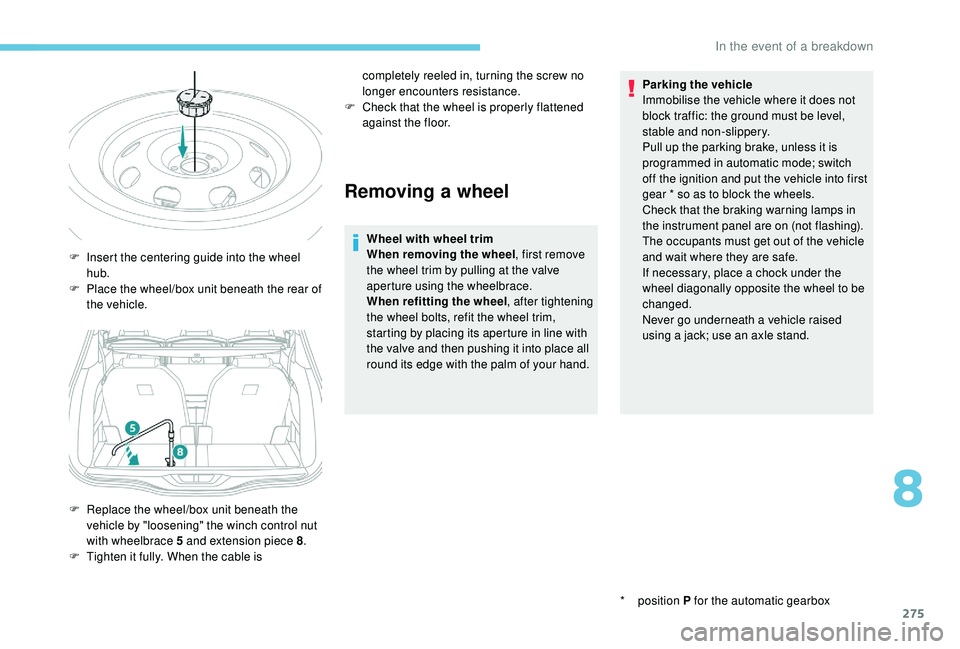
F
I
nsert the centering guide into the wheel
hub.
F
P
lace the wheel/box unit beneath the rear of
the vehicle.
F
R
eplace the wheel/box unit beneath the
vehicle by "loosening" the winch control nut
with wheelbrace 5
and extension piece 8 .
F
T
ighten it fully. When the cable is completely reeled in, turning the screw no
longer encounters resistance.
F
C
heck that the wheel is properly flattened
against the floor. Parking the vehicle
Immobilise the vehicle where it does not
block traffic: the ground must be level,
stable and non-slippery.
Pull up the parking brake, unless it is
programmed in automatic mode; switch
off the ignition and put the vehicle into first
gear * so as to block the wheels.
Check that the braking warning lamps in
the instrument panel are on (not flashing).
The occupants must get out of the vehicle
and wait where they are safe.
If necessary, place a chock under the
wheel diagonally opposite the wheel to be
changed.
Never go underneath a vehicle raised
using a jack; use an axle stand.
8
In the event of a breakdown
Page 280 of 404
278
After changing a wheel
With a "space-saver" type spare wheel
Visit a PEUGEOT dealer or a qualified
workshop as soon as possible to have the
tightness of the bolts and the pressure of
the spare wheel checked.
Have the punctured tyre examined. After
inspection, the technician will advise you
on whether the tyre can be repaired or if it
must be replaced.
Changing a bulb
The headlamps have polycarbonate
lenses with a protective coating:
F
d
o not clean them using a dr y or
abrasive cloth, nor with a detergent
or solvent product,
F
u
se a sponge and soapy water or a pH
neutral product,
F
w
hen using a high pressure washer
on persistent marks, do not keep the
lance directed towards the lamps or
their edges for too long, so as not to
damage their protective coating and
seals.
Changing a bulb must only be done with
the ignition off and after the headlamp has
been switched off for several minutes –
Risk of serious burns!
F
D
o not touch the bulb directly with your
fingers, use a lint-free cloth.
It is essential only to use anti-ultraviolet
(UV) type bulbs, so as not to damage the
headlamp.
Always replace a failed bulb with a new
bulb with the same type and specification. In some weather conditions (e.g. low
temperature or humidity), the presence
of misting on the internal sur face of the
glass of the headlamps and rear lamps is
normal; it disappears after the lamps have
been on for a few minutes.
Light emitting diodes (LED)
For the replacement of this type of bulbs,
you must contact a PEUGEOT dealer or a
qualified workshop.
The following is recommended:
-
d
eactivate some driving aid functions
(Active Safety Brake, Dynamic cruise
control with Stop function, etc.), as
indicated on the label attached to the
wheel,
-
d
o not exceed the maximum
authorised speed of 50
mph (80
km/h). Halogen bulbs
To ensure good quality lighting, check
that the bulb is correctly positioned in its
housing.
In the event of a breakdown