Page 252 of 404
250
Fitting the towball
F Below the rear bumper, remove the protective plug 2 from the towball carrier 1 .
F
I
nsert the end of towball 5 into carrier 1 and
push it upwards; the locking will take place
automatically. F
T
he locking wheel 6 turns a quarter of a
turn anti-clockwise; take care to keep your
hands clear!
F
C
heck that the mechanism has correctly
locked in to place (position A ).
F
C
lose the lock 7 using the key.F
A
lways remove the key. The key cannot be
removed when the lock is open.
F C lip the cap onto the lock.
F
R
emove the protective cover from the
towball.
F
A
ttach the trailer to the towball.
F
A
ttach the cable on the trailer to the safety
eye 4
on the carrier.
F
I
nsert the trailer plug and give it a quarter
turn to connect it to socket 3
of the carrier.
Practical information
Page 253 of 404
251
Removing the towball
F Give a quarter turn and pull the trailer plug to disconnect it from socket 3 of the carrier.
F
D
etach the cable on the trailer from the
safety eye 4
on the carrier.
F
D
etach the trailer from the towball.
F
R
efit the protective cover to the towball.
F
R
emove the cap from the lock and press it
onto the head of the key. F
I
nsert the key into the lock 7
.
F
O
pen the lock using the key.
F
H
old towball 5 firmly in one hand; using
the other hand, pull and turn locking wheel
6
fully in a clockwise direction; do not
release the locking wheel. F
E
xtract the towball from the bottom of its
carrier 1 .
F R elease the locking wheel; this
automatically stops in the unlocked position
(position B ).
F
R
efit protective plug 2 to carrier 1.
F
C
arefully stow the towball in its bag away
from knocks and dirt.
7
Practical information
Page 266 of 404
264
Never top up from an AdBlue® dispenser
reserved for heavy goods vehicles.
Recommendations on storage
AdBlue® freezes below around -11°C and
deteriorates above 25°C. It is recommended
that bottles or containers be stored in a cool
place and protected from direct sunlight.
Under these conditions, the fluid can be kept
for at least a year.
If the additive has frozen, it can be used once it
has completely thawed out.
Never store containers or bottles of
AdBlue
® in your vehicle.
Do not dispose of AdBlue
® bottles or
containers in the household waste.
Place them in a container provided
for this purpose or take them to your
dealer.
Procedure
In cold weather, before per forming the top-up
ensure that the temperature of the vehicle is
above -11°C. Other wise the AdBlue
® may be
frozen and so cannot be poured into its tank.
Park your vehicle in a warmer area for a few
hours to allow the top-up to be carried out.
F
B
efore topping up, ensure that the vehicle is
parked on a flat and level sur face.
F
S
witch off the ignition to stop the engine
and remove the key from the switch.
or
F
W
ith
K
eyless Entry and Starting, press the
" START/STOP " button to stop the engine.
F
W
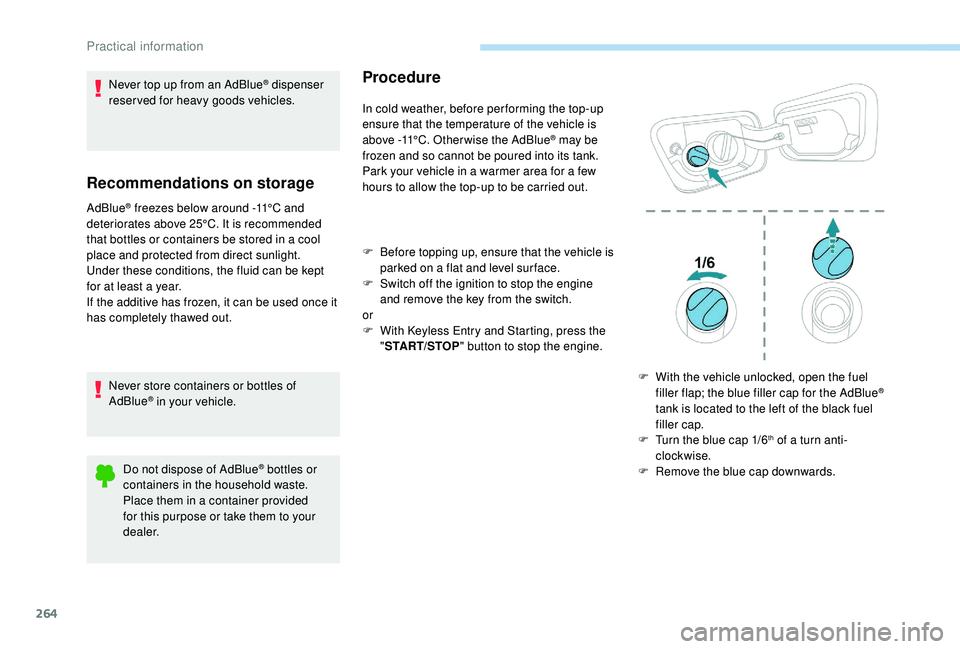
ith the vehicle unlocked, open the fuel
filler flap; the blue filler cap for the AdBlue
®
tank is located to the left of the black fuel
filler cap.
F
T
urn the blue cap 1/6
th of a turn anti-
clockwise.
F
R
emove the blue cap downwards.
Practical information
Page 291 of 404
289
The Stop & Start system may not be
operational during the trip following the
first engine start.
In this case, the system will only be
available again after a continuous
period of immobilisation of the vehicle,
a period which depends on the exterior
temperature and the state of charge of the
battery (up to about 8 hours).
For right-hand drive vehicles, when the
total distance recorder has reached
60
miles (100 km), it is necessary to wait
approx. 15 minutes before starting the
engine.
However, if minor problems persist following
this operation, contact a PEUGEOT dealer or a
qualified workshop.
Referring to the corresponding section, you
must yourself reinitialise or reset certain
systems, such as:
-
t
he key with remote control or electronic key
(depending on version),
-
t
he sunroof and its electric blind,
-
t
he electric windows,
-
t
he date and time,
-
t
he preset radio stations.
Towing the vehicle
Procedure for having your vehicle towed or
for towing another vehicle using a removable
towing eye.
Access to the tools
Depending on version, the towing eye is stored
either in the interior trim of the boot sill, left-
hand side, or in a bag behind the left rear seat.
For more information on access to the Tool kit
,
refer to the corresponding section.
Towing your vehicle
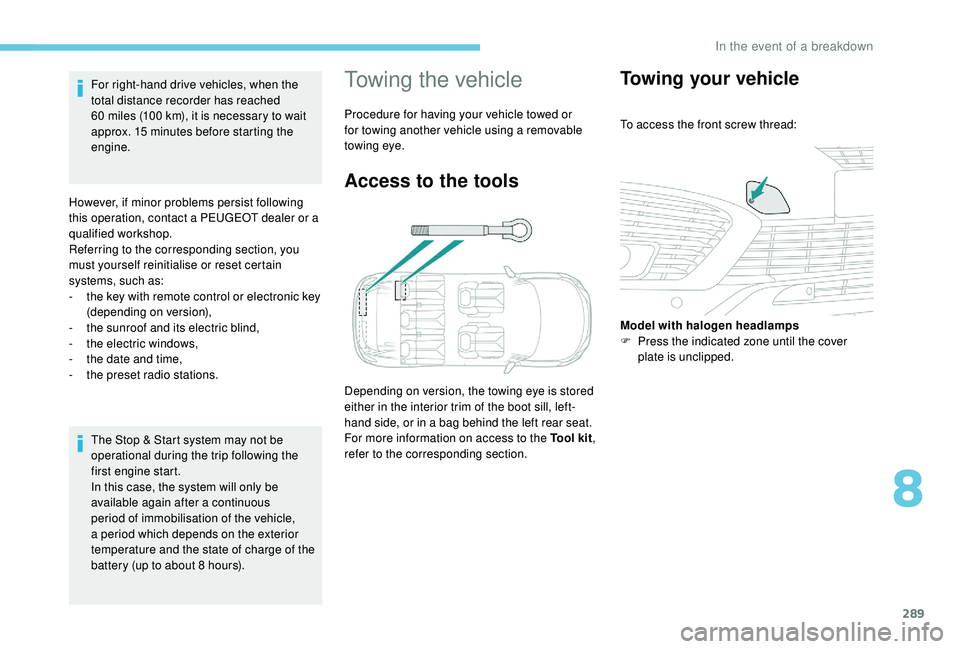
To access the front screw thread:
Model with halogen headlamps
F
P
ress the indicated zone until the cover
plate is unclipped.
8
In the event of a breakdown
Page 310 of 404
12
Press "OK" to select the " Guidance
criteria ".
And / Or Select "See on map " to select the
" Guidance criteria ".
Press " OK" to start navigation.
Zoom out / zoom in using the touch
buttons or with two fingers on the screen.
In order to be able to use the navigation,
it is necessary to fill in the " City", the
" Street " and the " Number" on the
virtual keyboard or take it from the
list in " Contact " or in the " History" of
addresses.
Without confirmation of the street number,
you will be guided to one end of the street.To a recent destination
or Press "Navigation"
to display the
primary page.
Press the " MENU" button to go to the
secondary page.
Select "My destinations ".
Select the " Recent" tab.
Select the address chosen in the list to display
the " Guidance criteria ".
Press " OK" to start navigation.
Select " Position " to visualise the arrival
point geographically.
To "My home" or "My work"
or Press "Navigation"
to display the
primary page.
Press the " MENU" button to go to the
secondary page.
Select "My destinations ".
Select the " Preferred" tab.
Select " My home ".
Or Select "My work ".
Or
Select a preset favourite destination.
PEUGEOT Connect Nav
Page 312 of 404
14
Towards GPS coordinates
or Press "Navigation"
to display the
primary page.
Explore the map by sliding a finger on the
screen. Press this button to display the world
map.
Using the grid, select by zoom the
desired country or region.
Press this button to enter the GPS
coordinates.
A marker is displayed in the middle
of the screen, with the " Latitude"
and " Longitude " coordinates. Press this button to start navigation.
Or Press this button to save the
address displayed.
OR Press this button to enter the value
for "Latitude " using the virtual
keypad.
And Press this button to enter the value
for "Longitude " using the virtual
keypad.
TMC (Traffic Message
Channel)
TMC (Traffic Message Channel)
messages are linked to a European
standard on the broadcasting of traffic
information via the RDS system on FM
radio, transmitting traffic information in
real time.
The TMC information is then displayed
on a GPS Navigation system map and
taken into account straight away during
navigation, so as to avoid accidents, traffic
jams and closed roads.
The display of danger zones depends on
the legislation in force and subscription to
the service.
PEUGEOT Connect Nav
Page 315 of 404
17
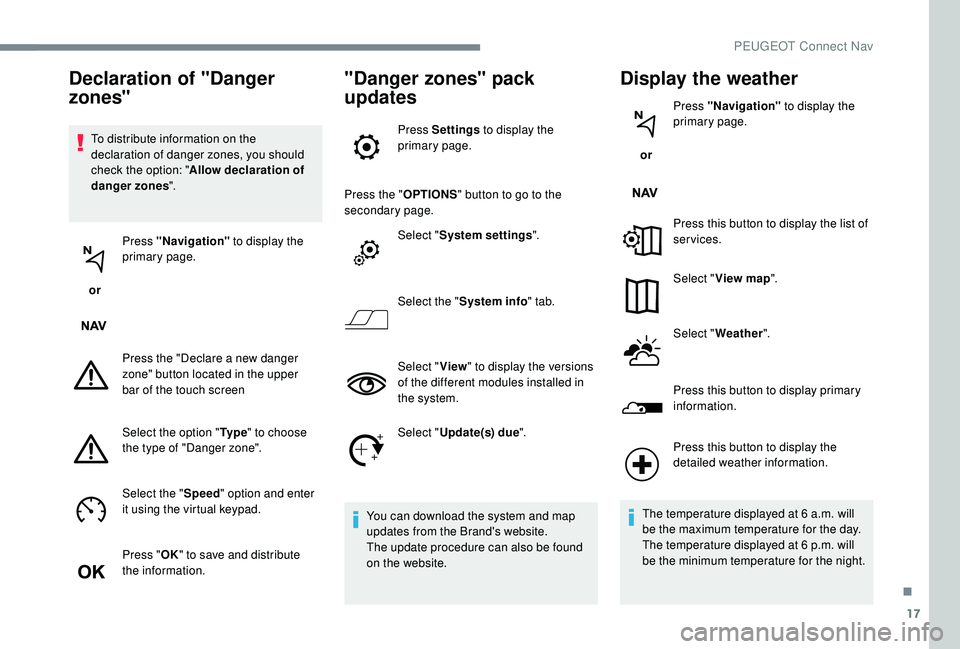
To distribute information on the
declaration of danger zones, you should
check the option: "Allow declaration of
danger zones ".
or Press "Navigation"
to display the
primary page.
Press the "Declare a new danger
zone" button located in the upper
bar of the touch screen
Select the option " Ty p e" to choose
the type of "Danger zone".
Select the " Speed" option and enter
it using the virtual keypad.
Press " OK" to save and distribute
the information.
"Danger zones" pack
updates
Press Settings to display the
primary page.
Press the " OPTIONS" button to go to the
secondary page.
Select "System settings ".
Select the " System info " tab.
Select " View" to display the versions
of the different modules installed in
the system.
Select " Update(s) due ".
You can download the system and map
updates from the Brand's website.
The update procedure can also be found
on the website.
Display the weather
or Press "Navigation"
to display the
primary page.
Press this button to display the list of
services.
Select " View map ".
Select " Weather ".
Press this button to display primary
information.
Declaration of "Danger
zones"
Press this button to display the
detailed weather information.
The temperature displayed at 6
a.m. will
be the maximum temperature for the day.
The temperature displayed at 6
p.m. will
be the minimum temperature for the night.
.
PEUGEOT Connect Nav
Page 320 of 404
22
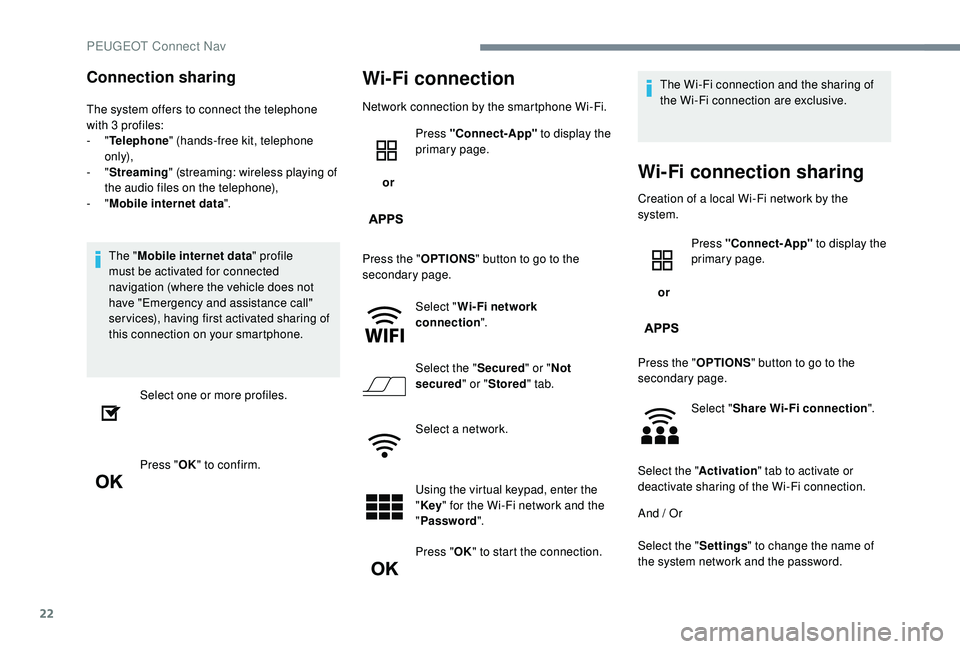
Connection sharing
The system offers to connect the telephone
with 3 profiles:
-
"Telephone " (hands-free kit, telephone
only),
-
"Streaming " (streaming: wireless playing of
the audio files on the telephone),
-
"Mobile internet data ".
The " Mobile internet data " profile
must be activated for connected
navigation (where the vehicle does not
have "Emergency and assistance call"
services), having first activated sharing of
this connection on your smartphone.
Select one or more profiles.
Press " OK" to confirm.
Wi-Fi connection
Network connection by the smartphone Wi-Fi.
or Press "Connect-App"
to display the
primary page.
Press the " OPTIONS" button to go to the
secondary page.
Select "Wi- Fi network
connection ".
Select the " Secured" or "Not
secured " or "Stored " tab.
Select a network.
Using the virtual keypad, enter the
" Key " for the Wi-Fi network and the
" Password ".
Press " OK" to start the connection. The Wi-Fi connection and the sharing of
the Wi-Fi connection are exclusive.
Wi-Fi connection sharing
Creation of a local Wi-Fi network by the
system.
or Press "Connect-App"
to display the
primary page.
Press the " OPTIONS" button to go to the
secondary page.
Select "Share Wi-Fi connection ".
Select the " Activation" tab to activate or
deactivate sharing of the Wi-Fi connection.
And / Or
Select the " Settings" to change the name of
the system network and the password.
PEUGEOT Connect Nav