2017 PEUGEOT 5008 key
[x] Cancel search: keyPage 183 of 404
181
Emergency switch-off
F To confirm the instruction to switch off the engine, press the " START/STOP" button for
about five seconds.
In the event of a fault with the electronic key,
contact a PEUGEOT dealer or a qualified
workshop.
In the event of an emergency only, the engine
can be switched off without conditions (even
when driving).
Press the " START/STOP " button for about five
seconds.
In this case, the steering column locks as soon
as the vehicle stops.
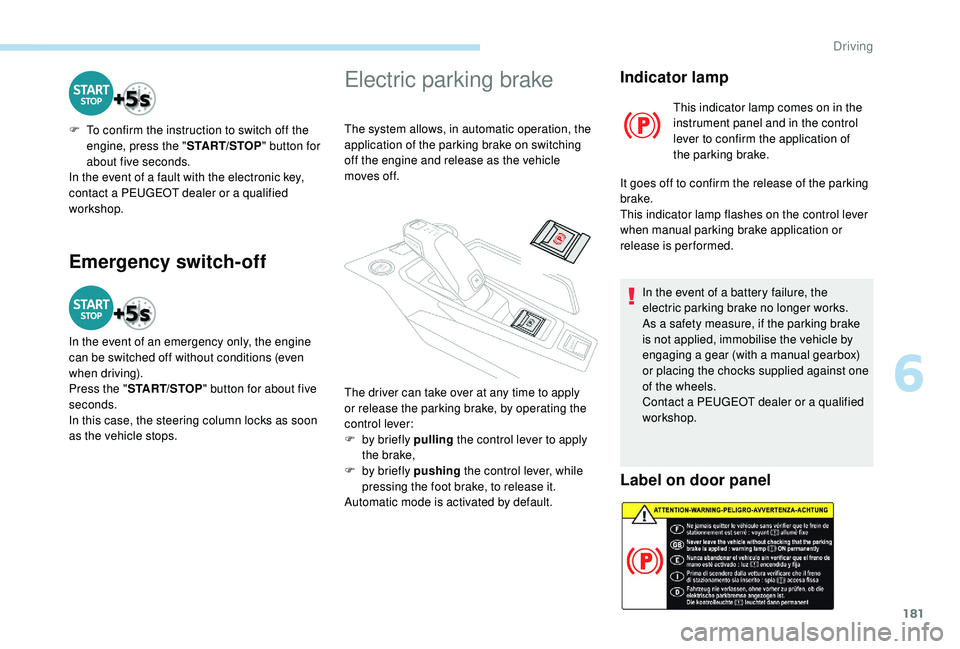
Electric parking brake
The system allows, in automatic operation, the
application of the parking brake on switching
off the engine and release as the vehicle
moves off.
Indicator lamp
This indicator lamp comes on in the
instrument panel and in the control
lever to confirm the application of
the parking brake.
It goes off to confirm the release of the parking
brake.
This indicator lamp flashes on the control lever
when manual parking brake application or
release is performed.
In the event of a battery failure, the
electric parking brake no longer works.
As a safety measure, if the parking brake
is not applied, immobilise the vehicle by
engaging a gear (with a manual gearbox)
or placing the chocks supplied against one
of the wheels.
Contact a PEUGEOT dealer or a qualified
workshop.
Label on door panel
The driver can take over at any time to apply
or release the parking brake, by operating the
control lever:
F
b
y briefly pulling the control lever to apply
the brake,
F
b
y briefly pushing the control lever, while
pressing the foot brake, to release it.
Automatic mode is activated by default.
6
Driving
Page 194 of 404
192
With a manual gearbox, the arrow may be
accompanied by the gear recommended.
The system adapts its gear shift
recommendation according to the driving
conditions (slope, load, etc.) and the
driver’s requirements (power, acceleration,
b r a k i n g ,e t c .) .
The system never suggests:
-
e
ngaging first gear,
-
enga
ging a lower gear,
-
enga
ging reverse.Stop & Start
The Stop & Start system puts the engine
temporarily into standby – STOP mode – during
stops in the traffic (red lights, traffic jams, etc.).
The engine restarts automatically – START
mode – as soon as you want to move off.
The restart takes place instantly, quickly and
silently.
Per fect for urban use, the Stop & Start system
reduces fuel consumption and exhaust
emissions as well as the noise level when
stationary.
Operation
Going into engine STOP mode
- with a manual gearbox , at speeds below
12 mph (20 km/h) or vehicle stationary
with the PureTech 130
petrol and BlueHDi
115
and 120 Diesel versions, when you
place the gear lever in neutral and you
release the clutch pedal,
-
w
ith an automatic gearbox , vehicle
stationary, when you press the brake pedal
or put the gear selector in N mode.
The time counter aggregates the STOP mode
activation periods during a trip. It resets itself to
zero every time the ignition is switched on with
the key or the " START/STOP" button.
For your convenience during parking
manoeuvres, STOP mode is not available
for a few seconds after coming out of
reverse gear.
Stop & Start does not affect the operation
of vehicle systems such as braking, power
steering, etc.
Never refuel with the engine in STOP
mode; you must switch off the ignition with
the key or the "START/STOP" button.
This indicator lamp comes on in the
instrument panel and the engine
goes into standby automatically:
Driving
Page 195 of 404
193
Special cases: STOP mode not
available
STOP mode is not invoked when:
- t he vehicle is on a steep slope (rising or
falling),
-
t
he driver's door is open,
-
t
he driver's seat belt is not fastened,
-
t
he vehicle has not exceeded 6 mph
(10
km/h) since the last engine start (with
the key or the "START/STOP" button),
-
t
he electric parking brake is applied or being
applied,
-
t
he engine is needed to maintain a
comfortable temperature in the passenger
compartment,
-
d
emisting is active,
-
s
ome temporary conditions (battery charge,
engine temperature, braking assistance,
exterior temperature, etc.) make this
necessary to ensure control of a system.
Going into engine START mode
In this case, this indicator lamp
flashes for a few seconds then goes
of f.
This operation is perfectly normal. -
w
ith a manual gearbox
, when you fully
depress the clutch pedal,
-
W
ith an automatic gearbox:
•
g
ear selector in D or M mode, when you
release the brake pedal,
•
o
r gear selector in N mode and brake
pedal released, when you place the gear
selector in D or M mode,
•
o
r when you engage reverse.This indicator lamp goes off and the
engine starts automatically:
Special cases: START mode
invoked automatically
As a safety measure or to maintain comfort
levels in the vehicle, START mode is invoked
automatically when:
-
y
ou open the driver's door,
-
y
ou unfasten the driver's seat belt,
-
t
he speed of the vehicle exceeds 16 mph
(25
km/h) with a manual gearbox (2 mph
(3
km/h) with PureTech 130 petrol and
BlueHDi 115
and 120 Diesel versions), or
2
mph (3 km/h) with an automatic gearbox.
-
t
he electric parking brake is being applied,
-
s
ome temporary conditions (battery charge,
engine temperature, braking assistance,
adjustment of the air conditioning, etc.)
make this necessary to ensure control of a
system or of the vehicle.
In this case, this indicator lamp
flashes for a few seconds then goes
of f.
This operation is perfectly normal.
6
Driving
Page 197 of 404
195
Operating fault
In the event of a fault with the
system, this warning lamp
flashes for a few moments in the
instrument panel, then remains on,
accompanied by the display of a
message.
Have it checked by a PEUGEOT dealer or a
qualified workshop.
If a fault occurs in STOP mode, the engine may
stall.
All of the instrument panel warning lamps come on.
It is then necessary to switch off the ignition and
start the engine again with the key or the
"START/STOP" button.
The Stop & Start system requires a
12 V battery of specific technology and
specification.
All work on this type of battery must be
carried out only by a PEUGEOT dealer or
a qualified workshop.
For more information on the 12
V batter y,
refer to the corresponding section.
Under-inflation detection
System which automatically checks the
pressures of the tyres while driving.
The system monitors the pressures in the four
tyres, once the vehicle is moving.
It compares the information given by the wheel
speed sensors with reference values, which
must be reinitialised ever y time the tyre
pressures are adjusted or a wheel changed .
The system triggers an alert as soon as it
detects a drop in the inflation pressure of one
or more tyres.
The under-inflation detection system does
not replace the need for vigilance on the
part of the driver.
This system does not avoid the need to
check the tyre pressures (including the
spare wheel) every month as well as
before a long journey.
Driving with under-inflated tyres worsens
road-holding, lengthens braking distances,
causes premature wear of the tyres,
particularly in adverse conditions (heavy
loads, high speeds, long journeys). Driving with under-inflated tyres
increases fuel consumption.
The inflation pressures defined for your
vehicle can be found on the tyre pressure
label.
For more information on the
Identification markings , refer to the
corresponding section.
Checking tyre pressures
This check should be done when the tyres
are "cold" (vehicle stopped for 1
hour or
after a journey of less than 6
miles (10 km)
at moderate speeds).
Other wise, add 0.3
bar to the pressures
shown on the label.
Snow chains
The system does not have to be
reinitialised after fitting or removing snow
chains.
6
Driving
Page 199 of 404
197
Operating fault
In this case, under-inflation monitoring of the
tyres is no longer assured.
Have the system checked by a PEUGEOT
dealer or a qualified workshop.Before doing anything to the system,
the pressures of the four tyres must be
checked and the system reinitialised.
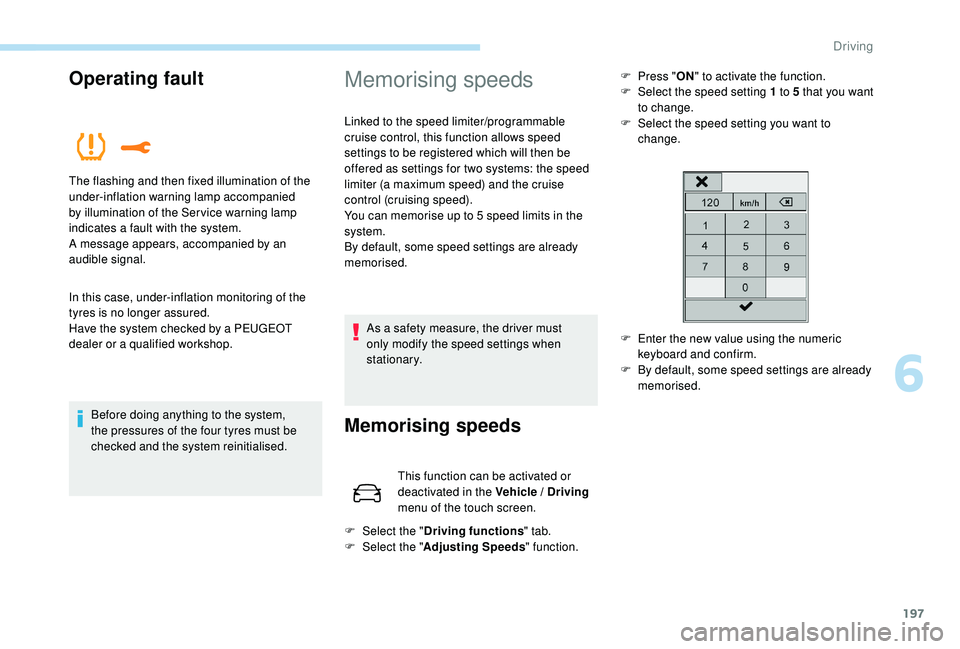
The flashing and then fixed illumination of the
under-inflation warning lamp accompanied
by illumination of the Ser vice warning lamp
indicates a fault with the system.
A message appears, accompanied by an
audible signal.
Memorising speeds
Linked to the speed limiter/programmable
cruise control, this function allows speed
settings to be registered which will then be
offered as settings for two systems: the speed
limiter (a maximum speed) and the cruise
control (cruising speed).
You can memorise up to 5
speed limits in the
system.
By default, some speed settings are already
memorised.
As a safety measure, the driver must
only modify the speed settings when
stationary.
Memorising speeds
F Select the " Driving functions " tab.
F Sel ect the " Adjusting Speeds " function.
This function can be activated or
deactivated in the Vehicle / Driving
menu of the touch screen. F
P
ress "
ON" to activate the function.
F
Sel
ect the speed setting 1 to 5 that you want
to change.
F
S
elect the speed setting you want to
change.
F
E
nter the new value using the numeric
keyboard and confirm.
F
B
y default, some speed settings are already
memorised.
6
Driving
Page 247 of 404
245
Fuel
Fuel tank capacity: approximately 56 litres.
R eser ve level: 6 litres.
Low fuel level
When the low fuel level is reached
in the fuel tank, this warning lamp
comes on in the instrument panel,
accompanied by the display of a
message and an audible signal.
When it first comes on, about
6
litres of fuel is left in the tank.
Until sufficient fuel is added, this warning lamp
appears every time the ignition is switched on,
accompanied by the display of a message and
an audible signal. When driving, this message
and audible signal are repeated with increasing
frequency as the fuel level drops towards 0 .
Refuel as soon as possible to avoid running out
of fuel.
For more information on Running out of fuel
(Diesel) , refer to the corresponding section.
If your vehicle is fitted with Stop & Start,
never refuel with the engine in STOP
mode; you must switch off the ignition
using the key, or the START/STOP button
if your vehicle has
K
eyless Entry and
Starting.
Refuelling
If you have put in the wrong fuel for your
vehicle, you must have the fuel tank
drained and filled with the correct fuel
before starting the engine.
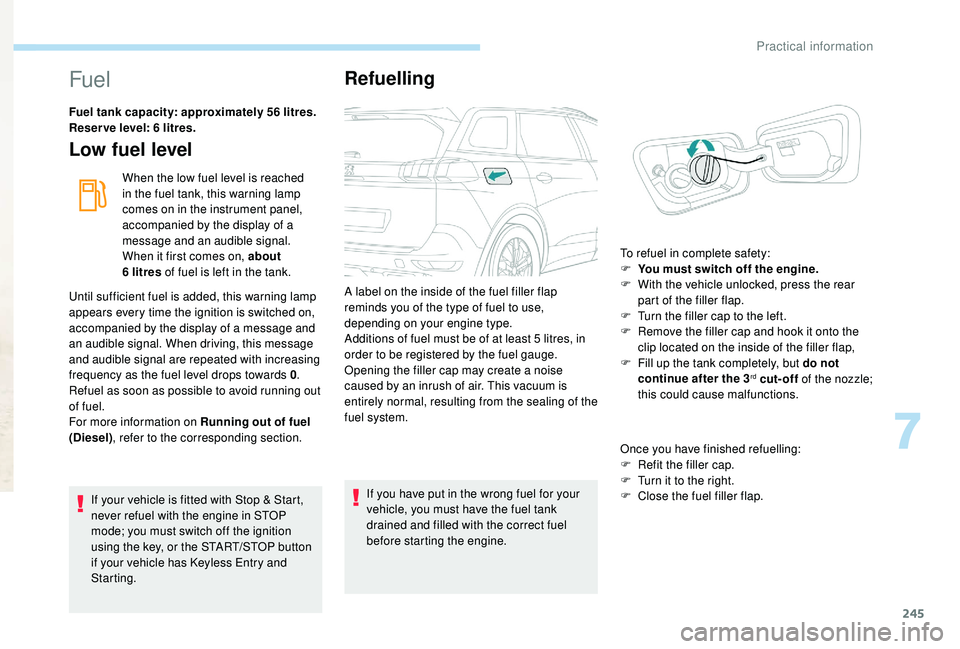
A label on the inside of the fuel filler flap
reminds you of the type of fuel to use,
depending on your engine type.
Additions of fuel must be of at least 5
litres, in
order to be registered by the fuel gauge.
Opening the filler cap may create a noise
caused by an inrush of air. This vacuum is
entirely normal, resulting from the sealing of the
fuel system.
Once you have finished refuelling:
F
R
efit the filler cap.
F T urn it to the right.
F C lose the fuel filler flap.
To refuel in complete safety:
F
Y
ou must switch off the engine.
F
W
ith the vehicle unlocked, press the rear
part of the filler flap.
F
T
urn the filler cap to the left.
F
R
emove the filler cap and hook it onto the
clip located on the inside of the filler flap,
F
F
ill up the tank completely, but do not
continue after the 3
rd cut-off of the nozzle;
this could cause malfunctions.
7
Practical information
Page 250 of 404
248
Towing a trailer
Your vehicle is primarily designed for
transporting people and luggage, but it may
also be used for towing a trailer.We recommend the use of genuine
PEUGEOT towbars and their harnesses
that have been tested and approved from
the design stage of your vehicle, and that
the fitting of the towbar is entrusted to a
PEUGEOT dealer or a qualified workshop.
If the towbar is not fitted by a PEUGEOT
dealer, it must still be fitted in accordance
with the vehicle manufacturer's
instructions. Please respect the maximum authorised
towable weights, indicated on the
registration certificate or in your vehicle’s
technical data.
For more information on Weights
(and the
towed loads which apply to your vehicle)
refer to the corresponding section.
Vehicle equipped with motorised
tailgate with "Hands-Free Tailgate
Access" function
To avoid unwanted opening of the tailgate
when using the towing device:
-
p
lease deactivate the "Hands-Free
Tailgate Access" function in advance in
your vehicle's configuration menu,
-
o
r move the electronic key away from
the recognition zone, with the tailgate
closed.
Towbar with quickly
detachable towball
No tools are required to install or remove the
towball on this genuine towbar system.
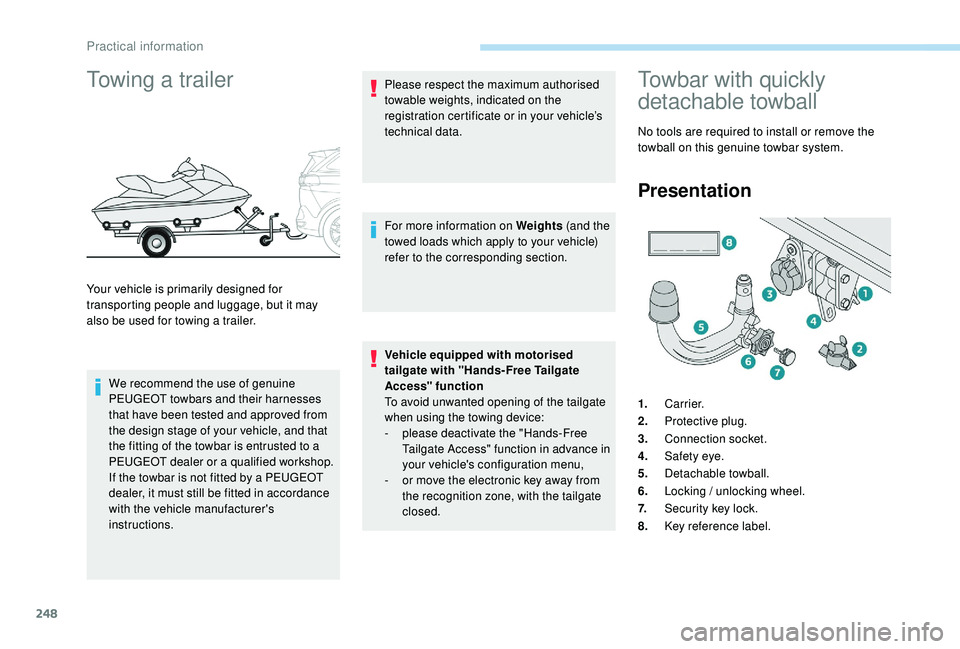
Presentation
1. Carrier.
2. Protective plug.
3. Connection socket.
4. Safety eye.
5. Detachable towball.
6. Locking / unlocking wheel.
7. Security key lock.
8. Key reference label.
Practical information
Page 251 of 404
249
Trailers with LED lamps are not
compatible with the wiring harness of this
device.
To know the technical features, and in
particular the towable weights for your
vehicle, refer to the corresponding section.
For advice on driving safely when To w i n g
a trailer , refer to the corresponding
section.
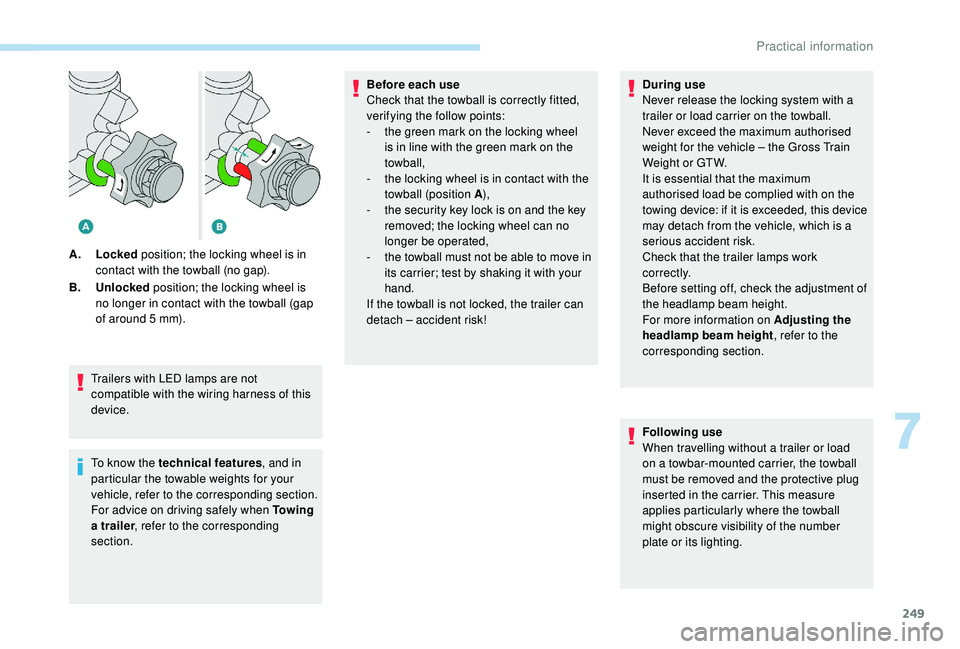
A.
Locked position; the locking wheel is in
contact with the towball (no gap).
B. Unlocked position; the locking wheel is
no longer in contact with the towball (gap
of around 5 mm). Before each use
Check that the towball is correctly fitted,
verifying the follow points:
-
t
he green mark on the locking wheel
is in line with the green mark on the
towball,
-
t
he locking wheel is in contact with the
towball (position A ),
-
t
he security key lock is on and the key
removed; the locking wheel can no
longer be operated,
-
t
he towball must not be able to move in
its carrier; test by shaking it with your
hand.
If the towball is not locked, the trailer can
detach – accident risk! During use
Never release the locking system with a
trailer or load carrier on the towball.
Never exceed the maximum authorised
weight for the vehicle – the Gross Train
Weight or GTW.
It is essential that the maximum
authorised load be complied with on the
towing device: if it is exceeded, this device
may detach from the vehicle, which is a
serious accident risk.
Check that the trailer lamps work
c o r r e c t l y.
Before setting off, check the adjustment of
the headlamp beam height.
For more information on Adjusting the
headlamp beam height
, refer to the
corresponding section.
Following use
When travelling without a trailer or load
on a towbar-mounted carrier, the towball
must be removed and the protective plug
inserted in the carrier. This measure
applies particularly where the towball
might obscure visibility of the number
plate or its lighting.
7
Practical information