2017 PEUGEOT 5008 headlamp
[x] Cancel search: headlampPage 228 of 404
226
Operating limits
The system goes into standby automatically in
the following cases:
-
E
SC deactivated or operation triggered,
-
S
peed below 40 mph (65 km/h) or greater
than 110
mph (180 km/h),
-
c
onnected electrically to a trailer,
-
u
se of the "space-saver" spare
wheel detected (as detection is not
immediate, deactivation of the system is
recommended),
-
d
ynamic driving style detected, pressure on
the brake or accelerator pedal,
-
d
riving where there are no lane markings,
-
a
ctivation of the direction indicators,
-
c
rossing the inside line on a bend,
-
d
riving in a tight corner,
-
i
nactivity by the driver detected during
correction. The following situations may interfere with
the operation of the system or prevent it
working:
-
c
onditions of poor visibility (inadequate
street lighting, snowfall, rain, fog),
-
d
azzle (headlamps of an oncoming
vehicle, low sun, reflections on a damp
road, leaving a tunnel, alternating
shade and light),
-
w
indscreen area located in front of the
camera: dirty, misted, frost-covered,
snow-covered, damaged or covered by
a s t i c ke r,
-
l
ane markings absent, worn, hidden
(snow, mud) or multiple (roadworks),
-
r
unning close to the vehicle in front
(the lane markings may not be
detected),
-
r
oads that are narrow, winding, etc.
Risk of undesirable operation
Deactivation of the system is recommended in
the following situations:
-
d
riving on a road sur face in poor condition,
-
u
nfavourable climatic conditions,
-
d
riving on slippery sur faces (ice).
The system is not intended for driving in the
following situations:
-
d
riving on a speed circuit,
-
d
riving with a trailer,
-
d
riving on a rolling stand,
-
d
riving on unstable sur faces.
Activation / Deactivation
Activation and deactivation of the
system is done in the Vehicle /
Driving menu of the touch screen.
Select the " Driving functions " then the "Lane
assist " tab.
The system state remains in memory when the
ignition is switched off.
Driving
Page 251 of 404
249
Trailers with LED lamps are not
compatible with the wiring harness of this
device.
To know the technical features, and in
particular the towable weights for your
vehicle, refer to the corresponding section.
For advice on driving safely when To w i n g
a trailer , refer to the corresponding
section.
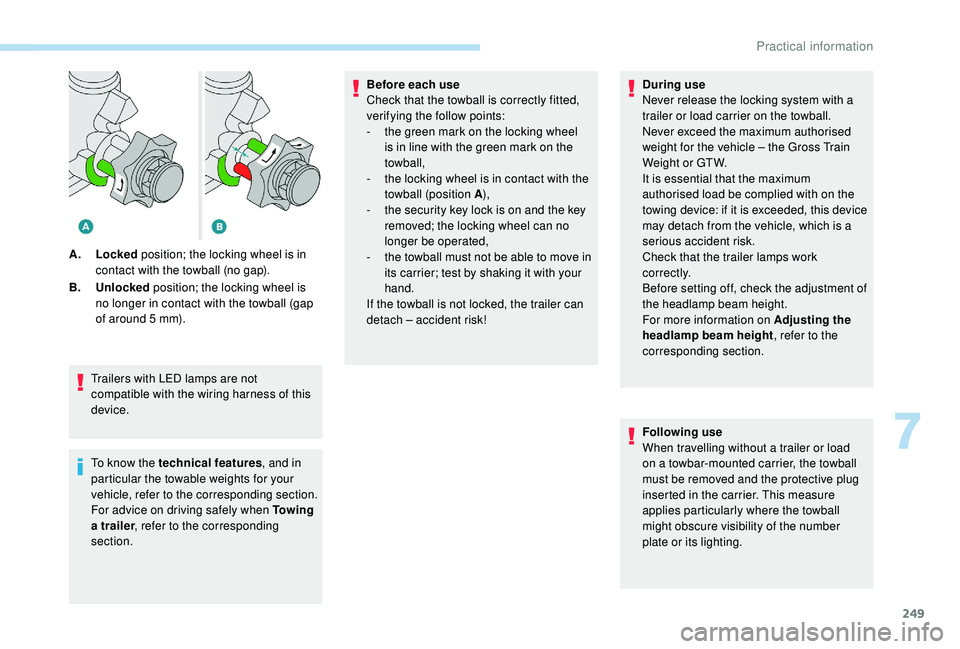
A.
Locked position; the locking wheel is in
contact with the towball (no gap).
B. Unlocked position; the locking wheel is
no longer in contact with the towball (gap
of around 5 mm). Before each use
Check that the towball is correctly fitted,
verifying the follow points:
-
t
he green mark on the locking wheel
is in line with the green mark on the
towball,
-
t
he locking wheel is in contact with the
towball (position A ),
-
t
he security key lock is on and the key
removed; the locking wheel can no
longer be operated,
-
t
he towball must not be able to move in
its carrier; test by shaking it with your
hand.
If the towball is not locked, the trailer can
detach – accident risk! During use
Never release the locking system with a
trailer or load carrier on the towball.
Never exceed the maximum authorised
weight for the vehicle – the Gross Train
Weight or GTW.
It is essential that the maximum
authorised load be complied with on the
towing device: if it is exceeded, this device
may detach from the vehicle, which is a
serious accident risk.
Check that the trailer lamps work
c o r r e c t l y.
Before setting off, check the adjustment of
the headlamp beam height.
For more information on Adjusting the
headlamp beam height
, refer to the
corresponding section.
Following use
When travelling without a trailer or load
on a towbar-mounted carrier, the towball
must be removed and the protective plug
inserted in the carrier. This measure
applies particularly where the towball
might obscure visibility of the number
plate or its lighting.
7
Practical information
Page 254 of 404
252
Apply the label provided to a clearly visible
area, close to the carrier or in the boot.
Go to a PEUGEOT dealer or a qualified
workshop for any work on the towbar
system.
Load reduction mode
System which manages the use of certain
functions according to the level of charge
remaining in the battery.
When the vehicle is being driven, the load
reduction function temporarily deactivates
certain functions, such as air conditioning,
heated rear screen, etc.
The deactivated functions are reactivated
automatically as soon as conditions permit.
Maintenance
Correct operation is only possible if the towball
and its carrier are kept clean.
Before cleaning the vehicle with a high-
pressure jet wash, the towball must be removed
and the protective plug fitted to the carrier.
Energy economy mode
System which manages the duration of use of
certain functions to conser ve a sufficient level
of charge in the battery.
After the engine has stopped, you can still use
functions such as the audio and telematics
system, windscreen wipers, dipped beam
headlamps, courtesy lamps, etc. for a
maximum combined duration of about forty
minutes.
Switching to this mode
A message appears in the instrument panel
screen indicating that the vehicle has switched
to economy mode and the active functions are
put on standby.If a telephone call is being made at this
time, it will be maintained for around
10
minutes with the Bluetooth hands-free
system of your audio system.
Exiting the mode
These functions will be automatically restored
the next time the vehicle is used.
In order to restore the use of these functions
immediately, start the engine and let it run:
-
f
or less than ten minutes, to use the
equipment for approximately five minutes,
-
f
or more than ten minutes, to use the
equipment for up to approximately thirty
minutes.
Let the engine run for the duration specified to
ensure that the battery charge is sufficient.
Do not repeatedly and continuously restart the
engine in order to charge the battery.
A flat battery prevents the engine from
starting.
For more information on the 12
V batter y,
refer to the corresponding section.
Practical information
Page 280 of 404
278
After changing a wheel
With a "space-saver" type spare wheel
Visit a PEUGEOT dealer or a qualified
workshop as soon as possible to have the
tightness of the bolts and the pressure of
the spare wheel checked.
Have the punctured tyre examined. After
inspection, the technician will advise you
on whether the tyre can be repaired or if it
must be replaced.
Changing a bulb
The headlamps have polycarbonate
lenses with a protective coating:
F
d
o not clean them using a dr y or
abrasive cloth, nor with a detergent
or solvent product,
F
u
se a sponge and soapy water or a pH
neutral product,
F
w
hen using a high pressure washer
on persistent marks, do not keep the
lance directed towards the lamps or
their edges for too long, so as not to
damage their protective coating and
seals.
Changing a bulb must only be done with
the ignition off and after the headlamp has
been switched off for several minutes –
Risk of serious burns!
F
D
o not touch the bulb directly with your
fingers, use a lint-free cloth.
It is essential only to use anti-ultraviolet
(UV) type bulbs, so as not to damage the
headlamp.
Always replace a failed bulb with a new
bulb with the same type and specification. In some weather conditions (e.g. low
temperature or humidity), the presence
of misting on the internal sur face of the
glass of the headlamps and rear lamps is
normal; it disappears after the lamps have
been on for a few minutes.
Light emitting diodes (LED)
For the replacement of this type of bulbs,
you must contact a PEUGEOT dealer or a
qualified workshop.
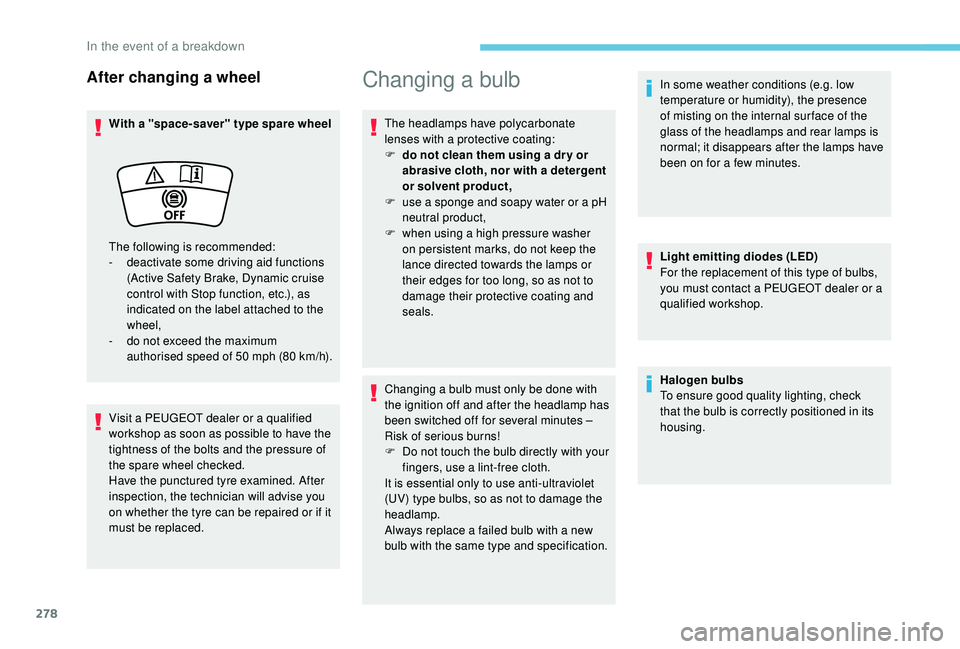
The following is recommended:
-
d
eactivate some driving aid functions
(Active Safety Brake, Dynamic cruise
control with Stop function, etc.), as
indicated on the label attached to the
wheel,
-
d
o not exceed the maximum
authorised speed of 50
mph (80
km/h). Halogen bulbs
To ensure good quality lighting, check
that the bulb is correctly positioned in its
housing.
In the event of a breakdown
Page 281 of 404
279
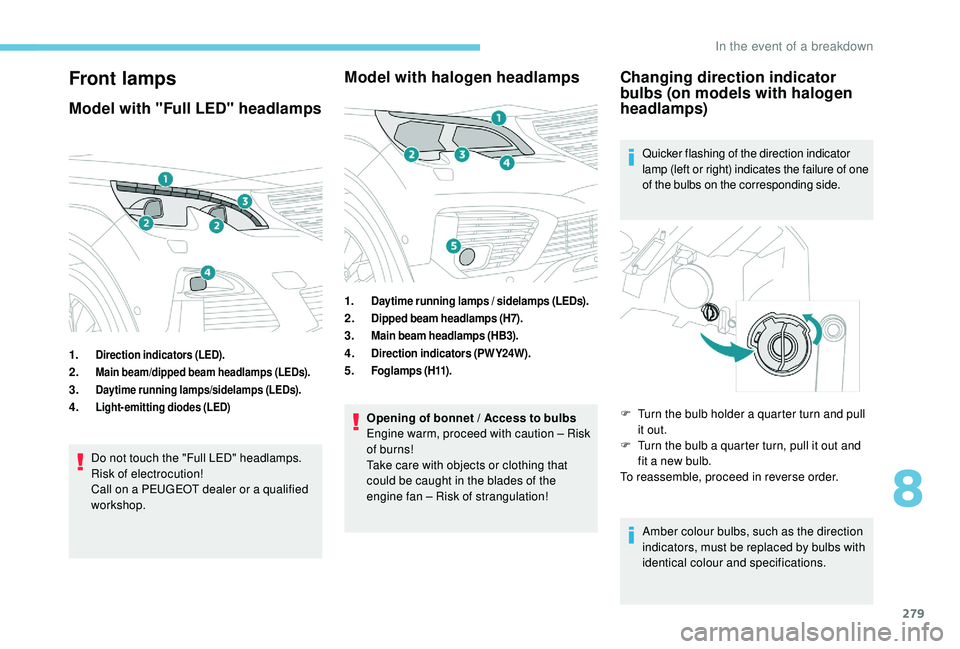
Front lamps
Model with "Full LED" headlamps
1.Direction indicators (LED).
2.Main beam/dipped beam headlamps (LEDs).
3.Daytime running lamps/sidelamps (LEDs).
4.Light-emitting diodes (LED)
Do not touch the "Full LED" headlamps.
Risk of electrocution!
Call on a PEUGEOT dealer or a qualified
workshop.
Model with halogen headlamps
1.Daytime running lamps / sidelamps (LEDs).
2.Dipped beam headlamps (H7).
3.Main beam headlamps (HB3).
4.Direction indicators (PWY24W).
5.Fo g l a m p s ( H11) .
Opening of bonnet / Access to bulbs
Engine warm, proceed with caution – Risk
of burns!
Take care with objects or clothing that
could be caught in the blades of the
engine fan – Risk of strangulation!
Changing direction indicator
bulbs (on models with halogen
headlamps)
Quicker flashing of the direction indicator
lamp (left or right) indicates the failure of one
of the bulbs on the corresponding side.
Amber colour bulbs, such as the direction
indicators, must be replaced by bulbs with
identical colour and specifications.
F
T
urn the bulb holder a quarter turn and pull
it out.
F
T
urn the bulb a quarter turn, pull it out and
fit a new bulb.
To reassemble, proceed in reverse order.
8
In the event of a breakdown
Page 282 of 404
280
To refit, close the protective cover very
carefully to guarantee the leak-tightness
of the lamp.
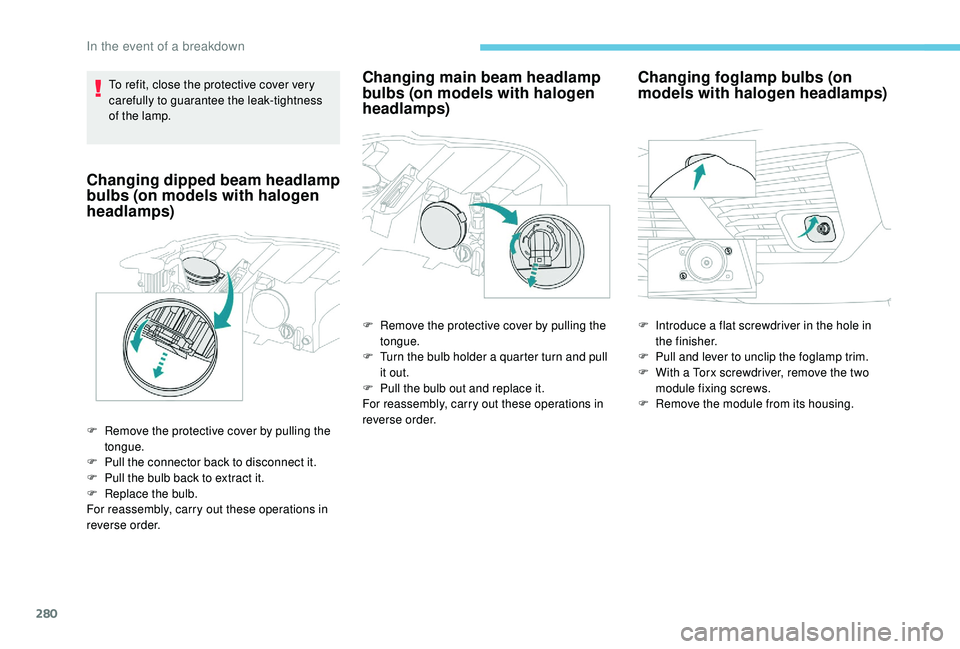
Changing dipped beam headlamp
bulbs (on models with halogen
headlamps)
F Remove the protective cover by pulling the tongue.
F
P
ull the connector back to disconnect it.
F
P
ull the bulb back to extract it.
F
R
eplace the bulb.
For reassembly, carry out these operations in
reverse order.
Changing main beam headlamp
bulbs (on models with halogen
headlamps)
F Remove the protective cover by pulling the tongue.
F
T
urn the bulb holder a quarter turn and pull
it out.
F
P
ull the bulb out and replace it.
For reassembly, carry out these operations in
reverse order.
Changing foglamp bulbs (on
models with halogen headlamps)
F Introduce a flat screwdriver in the hole in the finisher.
F
P
ull and lever to unclip the foglamp trim.
F
W
ith a Torx screwdriver, remove the two
module fixing screws.
F
R
emove the module from its housing.
In the event of a breakdown
Page 291 of 404
289
The Stop & Start system may not be
operational during the trip following the
first engine start.
In this case, the system will only be
available again after a continuous
period of immobilisation of the vehicle,
a period which depends on the exterior
temperature and the state of charge of the
battery (up to about 8 hours).
For right-hand drive vehicles, when the
total distance recorder has reached
60
miles (100 km), it is necessary to wait
approx. 15 minutes before starting the
engine.
However, if minor problems persist following
this operation, contact a PEUGEOT dealer or a
qualified workshop.
Referring to the corresponding section, you
must yourself reinitialise or reset certain
systems, such as:
-
t
he key with remote control or electronic key
(depending on version),
-
t
he sunroof and its electric blind,
-
t
he electric windows,
-
t
he date and time,
-
t
he preset radio stations.
Towing the vehicle
Procedure for having your vehicle towed or
for towing another vehicle using a removable
towing eye.
Access to the tools
Depending on version, the towing eye is stored
either in the interior trim of the boot sill, left-
hand side, or in a bag behind the left rear seat.
For more information on access to the Tool kit
,
refer to the corresponding section.
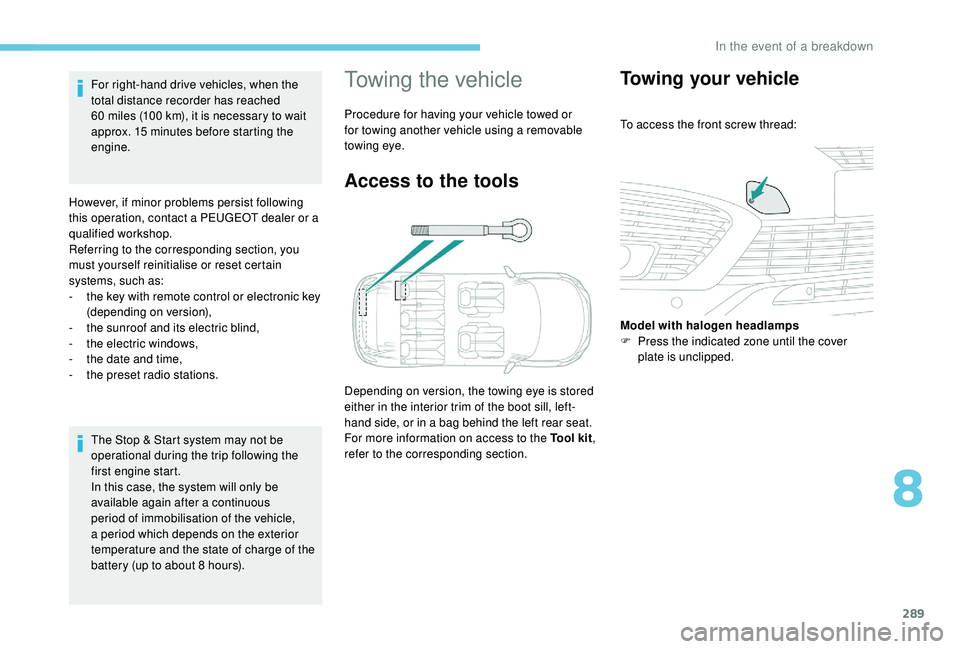
Towing your vehicle
To access the front screw thread:
Model with halogen headlamps
F
P
ress the indicated zone until the cover
plate is unclipped.
8
In the event of a breakdown
Page 292 of 404
290
F Move the gear lever into neutral (N mode with an automatic gearbox).
Failure to follow this instruction may cause
damage to some components (braking,
transmission, etc.) and the absence of
braking assistance when the engine is
restarted. F
S
witch on the hazard warning lamps on
both vehicles.
F
S
et off gently and drive slowly for a short
distance.
Towing another vehicle
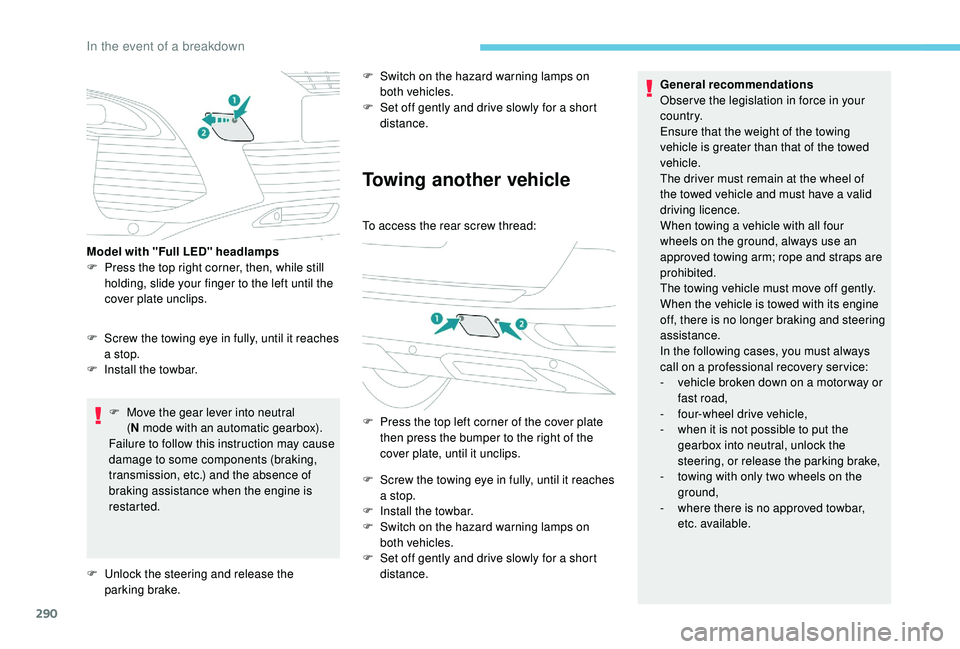
To access the rear screw thread:
F
P
ress the top left corner of the cover plate
then press the bumper to the right of the
cover plate, until it unclips.
F
S
crew the towing eye in fully, until it reaches
a stop.
F
I
nstall the towbar.
F
S
witch on the hazard warning lamps on
both vehicles.
F
S
et off gently and drive slowly for a short
distance. General recommendations
Obser ve the legislation in force in your
c o u nt r y.
Ensure that the weight of the towing
vehicle is greater than that of the towed
vehicle.
The driver must remain at the wheel of
the towed vehicle and must have a valid
driving licence.
When towing a vehicle with all four
wheels on the ground, always use an
approved towing arm; rope and straps are
prohibited.
The towing vehicle must move off gently.
When the vehicle is towed with its engine
off, there is no longer braking and steering
assistance.
In the following cases, you must always
call on a professional recovery ser vice:
-
v
ehicle broken down on a motor way or
fast road,
-
f
our-wheel drive vehicle,
-
w
hen it is not possible to put the
gearbox into neutral, unlock the
steering, or release the parking brake,
-
t
owing with only two wheels on the
ground,
-
w
here there is no approved towbar,
etc. available.
F
S
crew the towing eye in fully, until it reaches
a stop.
F
I
nstall the towbar.
Model with "Full LED" headlamps
F
P
ress the top right corner, then, while still
holding, slide your finger to the left until the
cover plate unclips.
F
U
nlock the steering and release the
parking brake.
In the event of a breakdown