Page 175 of 392
173
Memorising speeds
Memorising
this function allows speeds to be saved, which can then be offered to set the two systems: the speed limiter (to limit the speed of the vehicle) or the
cruise control (for a vehicle cruising speed).
You can memorise up to six speed settings for each of the two systems. By default, some speed settings are already memorised.F
S
elect the system for which you want to
memorise new speed settings:
th
is function is accessible in the touch screen.
F
e
n
ter the new value using the numerical
keypad and confirm.
F
C
onfirm to save the modification and quit
the menu.
●
s
peed limiter
or
F
P
ress the button corresponding to the
speed setting you want to modify.
Touch screen
F Select " Speed settings " in the
" Driving assistance " menu.
●
c
ruise control.
As a safety measure, the driver must
carry out these operations when
stationary.
6
Driving
Page 215 of 392
213
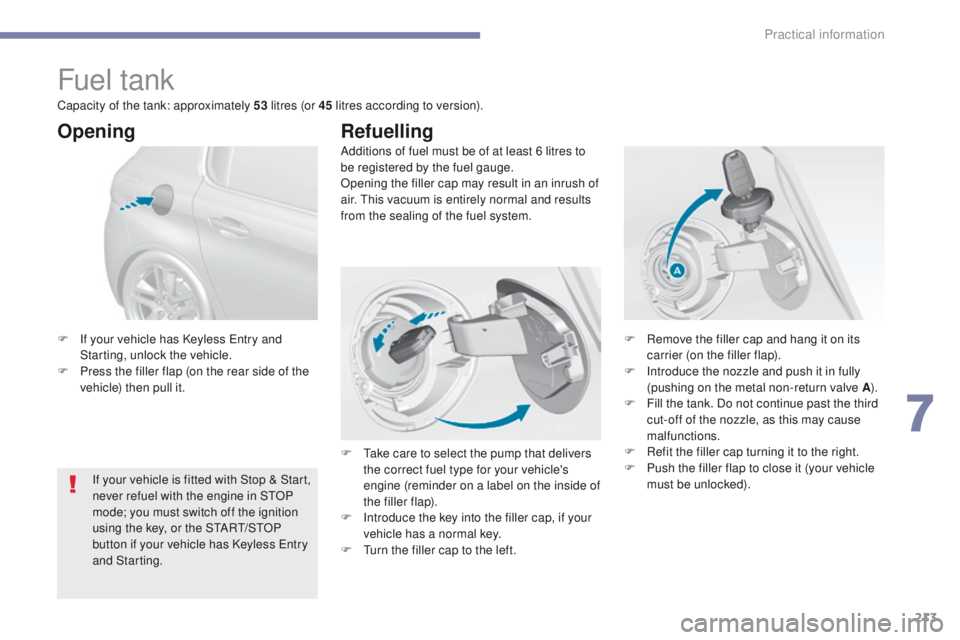
Fuel tank
Additions of fuel must be of at least 6 litres to
be registered by the fuel gauge.
Opening the filler cap may result in an inrush of
air. t
h
is vacuum is entirely normal and results
from the sealing of the fuel system.
Opening
If your vehicle is fitted with Stop & Start,
never refuel with the engine in StO P
mode; you must switch off the ignition
using the key, or the S
tA
R
t/
S
tO
P
button if your vehicle has Keyless
e
n
try
and Starting.
F
I
f your vehicle has Keyless e
n
try and
Starting, unlock the vehicle.
F
P
ress the filler flap (on the rear side of the
vehicle) then pull it.
Refuelling
F Remove the filler cap and hang it on its carrier (on the filler flap).
F
I
ntroduce the nozzle and push it in fully
(pushing on the metal non-return valve A ).
F
F
ill the tank. Do not continue past the third
cut-off of the nozzle, as this may cause
malfunctions.
F
R
efit the filler cap turning it to the right.
F
P
ush the filler flap to close it (your vehicle
must be unlocked).
F
t
a
ke care to select the pump that delivers
the correct fuel type for your vehicle's
engine (reminder on a label on the inside of
the filler flap).
Capacity of the tank: approximately 53
litres (or 45 litres according to version).
F
I
ntroduce the key into the filler cap, if your
vehicle has a normal key.
F
t
u
rn the filler cap to the left.
7
Practical information
Page 237 of 392
235
Recommendations on storage
Never store bottles of AdBlue® in your
vehicle.
AdBlue
® freezes at about -11°C and
deteriorates above 25°C. It is recommended
that bottles be stored in a cool area and
protected from direct sunlight.
un
der these conditions, the fluid can be kept
for at least a year.
If the additive has frozen, it can be used once
it has completely thawed out.
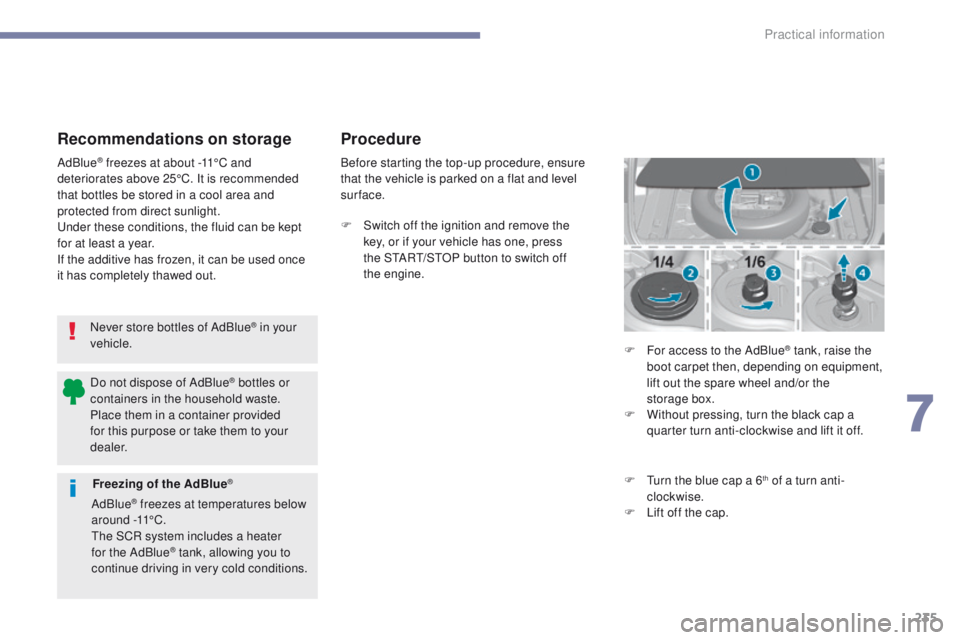
Procedure
Before starting the top-up procedure, ensure
that the vehicle is parked on a flat and level
sur face.
F
S
witch off the ignition and remove the
key, or if your vehicle has one, press
the S
tA
R
t/
S
tO
P button to switch off
the
engine. F
F
or access to the AdBlue
® tank, raise the
boot carpet then, depending on equipment,
lift out the spare wheel and/or the
storage
box.
F
W
ithout pressing, turn the black cap a
quarter turn anti-clockwise and lift it off.
F
t
u
rn the blue cap a 6
th of a turn anti-
clockwise.
F
L
ift off the cap.
Freezing of the AdBlue®
AdBlue® freezes at temperatures below
around -11°C.
th
e SCR system includes a heater
for the AdBlue
® tank, allowing you to
continue driving in very cold conditions.
Do not dispose of AdBlue
® bottles or
containers in the household waste.
Place them in a container provided
for this purpose or take them to your
dealer.
7
Practical information
Page 238 of 392
236
Never dispose of AdBlue® bottles in
the household waste. Place them in
a special container provided for this
purpose or take them to your dealer.
F
A
fter emptying the bottle, wipe away any
spillage around the tank filler using a damp
cloth. If any AdBlue
® fluid is spilt or splashed,
wash immediately with cold water or
wipe with a damp cloth.
If the AdBlue
® has crystallised, clean it
off using a sponge and hot water.
F
R
efit the blue cap to the tank and turn it a
6
th of a turn clockwise, to its stop.
F
R
efit the black cap and turn it a quarter of
a turn clockwise without pressing.
e
n
sure
that the indicator on the cap lines up with
the indicator on the support.
F
D
epending on equipment, return the spare
wheel and/or the storage box to the bottom
of the boot.
F
R
efit the boot carpet and close the tailgate. Important: when topping-up after
running out of AdBlue
®, signalled
by the message "to
p-up AdBlue:
Starting prevented", you must wait for
about 5 minutes before switching the
ignition on again, without opening the
driver's door, unlocking the vehicle,
introducing the remote control key
into the ignition switch, or placing
the electronic key of the "Keyless
Entr y and Star ting" system inside
the vehicle.
Switch on the ignition, then wait for
10
seconds before starting the engine.
F
O
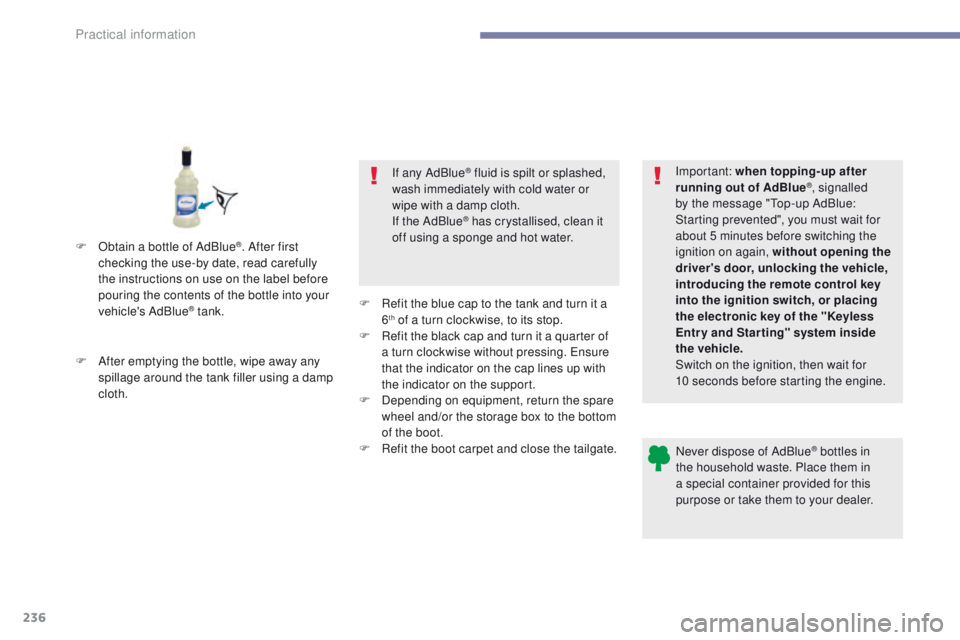
btain a bottle of AdBlue
®. After first
checking the use-by date, read carefully
the instructions on use on the label before
pouring the contents of the bottle into your
vehicle's AdBlue
® tank.
Practical information
Page 266 of 392
264
Dashboard fuses
the fusebox is placed in the lower dashboard
(left-hand side).Fuse
N° Rating
(A) Functions
F4 5
em
ergency and assistance calls.
F6 A or B 15Audio system, touch screen, CD player, navigation.
F11 5"Keyless
e
n
try and starting" system
F13 10Front 12 V accessory socket.
F14 1012 V accessory socket in the boot.
F16 3
gl
ove box lamp, rear courtesy lamp.
F17 3Vanity mirror lamp, front courtesy lamp.
F19 5Instrument panel.
F21 10Multifunction screen, air conditioning.
F22 5Reversing camera, parking sensors.
F24 3Rain and sunshine sensor
F25 5Airbags.
F28 A or B 15Audio system (battery +).
F30 20Rear wiper.
F31 30Locks.
F32 10Hi-Fi amplifier.
F33 3Memorisation of driving positions.
F34 5
el
ectric power steering.
F35 3Seat belts not fastened display.
F
u
n
clip the cover by pulling at top left, then
right.
Version 1 (Full)
Access to the fuses
In the event of a breakdown
Page 273 of 392
271
Do not apply excessive force on the
lever as locking will not be possible if
the clamp is not positioned correctly;
start the procedure again.
th
e Stop & Start system may not be
operational during the trip following the
first engine start.
In this case, the system will only be
available again after a continuous
period of immobilisation of the vehicle,
a period which depends on the ambient
temperature and the state of charge of
the battery (up to about 8 hours).
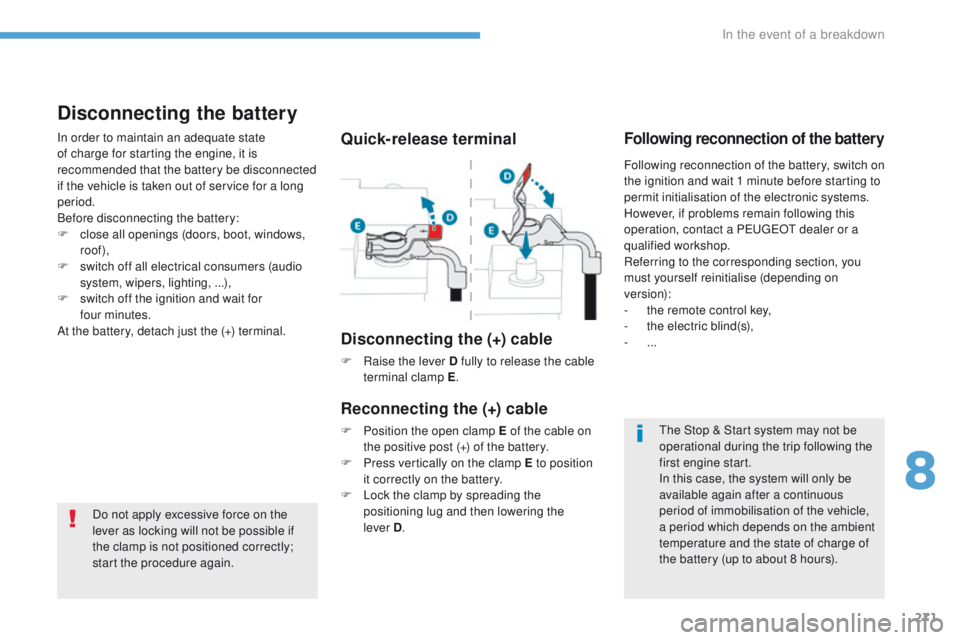
Quick-release terminal
Disconnecting the (+) cable
F Raise the lever D fully to release the cable terminal clamp E .
Reconnecting the (+) cable
F Position the open clamp E of the cable on
the positive post (+) of the battery.
F
P
ress vertically on the clamp E to position
it correctly on the battery.
F
L
ock the clamp by spreading the
positioning lug and then lowering the
lever
D.
Disconnecting the battery
In order to maintain an adequate state
of charge for starting the engine, it is
recommended that the battery be disconnected
if the vehicle is taken out of service for a long
period.
Before disconnecting the battery:
F
c
lose all openings (doors, boot, windows,
roof),
F
s
witch off all electrical consumers (audio
system, wipers, lighting, ...),
F
s
witch off the ignition and wait for
four
minutes.
At the battery, detach just the (+) terminal.Following reconnection of the battery
Following reconnection of the battery, switch on
the ignition and wait 1 minute before starting to
permit initialisation of the electronic systems.
However, if problems remain following this
operation, contact a P
e
uge
Ot
dealer or a
qualified workshop.
Referring to the corresponding section, you
must yourself reinitialise (depending on
version):
-
t
he remote control key,
-
t
he electric blind(s),
-
...
8
In the event of a breakdown
Page 303 of 392
301
Telephone
Configuration Connected services
Connect a telephone by Bluetooth®.
Adjust settings for audio (balance,
ambience,
...), colour scheme, brightness of the
instruments and controls, display (language,
units, date, time, ...) and access the interactive
help for the vehicle's main systems and
warning lamps. Pe
ugeOt C
ONNeCt A
PPS
Connect to an applications portal to facilitate,
make safe and personalise journeys by means
of a connection key available on subscription
from a P
e
uge
Ot
dealer.
(Depending on equipment)
.
Audio and Telematics
Page 311 of 392
309
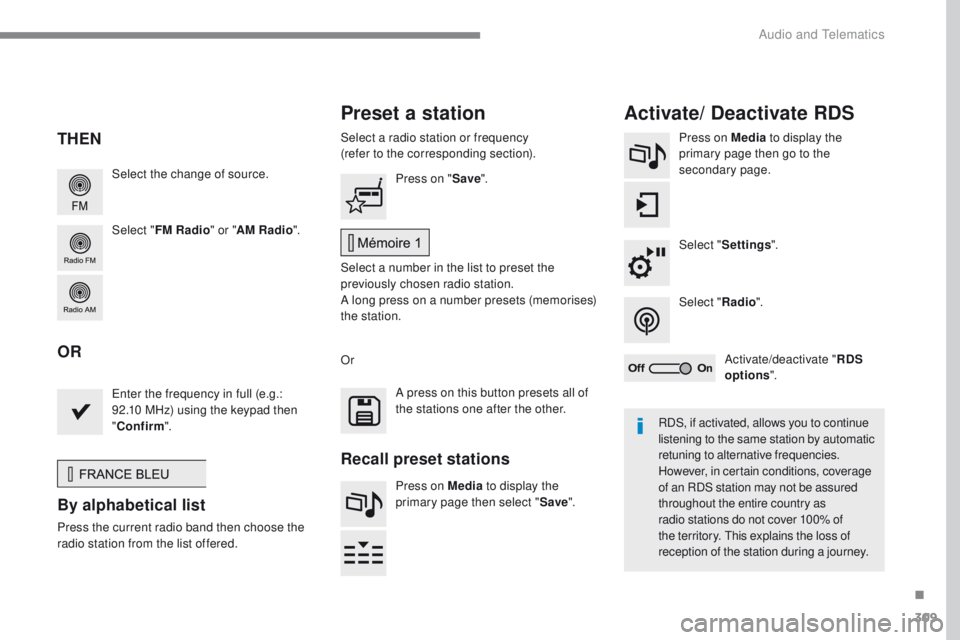
Select the change of source.
Select "FM Radio " or "AM Radio ".Select a radio station or frequency
(refer to the corresponding section).
Press on Media
to display the
primary page then go to the
secondary page.
Select " Settings ".
Select " Radio".
Activate/deactivate " RDS
options ".
Press on "
Save".
Select a number in the list to preset the
previously chosen radio station.
A long press on a number presets (memorises)
the station.
en
ter the frequency in full (e.g.:
92.10 MHz) using the keypad then
" Confirm ".
By alphabetical list
Press the current radio band then choose the
radio station from the list offered. Or
Press on Media to display the
primary page then select " Save".
Preset a station Activate/ Deactivate RDS
THEN
OR
A press on this button presets all of
the stations one after the other.
Recall preset stations
RDS, if activated, allows you to continue
listening to the same station by automatic
retuning to alternative frequencies.
However, in certain conditions, coverage
of an RDS station may not be assured
throughout the entire country as
radio stations do not cover 100% of
the territory.
t
h
is explains the loss of
reception of the station during a journey.
.
Audio and telematics