2017 Peugeot 308 key
[x] Cancel search: keyPage 71 of 392
69
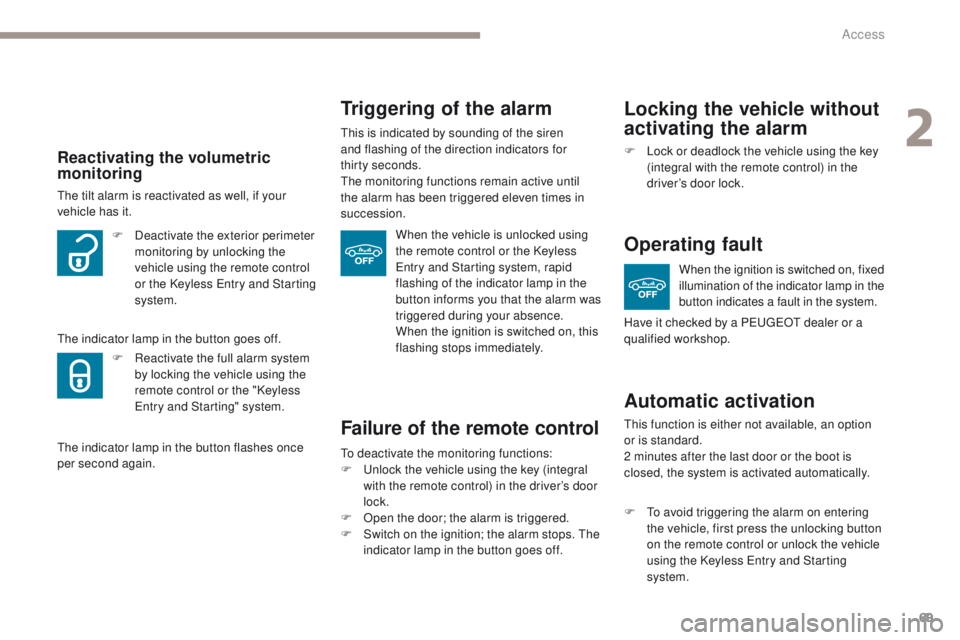
Failure of the remote control
to deactivate the monitoring functions:
F un lock the vehicle using the key (integral
with the remote control) in the driver’s door
lock.
F
O
pen the door; the alarm is triggered.
F
S
witch on the ignition; the alarm stops. t
h
e
indicator lamp in the button goes off.
Locking the vehicle without
activating the alarm
F Lock or deadlock the vehicle using the key (integral with the remote control) in the
driver’s door lock.
Operating fault
When the ignition is switched on, fixed
illumination of the indicator lamp in the
button indicates a fault in the system.
Automatic activation
this function is either not available, an option
or is standard.
2 minutes after the last door or the boot is
closed, the system is activated automatically.
F
t
o a
void triggering the alarm on entering
the vehicle, first press the unlocking button
on the remote control or unlock the vehicle
using the Keyless
e
n
try and Starting
system.
Triggering of the alarm
this is indicated by sounding of the siren
and flashing of the direction indicators for
thirty
seconds.
th
e monitoring functions remain active until
the alarm has been triggered eleven times in
succession.
When the vehicle is unlocked using
the remote control or the Keyless
en
try and Starting system, rapid
flashing of the indicator lamp in the
button informs you that the alarm was
triggered during your absence.
When the ignition is switched on, this
flashing stops immediately.
Reactivating the volumetric
monitoring
the tilt alarm is reactivated as well, if your
vehicle has it.
th
e indicator lamp in the button goes off. F
D
eactivate the exterior perimeter
monitoring by unlocking the
vehicle using the remote control
or the Keyless
e
n
try and Starting
system.
F
R
eactivate the full alarm system
by locking the vehicle using the
remote control or the "Keyless
en
try and Starting" system.
th
e indicator lamp in the button flashes once
per second again. Have it checked by a P
e
uge
Ot
dealer or a
qualified workshop.
2
Access
Page 72 of 392
70
electric windows
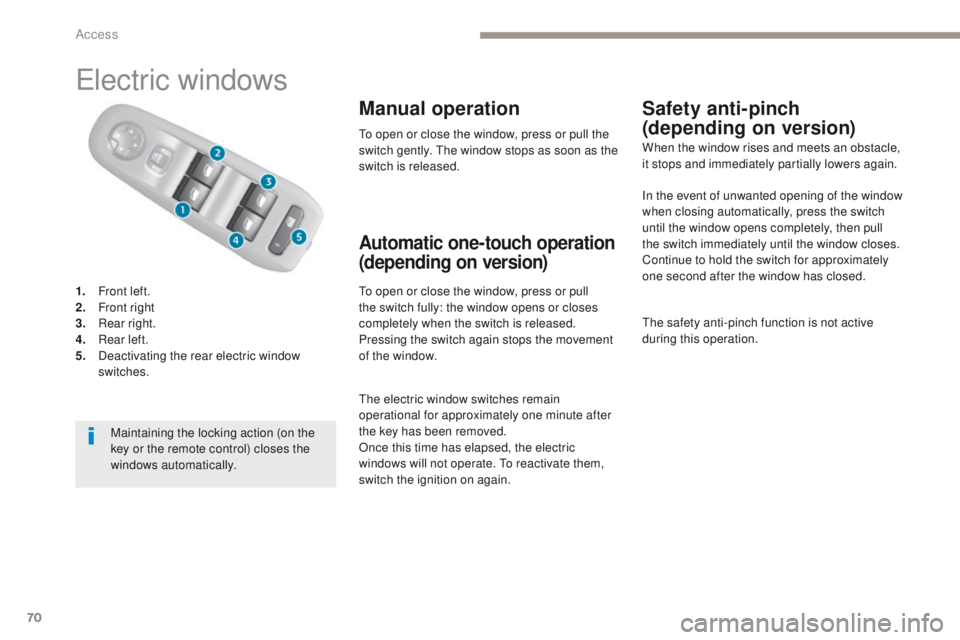
1. Front left.
2. Front right
3.
R
ear right.
4.
R
ear left.
5.
D
eactivating the rear electric window
switches.
Manual operation
to open or close the window, press or pull
the switch fully: the window opens or closes
completely when the switch is released.
Pressing the switch again stops the movement
of the window.
Safety anti-pinch
(depending on version)
Automatic one-touch operation
(depending on version)
to open or close the window, press or pull the
switch gently. th e window stops as soon as the
switch is released. When the window rises and meets an obstacle,
it stops and immediately partially lowers again.
Maintaining the locking action (on the
key or the remote control) closes the
windows automatically.
the
electric window switches remain
operational for approximately one minute after
the key has been removed.
Once this time has elapsed, the electric
windows will not operate.
t
o r
eactivate them,
switch the ignition on again. In the event of unwanted opening of the window
when closing automatically, press the switch
until the window opens completely, then pull
the switch immediately until the window closes.
Continue to hold the switch for approximately
one second after the window has closed.
th
e safety anti-pinch function is not active
during this operation.
Access
Page 73 of 392
71
Reinitialising the electric
windows
Always remove the key when leaving
the vehicle, even for a short time.
In the event of contact during operation
of the windows, you must reverse the
movement of the window. t
o d
o this,
press the switch concerned.
When operating the passenger electric
window switches, the driver must
ensure that no one is preventing correct
closing of the windows.
th
e driver must ensure that the
passengers use the electric windows
c o r r e c t l y.
Be aware of children when operating
the windows.
For the safety of your children, press
this switch to prevent operation
of the windows of the rear doors,
irrespective of their position.Deactivating the rear
window controls
With the indicator lamp on, the rear switches
are deactivated.
With the indicator lamp off, the switches are
active.
Following reconnection of the battery, the
safety anti-pinch function must be reinitialised.
th
e safety anti-pinch is not active during these
operations:
-
l
ower the window completely, then raise
it, it will rise in steps of a few centimetres
each time the switch is pressed. Repeat
the operation until the window closes
completely,
-
p
ress and hold the switch upwards for
at least one second after reaching this
position, window closed.
2
Access
Page 105 of 392
103
Courtesy lamps
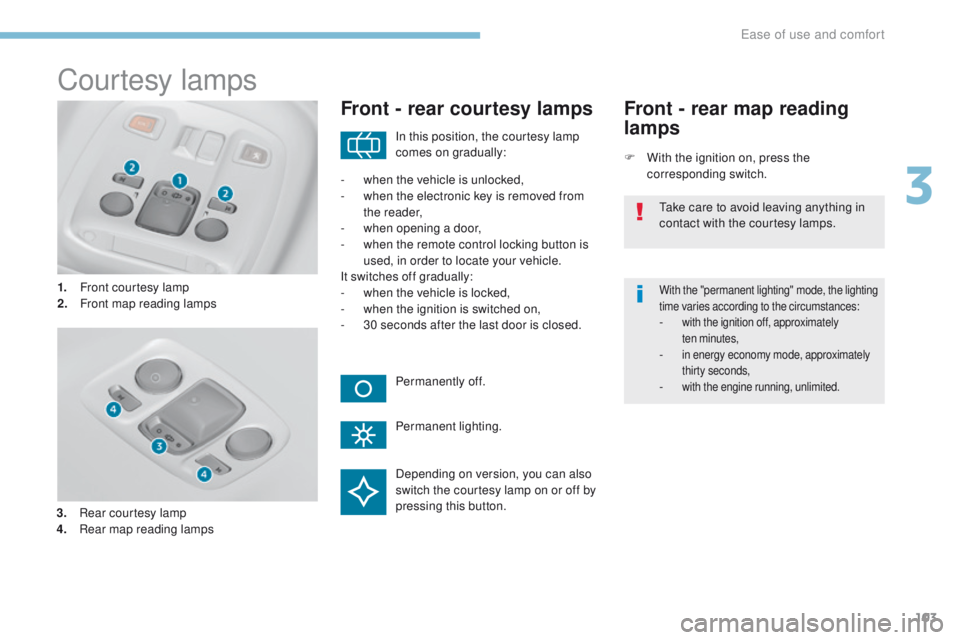
1. Front courtesy lamp
2. Front map reading lamps
Front - rear courtesy lamps
F With the ignition on, press the corresponding switch.
Front - rear map reading
lamps
With the "permanent lighting" mode, the lighting
time varies according to the circumstances:
- with the ignition off, approximately ten minutes,
- in energy economy mode, approximately thirty seconds,
- with the engine running, unlimited.
In this position, the courtesy lamp
comes on gradually:
Permanently off.
Permanent lighting.
-
w
hen the vehicle is unlocked,
-
w
hen the electronic key is removed from
the reader,
-
w
hen opening a door,
-
w
hen the remote control locking button is
used, in order to locate your vehicle.
It switches off gradually:
-
w
hen the vehicle is locked,
-
w
hen the ignition is switched on,
-
3
0 seconds after the last door is closed.
ta
ke care to avoid leaving anything in
contact with the courtesy lamps.
Depending on version, you can also
switch the courtesy lamp on or off by
pressing this button.
3.
R
ear courtesy lamp
4.
R
ear map reading lamps
3
ease of use and comfort
Page 107 of 392
105
Mirrors
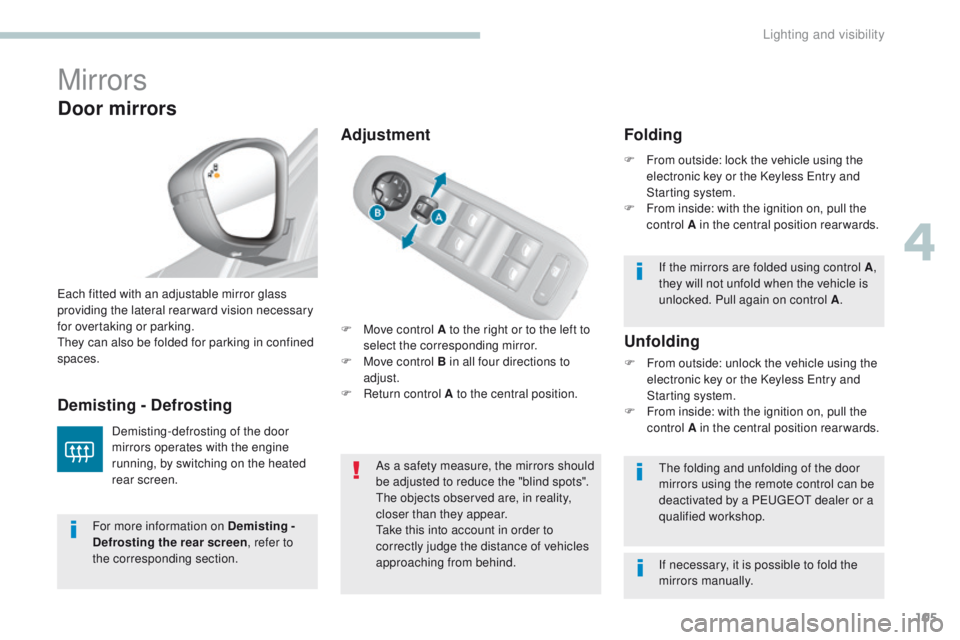
F Move control A to the right or to the left to select the corresponding mirror.
F
M
ove control B in all four directions to
adjust.
F
R
eturn control A to the central position.
ea
ch fitted with an adjustable mirror glass
providing the lateral rear ward vision necessary
for overtaking or parking.th
ey can also be folded for parking in confined
spaces.
Demisting - Defrosting
Door mirrors
Demisting-defrosting of the door
mirrors operates with the engine
running, by switching on the heated
rear screen. As a safety measure, the mirrors should
be adjusted to reduce the "blind spots".
th
e objects observed are, in reality,
closer than they appear.
ta
ke this into account in order to
correctly judge the distance of vehicles
approaching from behind.
th
e folding and unfolding of the door
mirrors using the remote control can be
deactivated by a P
e
uge
Ot
dealer or a
qualified workshop.
Unfolding
F From outside: unlock the vehicle using the electronic key or the Keyless en try and
Starting system.
F
F
rom inside: with the ignition on, pull the
control A in the central position rearwards.
Folding
F From outside: lock the vehicle using the electronic key or the Keyless en try and
Starting system.
F
F
rom inside: with the ignition on, pull the
control A in the central position rearwards.
If the mirrors are folded using control A ,
they will not unfold when the vehicle is
unlocked. Pull again on control A .
For more information on Demisting -
Defrosting the rear screen , refer to
the corresponding section. If necessary, it is possible to fold the
mirrors manually.
Adjustment
4
Lighting and visibility
Page 114 of 392
112
Automatic
When the automatic illumination of headlamps
function is activated (lighting control stalk
in the "AUTO" position), under low ambient
light the dipped beams headlamps come on
automatically when the ignition is switched off.
Activation or deactivation, as well
as the duration of the guide-me-
home lighting, is set in the " Driving
assistance " menu, then " Vehicle
settings " in the secondary page.
Exterior welcome
lighting
the remote switching on of the lighting makes
your approach to the vehicle easier in poor
light. It is activated when the lighting control
is in the " AUTO" position and the level of light
detected by the sunshine sensor is low.
Switching on
F Press the open padlock on the remote control or one of the front
door handles with Keyless
e
n
try
and Starting.
Switching offthe exterior welcome lighting switches off
automatically after a set time, when the ignition
is switched on or on locking the vehicle.
Programmingthe activation, deactivation and
choice of welcome lighting duration
are done in the " Driving assistance "
menu then " Vehicle settings ".
th
e dipped beam headlamps and sidelamps
come on; your vehicle is also unlocked.
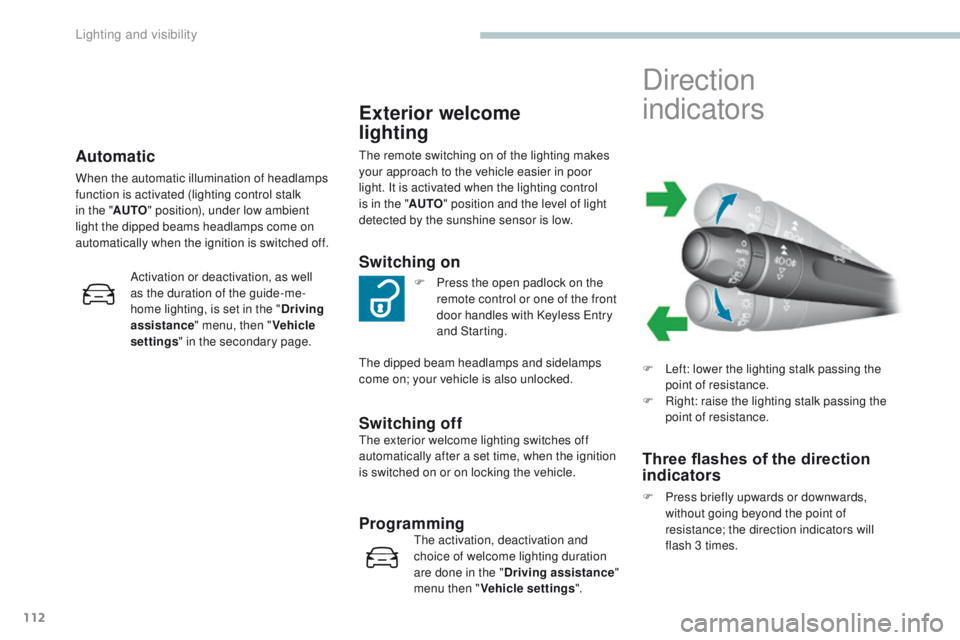
Direction
indicators
F Left: lower the lighting stalk passing the point of resistance.
F
R
ight: raise the lighting stalk passing the
point of resistance.
Three flashes of the direction
indicators
F Press briefly upwards or downwards, without going beyond the point of
resistance; the direction indicators will
flash 3 times.
Lighting and visibility
Page 130 of 392
128
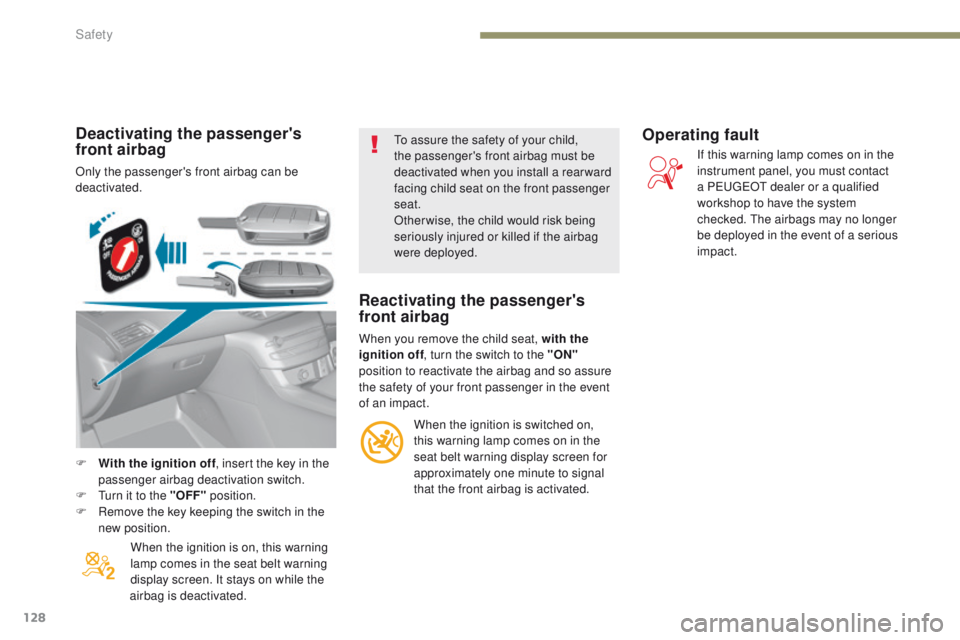
F With the ignition off, insert the key in the
passenger airbag deactivation switch.
F
t
u
rn it to the "OFF" position.
F
R
emove the key keeping the switch in the
new position.
When the ignition is on, this warning
lamp comes in the seat belt warning
display screen. It stays on while the
airbag is deactivated.
to a
ssure the safety of your child,
the passenger's front airbag must be
deactivated when you install a rear ward
facing child seat on the front passenger
seat.
Otherwise, the child would risk being
seriously injured or killed if the airbag
were deployed.
Reactivating the passenger's
front airbag
When you remove the child seat, with the
ignition off , turn the switch to the "ON"
position to reactivate the airbag and so assure
the safety of your front passenger in the event
of an impact.
When the ignition is switched on,
this warning lamp comes on in the
seat belt warning display screen for
approximately one minute to signal
that the front airbag is activated.
Operating fault
If this warning lamp comes on in the
instrument panel, you must contact
a P
e
uge
Ot
dealer or a qualified
workshop to have the system
checked.
t
h
e airbags may no longer
be deployed in the event of a serious
impact.
Deactivating the passenger's
front airbag
Only the passenger's front airbag can be
deactivated.
Safety
Page 146 of 392
144
IUF Seat suitable for the installation of an Isofix U niversal seat, F or ward facing
secured using the upper strap.
IL- SU
S
eat suitable for the installation of an
I sofix S emi-Universal seat either:
-
r
ear ward facing fitted with an upper strap
or a support leg,
-
f
or ward facing fitted with a support leg,
-
a
n infant car seat fitted with an upper strap
or a support leg. For more information on ISOFIX
mountings and child seats
and in
particular the upper strap, refer to the
corresponding section.
X
S
eat not suitable for the installation of a
child seat of the weight group indicated.
(a)
M
ove a seat without height adjustment
for wards by 1 notch from the mid position
for wards and backwards. A seat with
height adjustment must be in the highest
position.
(b)
t
h
e installation of an infant carrier on one
of the outer seats makes use of the other
two seats impossible.
(c)
A s
eat with height adjustment must be
placed in the highest position. Move the
seat without height adjustment for ward by
5 notches from the mid-position for wards
and backwards. Remove and stow the head restraint
before fitting a child seat with a
backrest to a passenger seat.
Refit the head restraint when the child
seat is removed.
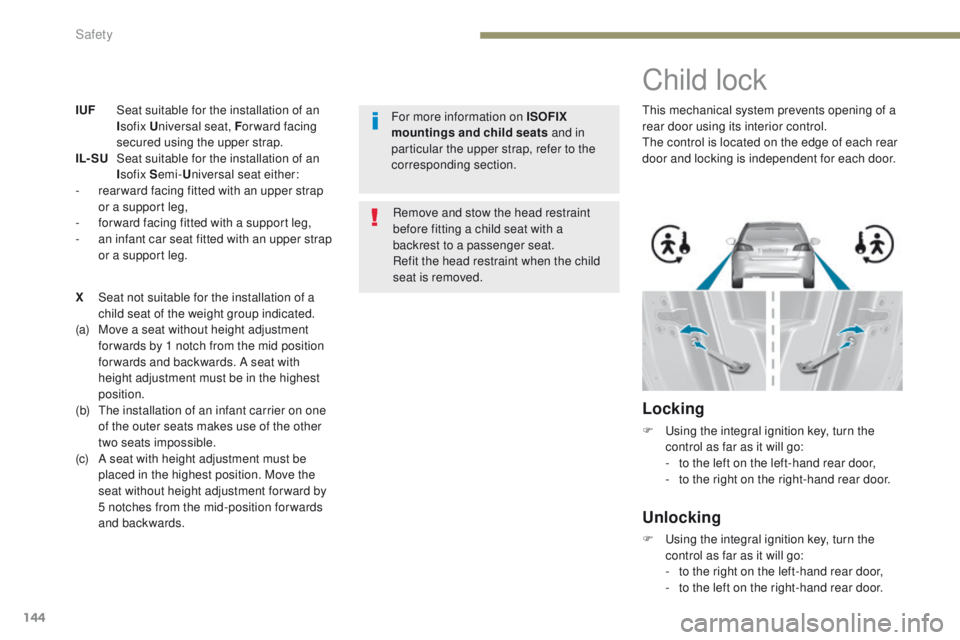
Child lock
this mechanical system prevents opening of a
rear door using its interior control.
th
e control is located on the edge of each rear
door and locking is independent for each door.
Locking
F using the integral ignition key, turn the control as far as it will go:
-
t
o the left on the left-hand rear door,
-
t
o the right on the right-hand rear door.
Unlocking
F using the integral ignition key, turn the control as far as it will go:
-
t
o the right on the left-hand rear door,
-
t
o the left on the right-hand rear door.
Safety