2017 Peugeot 3008 Hybrid 4 engine
[x] Cancel search: enginePage 244 of 578
242
3008-2_en_Chap06_conduite_ed01-2016
Modification of the inter-
vehicle distance setting
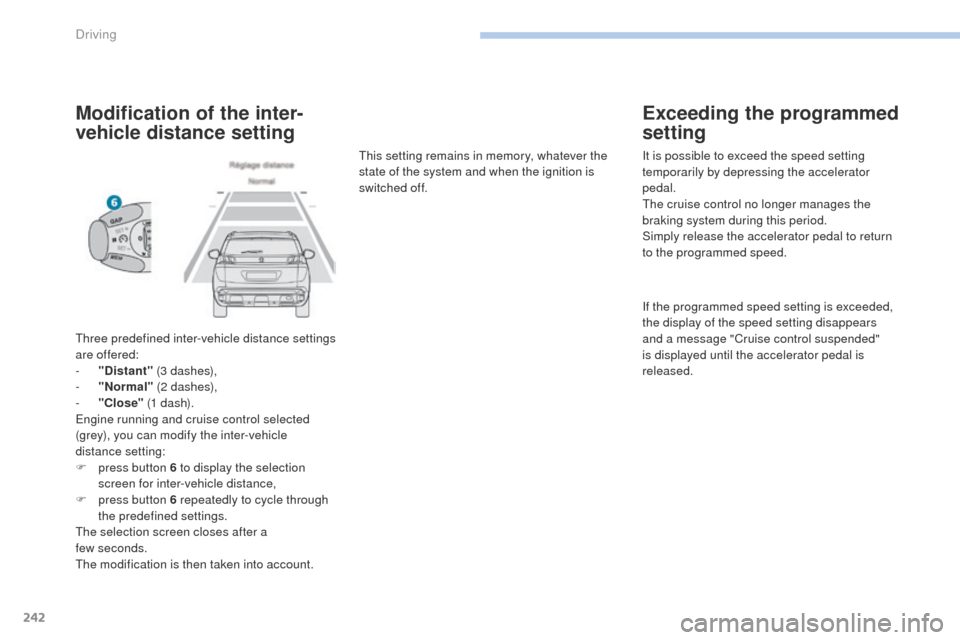
Three predefined inter-vehicle distance settings
are offered:
-
"
Distant" (3 dashes),
-
"
Normal" (2 dashes),
-
"
Close" (1 dash).
Engine running and cruise control selected
(grey), you can modify the inter-vehicle
distance setting:
F
p
ress button 6 to display the selection
screen for inter-vehicle distance,
F
p
ress button 6 repeatedly to cycle through
the predefined settings.
The selection screen closes after a
few
seconds.
The modification is then taken into account. This setting remains in memory, whatever the
state of the system and when the ignition is
switched off.
Exceeding the programmed
setting
It is possible to exceed the speed setting
temporarily by depressing the accelerator
pedal.
The cruise control no longer manages the
braking system during this period.
Simply release the accelerator pedal to return
to the programmed speed.
If the programmed speed setting is exceeded,
the display of the speed setting disappears
and a message "Cruise control suspended"
is displayed until the accelerator pedal is
released.
Driving
Page 250 of 578
248
3008-2_en_Chap06_conduite_ed01-2016
Depending on the degree of risk of collision
detected by the system and the alert threshold
chosen by the driver, different levels of alert can be
triggered and displayed in the instrument panel.
Because of limits in the operation of the
system, it is possible that warnings are
not given, are given too late or seem
unjustified.
Consequently, the driver must always
remain attentive and able to react at any
time to avoid an accident.
Distance alert
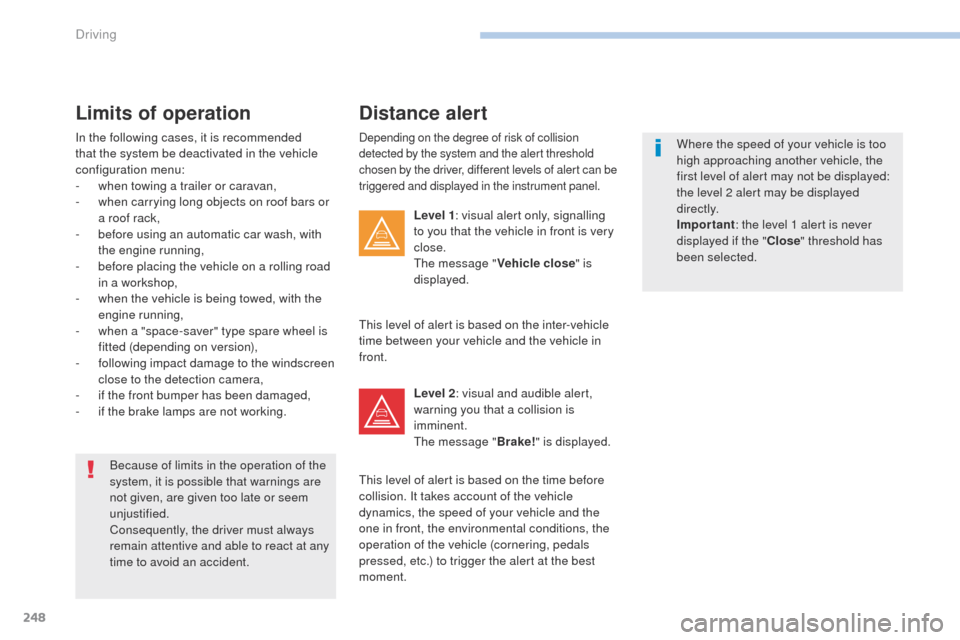
Level 1: visual alert only, signalling
to you that the vehicle in front is very
close.
The message " Vehicle close" is
displayed.
Limits of operation
In the following cases, it is recommended
that the system be deactivated in the vehicle
configuration menu:
-
w
hen towing a trailer or caravan,
-
w
hen carrying long objects on roof bars or
a roof rack,
-
b
efore using an automatic car wash, with
the engine running,
-
b
efore placing the vehicle on a rolling road
in a workshop,
-
w
hen the vehicle is being towed, with the
engine running,
-
w
hen a "space-saver" type spare wheel is
fitted (depending on version),
-
f
ollowing impact damage to the windscreen
close to the detection camera,
-
i
f the front bumper has been damaged,
-
i
f the brake lamps are not working. This level of alert is based on the inter-vehicle
time between your vehicle and the vehicle in
front.
Level 2: visual and audible alert,
warning you that a collision is
imminent.
The message " Brake!" is displayed.
This level of alert is based on the time before
collision. It takes account of the vehicle
dynamics, the speed of your vehicle and the
one in front, the environmental conditions, the
operation of the vehicle (cornering, pedals
pressed, etc.) to trigger the alert at the best
moment. Where the speed of your vehicle is too
high approaching another vehicle, the
first level of alert may not be displayed:
the level 2 alert may be displayed
di r e c t l y.
Important
: the level 1 alert is never
displayed if the " Close" threshold has
been selected.
Driving
Page 252 of 578
250
3008-2_en_Chap06_conduite_ed01-2016
Active Safety Brake
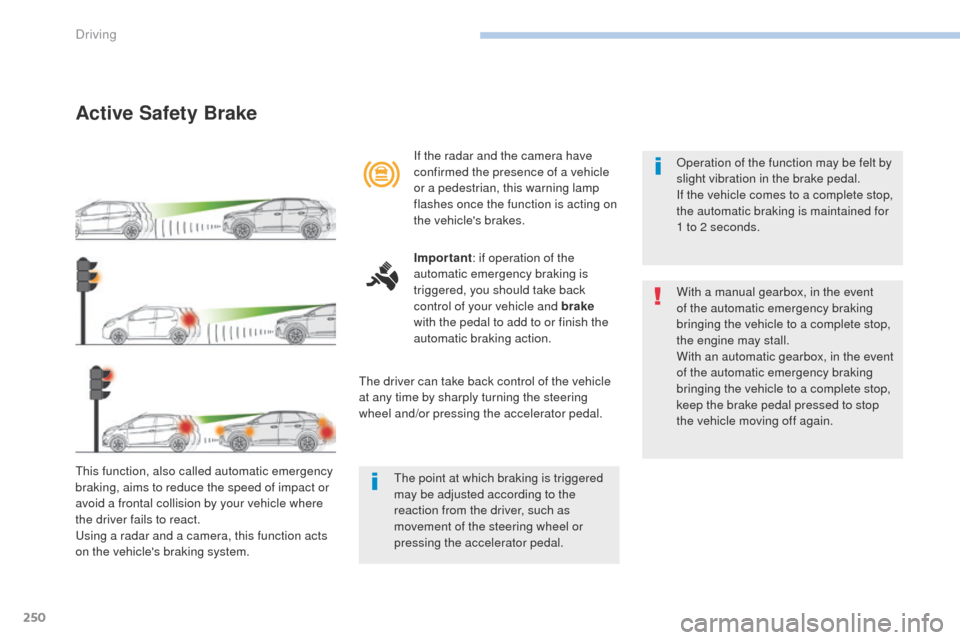
This function, also called automatic emergency
braking, aims to reduce the speed of impact or
avoid a frontal collision by your vehicle where
the driver fails to react.
Using a radar and a camera, this function acts
on the vehicle's braking system.If the radar and the camera have
confirmed the presence of a vehicle
or a pedestrian, this warning lamp
flashes once the function is acting on
the vehicle's brakes.
Important
: if operation of the
automatic emergency braking is
triggered, you should take back
control of your vehicle and brake
with the pedal to add to or finish the
automatic braking action.
The driver can take back control of the vehicle
at any time by sharply turning the steering
wheel and/or pressing the accelerator pedal. Operation of the function may be felt by
slight vibration in the brake pedal.
If the vehicle comes to a complete stop,
the automatic braking is maintained for
1 to 2 seconds.
With a manual gearbox, in the event
of the automatic emergency braking
bringing the vehicle to a complete stop,
the engine may stall.
With an automatic gearbox, in the event
of the automatic emergency braking
bringing the vehicle to a complete stop,
keep the brake pedal pressed to stop
the vehicle moving off again.
The point at which braking is triggered
may be adjusted according to the
reaction from the driver, such as
movement of the steering wheel or
pressing the accelerator pedal.
Driving
Page 253 of 578
251
3008-2_en_Chap06_conduite_ed01-2016
Deactivation / ActivationOperating fault
In the event of a fault, you are alerted
by the illumination of this warning
lamp, accompanied by the display of
a message and an audible signal.
Clean the windscreen regularly,
particularly the area in front of the
camera.
Do not allow snow to accumulate on
the bonnet or roof of the vehicle as this
could mask the camera's view.
Clean the front bumper, removing mud,
snow, ...
If the front bumper is to be repainted,
contact a PEUGEOT dealer or a
qualified workshop. Certain types of
paint could inter fere with the operation
of the radar.
Check that the sensors (camera and radar) are
not covered by dirt, mud, frost, snow...
If the problem persists, contact a PEUGEOT
dealer or a qualified workshop to have the
system checked.
By default, the system is automatically
activated at every engine start.
The system can be deactivated or activated in
the vehicle settings menu in the screen.
Deactivation of the system is
signalled by the illumination of this
indicator lamp, accompanied by the
display of a message. There may be interference in the
operation of the camera or it may not
work at all in the following situations:
-
p
oor visibility (inadequate street
lighting, falling snow, heavy rain,
dense fog, ...),
-
d
azzle (headlamps of an
approaching vehicle on the other
side of the road, low sun, reflection
on a wet road, leaving a tunnel,
alternating between light and
shade, ...),
-
c
amera or radar masked (mud,
frost, snow, ...).
In these situations, detection
performance may be reduced.
6
Driving
Page 267 of 578
265
3008-2_en_Chap06_conduite_ed01-2016
Panoramic vision
General points
Visiopark 1 - Visiopark 2
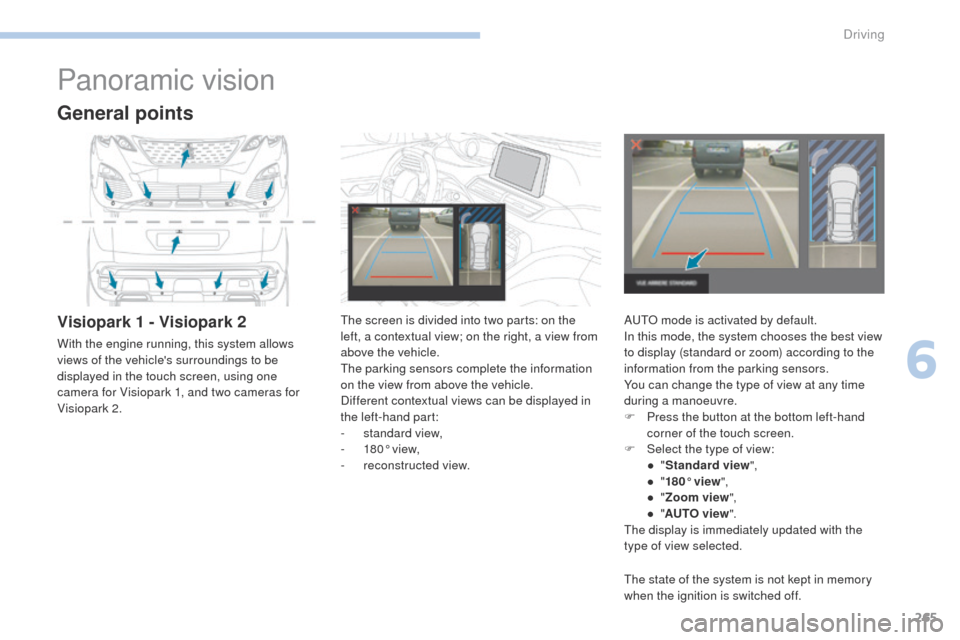
With the engine running, this system allows
views of the vehicle's surroundings to be
displayed in the touch screen, using one
camera for Visiopark 1, and two cameras for
Visiopark 2.The screen is divided into two parts: on the
left, a contextual view; on the right, a view from
above the vehicle.
The parking sensors complete the information
on the view from above the vehicle.
Different contextual views can be displayed in
the left-hand part:
-
s
tandard view,
-
1
80° view,
-
r
econstructed view.AUTO mode is activated by default.
In this mode, the system chooses the best view
to display (standard or zoom) according to the
information from the parking sensors.
You can change the type of view at any time
during a manoeuvre.
F
P
ress the button at the bottom left-hand
corner of the touch screen.
F
Sel
ect the type of view:
●
"St
andard view",
●
"1
80° view",
●
"Z
oom view",
●
"AU
TO view".
The display is immediately updated with the
type of view selected.
The state of the system is not kept in memory
when the ignition is switched off.
6
Driving
Page 272 of 578
270
3008-2_en_Chap06_conduite_ed01-2016
Front and rear visionAUTO mode
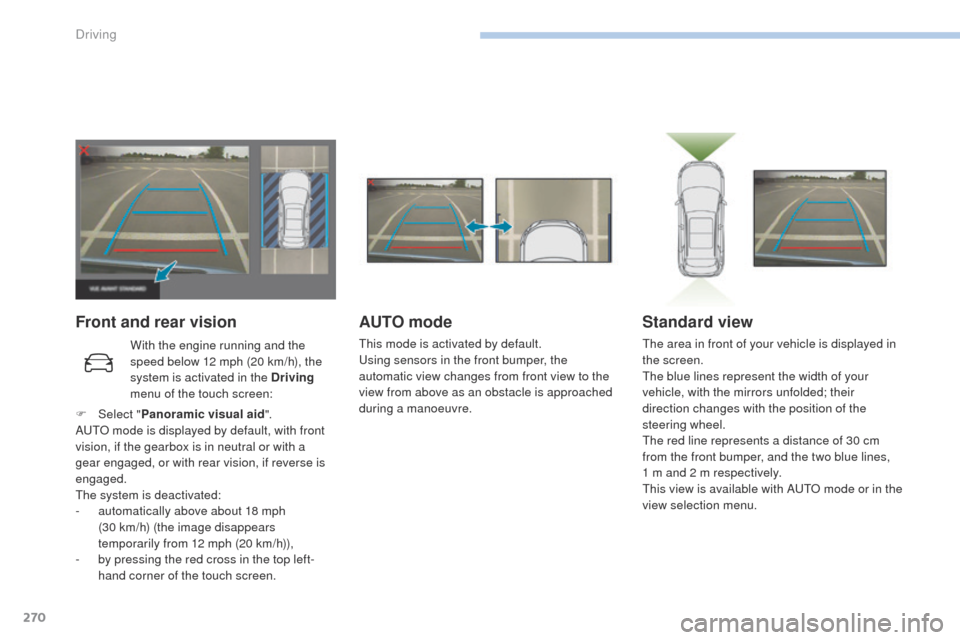
This mode is activated by default.
Using sensors in the front bumper, the
automatic view changes from front view to the
view from above as an obstacle is approached
during a manoeuvre.
Standard view
The area in front of your vehicle is displayed in
the screen.
The blue lines represent the width of your
vehicle, with the mirrors unfolded; their
direction changes with the position of the
steering wheel.
The red line represents a distance of 30 cm
from the front bumper, and the two blue lines,
1 m and 2 m respectively.
This view is available with AUTO mode or in the
view selection menu.
With the engine running and the
speed below 12 mph (20 km/h), the
system is activated in the Driving
menu of the touch screen:
F
Sel
ect " Panoramic visual aid ".
AUTO mode is displayed by default, with front
vision, if the gearbox is in neutral or with a
gear engaged, or with rear vision, if reverse is
engaged.
The system is deactivated:
-
a
utomatically above about 18 mph
(30
km/h) (the image disappears
temporarily from 12 mph (20 km/h)),
-
b
y pressing the red cross in the top left-
hand corner of the touch screen.
Driving
Page 274 of 578
272
3008-2_en_Chap06_conduite_ed01-2016
Park Assist
This system provides active assistance with
parking. It detects a parking space then
operates the steering to park in the space.
It operates the steering while the driver
manages the accelerator, brakes, gears and
clutch (manual gearbox). During phases of
entry into and exit from a parking space, the
system provides visual and audible information
to the driver in order to make the manoeuvres
safe. It may be necessary to move for wards
and backwards more than once.During a manoeuvre, the steering
wheel turns quickly: do not hold the
steering wheel, do not place your
hands between the spokes of the
steering wheel and take care with
loose and bulky clothing (scarves, ties,
handbags...) - Risk of injury!
When Park Assist is activated, it
prevents a change to STOP mode of
Stop & Start. In STOP mode, activation
of Park Assist restarts the engine.
This manoeuvring assistance system
cannot, in any circumstances, replace
the need for vigilance on the part of the
driver.
The driver must remain in control of their
vehicle ensuring that the space remains
clear throughout the manoeuvre.
In some circumstances, the sensors may
not detect small obstacles located in
their blind spots.
The driver can take control at any time by
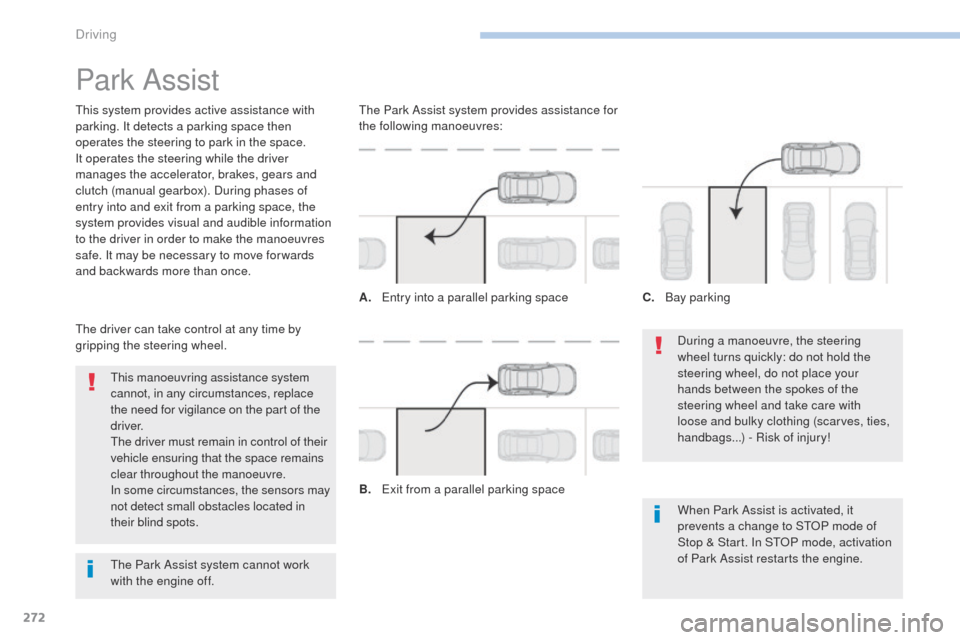
gripping the steering wheel. The Park Assist system provides assistance for
the following manoeuvres:
A.
E
ntry into a parallel parking space
B.
E
xit from a parallel parking spaceC.
B
ay parking
The Park Assist system cannot work
with the engine off.
Driving
Page 278 of 578
276
3008-2_en_Chap06_conduite_ed01-2016
Assistance in exiting from a
parallel parking space
F Select "Park Assist " in the
" Driving " menu of the touch
screen to activate the function.
F
P
ress on " Exit parking slot " in
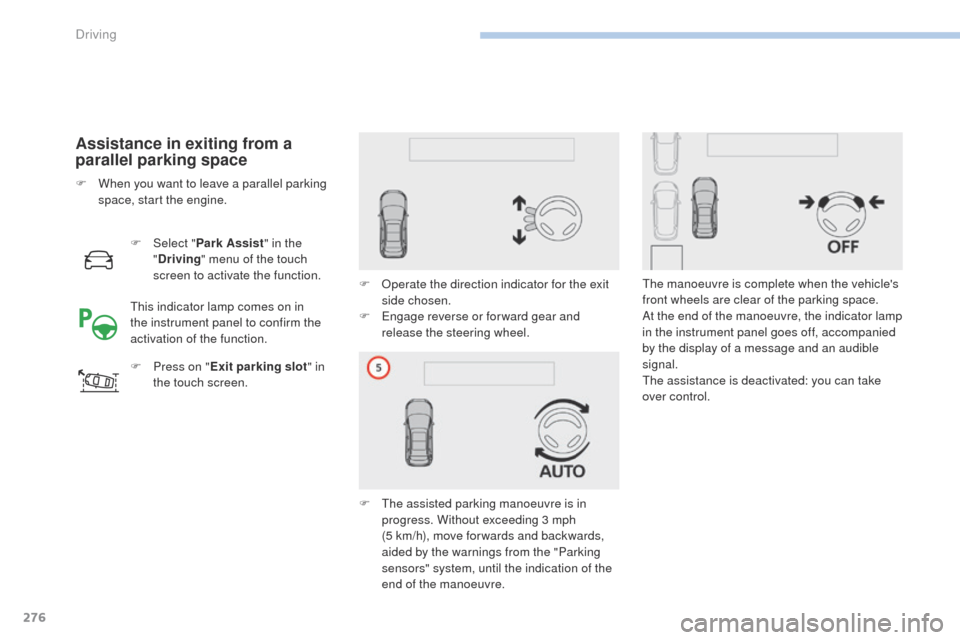
the touch screen. F
O
perate the direction indicator for the exit
side chosen.
F
E
ngage reverse or for ward gear and
release the steering wheel.
F
T
he assisted parking manoeuvre is in
progress. Without exceeding 3 mph
(5
km/h), move for wards and backwards,
aided by the warnings from the "Parking
sensors" system, until the indication of the
end of the manoeuvre.
F
W
hen you want to leave a parallel parking
space, start the engine.
This indicator lamp comes on in
the instrument panel to confirm the
activation of the function. The manoeuvre is complete when the vehicle's
front wheels are clear of the parking space.
At the end of the manoeuvre, the indicator lamp
in the instrument panel goes off, accompanied
by the display of a message and an audible
signal.
The assistance is deactivated: you can take
over control.
Driving