Page 65 of 247
Storage63Completely pull out the rear carrier
system until you hear it engage.
Ensure that it is not possible to push in the rear carrier system without
pulling the release lever again.9 Warning
It is only permissible to fit objects
to the rear carrier system if the
system has been correctly
engaged. If the rear carrier system
will not engage correctly, do not fit
objects to the system and slide the system back. Seek the assistance
of a workshop.
Unfold number plate holder
Lift the number plate holder and fold
it backwards.
Affix the number plate before first use of the rear carrier system.
Fold out tail lights
To install the tail lights, remove both
pins ( 1). Pull tail lights out of the
retainer towards the front ( 2) and
downwards and swivel them to the
side.
Page 66 of 247
64Storage
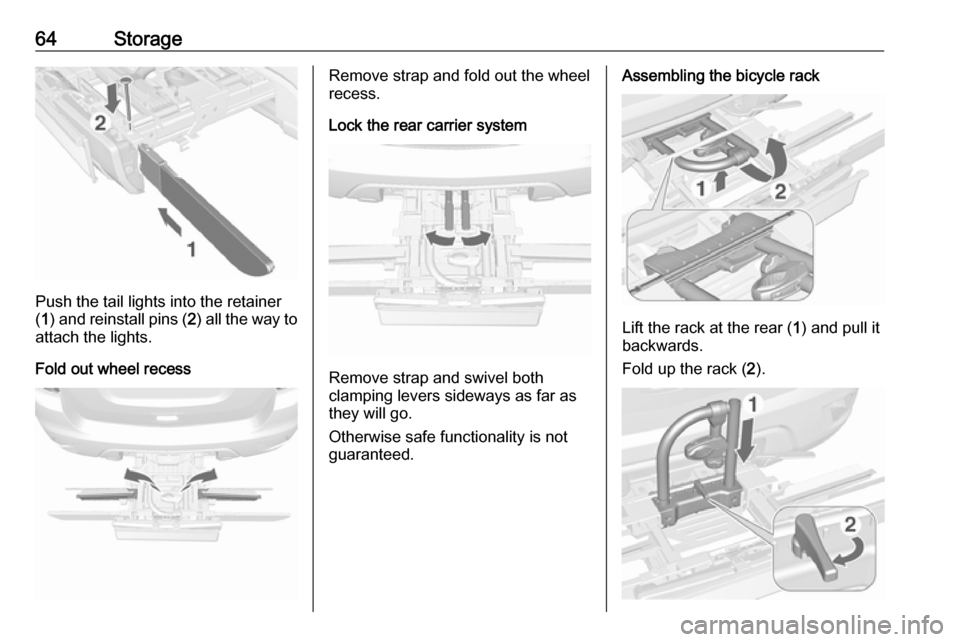
Push the tail lights into the retainer
( 1 ) and reinstall pins ( 2) all the way to
attach the lights.
Fold out wheel recess
Remove strap and fold out the wheel
recess.
Lock the rear carrier system
Remove strap and swivel both
clamping levers sideways as far as
they will go.
Otherwise safe functionality is not
guaranteed.
Assembling the bicycle rack
Lift the rack at the rear ( 1) and pull it
backwards.
Fold up the rack ( 2).
Page 67 of 247
Storage65Push down the rack (1) and swivel
handle ( 2) backwards to engage.
Press button ( 1) and remove left part
of rack ( 2).
Press button ( 1) and insert left part of
rack into the right part ( 2).
Attaching a bicycle
1. Rotate the pedals into position, as
shown in the illustration, and put
the bicycle on the wheel recess.
Make sure that the bicycle stands centrally on the wheel recesses.
2. Attach the short mounting bracket
to the bicycle frame. Turn the
knob clockwise to fasten.
Page 68 of 247

66Storage3.Secure both bicycle wheels to the
wheel recesses using the strap
retainers.
4. Check the bicycle to make sure it is secure.Caution
Ensure gap between bicycle and
vehicle is at least 5 cm. If
necessary, loosen handlebar and swivel sideways.
Attaching the adapter
When carrying more than one bicycle, the adapter must be fixed.
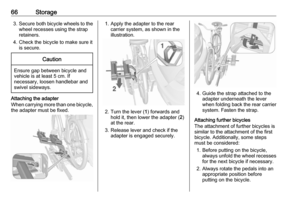
1. Apply the adapter to the rear carrier system, as shown in the
illustration.
2. Turn the lever ( 1) forwards and
hold it, then lower the adapter ( 2)
at the rear.
3. Release lever and check if the adapter is engaged securely.
4. Guide the strap attached to the adapter underneath the lever
when folding back the rear carrier system. Fasten the strap.
Attaching further bicycles
The attachment of further bicycles is
similar to the attachment of the first
bicycle. Additionally, some steps
must be considered:
1. Before putting on the bicycle, always unfold the wheel recesses
for the next bicycle if necessary.
2. Always rotate the pedals into an appropriate position before
putting on the bicycle.
Page 69 of 247

Storage67
3. Position the bicycles on the rearcarrier system alternately aligned
to the left and to the right.
4. Align the bicycles with the one attached previously. The wheel
hubs of the bicycles must not
touch each other.
5. Attach the bicycles with mounting brackets and strap retainers as
described for the first bicycle. The
mounting brackets should be
fixed in parallel.
Use the long mounting bracket to
attach the second bicycle to the
rack.Use the short accessory mounting
bracket to attach the third bicycle. The bracket must be fixed
between the frames of the second and third bicycle.
6. Additionally, secure both bicycle wheels of the third bicycle to the
wheel recesses using the
tensioning straps.
It is recommended to attach a
warning sign to the rearmost bicycle,
to increase visibility.
Fold the rear carrier system
backwards
The rear carrier system can be folded
backwards to gain access to the load compartment.
● Without attached adapter:
Push the lever ( 1) to disengage
and hold it.
Page 70 of 247
68StoragePull the rack (2) backwards to
fold the rear carrier system.
● With attached adapter:9 Warning
Take care when disengaging the
rear carrier system as it will tilt
backwards. Risk of injury.
Hold frame ( 1) of rearmost
bicycle with one hand and pull the
loop ( 2) to disengage.
Hold rearmost bicycle with both
hands and fold the rear carrier
system backwards.
To increase visibility, the tail lights of
the vehicle are activated when the
rear carrier system is folded back.9 Warning
When folding the rear carrier
system forwards again, ensure
that the system is engaged
securely.
Removing bicycles
Undo strap retainers on both bicycle
tyres.
Turn knob anticlockwise and remove
mounting brackets.
Detaching adapter
Detach the adapter before removing
the bicycle on the rear carrier system.
1. Fold in wheel recesses.
2. Unbutton the strap.
3. Turn the lever ( 1) forwards and
hold it.
4. Lift the adapter ( 2) at the rear and
remove.
Page 71 of 247
Storage69Disassembling the bicycle rack
Press button (1) and remove upper
part of rack ( 2).
Press button ( 1) and reinstall rack ( 2).
Arrange mounting brackets as shown
in the illustration.
Swivel handle ( 1) sideways to
disengage and lift the rack ( 2).
Fold the rack backwards, then push
forwards until it stops ( 1).
Press the rack down at the rear ( 2).
Fold in wheel recess
Fold in wheel recess. Fasten strap.
Stow the strap retainers accurately.
Page 72 of 247
70StorageUnlock the rear carrier system
Swivel both clamping levers inwards
as far as they will go. Fasten strap.
Fold in tail lights
Remove both pins. Pull tail lights out
of the retainer and put them in the
position to be stored in.
Push the tail lights into the retainer
(1). Insert pins into the designated
holes of the retainer and the tail lights (2).
Note
Check that the tail lights of the
vehicle are working properly.
Fold in number plate holder
Lift the number plate holder and fold
it forwards.
Retracting the rear carrier systemCaution
Ensure that all foldable parts, e.g.
wheel recesses and mounting
brackets, are stowed correctly.
Otherwise the rear carrier system may get damaged when trying to
retract it.
Push the release lever up and hold it. Lift the system slightly and push it into
the bumper until it engages.
Release lever must return to original
position.