Page 146 of 414
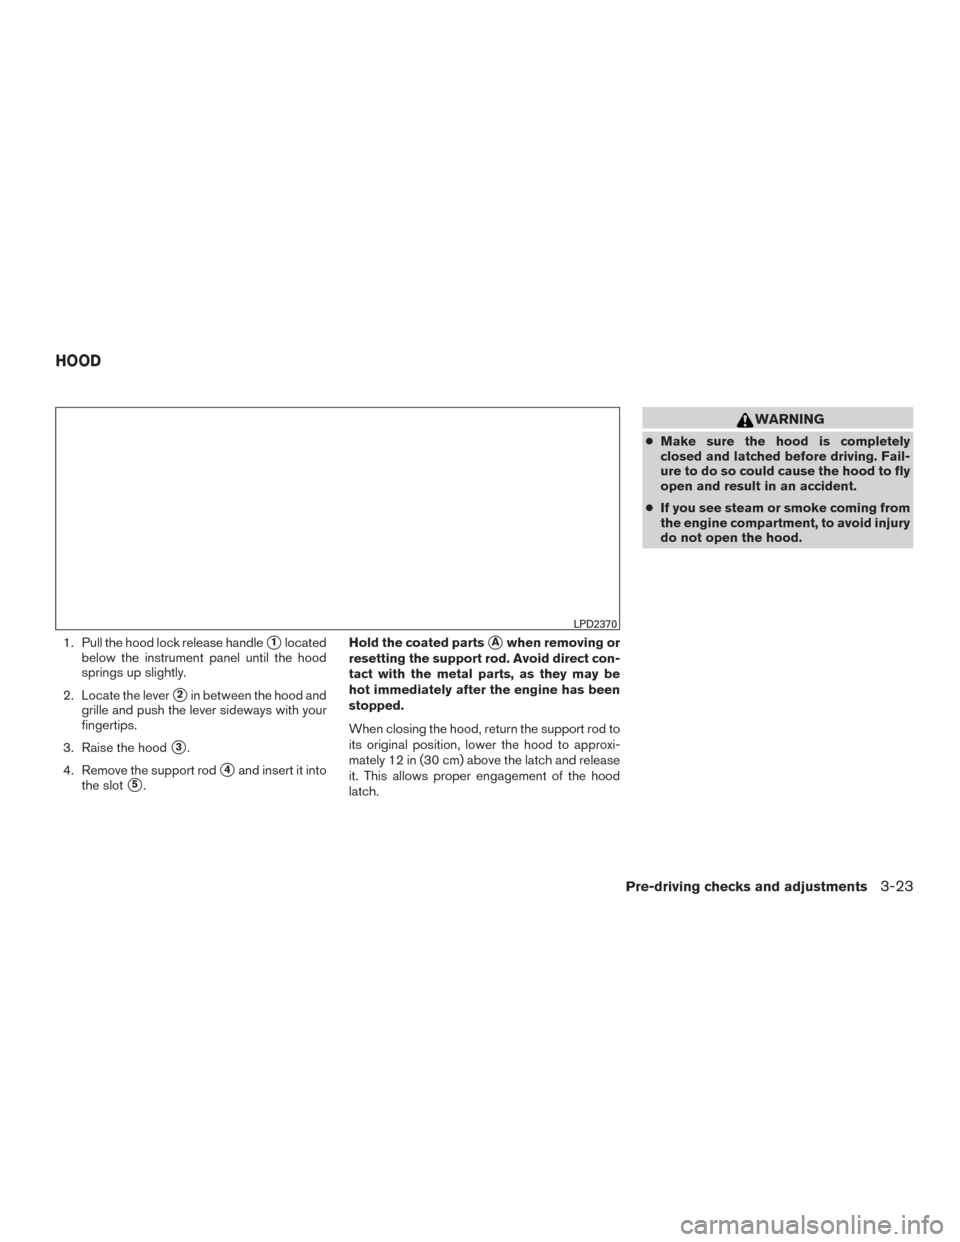
1. Pull the hood lock release handle�1located
below the instrument panel until the hood
springs up slightly.
2. Locate the lever
�2in between the hood and
grille and push the lever sideways with your
fingertips.
3. Raise the hood
�3.
4. Remove the support rod
�4and insert it into
the slot
�5. Hold the coated parts
�Awhen removing or
resetting the support rod. Avoid direct con-
tact with the metal parts, as they may be
hot immediately after the engine has been
stopped.
When closing the hood, return the support rod to
its original position, lower the hood to approxi-
mately 12 in (30 cm) above the latch and release
it. This allows proper engagement of the hood
latch.
WARNING
● Make sure the hood is completely
closed and latched before driving. Fail-
ure to do so could cause the hood to fly
open and result in an accident.
● If you see steam or smoke coming from
the engine compartment, to avoid injury
do not open the hood.
LPD2370
HOOD
Pre-driving checks and adjustments3-23
Page 147 of 414

WARNING
The rear hatch must be closed securely
before driving. An open rear hatch could
allow dangerous exhaust gases to be
drawn inside the vehicle. For additional
information, refer to “Exhaust gas (carbon
monoxide)” in the “Starting and driving”
section of this manual.
OPENING THE REAR HATCH
To open the rear hatch, unlock it with one of the
following operations, then pull the handle.● Push the power door lock switch to the
unlock position.
● Unlock all doors using the key.
● Press the
button on the key fob (if
equipped) twice. For additional information,
refer to “Remote keyless entry system (mod-
els without NISSAN Intelligent Key®)” in this
section. ●
Push the rear hatch request switch or door
handle request switch (if equipped) twice.
For additional information, refer to “NISSAN
Intelligent Key®” in this section.
● Press the
button on the Intelligent Key
(if equipped) twice. For additional informa-
tion, refer to “NISSAN Intelligent Key®” in
this section.
LPD2170
REAR HATCH
3-24Pre-driving checks and adjustments
Page 148 of 414

REAR HATCH RELEASE
The rear hatch release mechanism allows the rear
hatch to be opened in the event of a discharged
battery.
To release the rear hatch from the inside of the
vehicle, perform the following operations:1. Fold the rear seats down. For additional information, refer to “Folding rear seat” in the
“Safety—Seats, seat belts and supplemen-
tal restraint system” section of this manual.
2. Insert a suitable tool in the access opening. Move the release lever to the left (passenger
side) . The rear hatch will be unlatched. 3. Use the exterior rear hatch handle to open.
NOTE:
If you had to open the rear hatch using this
lever, have your vehicle checked. It is rec-
ommended that you visit a NISSAN dealer
for this service as soon as possible.
OPENER OPERATION
The fuel-filler door release is located below the
instrument panel. To open the fuel-filler door, pull
the release. To lock, close the fuel-filler door
securely.
LPD2366LPD2371
FUEL-FILLER DOOR
Pre-driving checks and adjustments3-25
Page 150 of 414

●If fuel is spilled on the vehicle body,
flush it away with water to avoid paint
damage.
NOTE:
Changing ignition switch status during the
refueling process may cause a delay in fuel
gauge response.
To remove the fuel-filler cap:1. Turn the fuel-filler cap counterclockwise to remove.
2. Put the fuel-filler cap on the cap holder
�1
while refueling.
To install the fuel-filler cap: 1. Insert the fuel-filler cap straight into the fuel- filler tube.
2. Turn the fuel-filler cap clockwise until a single click is heard.
Loose Fuel Cap warning message
The LOOSE FUEL CAP warning message dis-
plays in the odometer when the fuel-filler cap is
not tightened correctly after the vehicle has been
refueled. It may take a few driving trips for the
message to be displayed. To turn off the warning
message, perform the following:
1. Remove and install the fuel-filler cap as pre- viously described as soon as possible.
2. Tighten the fuel-filler cap until it clicks.
LPD2172
Type A (if so equipped)
LPD2025
Pre-driving checks and adjustments3-27
Page 151 of 414
3. Press the loose fuel cap warning reset but-ton
�Ain the meter for about 1 second to
turn off the LOOSE FUEL CAP warning
message after tightening the fuel-filler cap.
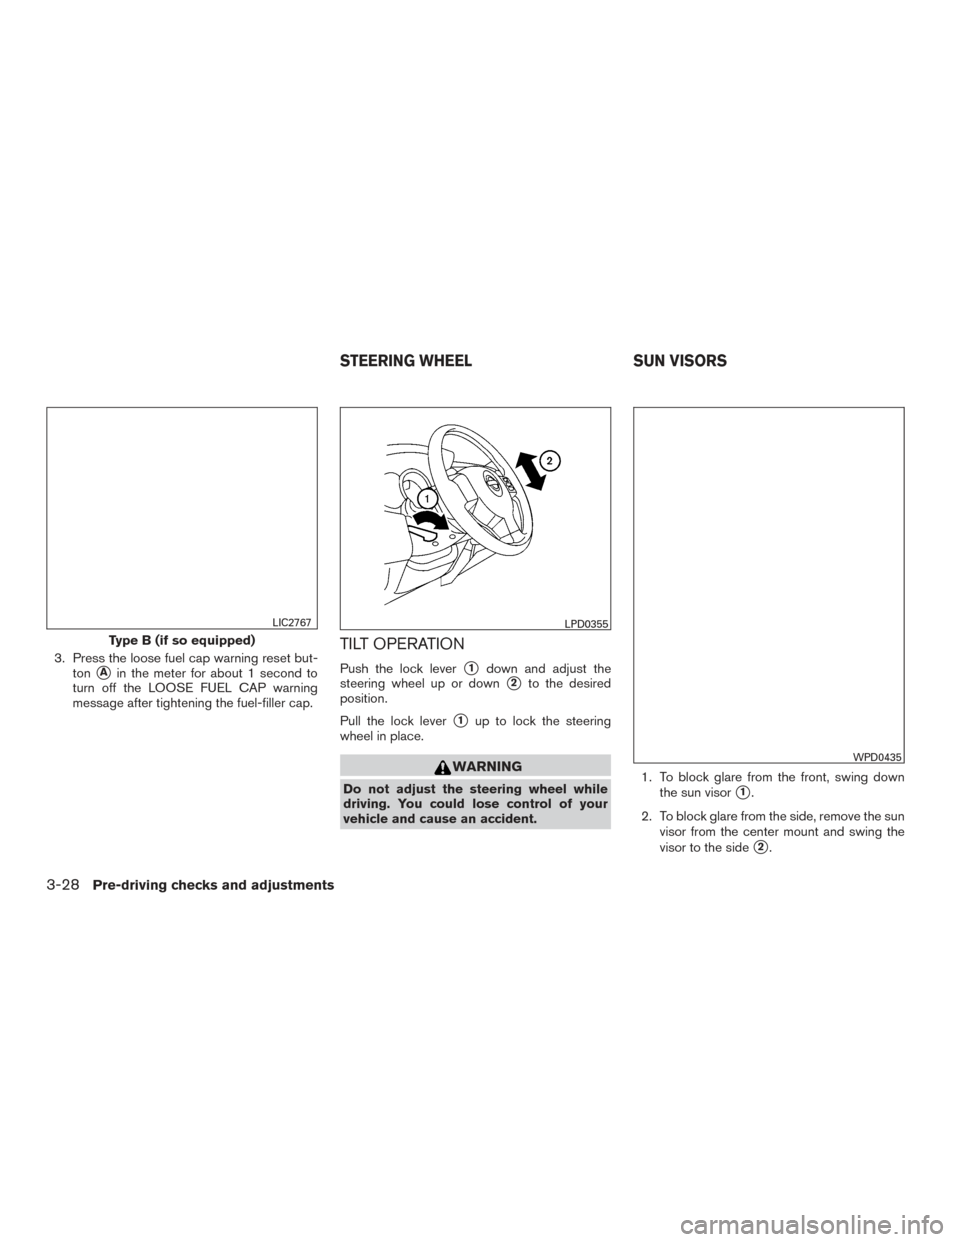
TILT OPERATION
Push the lock lever�1down and adjust the
steering wheel up or down
�2to the desired
position.
Pull the lock lever
�1up to lock the steering
wheel in place.
WARNING
Do not adjust the steering wheel while
driving. You could lose control of your
vehicle and cause an accident. 1. To block glare from the front, swing down
the sun visor�1.
2. To block glare from the side, remove the sun visor from the center mount and swing the
visor to the side
�2.
Type B (if so equipped)
LIC2767LPD0355
WPD0435
STEERING WHEEL SUN VISORS
3-28Pre-driving checks and adjustments
Page 154 of 414
..................4-4
How to use the touch-screen . . .....")
4 Monitor, climate, audio, phone and voice
recognition systems
Control panel buttons — color screen with
Navigation System (if so equipped)..................4-4
How to use the touch-screen . . ..................4-5
How to use the BACK button ....................4-7
How to use the [
] button ..................4-7
Clock Set ......................................4-9
button...................................4-9
How to use the ON•OFF button/VOL
(volume) control knob ...........................4-9
How to use the CAMERA button .................4-9
RearView Monitor (if so equipped) ..................4-10
RearView Monitor system operation .............4-11
How to read the displayed lines .................4-11
Difference between predicted and actual
distances ..................................... 4-12
Adjusting the screen ........................... 4-13
RearView Monitor system limitations .............4-14
System maintenance ........................... 4-15
Around View® Monitor (if so equipped) .............4-16
Around View® Monitor system operation .........4-17
Difference between predicted and actual
distances ..................................... 4-20
How to park with predicted course lines ..........4-22 How to switch the display
......................4-23
Adjusting the screen ........................... 4-24
Around View® Monitor system limitations ........4-24
System maintenance ........................... 4-26
Vents ........................................... 4-27
Heater and Air Conditioner (manual) ................4-27
Controls ...................................... 4-28
Heater operation .............................. 4-29
Air conditioner operation .......................4-30
Air flow charts ................................. 4-31
Servicing air conditioner ........................... 4-34
Audio system .................................... 4-35
Radio ........................................ 4-35
FM radio reception ............................ 4-35
AM radio reception ............................ 4-35
Satellite radio reception (if so equipped) .........4-36
Audio operation precautions ....................4-36
FM/AM radio with compact disc (CD) player
(if so equipped) ............................... 4-43
FM/AM/SAT radio with compact disc (CD)
player (Type A) (if so equipped) .................4-47
FM/AM/SAT radio with compact disc (CD)
player (T
ype B) (if so equipped) .................4-52
Page 161 of 414

Menu itemResult
Display Touch this key to adjust the appearance of the display.
Brightness Adjusts the brightness of the display.
Display Mode Adjusts to fit the level of lighting in the vehicle. Touch key to cycle through options. “Day” and “Night” modes are suited for the respec- tive times of day while “Auto” controls the display automatically.
Scroll Direction Adjusts the direction of the menu scroll. Choose to either move up or down.
Clock Touch this key to adjust the time.
Time Format The clock can be set to 12 hours or 24 hours.
Date Format Select from five possible formats of displaying the day, month, and year.
Clock Mode Adjust the mode for the clock. “Auto” uses the system’s GPS to automatically maintain the time. “Manual” allows you to set the clock using the “Set Clock Manually” key.
Set Clock
Manually Adjust the clock manually, Touch the “+” or “-” keys to adjust the hours, minutes, day, month and year up or down. “Clock Mode” must
be set to manual for this option to be available.
Daylight Sav-
ings Time Adjusts the daylight savings time on or off.
Time Zone Choose the applicable time zone from the list.
Language Touch this key to change the language on the display.
Camera Settings Touch this key to change the camera settings.
Display Mode Touch this key to select the touch-screen display mode (day, night, or automatic) .
Brightness Adjust touch-screen brightness.
Contrast Adjust touch-screen contrast.
Color Adjust touch-screen color.
4-8Monitor, climate, audio, phone and voice recognition systems
Page 162 of 414
 .
Touchscreen click Toggles the touch-screen click feature on or off. When activa")
Menu itemResult
Temperature Unit Touch this key to change the temperature unit being displayed (Fahrenheit or Celsius) .
Touchscreen click Toggles the touch-screen click feature on or off. When activated a click sound will be heard every time a key on the screen is touched.
System Beeps Toggle the system beep tones feature on or off. When activated, a beep sound will be heard when a pop-up message appears on the
screen or a button on the unit (such as the
button) is pressed and held for 2 seconds.
Return to Factory Settings/
Clear Memory Touch this key to return all settings to default and to clear the memory.
Software Licenses Touch this key to display software licensing information.
Traffic Touch this key to display traffic settings. For additional information, refer to the separate Navigation System Owner’s Manual.
SXM Touch this key to start SiriusXM® radio. For additional information, refer to “Audio system” in this section.
CLOCK SET
1. Press the [] button.
2. Touch the “Settings” key.
3. Touch the “System” key
4. Touch the “Clock” key.
5. Touch “Clock Mode” to select “Manual” to adjust time manually.
6. Touch “Set Clock Manually”.
7. Touch “+” and “-” keys to adjust hour, min- ute, day, month and year.
8. Press the BACK button to finish.
BUTTON
To change the display brightness, press
the
button. Pressing the button again will
change the display to the day or the night display.
If no operation is performed within 5 seconds, the
display will return to the previous display.
Press and hold the
button for more than
2 seconds to turn the display off and show the
clock, press the button again to turn the display
back on.
HOW TO USE THE ON•OFF
BUTTON/VOL (volume) CONTROL
KNOB
Press the ON•OFF button to turn audio function
on and off. Turn the VOL (volume) control knob to
adjust audio volume.
HOW TO USE THE CAMERA
BUTTON
For additional information, refer to “RearView
Monitor” or “Around View® Monitor” in this sec-
tion.
Monitor, climate, audio, phone and voice recognition systems4-9