Page 42 of 671
●Do not allow children to play with the
seat belts. Most seating positions are
equipped with Automatic Locking Re-
tractor (ALR) mode seat belts. If the seat
belt becomes wrapped around a child’s
neck with the ALR mode activated, the
child can be seriously injured or killed if
the seat belt retracts and becomes
tight. This can occur even if the vehicle
is parked. Unbuckle the seat belt to
release the child. If the seat belt cannot
be unbuckled or is already unbuckled,
release the child by cutting the seat belt
with a suitable tool (such as a knife or
scissors) to release the seat belt.
Fastening the seat belts
1. Adjust the seat. For additional information, refer to “Seats” in this section.
Page 44 of 671

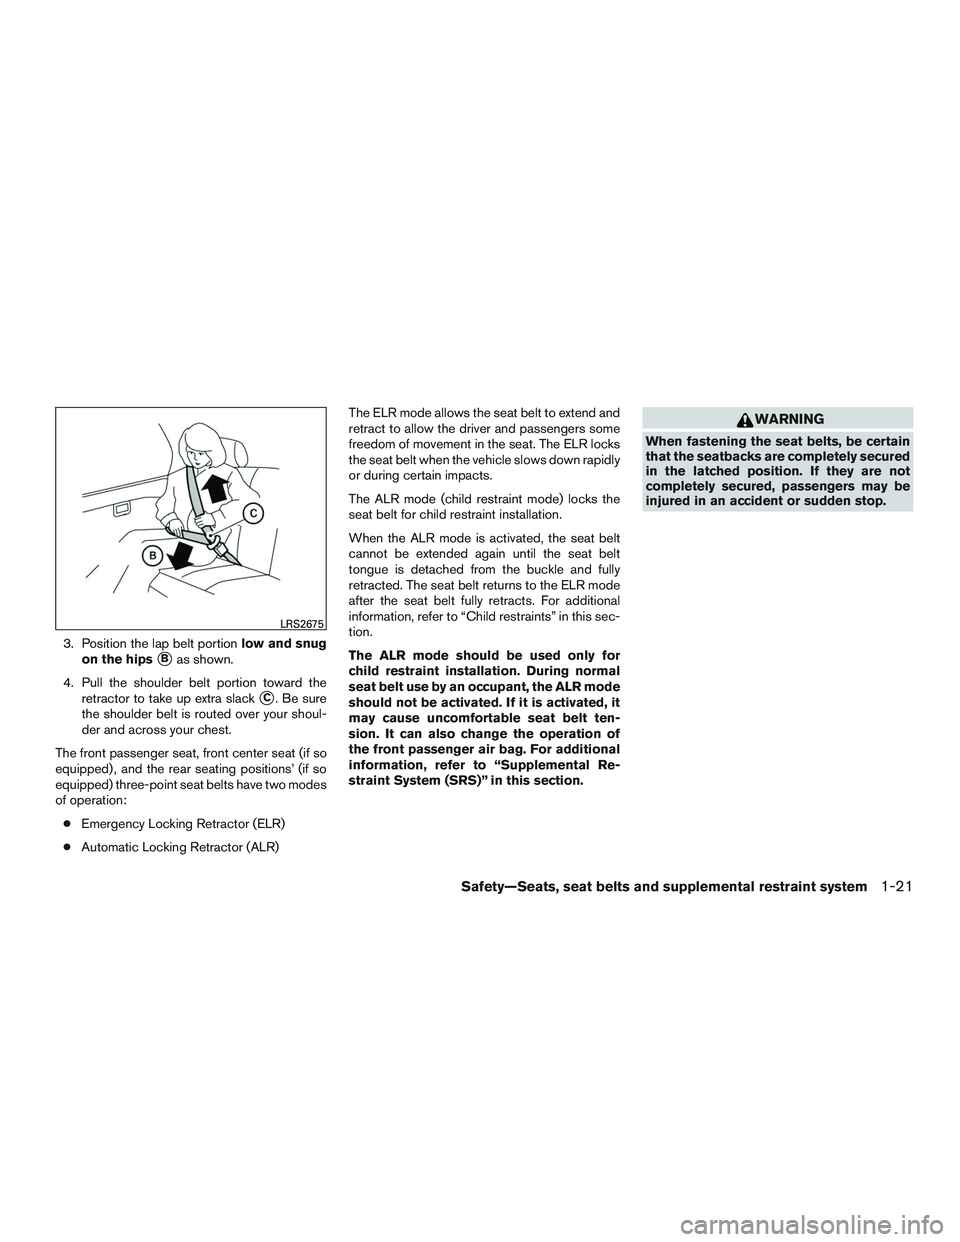
3. Position the lap belt portionlow and snug
on the hips
�Bas shown.
4. Pull the shoulder belt portion toward the retractor to take up extra slack
�C. Be sure
the shoulder belt is routed over your shoul-
der and across your chest.
The front passenger seat, front center seat (if so
equipped) , and the rear seating positions’ (if so
equipped) three-point seat belts have two modes
of operation: ● Emergency Locking Retractor (ELR)
● Automatic Locking Retractor (ALR) The ELR mode allows the seat belt to extend and
retract to allow the driver and passengers some
freedom of movement in the seat. The ELR locks
the seat belt when the vehicle slows down rapidly
or during certain impacts.
The ALR mode (child restraint mode) locks the
seat belt for child restraint installation.
When the ALR mode is activated, the seat belt
cannot be extended again until the seat belt
tongue is detached from the buckle and fully
retracted. The seat belt returns to the ELR mode
after the seat belt fully retracts. For additional
information, refer to “Child restraints” in this sec-
tion.
The ALR mode should be used only for
child restraint installation. During normal
seat belt use by an occupant, the ALR mode
should not be activated. If it is activated, it
may cause uncomfortable seat belt ten-
sion. It can also change the operation of
the front passenger air bag. For additional
information, refer to “Supplemental Re-
straint System (SRS)” in this section.
Page 47 of 671

WARNING
Do not allow children to play with the seat
belts. Most seating positions are
equipped with Automatic Locking Retrac-
tor (ALR) mode seat belts. If the seat belt
becomes wrapped around a child’s neck
with the ALR mode activated, the child can
be seriously injured or killed if the seat
belt retracts and becomes tight. This can
occur even if the vehicle is parked. Un-
buckle the seat belt to release the child. If
the seat belt cannot be unbuckled or is
already unbuckled, release the child by
cutting the seat belt with a suitable tool
(such as a knife or scissors) to release the
seat belt.
Children need adults to help protect them.
They need to be properly restrained.
In addition to the general information in this
manual, child safety information is available from
many other sources, including doctors, teachers,
government traffic safety offices, and community
organizations. Every child is different, so be sure
to learn the best way to transport your child.
There are three basic types of child restraint
systems: ● Rear-facing child restraints ●
Forward-facing child restraints
● Booster seats
The proper restraint depends on the child’s size.
Generally, infants up to about 1 year and less
than 20 lbs (9 kg) should be placed in rear-facing
child restraints. Forward-facing child restraints
are available for children who outgrow rear-
facing child restraints and are at least 1 year old.
Booster seats are used to help position a vehicle
lap/shoulder belt on a child who can no longer
use a forward-facing child restraint.
Page 82 of 671

WARNING
To ensure proper operation of the passen-
ger’s NISSAN Advanced Air Bag System,
please observe the following items.
●Do not allow a passenger in the rear
bench seats (if so equipped) to push or
pull on the seatback pocket.
● Do not place heavy loads heavier than
1 kg (2.2 lb) on the seatback, head re-
straint or in the seatback pocket.
● Do not store luggage behind the seat
that can press into the seatback.
● Do not position the front passenger
seat so it contacts the rear bench seats
(if so equipped) . If the front seat does
contact the rear bench seats (if so
equipped) , the air bag system may de-
termine a sensor malfunction has oc-
curred and the front passenger air bag
status light may illuminate and the
supplemental air bag warning light may
flash. ●
If a forward-facing child restraint is in-
stalled in the front passenger seat, do
not position the front passenger seat so
the child restraint contacts the instru-
ment panel. If the child restraint does
contact the instrument panel, the sys-
tem may determine the seat as occu-
pied and the passenger air bag may
deploy in a collision. Also the front pas-
senger air bag status light may not illu-
minate. For additional information
about installing and using child re-
straints, refer to “Child restraints” in
this section.
● Confirm the operating condition with
the front passenger air bag status light.
● If you notice that the front passenger air
bag status light is not operating as de-
scribed in this section, get the occupant
classification system checked. It is rec-
ommended that you take your vehicle to
a NISSAN dealer for this service.
● Until you have confirmed with your
dealer that your passenger seat occu-
pant classification system is working
properly, position the occupants in the
rear seating positions (if so equipped) .
Do not use the front seat or transport a
child in the vehicle (Single Cab) . This vehicle is equipped with the NISSAN Ad-
vanced Air Bag System for the driver and front
passenger seats.
All of the information, cau-
tions and warnings in this manual still ap-
ply and must be followed.
The driver supplemental front-impact air bag is
located in the center of the steering wheel. The
front passenger supplemental front-impact air
bag is mounted in the dashboard above the glove
box. The front air bags are designed to inflate in
higher severity frontal collisions, although they
may inflate if the forces in another type of collision
are similar to those of a higher severity frontal
impact. They may not inflate in certain frontal
collisions. Vehicle damage (or lack of it) is not
always an indication of proper front air bag sys-
tem operation.
The NISSAN Advanced Air Bag System monitors
information from the crash zone sensor and the
Air bag Control Unit (ACU) . Inflator operation is
based on the severity of a collision and seat belt
usage for the driver. For the front passenger, the
occupant classification sensor is also monitored.
Based upon the information from the sensor, only
one front air bag may inflate in a crash, depending
on the crash severity. Additionally, the front pas-
senger air bag may be automatically turned off
under some conditions, depending on the weight
detected on the front passenger seat and how
the seat belt is used. If the front passenger air bag
Safety—Seats, seat belts and supplemental restraint system1-59
Page 114 of 671
AUXILIARY GAUGES (if so equipped)
1. Exhaust temperature gauge (if so equipped)
2. Automatic Transmission fluid temperaturegauge
3. Turbo meter (if so equipped)
4. Engine oil pressure gauge
5. Engine oil temperature gauge
6. Voltmeter Exhaust temperature gauge (if so
equipped)
For additional information, refer to the “Titan Die-
sel Owner’s Manual”.
Automatic Transmission fluid temperature
gauge
This gauge indicates the temperature of the au-
tomatic transmission fluid.
Page 127 of 671
●Shift the 4WD switch into the 2WD, 4H
or 4LO position again to turn off the ATP
warning light when the shift lever to the
P position and the ATP warning light is
ON. (Before shifting the 4WD switch
into the 4LO position, move the shift
lever to the N position once, shift the
shift lever into P again and make sure
the ATP warning light is OFF.)
This light indicates that the automatic transmis-
sion parking function is not engaged. If the trans-
fer control is not secured in any drive position
while the shift lever is in the P (Park) position, the
transmission will disengage and the drive wheels
will not lock.
Page 155 of 671
To defrost the rear window glass and/or outside
mirrors, start the engine and push the rear
window/outside mirror defroster switch on. The
indicator light on the switch will illuminate. Push
the switch again to turn the defroster off.
The defroster automatically turns off after ap-
proximately 15 minutes.NOTE:
If the rear power window (if so equipped) is
open while the defroster switch is on, the
rear window defroster will automatically
shut off. The heated outside mirrors (if so
equipped) will remain on. The rear window
defroster will automatically turn on when
the rear power window is fully closed if the
switch is on.
Page 188 of 671
Automatic operation
To fully open a window equipped with automatic
operation, press the window switch down to the
second detent and release it; it need not be held.
The window automatically opens all the way. To
stop the window, lift the switch up while the
window is opening.
To fully close a window equipped with automatic
operation, pull the switch up to the second detent
and release it; it need not be held. To stop the
window, press the switch down while the window
is closing.
Auto-reverse function
The auto-reverse function can be activated when
a window is closed by automatic operation.
Depending on the environment or driving
conditions, the auto-reverse function may
be activated if an impact or load similar to
something being caught in the window oc-
curs.