Page 9 of 40

The
Trailer Brake Controller Unit will assist with effective and smooth braking while
towing a trailer.
Operating Modes
•
A")
7
TOWING1
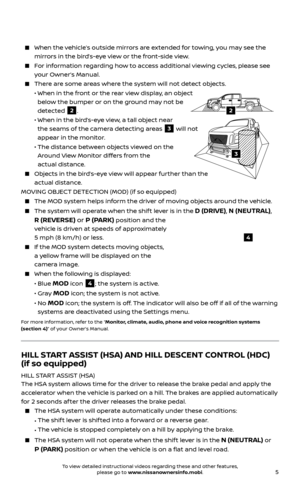
TRAILER BRAKE CONTROLLER UNIT (if so equipped)
The
Trailer Brake Controller Unit will assist with effective and smooth braking while
towing a trailer.
Operating Modes
•
A
utomatic: Automatic operation of trailer brake pressure based on gain and
boost settings.
•
Manual
: Manually applies trailer brake pressure without pressing the vehicle’s
brake pedal.
In automatic mode, the gain controls the
amount of trailer braking pressure. To set
the gain:
•
Pr
ess the
or button 1 to decrease or
increase the braking force supplied to the
trailer brakes. For example, a gain setting of
6.0 is a typical starting point for heavy loads.
In automatic mode, the boost can be set to change the feel of the trailer brake
when the vehicle’s brake pedal is pressed. To set the boost:
•
Pr
ess the
button 2 once to display the current boost setting.
•
Pr
ess the
button 2 again to increase the boost level or continue to press
the
button 2 to return boost to the off position.
To manually apply brake pressure to the trailer without pushing the vehicle’s brake pedal, pinch the manual control levers
3 together. The amount of
pinch pressure applied to the levers will correlate to the amount of brake
pressure applied.
TRAILER LIGHT CHECKING (if so equipped)
Your Nissan Intelligent Key ®
can be used to check
the trailer lights from outside the vehicle. If your
vehicle is equipped with a three-button key fob,
this feature operates in the same manner.
1. Aim the Intel
ligent Key at the vehicle.
2. Pr
ess and release the
button 4.
3.
Within 2 sec
onds, press the
button 4
again and hold it until the horn beeps once and the parking lights turn on.
The trailer light check will follow the following sequence:
• The lef
t turn light on the vehicle and trailer will flash for 5 seconds.
• The right turn light on the v
ehicle and trailer will flash for 5 seconds.
• The br
ake lights on the vehicle and trailer will turn on for 5 seconds.
1
23
4
To view detailed instructional videos regarding these and other features, please go to www.nissanownersinfo.mobi.
Page 10 of 40
 (diesel models only)
An Exhaust Filter Overloaded message will
appear in the vehicle information display
1
and the warning light 2 will i")
8
NEW SYSTEM FEATURES
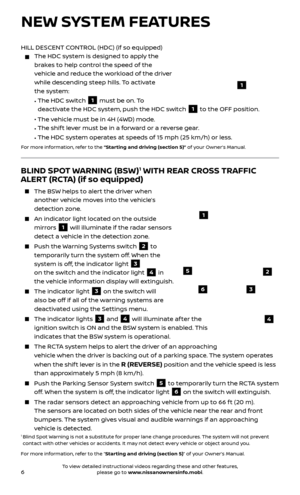
DIESEL PARTICULATE FILTER (DPF) (diesel models only)
An Exhaust Filter Overloaded message will
appear in the vehicle information display
1
and the warning light 2 will illuminate
if the particulate matter has accumulated in
the DPF to the specified limit.
As soon as saf ely possible, drive the vehicle at
a speed greater than 55 mph (89 km/h) for at
least 45 minutes.
If the warning light 2 is blinking, refer
to the “Do-it-yourself (section 6)” of your Titan
Diesel Owner’s Manual.
For more information, refer to the “Instrument panel
(section 2)” and the “Do-it-yourself (section 6)” of your Titan
Diesel Owner’s Manual.
2
1
Exhaust Filter
Overloaded
DIESEL EXHAUST FLUID (DEF) (diesel models only)
A DEF Low message will appear in the vehicle
information display
1 and the warning
light
2 will illuminate if the DEF is low and
needs to be topped off.
If the fluid is c ontaminated, it will need to
be replaced.
For more information, refer to the “Instrument panel
(section 2)” and the “Fuel and refueling (section 4)” of your
Titan Diesel Owner’s Manual.2
DEF Low
1
GOOSENECK HITCH (if so equipped)
The integr ated gooseneck hitch is located in
the center of the vehicle bed
5.
For installation instructions and towing information, refer to the “Starting and
driving (section 5)” and the “Technical and
consumer information (section 10)” of your
Owner’s Manual.
1 Towing capability varies by configuration. See Nissan towing guide and owner’s manual for additional information.
For more information, refer to the “Instruments and controls (section 2)”, the “Pre-driving checks
and adjustments (section 3)” and the “ Technical and consumer information (section 10)” of your
Owner’s Manual.
5
To view detailed instructional videos regarding these and other features, please go to www.nissanownersinfo.mobi.
Page 11 of 40

Your vehicle’s Navigation System is equipped
with SiriusXM Travel Link and SiriusXM
Traffic capabilities.
SiriusXM Travel")
9
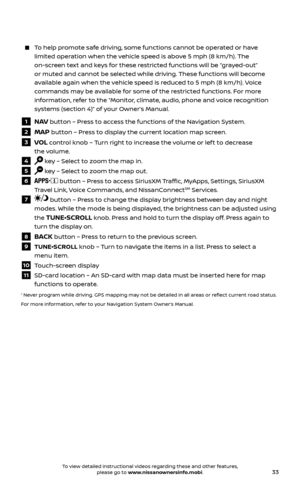
SiriusXM TRAVEL LINK1 AND SiriusXM TRAFFIC1
(if so equipped)
Your vehicle’s Navigation System is equipped
with SiriusXM Travel Link and SiriusXM
Traffic capabilities.
SiriusXM Travel Link provides access to
real-time weather information and forecasts,
nearby fuel prices, movie listings, sports
scores and stock quotes.
SiriusXM Traffic provides information that
may help to avoid delays due to traffic
incidents. Traffic jams, roadwork, road
closures around the current location, etc., are
represented graphically on the map by icons
depicting the nature of the event. Incidents
on the route are automatically displayed as they are approached.
1 Required monthly subscriptions sold separately for each available SiriusXM feature af ter trial period, and are continuous until you call SiriusXM to cancel. Installation costs, one-time activation fee, other fees and
taxes will apply. Each SiriusXM feature availability is dependent upon vehicle model, trim level, packaging,
and/or options, and may only be available in select markets. Satellite Radio U.S. service, NavWeather
service, and SiriusXM TravelLink services (if any of the foregoing features are equipped on vehicle)
available only to those 18 or older in the 48 contiguous states and D.C. Fees and programming subject
to change. Subscriptions governed by Customer Agreement available at siriusxm.com. ©2016 Sirius XM
Radio Inc. Sirius, XM and all related marks and logos are trademarks of Sirius XM Radio Inc.
For more information, refer to the “Navigation (section 4)” and the “General system information
(section 6)” of your Navigation System Owner’s Manual.
SIRI ®
EYES FREE1 (if so equipped)
If you have a compatible iPhone ®,2 with
Siri ®
, you can link your iPhone ®
to the
Siri ®
Eyes Free function in your vehicle’s
Bluetooth ®
,1 system.
If you have a compatible iPhone ®
connected
to the system, press and hold the
button
1 on the steering wheel for a few seconds
and Siri will be activated in Eyes Free mode.
1 Driving is serious business and r equires your full attention. Only use feature when safe to do so.
Compatible smartphone required. Availability of specific feature is dependent upon the phone’s
Bluetooth® support. Please refer to your phone owner’s manual for details. Bluetooth word mark and
logos are owned by Bluetooth SIG, Inc., and any use of such marks by Nissan is under license. See
http://www.NissanUSA.com/bluetooth for details. Text rates and/or data usage may apply. Certain
services, including Siri, are provided by independent companies not within Nissan’s control. Should
service provider terminate/restrict service, service may be suspended or terminated without notice or
liability to Nissan and/or its agents. Nissan not responsible for any equipment replacement or upgrades,
or associated costs, that may be required for continued operation due to service changes. Siri Eyes Free
is a registered trademark of Apple, Inc.
2 iPhone is a registered trademark of Apple, Inc. All rights reserved. iPhone not included.
For more information, refer to the “Monitor, climate, audio, phone and voice recognition systems
(section 4)” of your Owner’s Manual and visit www.NissanUSA.com/bluetooth.
1
To view detailed instructional videos regarding these and other features, please go to www.nissanownersinfo.mobi.
Page 12 of 40
 WITH EASY-FILL
TIRE ALERT2
A Tire Pressure Low Add Air warning
message will appear in the vehicle
information display
1 and the low tire
pressure wa")
10
TIRE PRESSURE MONITORING SYSTEM1 (TPMS) WITH EASY-FILL
TIRE ALERT2
A Tire Pressure Low Add Air warning
message will appear in the vehicle
information display
1 and the low tire
pressure warning light
2 will illuminate
when one or more tires are low in pressure
and air is needed.
• The tir
e pressures should be checked when
the tires are cold. The tires are considered
cold af ter the vehicle has been parked for
3 hours or more or driven less than 1 mi (1.6 km)
at moderate speeds.
Af ter tire pressures are adjusted, drive the vehicle at speeds above
16 mph (25 km/h). The
Tire Pressure Low Add Air warning
message and low tire pressure warning light
2 will extinguish.
In addition to the Tire Pressure Low Add Air warning message, you can view
the individual tire’s pressure in the vehicle information display as well as the
recommended pressure, denoted by blue lettering, for each tire.
When adding air to an under -inflated tire, the TPMS with Easy-Fill Tire Alert
provides visual and audible signals to help you inflate the tire to the
recommended COLD tire pressure.
T
o use the Easy-Fill Tire Alert:
1.
Move the shif t lever to the
P (PARK) position and apply the parking brake.
2.
Plac
e the ignition switch in the ON position. Do not start the engine.
3.
A
dd air to the under-inflated tire, and within a few seconds, the hazard
warning lights will start flashing.
4.
When the designated tir
e pressure is reached, the horn will beep once and the
hazard warning flashers will stop flashing.
5
. Repeat this procedure for any additional under-inflated tires.
When the lo w tire pressure warning light 2 flashes for 1 minute and then
remains on, the TPMS is not functioning properly. Have the system checked. It is
recommended you visit a Nissan dealer for this service.
Tire pressure rises and falls depending on the heat caused by the vehicle’s operation and the outside temperature. Low outside temperature can lower
the temperature of the air inside the tire, which can cause a lower tire inflation
pressure. This may cause the low tire pressure warning light
2 to illuminate.
If the warning light illuminates, check the tire pressure in your tires.
•
Check the tir
e pressure (including the spare tire) of ten and always prior to long
distance trips.
The Tire and Loading Information label contains valuable information. Refer to the “Technical and consumer information (section 10)” of your Owner’s Manual
for the location of the Tire and Loading Information label.
1 TPMS is not a substitute for regular tire pressure checks. 2 Vehicle must be on for the Easy-Fill Tire Alert to operate.
For more information, refer to the “Instruments and controls (section 2)”, the “Starting and driving
(section 5)” and the “Do-it-yourself (section 8)” of your Owner’s Manual.
2
1
ESSENTIAL INFORMATION
To view detailed instructional videos regarding these and other features, please go to www.nissanownersinfo.mobi.
Page 13 of 40

A LOOSE FUEL CAP warning message will
display in the vehicle information display/
odometer
1 when the fuel-filler cap is not
tightened correctly.")
11
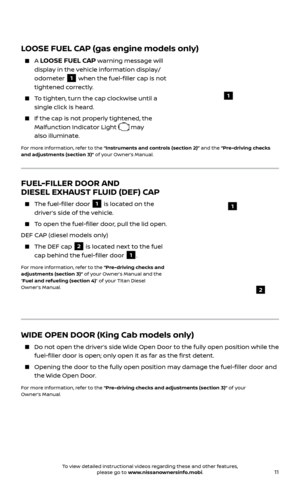
LOOSE FUEL CAP (gas engine models only)
A LOOSE FUEL CAP warning message will
display in the vehicle information display/
odometer
1 when the fuel-filler cap is not
tightened correctly.
To tighten, turn the cap clockwise until a single click is heard.
If the cap is not properly tightened, the Malfunction Indicator Light
may
also illuminate.
For more information, refer to the “Instruments and controls (section 2)” and the “Pre-driving checks
and adjustments (section 3)” of your Owner’s Manual.
WIDE OPEN DOOR (King Cab models only)
Do not open the driv er’s side Wide Open Door to the fully open position while the
fuel-filler door is open; only open it as far as the first detent.
Opening the door to the ful ly open position may damage the fuel-filler door and
the Wide Open Door.
For more information, refer to the “Pre-driving checks and adjustments (section 3)” of your
Owner’s Manual.
FUEL-FILLER DOOR AND
DIESEL EXHAUST FLUID (DEF) CAP
The fuel-filler door 1 is located on the
driver’s side of the vehicle.
To open the fuel-filler door, pull the lid open.
DEF CAP (diesel models only)
The DEF c ap 2 is located next to the fuel
cap behind the fuel-filler door 1.
For more information, refer to the “Pre-driving checks and
adjustments (section 3)” of your Owner’s Manual and the
“Fuel and refueling (section 4)” of your Titan Diesel
Owner’s Manual.
2
1
1
To view detailed instructional videos regarding these and other features, please go to www.nissanownersinfo.mobi.
Page 14 of 40

1.
Pr
ess the
ENTER/SETTING button 1 to show
the “Settings” screen on the display.
2.
Turn the
TUNE•SCROLL knob 2 to highli")
12
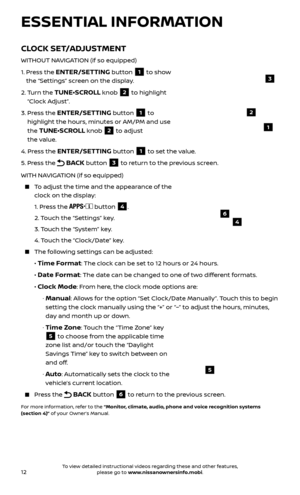
CLOCK SET/ADJUSTMENT
WITHOUT NAVIGATION (if so equipped)
1.
Pr
ess the
ENTER/SETTING button 1 to show
the “Settings” screen on the display.
2.
Turn the
TUNE•SCROLL knob 2 to highlight
“Clock Adjust”.
3.
Pr
ess the
ENTER/SETTING button 1 to
highlight the hours, minutes or AM/PM and use
the
TUNE•SCROLL knob 2 to adjust
the value.
4.
Pr
ess the
ENTER/SETTING button 1 to set the value.
5.
Pr
ess the
BACK button 3 to return to the previous screen.
WITH NAVIGATION (if so equipped)
To adjust the time and the appearance of the clock on the display:
1.
Press the
button 4.
2.
Touch the “Settings” key.
3.
Touch the “System” key.
4.
Touch the “Clock/Date” key.
The following settings can be adjusted:
•
Time Format: The clock can be set to 12 hours or 24 hours.
•
Date Format: The date can be changed to one of two different formats.
• Clock Mode: From here, the clock mode options are:
· Manual: Allows for the option “Set Clock/Date Manually”. Touch this to begin
setting the clock manually using the “+” or “–” to adjust the hours, minutes,
day and month up or down.
·
Time Zone: Touch the “Time Zone” key
5 to choose from the applicable time
zone list and/or touch the “Daylight
Savings Time” key to switch between on
and off.
· Auto: Automatically sets the clock to the
vehicle’s current location.
Press the BACK button 6 to return to the previous screen.
For more information, refer to the “Monitor, climate, audio, phone and voice recognition systems
(section 4)” of your Owner’s Manual.
5
2
ESSENTIAL INFORMATION
1
46
3
To view detailed instructional videos regarding these and other features, please go to www.nissanownersinfo.mobi.
Page 15 of 40

13
NISSAN INTELLIGENT KEY®
SYSTEM
The Nissan Intelligent Key ®
system allows you to lock or unlock the vehicle and start
the engine. It is important to make sure the Intelligent Key is with you (that is, in your
pocket or purse).
The oper ating range of the Intelligent Key is within 31.5 in (80 cm) of the
corresponding request switch.
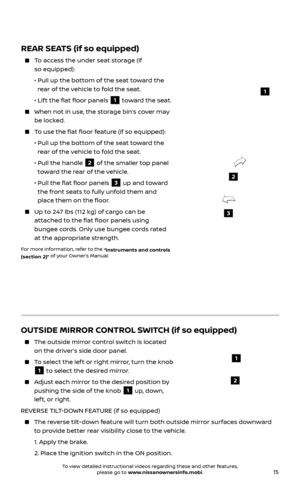
To lock the vehicle, push either door handle request switch
1 (if so equipped) or press
the
button 2 on the key fob.
To unlock the vehicle, perform one of the
following procedures:
•
Push either door hand
le request switch
1
(if so equipped) once and the corresponding
door will unlock. Push the request switch
1
(if so equipped) again within 5 seconds;
all other doors will unlock, or
•
Pr
ess the
button 3 on the key fob to
unlock the driver’s side door. Press the
button 3 again; all other doors will unlock.
The Intel ligent Key can also be used to
activate the panic alarm by pressing and holding the
button 4 for more
than 1 second. Once activated, the panic alarm and headlights will stay on for a
period of time.
INTELLIGENT KEY BATTERY DISCHARGE
If the bat tery of the Intelligent Key is discharged or environmental conditions
interfere with the Intelligent Key operation, start the engine according to the
following procedure:
1.
Move the shif t lever to the
P (PARK) position.
2.
Firmly apply the foot brake.
3.
T
ouch the ignition switch with the Intelligent Key, and a chime will sound.
4.
Within 10 sec
onds af ter the chime sounds, press the ignition switch
START/STOP button while depressing the brake pedal and the engine
will start.
REMOTE ENGINE START* (if so equipped)
The remote start operating range is approximately 200 f t (60 m) from the vehicle. The effective operating range may be shorter if there are walls, strong
radio wave sources near the operating location or other obstructions between
the key and the vehicle.
For the remote start to function, the vehicle must be in the P (PARK) position
with the ignition off and all of the doors must be closed and locked. Please see
your Owner’s Manual for additional information.
1
FIRST DRIVE FEATURES
2
3
4
5
*State laws may apply; review local laws before using.
To view detailed instructional videos regarding these and other features, please go to www.nissanownersinfo.mobi.
Page 16 of 40

14
To start your vehicle remotely:
1.
Press the
button 2 to lock all of the doors.
2.
Within 5 sec
onds, press and hold the engine start
button 5 for at
least 2 seconds.
The engine wil l start, and the parking lights will turn on.
While the remote start feature is being used, the manual or automatic climate
control system will default to the last used heating or cooling mode.
The engine wil l run for 10 minutes and then turn off.
Repeat steps 1 through 2 to extend the time for an additional 10-minute period.
Remote start can only be activated for a maximum of 20 minutes.
•
A
f ter two remote starts, the ignition switch must be cycled before the remote
start can be used again.
• T
o cancel remote start, press the engine start
button 5.
To start driving, depress the brake pedal and press the ignition switch
START/STOP button.
For more information, refer to the “Pre-driving checks and adjustments (section 3)” and the “Starting
and driving (section 5)” of your Owner’s Manual.
OPENING THE TAILGATE
Pull the tailgate handle 1 upward and
lower the tailgate. Support cables hold the
tailgate open.
For more information, refer to the “Pre-driving checks and
adjustments (section 3)” of your Owner’s Manual.
1
POWER SEAT ADJUSTMENTS (if so equipped)
To slide the seat forward or backward, push the switch 1 forward or backward.
To adjust the angle of the seatback, push the switch 2 forward or backward.
SEAT LIFTER (driver’s seat)
To adjust the angle and height of the seat cushion, push the front or rear end of the
switch
1 up or down.
POWER LUMBAR SUPPORT (driver’s seat)
To adjust the lumbar area, push the front or back end of the switch 3.
For more information, refer to the “Safety — Seats, seat belts and supplemental restraint system
(section 1)” of your Owner’s Manual.
123
FIRST DRIVE FEATURES
To view detailed instructional videos regarding these and other features, please go to www.nissanownersinfo.mobi.