2017 NISSAN SENTRA display
[x] Cancel search: displayPage 2 of 36
*See your Owner’s Manual for information.
2
1
3
10
15
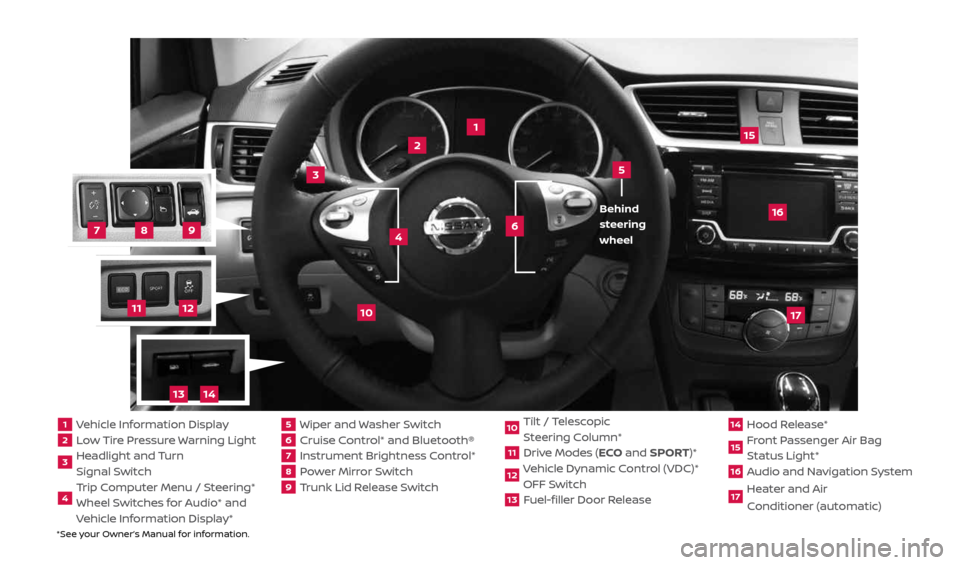
1 Vehicle Information Display2 Low Tire Pressure Warning Light3 Headlight and Turn
Signal Switch4 Trip Computer Menu / Steering*
Wheel Switches for Audio* and
Vehicle Information Display*
5 Wiper and Washer Switch6 Cruise Control* and Bluetooth®7 Instrument Brightness Control*8 Power Mirror Switch9 Trunk Lid Release Switch
10 Tilt / Telescopic
Steering Column*11 Drive Modes (ECO and SPORT)*12 Vehicle Dynamic Control (VDC)*
OFF Switch13 Fuel-filler Door Release
14 Hood Release*15 Front Passenger Air Bag
Status Light*16 Audio and Navigation System17 Heater and Air
Conditioner (automatic)
6
5
16
17
4 Behind
steering
wheel
8
7
9
11
12
14
13
2434454_17b_Sentra_US_pQRG_101416.indd 310/14/16 10:59 AM
Page 3 of 36
NEW SYSTEM FEATURESDrive Modes........................................................................\
.... 2
NissanConnectSM Services Powered by SiriusXM® (if so equipped) . . . . . . . . . . . . . . . . . . . .2
RearView Monitor (if so equipped) ..................................................... 4
Blind Spot Warning (BSW) with Rear Cross Traffic Alert (RCTA) (if so equipped) .......4
Forward Emergency Braking (FEB) (if so equipped) ................................... 5
Siri® Eyes Free (if so equipped) ......................................................... 5
SiriusXM Travel Link and SiriusXM Traffic (if so equipped) ............................. 5
ESSENTIAL INFORMATION Tire Pressure Monitoring System (TPMS) with Easy-Fill Tire Alert (if so equipped) .... 7
Loose Fuel Cap ........................................................................\
. 8
Fuel-filler Door .......................................................................\
.. 8
Clock Set/Adjustment ................................................................. 8
FIRST DRIVE FEATURESNissan Intelligent Key® System (if so equipped) ....................................... 11
Trunk Lid Release Switch .............................................................. 11
Front Power Seat Adjustments (if so equipped for driver’s seat) ..................... 12
Outside Mirror Control Switch ........................................................ 12
Starting/Stopping the Engine ........................................................ 13
Headlight Control Switch ............................................................. 13
Wiper and Washer Switch ............................................................. 14
Heater and Air Conditioner (automatic) (if so equipped) ............................. 15
FM/AM/SiriusXM® Satellite Radio (if so equipped) with CD Player ....................17
USB (Universal Serial Bus) Connection Port/Aux Jack and iPod® Interface .......... 18
Cruise Control (if so equipped) ........................................................ 18
Intelligent Cruise Control (ICC) (if so equipped) .......................................19
SYSTEM GUIDE
Vehicle Information Display (if so equipped) ..........................................21
Hands-free Text Messaging Assistant (if so equipped) ............................... 22
NissanConnect
SM Mobile Apps (if so equipped) ....................................... 22
Bluetooth® Hands-free Phone System ............................................... 24
• System Operating Tips ........................................................... 24
Bluetooth® System without Navigation (if so equipped) ............................. 25
Bluetooth® System with Navigation (if so equipped) .................................26
Navigation System (if so equipped) ................................................... 28
HomeLink® Universal Transceiver (if so equipped) ....................................29
TABLE OF CONTENTS
Additional information about your vehicle is also available in your Owner’s Manual,
Navigation System Owner’s Manual and at www.NissanUSA.com.
Please see your Owner’s Manual for important safety information and system
operation limitations.
• A cellular telephone should not be used for any purpose while driving so full attention may
be given to vehicle operation.
• Always wear your seat belt.
• Supplemental air bags do not replace proper seat belt usage.
• Children 12 and under should always ride in the rear seat properly secured in child restraints
or seat belts according to their age and weight.
• Do not drink and drive.
For more information, refer to the “Safety — Seats, seat belts and supplemental restraint system
(section 1)”, the “Monitor, climate, audio, phone and voice recognition systems (section 4)” and the
“Starting and driving (section 5)” of your Owner’s Manual.
2434454_17b_Sentra_US_pQRG_101416.indd 410/14/16 10:59 AM
Page 6 of 36
4
REARVIEW MONITOR (if so equipped)
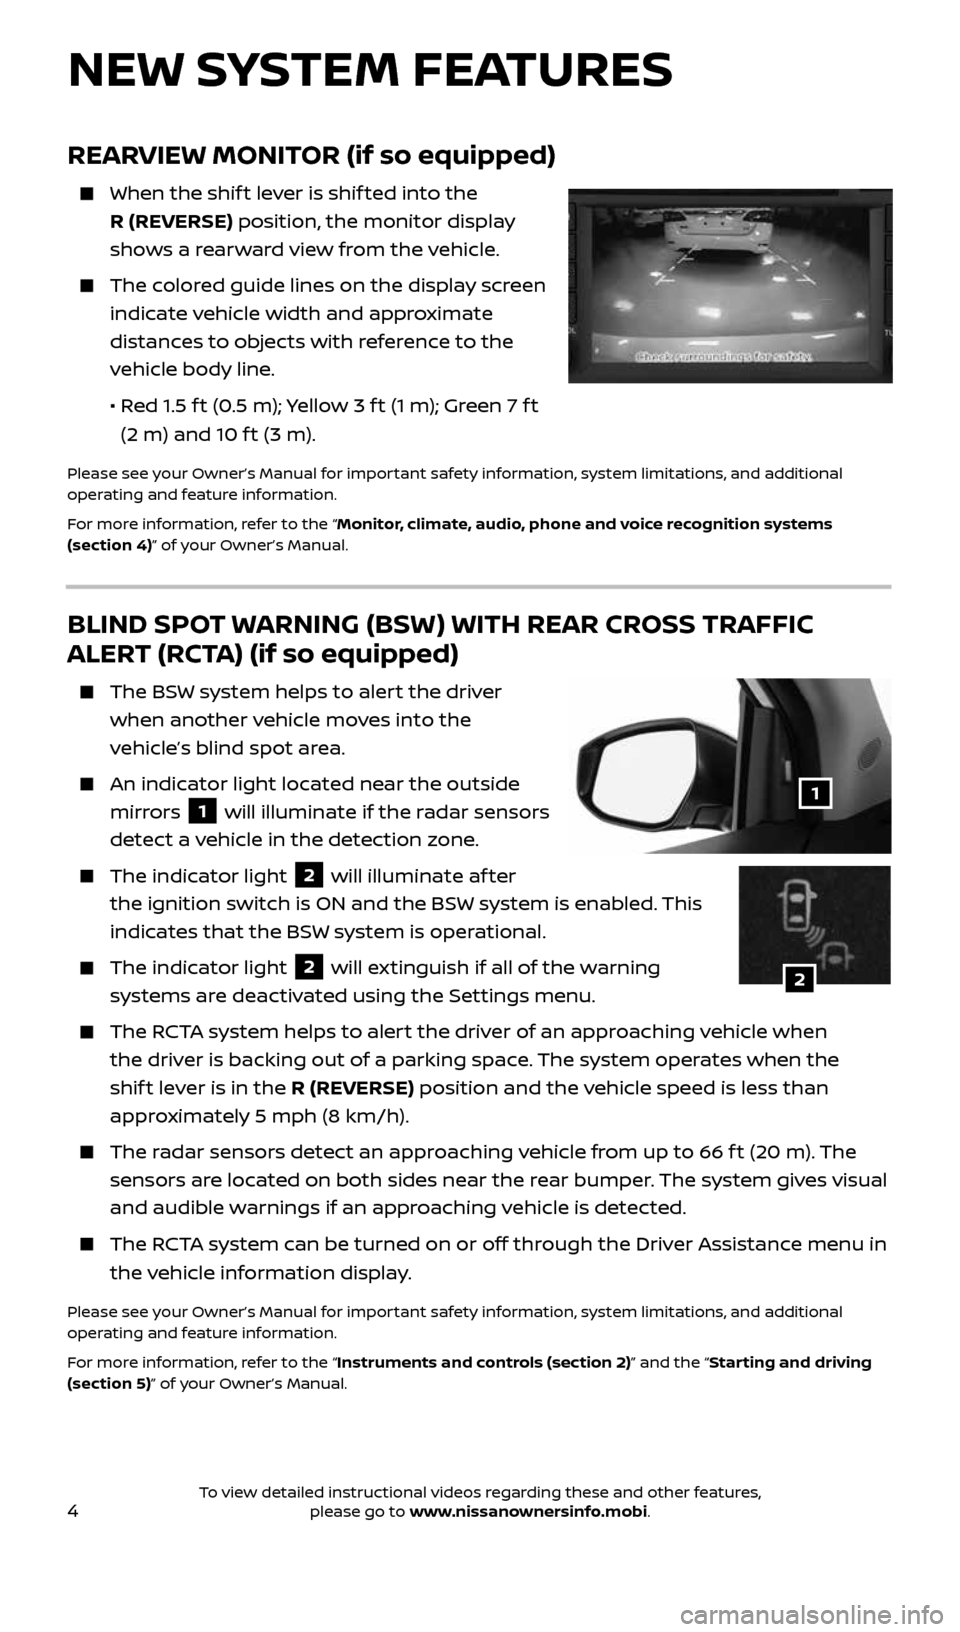
When the shif t lever is shif ted into the
R (REVERSE) position, the monitor display
shows a rearward view from the vehicle.
The colored guide lines on the display screen
indicate vehicle width and approximate
distances to objects with reference to the
vehicle body line.
• Red 1.5 f t (0.5 m); Yellow 3 f t (1 m); Green 7 f t
(2 m) and 10 f t (3 m).
Please see your Owner’s Manual for important safety information, system limitations, and additional
operating and feature information.
For more information, refer to the “Monitor, climate, audio, phone and voice recognition systems
(section 4)” of your Owner’s Manual.
BLIND SPOT WARNING (BSW) WITH REAR CROSS TRAFFIC
ALERT (RCTA) (if so equipped)
The BSW system helps to alert the driver
when another vehicle moves into the
vehicle’s blind spot area.
An indicator light located near the outside
mirrors
1 will illuminate if the radar sensors
detect a vehicle in the detection zone.
The indicator light 2 will illuminate af ter
the ignition switch is ON and the BSW system is enabled. This
indicates that the BSW system is operational.
The indicator light 2 will extinguish if all of the warning
systems are deactivated using the Settings menu.
The RCTA system helps to alert the driver of an approaching vehicle when
the driver is backing out of a parking space. The system operates when the
shif t lever is in the R (REVERSE) position and the vehicle speed is less than
approximately 5 mph (8 km/h).
The radar sensors detect an approaching vehicle from up to 66 f t (20 m). The
sensors are located on both sides near the rear bumper. The system gives visual
and audible warnings if an approaching vehicle is detected.
The RCTA system can be turned on or off through the Driver Assistance menu in
the vehicle information display.
Please see your Owner’s Manual for important safety information, system limitations, and additional
operating and feature information.
For more information, refer to the “Instruments and controls (section 2)” and the “Starting and driving
(section 5)” of your Owner’s Manual.
1
NEW SYSTEM FEATURES
2
2434454_17b_Sentra_US_pQRG_101416.indd 410/14/16 10:59 AM
To view detailed instructional videos regarding these and other features, please go to www.nissanownersinfo.mobi.
Page 8 of 36
6
NEW SYSTEM FEATURES
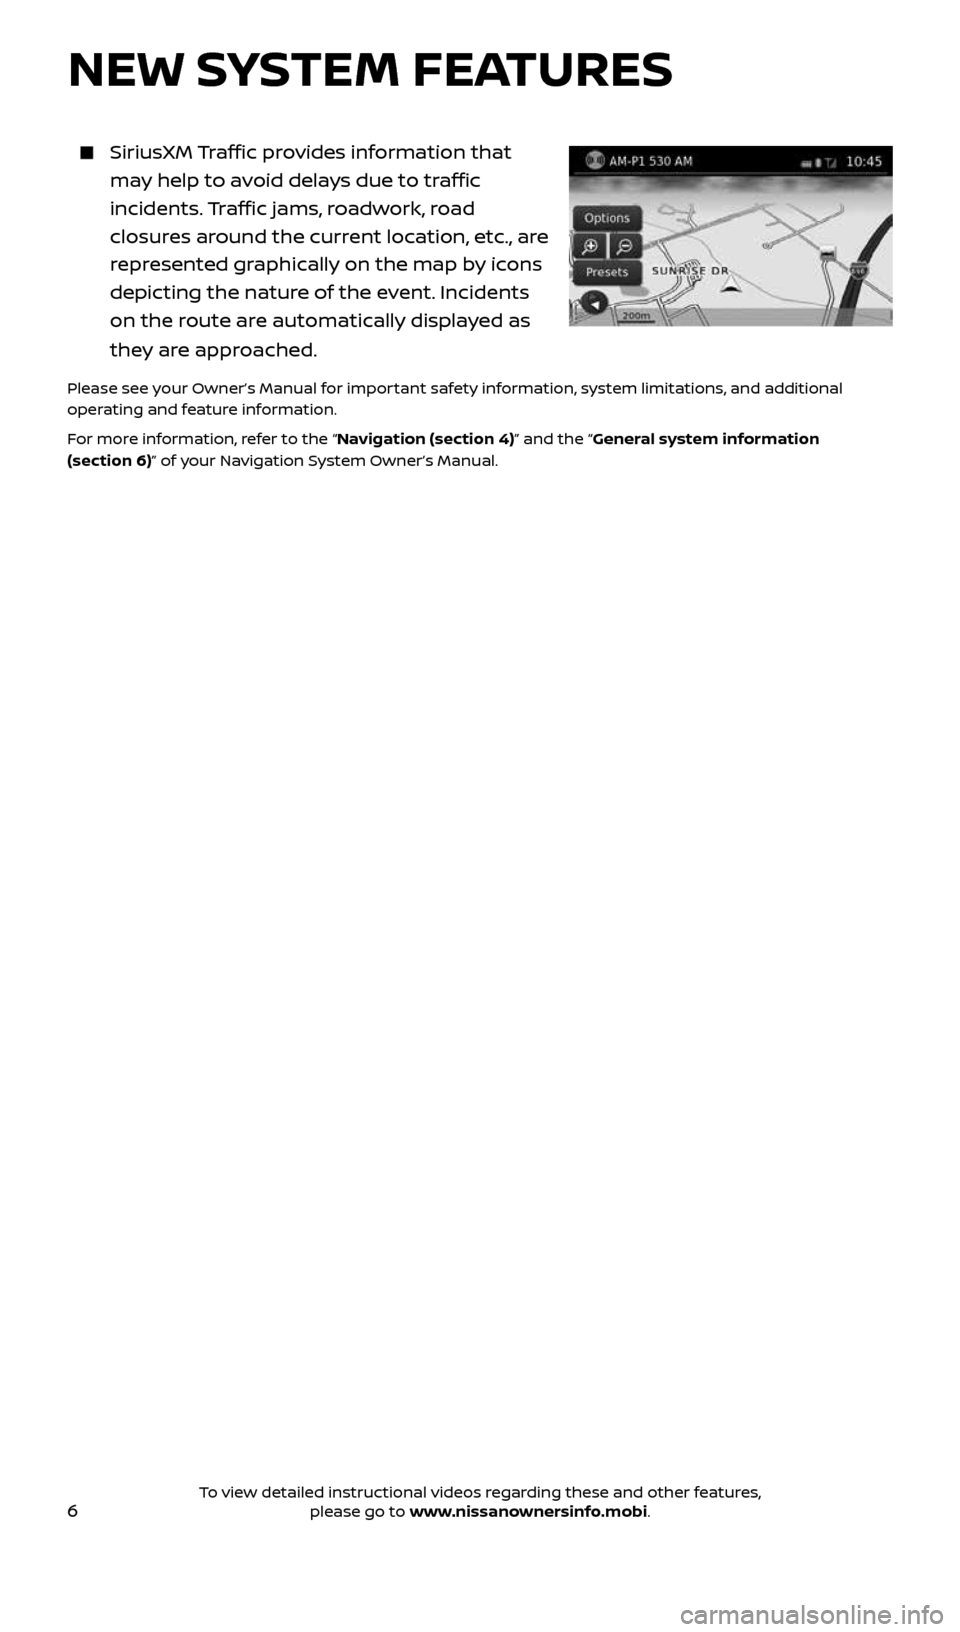
SiriusXM Traffic provides information that
may help to avoid delays due to traffic
incidents. Traffic jams, roadwork, road
closures around the current location, etc., are
represented graphically on the map by icons
depicting the nature of the event. Incidents
on the route are automatically displayed as
they are approached.
Please see your Owner’s Manual for important safety information, system limitations, and additional
operating and feature information.
For more information, refer to the “Navigation (section 4)” and the “General system information
(section 6)” of your Navigation System Owner’s Manual.
2434454_17b_Sentra_US_pQRG_101416.indd 610/14/16 10:59 AM
To view detailed instructional videos regarding these and other features, please go to www.nissanownersinfo.mobi.
Page 10 of 36
8
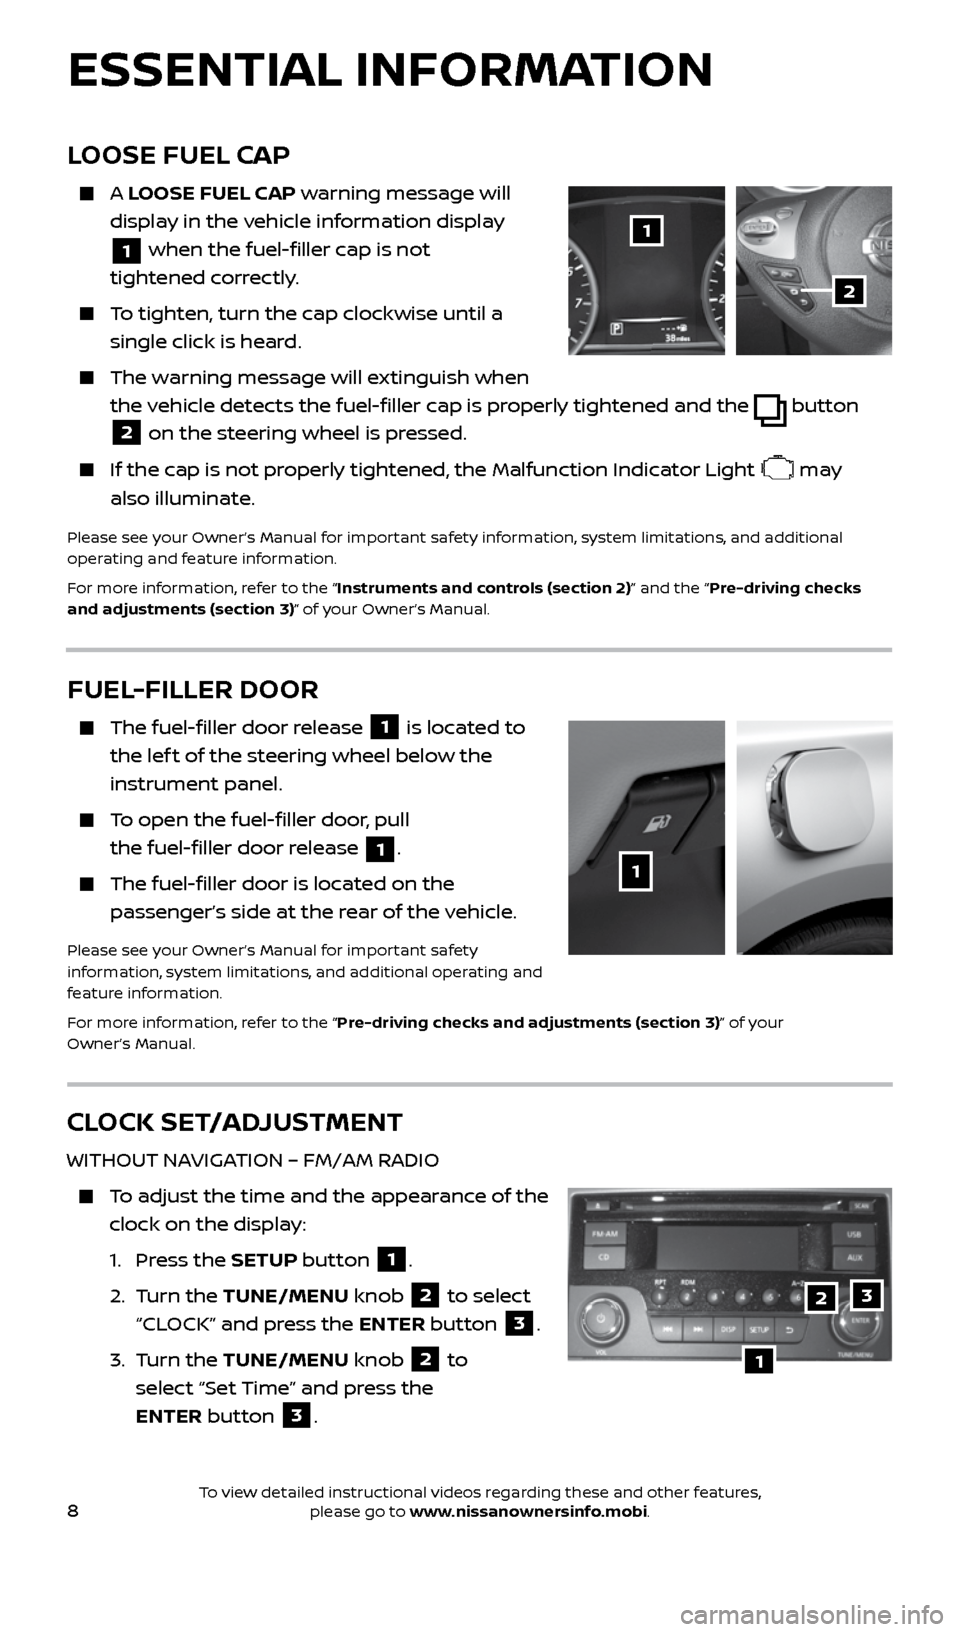
CLOCK SET/ADJUSTMENT
WITHOUT NAVIGATION – FM/AM RADIO
To adjust the time and the appearance of the
clock on the display:
1. Press the SETUP button
1.
2. Turn the TUNE/MENU knob
2 to select
“CLOCK” and press the ENTER button
3.
3. Turn the TUNE/MENU knob
2 to
select “Set Time” and press the
ENTER button
3.
LOOSE FUEL CAP
A LOOSE FUEL CAP warning message will
display in the vehicle information display
1 when the fuel-filler cap is not
tightened correctly.
To tighten, turn the cap clockwise until a
single click is heard.
The warning message will extinguish when
the vehicle detects the fuel-filler cap is properly tightened and the
button
2 on the steering wheel is pressed.
If the cap is not properly tightened, the Malfunction Indicator Light may
also illuminate.
Please see your Owner’s Manual for important safety information, system limitations, and additional
operating and feature information.
For more information, refer to the “Instruments and controls (section 2)” and the “Pre-driving checks
and adjustments (section 3)” of your Owner’s Manual.
1
2
FUEL-FILLER DOOR
The fuel-filler door release 1 is located to
the lef t of the steering wheel below the
instrument panel.
To open the fuel-filler door, pull
the fuel-filler door release
1.
The fuel-filler door is located on the
passenger’s side at the rear of the vehicle.
Please see your Owner’s Manual for important safety
information, system limitations, and additional operating and
feature information.
For more information, refer to the “Pre-driving checks and adjustments (section 3)” of your
Owner’s Manual.
1
ESSENTIAL INFORMATION
1
23
2434454_17b_Sentra_US_pQRG_101416.indd 810/14/16 10:59 AM
To view detailed instructional videos regarding these and other features, please go to www.nissanownersinfo.mobi.
Page 11 of 36
9
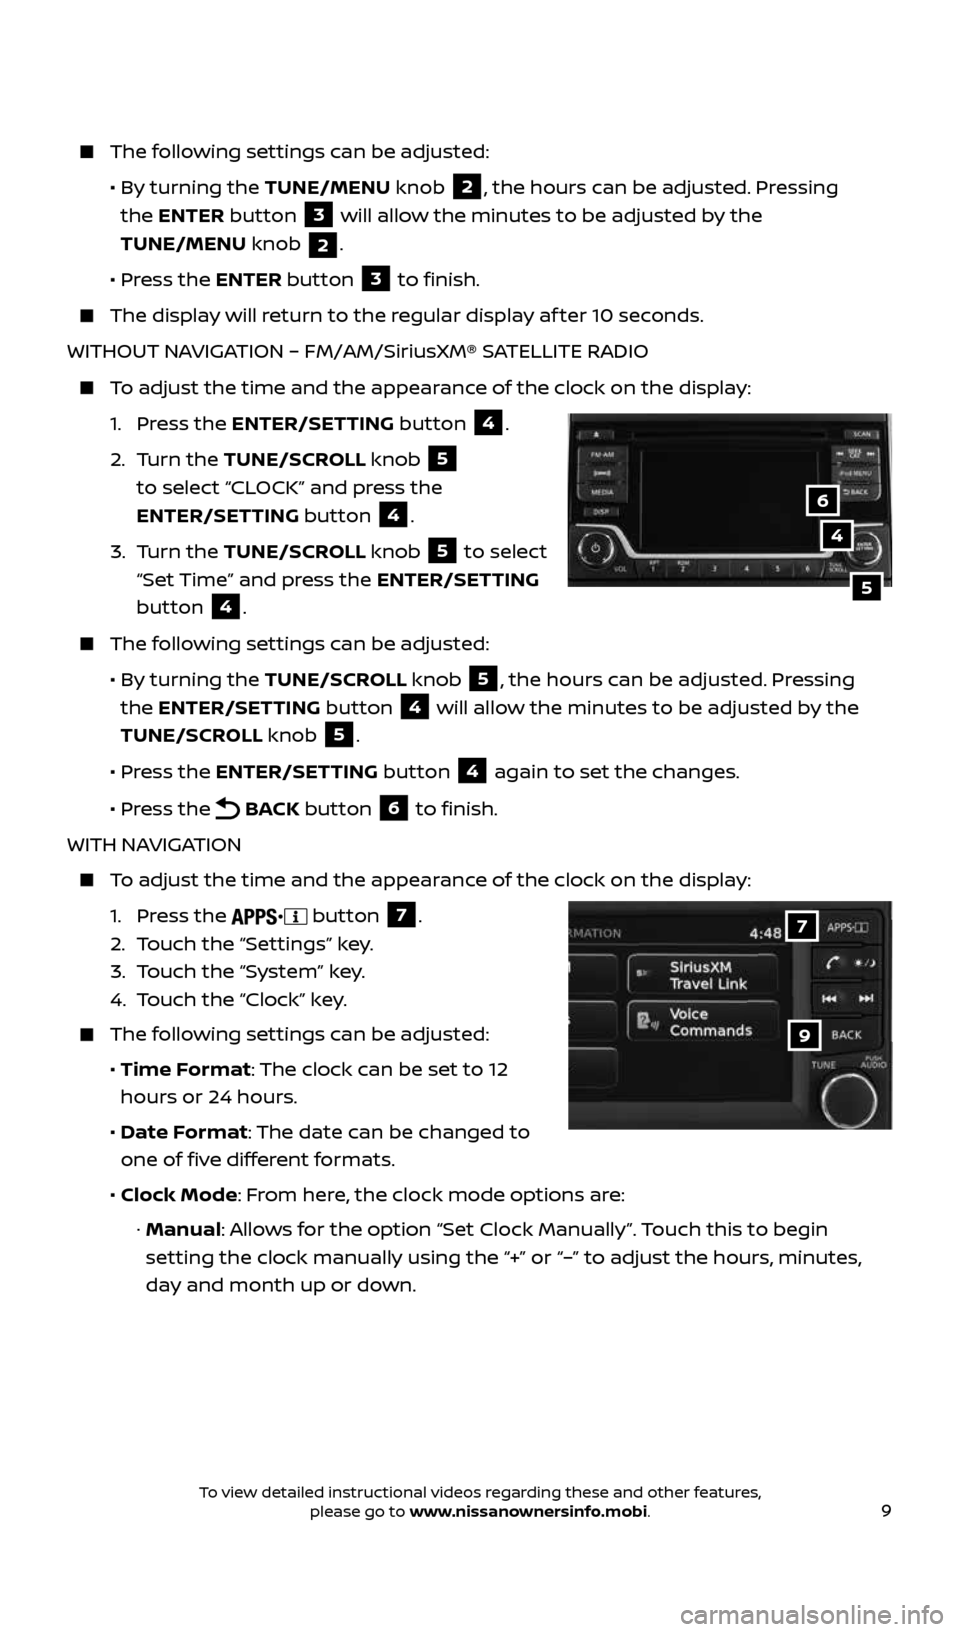
The following settings can be adjusted:
• By turning the TUNE/MENU knob
2, the hours can be adjusted. Pressing
the ENTER button
3 will allow the minutes to be adjusted by the
TUNE/MENU knob
2.
• Press the ENTER button
3 to finish.
The display will return to the regular display af ter 10 seconds.
WITHOUT NAVIGATION – FM/AM/SiriusXM® SATELLITE RADIO
To adjust the time and the appearance of the clock on the display:
1. Press the ENTER/SETTING button
4.
2. Turn the TUNE/SCROLL knob
5
to select “CLOCK” and press the
ENTER/SETTING button
4.
3. Turn the TUNE/SCROLL knob
5 to select
“Set Time” and press the ENTER/SETTING
button
4.
The following settings can be adjusted:
• By turning the TUNE/SCROLL knob
5, the hours can be adjusted. Pressing
the ENTER/SETTING button
4 will allow the minutes to be adjusted by the
TUNE/SCROLL knob
5.
• Press the ENTER/SETTING button
4 again to set the changes.
• Press the
BACK button 6 to finish.
WITH NAVIGATION
To adjust the time and the appearance of the clock on the display:
1. Press the
button 7.
2. Touch the “Settings” key.
3. Touch the “System” key.
4. Touch the “Clock” key.
The following settings can be adjusted:
• Time Format: The clock can be set to 12
hours or 24 hours.
• Date Format: The date can be changed to
one of five different formats.
• Clock Mode: From here, the clock mode options are:
· Manual: Allows for the option “Set Clock Manually”. Touch this to begin
setting the clock manually using the “+” or “–” to adjust the hours, minutes,
day and month up or down.
4
5
6
9
7
2434454_17b_Sentra_US_pQRG_101416.indd 910/14/16 10:59 AM
To view detailed instructional videos regarding these and other features, please go to www.nissanownersinfo.mobi.
Page 20 of 36
18
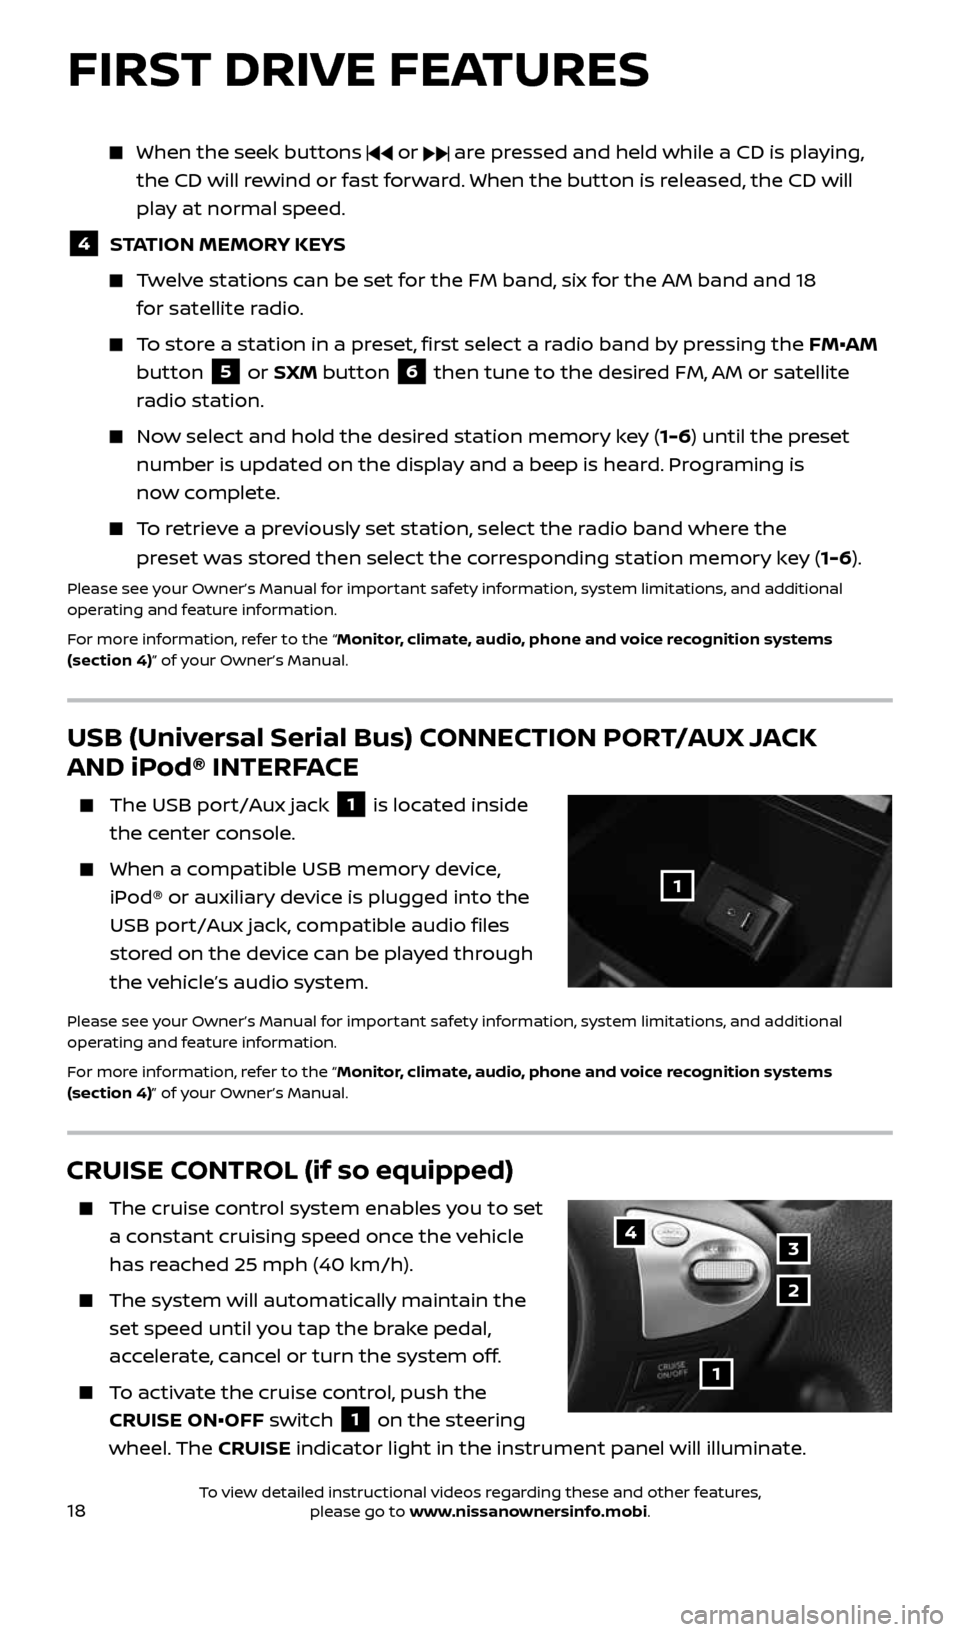
CRUISE CONTROL (if so equipped)
The cruise control system enables you to set
a constant cruising speed once the vehicle
has reached 25 mph (40 km/h).
The system will automatically maintain the
set speed until you tap the brake pedal,
accelerate, cancel or turn the system off.
To activate the cruise control, push the
CRUISE ON•OFF switch
1 on the steering
wheel. The CRUISE indicator light in the instrument panel will illuminate.
1
4
2
3
FIRST DRIVE FEATURES
USB (Universal Serial Bus) CONNECTION PORT/AUX JACK
AND iPod® INTERFACE
The USB port/Aux jack 1 is located inside
the center console.
When a compatible USB memory device,
iPod® or auxiliary device is plugged into the
USB port/Aux jack, compatible audio files
stored on the device can be played through
the vehicle’s audio system.
Please see your Owner’s Manual for important safety information, system limitations, and additional
operating and feature information.
For more information, refer to the “Monitor, climate, audio, phone and voice recognition systems
(section 4)” of your Owner’s Manual.
1
When the seek buttons or are pressed and held while a CD is playing,
the CD will rewind or fast forward. When the button is released, the CD will
play at normal speed.
4 STATION MEMORY KEYS
Twelve stations can be set for the FM band, six for the AM band and 18
for satellite radio.
To store a station in a preset, first select a radio band by pressing the FM•AM
button
5 or SXM button 6 then tune to the desired FM, AM or satellite
radio station.
Now select and hold the desired station memory key (1-6) until the preset
number is updated on the display and a beep is heard. Programing is
now complete.
To retrieve a previously set station, select the radio band where the
preset was stored then select the corresponding station memory key (1-6).
Please see your Owner’s Manual for important safety information, system limitations, and additional
operating and feature information.
For more information, refer to the “Monitor, climate, audio, phone and voice recognition systems
(section 4)” of your Owner’s Manual.
2434454_17b_Sentra_US_pQRG_101416.indd 1810/14/16 11:00 AM
To view detailed instructional videos regarding these and other features, please go to www.nissanownersinfo.mobi.
Page 23 of 36
21
SYSTEM GUIDE
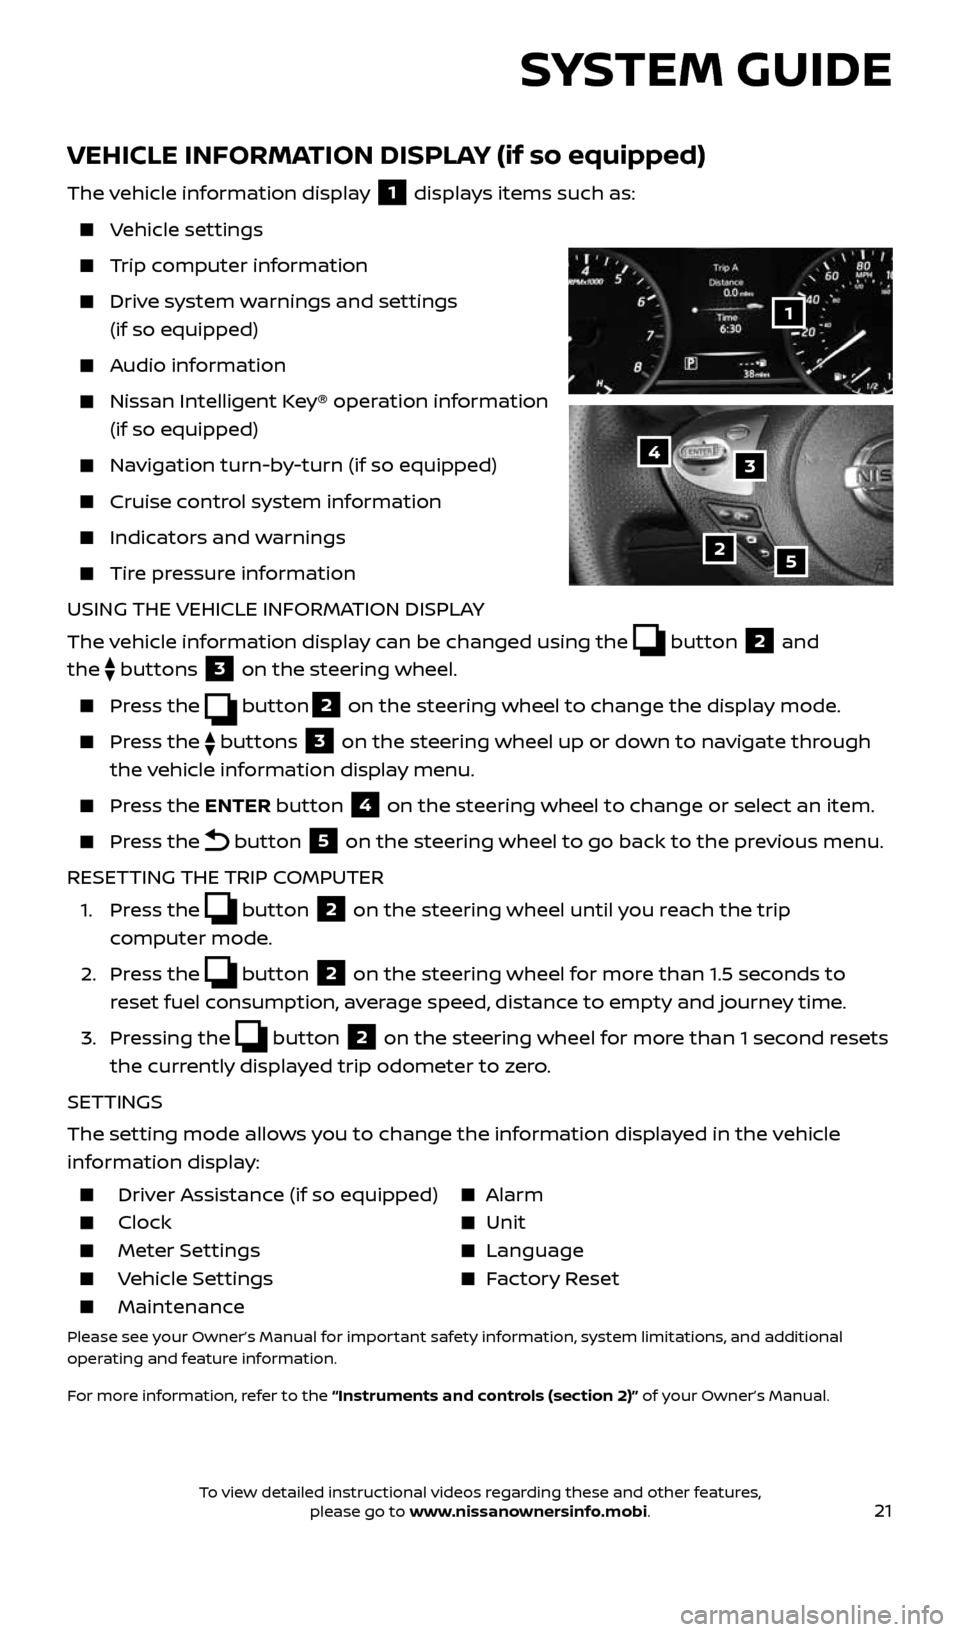
VEHICLE INFORMATION DISPLAY (if so equipped)
The vehicle information display 1 displays items such as:
Vehicle settings
Trip computer information
Drive system warnings and settings
(if so equipped)
Audio information
Nissan Intelligent Key® operation information
(if so equipped)
Navigation turn-by-turn (if so equipped)
Cruise control system information
Indicators and warnings
Tire pressure information
USING THE VEHICLE INFORMATION DISPLAY
The vehicle information display can be changed using the
button 2 and
the
buttons 3 on the steering wheel.
Press the button2 on the steering wheel to change the display mode.
Press the buttons 3 on the steering wheel up or down to navigate through
the vehicle information display menu.
Press the ENTER button 4 on the steering wheel to change or select an item.
Press the button 5 on the steering wheel to go back to the previous menu.
RESETTING THE TRIP COMPUTER
1. Press the
button 2 on the steering wheel until you reach the trip
computer mode.
2. Press the
button 2 on the steering wheel for more than 1.5 seconds to
reset fuel consumption, average speed, distance to empty and journey time.
3. Pressing the
button 2 on the steering wheel for more than 1 second resets
the currently displayed trip odometer to zero.
SETTINGS
The setting mode allows you to change the information displayed in the vehicle
information display:
Driver Assistance (if so equipped) Alarm
Clock Unit
Meter Settings Language
Vehicle Settings Factory Reset
Maintenance
Please see your Owner’s Manual for important safety information, system limitations, and additional
operating and feature information.
For more information, refer to the “Instruments and controls (section 2)” of your Owner’s Manual.
2
1
34
5
2434454_17b_Sentra_US_pQRG_101416.indd 2110/14/16 11:00 AM
To view detailed instructional videos regarding these and other features, please go to www.nissanownersinfo.mobi.