Page 15 of 53

2-5 High-voltage Safety System
The
high-voltage safety system is intended to help keep vehicle occupants and emergency responders safe
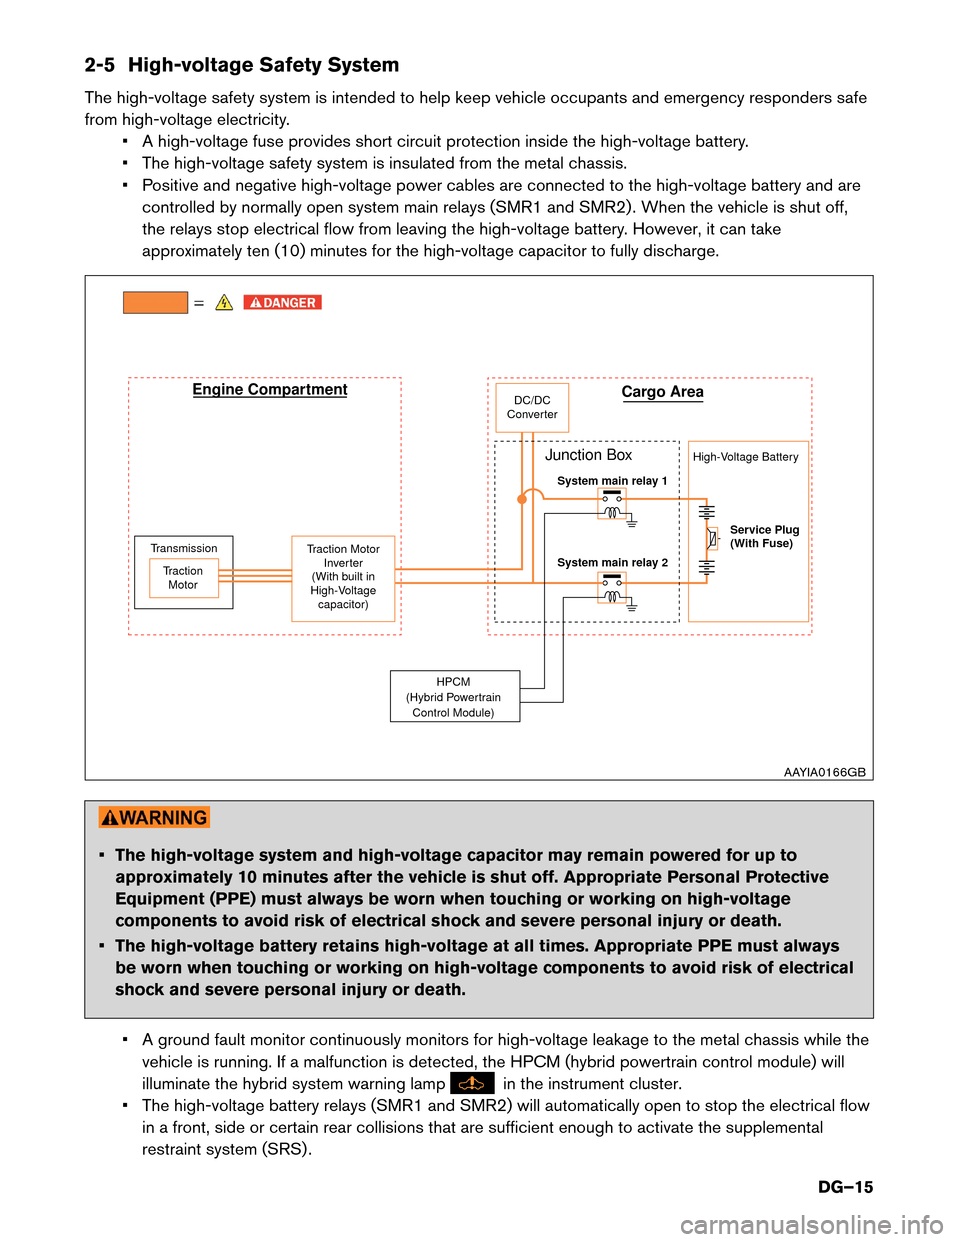
from high-voltage electricity. • A high-voltage fuse provides short circuit protection inside the high-voltage battery.
• The high-voltage safety system is insulated from the metal chassis.
• Positive and negative high-voltage power cables are connected to the high-voltage battery and arecontrolled by normally open system main relays (SMR1 and SMR2) . When the vehicle is shut off,
the relays stop electrical flow from leaving the high-voltage battery. However, it can take
approximately ten (10) minutes for the high-voltage capacitor to fully discharge. • The high-voltage system and high-voltage capacitor may remain powered for up to
approximately
10 minutes after the vehicle is shut off. Appropriate Personal Protective
Equipment (PPE) must always be worn when touching or working on high-voltage
components to avoid risk of electrical shock and severe personal injury or death.
• The high-voltage battery retains high-voltage at all times. Appropriate PPE must always be worn when touching or working on high-voltage components to avoid risk of electrical
shock and severe personal injury or death.
• A ground fault monitor continuously monitors for high-voltage leakage to the metal chassis while the vehicle is running. If a malfunction is detected, the HPCM (hybrid powertrain control module) will
illuminate the hybrid system warning lamp in the instrument cluster.
•
The high-voltage battery relays (SMR1 and SMR2) will automatically open to stop the electrical flow
in a front, side or certain rear collisions that are sufficient enough to activate the supplemental
restraint system (SRS) . HPCM
(Hybr
id Powertrain
Control Module) DC/DC
Converter
Service Plug
(With Fuse)
Traction Motor
Inverter
(With built in
High-Voltage capacitor)
Traction
Motor Junction Box
Transmission Engine Compartment
Cargo Area
High-Voltage Battery
System main relay 1
System main relay 2 AAYIA0166GB
DG–15
Page 26 of 53
8. Disconnect negative (-) battery cable and cover it with
insulated tape.
9. Wait approximately ten (10) minutes for complete discharge of the high-voltage capacitor
after the battery cable has been disconnected.
10. Perform the dismantling operation. Refer to 6. Dismantling Information (DG–43).
Alternate
Procedure 1 (Remove Fuses)
NOTE:
Before removing any fuses, if necessary, lower the windows, adjust the steering column,
adjust the seats, unlock the doors, etc. Once fuses are removed, power controls will not
operate.
1. Pull release handle located on the instrument panel and push the release lever under the hoodsideways to open hood.
2. Release clips on the narrow ends of the fuse box cover and remove it. : Vehicle front AAYIA0538ZZ
AAYIA0539ZZ
AAYIA0540ZZ
DG–26
Page 27 of 53
3. Remove IGCT RLY fuse (F/L 50A IGCT RLY) .
: Vehicle front
4.
If you cannot identify the correct fuse, remove all the
fuses. To avoid unintended reinstallation and risk of
electrical
shock and severe personal injury or death, the
dismantler should carry the fuse or fuses on his/her
person and cover the fuse box with insulated tape.
5. Open luggage compartment, release the 2 push pinretainers (A)and lift rear luggage board. Detach the
2 straps (B)and remove the rear luggage board. AAYIA0176GB
AAYIA0535ZZ
DG–27
Page 39 of 53

4-1 Jump Starting Procedures
NO
TE:
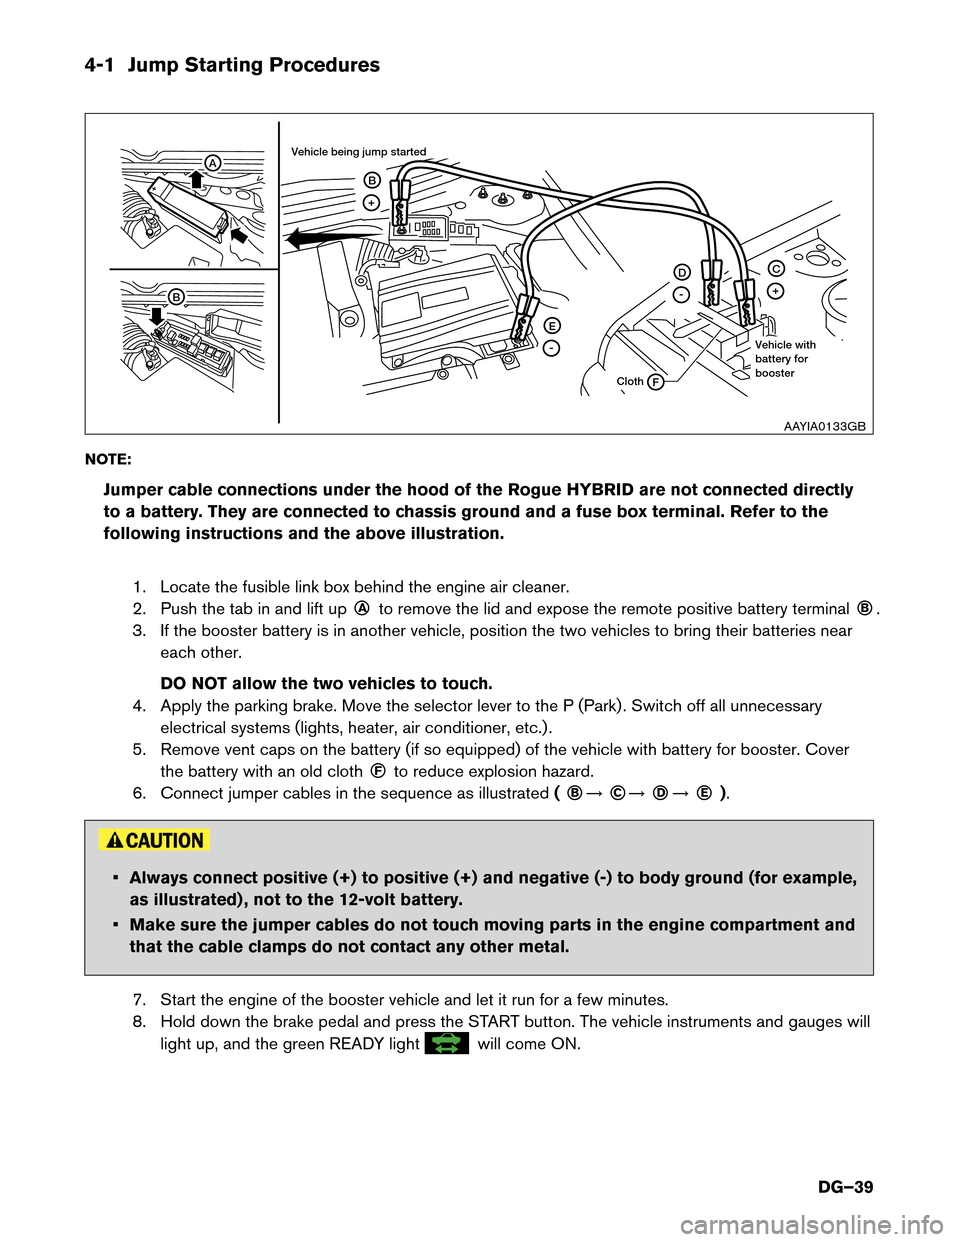
Jumper cable connections under the hood of the Rogue HYBRID are not connected directly
to a battery. They are connected to chassis ground and a fuse box terminal. Refer to the
following instructions and the above illustration.
1. Locate the fusible link box behind the engine air cleaner.
2. Push the tab in and lift up ○A
to remove the lid and expose the remote positive battery terminal
○B
.
3. If the booster battery is in another vehicle, position the two vehicles to bring their batteries near each other.
DO NOT allow the two vehicles to touch.
4. Apply the parking brake. Move the selector lever to the P (Park) . Switch off all unnecessary electrical systems (lights, heater, air conditioner, etc.) .
5. Remove vent caps on the battery (if so equipped) of the vehicle with battery for booster. Cover the battery with an old cloth ○F
to reduce explosion hazard.
6. Connect jumper cables in the sequence as illustrated (
○B
�
○C
�
○D
�
○E
). • Always connect positive (+) to positive (+) and negative (-) to body ground (for example,
as
illustrated) , not to the 12-volt battery.
• Make sure the jumper cables do not touch moving parts in the engine compartment and that the cable clamps do not contact any other metal.
7. Start the engine of the booster vehicle and let it run for a few minutes.
8. Hold down the brake pedal and press the START button. The vehicle instruments and gauges will light up, and the green READY light will come ON.A
B
+
E
F
-
D
-
C
+
B
Cloth
Vehicle being jump started
Vehicle with
battery for
boosterAAYIA0133GB
DG–39