2017 NISSAN QUEST heater
[x] Cancel search: heaterPage 2 of 32
*See your Owner’s Manual for information.
1
3
4
2
20
2122
23
5
8
6
13
24
15
7
16
17
12
25
11
24
14
9
10
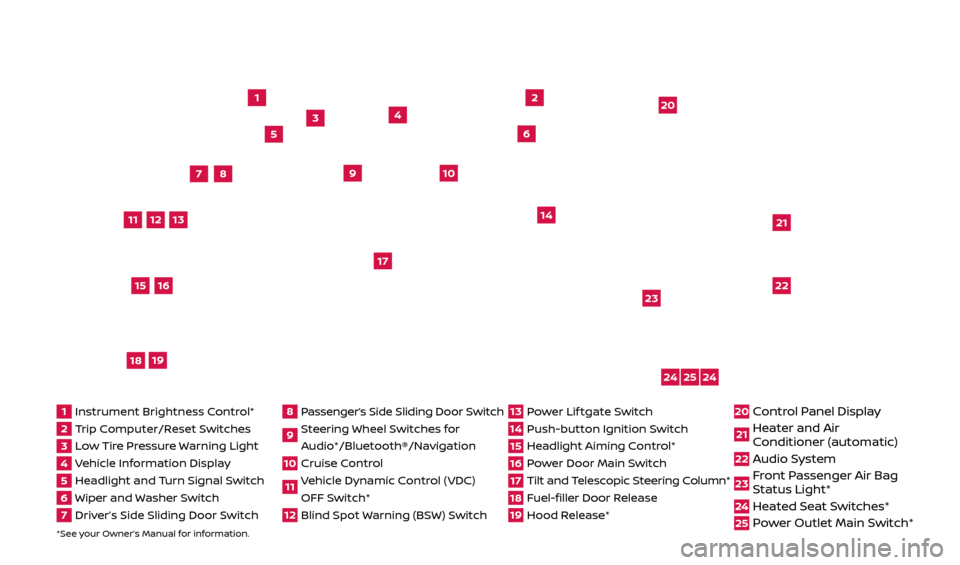
1 Instrument Brightness C ontrol*2 Trip Computer/Reset Switches3 Low Tire Pressure Warning Light4 Vehicle Information Display5 Headlight and Turn Signal Switch6 Wiper and Washer Switch7 Driver’s Side Sliding Door Switch
8 Passenger’s Side Sliding Door Switch9 Steering Wheel Switches for
Audio*/Bluetooth®/Navigation10 Cruise Control11 Vehicle Dynamic Control (VDC) OFF Switch* 12 Blind Spot Warning (BSW) Switch
13 Power Lif tgate Switch14 Push-button Ignition Switch15 Headlight Aiming Control*16 Power Door Main Switch17 Tilt and Telescopic Steering Column*18 Fuel-filler Door Release19 Hood Release*
20 Control Panel Display21 Heater and Air
C onditioner (automatic)22 Audio System
23 Front Passenger Air Bag
Status Light*24 Heated Seat Switches*25 Power Outlet Main Switch*
18
19
2512696_17a_Quest_US_pQRG_092016.indd 49/20/16 4:46 PM
Page 3 of 32
NEW SYSTEM FEATURES
Around View® Monitor with Moving Object Detection (MOD) (if so equipped) ........2
Blind Spot Warning (BSW) (if so equipped)
.............................................4
A
dvanced Climate Control System (if so equipped) ...................................
4
ESSENTIAL INFORMATION
Tire Pressure Monitoring System (TPMS) with Easy-Fill Tire Alert .....................5
L oose Fuel Cap
........................................................................\
.6
Fuel-filler Door
........................................................................\
.6
Clock Set/A
djustment .................................................................
6
FIRST DRIVE FEATURES
Nissan Intelligent Key® System ........................................................8
P ower Sliding Door Release (if so equipped) ..........................................
9
Power Lif tgate Release (if so equipped)
..............................................
10
F
ront Power Seat Adjustments (if so equipped) ......................................
10
2nd Row Seat Adjustments .............................................................11
F
olding the 2nd Row Seats..............................................................11
Entering/Exiting the 3rd Row Seats ....................................................11
3rd Row Seat Adjustments ............................................................12
3rd Row Power Folding Seats (if so equipped).........................................12
A
utomatic Drive Positioner (if so equipped) ..........................................
12
Outside Mirr
or Control Switch ........................................................
13
S
tarting/Stopping the Engine ........................................................
13
He
adlight Control Switch .............................................................
14
Wiper and Washer Switch
............................................................
15
He
ater and Air Conditioner (automatic) (if so equipped) .............................
16
FM/AM/SiriusXM® Satel
lite Radio with CD/DVD Player (if so equipped)
..............18
USB (Universal Serial Bus) Connection Port/iPod® Interface (if so equipped)
........
19
Cruise Control . . . . . . . . . . . . . . . . . . . . . . . . . . . . . . . . . . . .\
. . . . . . . . . . . . . . . . . . . . . . . . . . . . . . . . . . . . 19 Power Outlets
........................................................................\
.20
SYSTEM GUIDE
Trip Computer .......................................................................\
.21
Bluetooth® Hands-fr ee Phone System (if so equipped) ..............................
21
S
ystem Operating Tips
.............................................................21
Bluetooth® S
ystem without Navigation (if so equipped) .............................
22
Bluetooth® S
ystem with Navigation (if so equipped)
.................................23
Bluetooth® Streaming Audio with Navigation (if so equipped) .......................25
Na
vigation System (if so equipped)
...................................................26
Nissan Mobile Enter
tainment System (MES) (if so equipped) ........................
27
HomeLink® Univ
ersal Transceiver (if so equipped)
...................................28
Additional information about your vehicle is also available in your Owner’s Manual,
Navigation System Owner’s Manual and at www.NissanUSA.com.
TABLE OF CONTENTS
Please see your Owner’s Manual for important safety information and system operation limitations.
• A c ellular telephone should not be used for any purpose while driving so full attention may be
given to vehicle operation.
•
A
lways wear your seat belt.
•
Supplemental air bags do not r
eplace proper seat belt usage.
•
Childr
en 12 and under should always ride in the rear seat properly secured in child restraints or
seat belts according to their age and weight.
•
Do not drink and driv
e.
F
or more information, refer to the “Safety — Seats, seat belts and supplemental restraint
system (section 1)”, the “Monitor, heater, air conditioner, audio, phone and voice recognition
systems (section 4)” and the “Starting and driving (section 5)” of your Owner’s Manual.
2512696_17a_Quest_US_pQRG_092016.indd 59/20/16 4:46 PM
Page 5 of 32
3
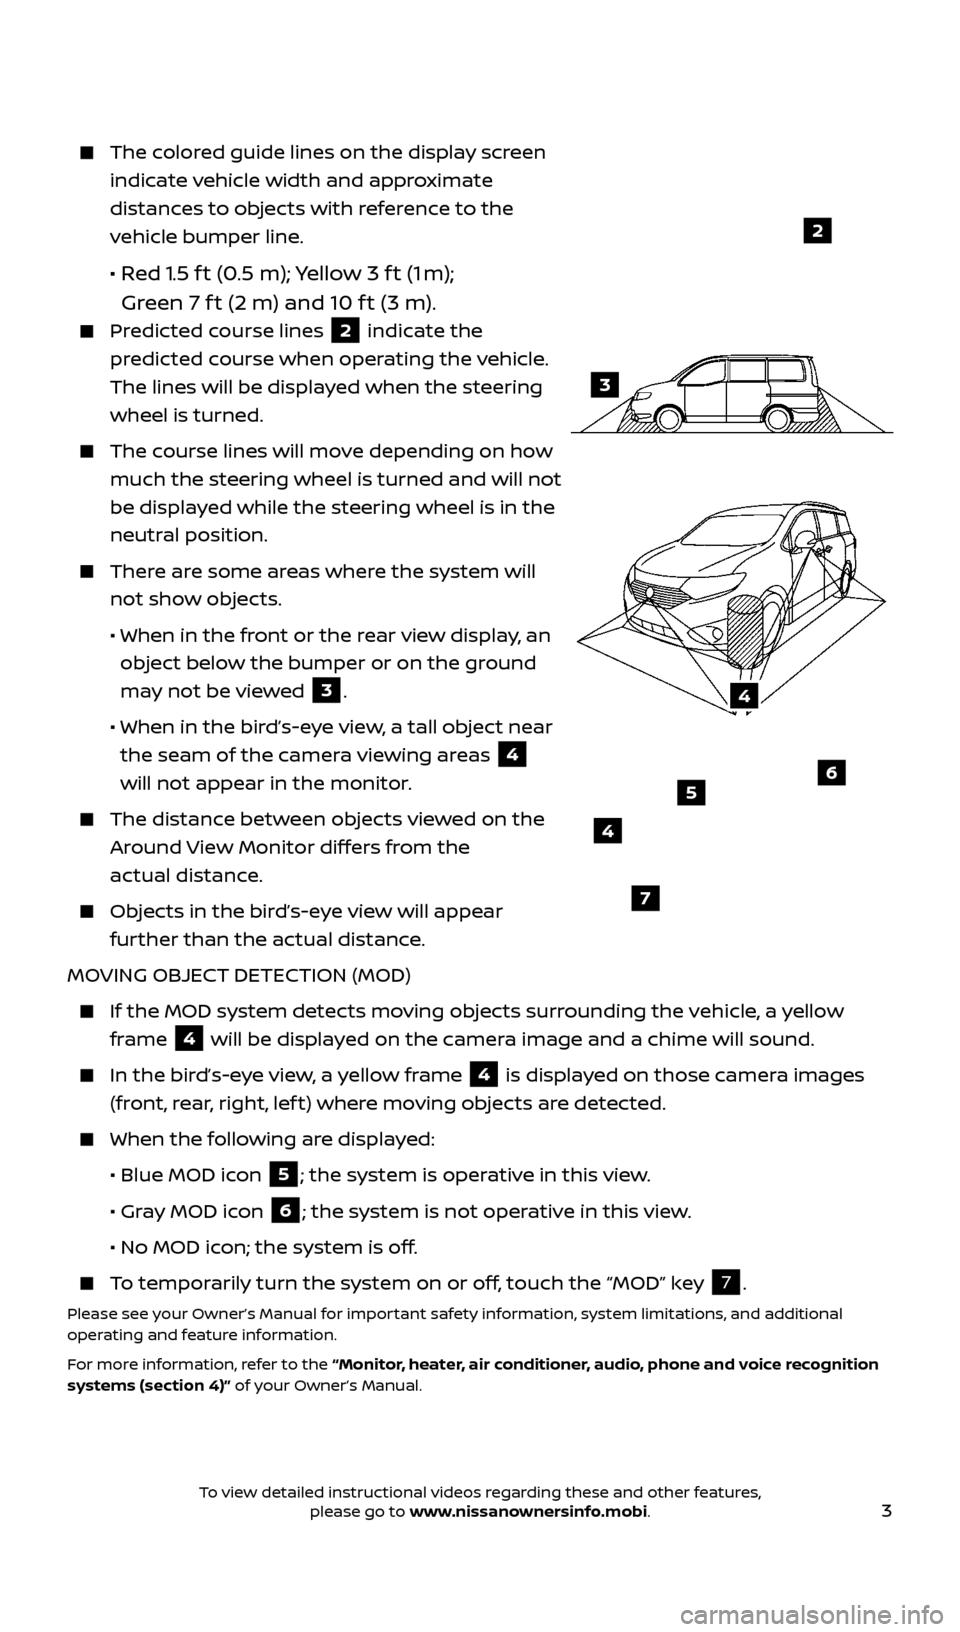
The colored guide lines on the display screen indicate vehicle width and approximate
distances to objects with reference to the
vehicle bumper line.
• Red 1.5 f t (0.5 m); Yellow 3 f t (1 m);
Green 7 f t (2 m) and 10 f t (3 m).
Predicted course lines 2 indicate the
predicted course when operating the vehicle.
The lines will be displayed when the steering
wheel is turned.
The course lines will move depending on how much the steering wheel is turned and will not
be displayed while the steering wheel is in the
neutral position.
There are some areas where the system will not show objects.
• When in the fr
ont or the rear view display, an
object below the bumper or on the ground
may not be viewed
3.
• When in the bir
d’s-eye view, a tall object near
the seam of the camera viewing areas
4
will not appear in the monitor.
The distanc e between objects viewed on the
Around View Monitor differs from the
actual distance.
Objects in the bird’s-eye view will appear further than the actual distance.
MOVING OBJECT DETECTION (MOD)
If the MOD system detec ts moving objects surrounding the vehicle, a yellow
frame
4 will be displayed on the camera image and a chime will sound.
In the bir
d’s-eye view, a yellow frame 4 is displayed on those camera images
(front, rear, right, lef t) where moving objects are detected.
When the f ollowing are displayed:
•
Blue MOD ic
on
5; the system is operative in this view.
•
Gr
ay MOD icon
6; the system is not operative in this view.
•
No MOD ic
on; the system is off.
To temporarily turn the system on or off, touch the “MOD” key 7.
Please see your Owner’s Manual for important safety information, system limitations, and additional
operating and feature information.
For more information, refer to the “Monitor, heater, air conditioner, audio, phone and voice recognition
systems (section 4)” of your Owner’s Manual.
4
3
2
4
7
56
2512696_17a_Quest_US_pQRG_092016.indd 39/20/16 4:46 PM
To view detailed instructional videos regarding these and other features, please go to www.nissanownersinfo.mobi.
Page 6 of 32

4
NEW SYSTEM FEATURES
BLIND SPOT WARNING (BSW) (if so equipped)
The BSW system helps to alert the driver when another vehicle moves into the
vehicle’s detection zone.
An indicator light located on the outside mirrors
1 will illuminate if the radar sensors
detect a vehicle in the detection zone.
Push the BS W switch 2 to temporarily turn
the system off. When the system is off, the
indicator light
3 on the switch is off.
The indic ator light 3 on the switch will
illuminate af ter the ignition switch is
switched to the ON position and the BSW
system is enabled.
Please see your Owner’s Manual for important safety information, system limitations, and additional
operating and feature information.
For more information, refer to the “Starting and driving (section 5)” of your Owner’s Manual.
1
2
ADVANCED CLIMATE CONTROL SYSTEM (if so equipped)
The advanced climate control system keeps the air inside the vehicle clean using ion control and automatic air intake control with an exhaust gas detecting sensor.
When ion c ontrol is activated, this unit generates highly concentrated
Plasmacluster® ions into the air blown from the vents, reducing the odor
absorbed inside the vehicle.
When the automatic air intak e control is activated, the exhaust gas detection
sensor can detect odors, such as pulp or chemicals, and exhaust gas,
such as gasoline or diesel. When such odors or gases are detected, the
system automatically changes from the outside air circulation mode to the
recirculation mode.
Please see your Owner’s Manual for important safety information, system limitations, and additional
operating and feature information.
For more information, refer to the “Monitor, heater, air conditioner, audio, phone and voice recognition
systems (section 4)” of your Owner’s Manual.
3
2512696_17a_Quest_US_pQRG_092016.indd 49/20/16 4:46 PM
To view detailed instructional videos regarding these and other features, please go to www.nissanownersinfo.mobi.
Page 9 of 32

7
FM/AM/SAT RADIO WITH COMPACT DISC (CD) PLAYER (Type A) (if so equipped)
1.
R
otate the TUNE SCROLL knob
4 until
“Clock Adjust” is displayed and press the
ENTER/SETTING button.
2.
Turn the TUNE SCROLL knob
4 to adjust
the hour and then press the ENTER/SETTING
button
3.
3.
Turn the TUNE SCROLL knob
4 to adjust the
minute and then press the ENTER/SETTING
button
3.
FM/AM/SAT RADIO WITH COMPACT DISC (CD) PLAYER (Type B) (if so equipped)
To adjust the time and the appearance of the clock on the display:
1.
Press the SETTING button on the
control panel.
2.
Touch the “Others” key.
3.
Touch the “Clock” key.
The following settings can be adjusted:
•
On-screen Clock: The clock in the upper
right corner of the display can be turned ON or off.
•
Clock Format (24h): The clock can be set to 12 hours or 24 hours.
•
Offset (hour): The time can be adjusted by increasing or decreasing per hour.
•
Offset (min): The time can be adjusted by increasing or decreasing per minute.
•
Daylight Savings Time: The application of Daylight Savings Time can be turned
ON or off.
•
Time Zone: Adjust the time zone. Choose a time zone from the available list.
Touch the “ BACK” key to return to the previous screen.
Please see your Owner’s Manual for important safety information, system limitations, and additional
operating and feature information.
For more information, refer to the “Monitor, heater, air conditioner, audio, phone and voice recognition
systems (section 4)” of your Owner’s Manual.
4
3
2512696_17a_Quest_US_pQRG_092016.indd 79/20/16 4:47 PM
To view detailed instructional videos regarding these and other features, please go to www.nissanownersinfo.mobi.
Page 18 of 32
16
HEATER AND AIR CONDITIONER (automatic) (if so equipped)
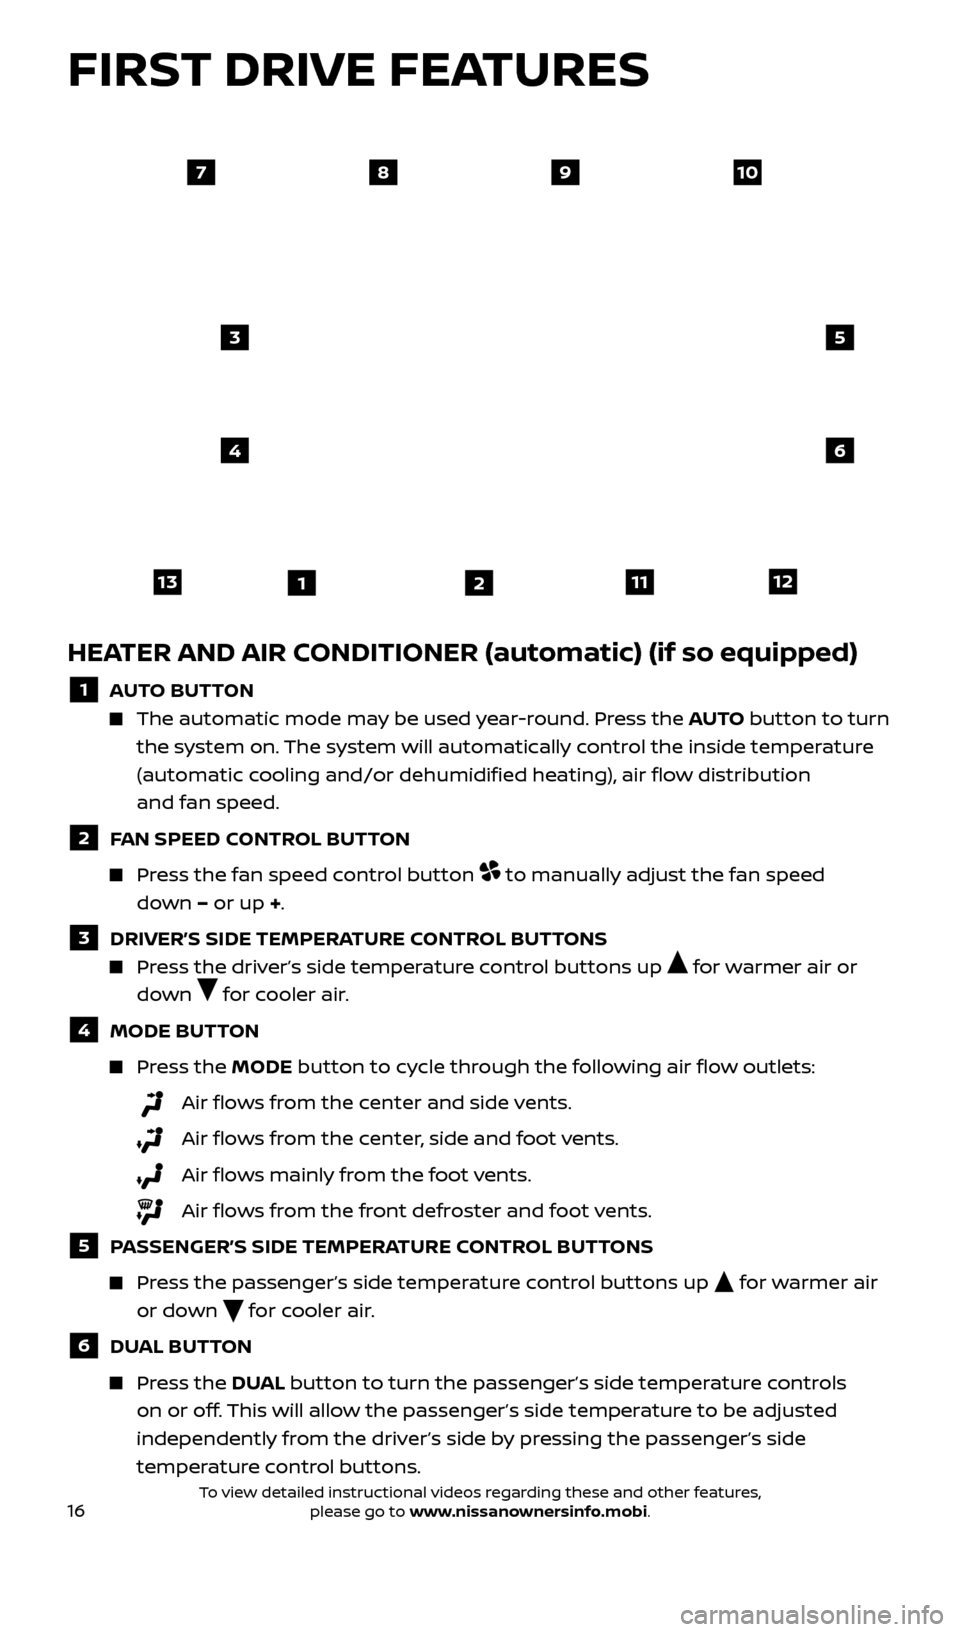
1 AUTO BUTTON
The automatic mode may be used year-round. Press the AUTO button to turn
the system on. The system will automatically control the inside temperature
(automatic cooling and/or dehumidified heating), air flow distribution
and fan speed.
2 FAN SPEED CONTROL BUTTON
Press the fan speed control button to manually adjust the fan speed
down – or up +.
3 DRIVER’S SIDE TEMPERATURE CONTROL BUTTONS
Press the driver’s side temperature control buttons up for warmer air or
down
for cooler air.
4 MODE BUT TON
Press the MODE button to cycle through the following air flow outlets:
Air flows from the center and side vents.
Air flo ws from the center, side and foot vents.
Air flo ws mainly from the foot vents.
Air flo ws from the front defroster and foot vents.
5 PASSENGER’S SIDE TEMPERATURE CONTROL BUTTONS
Press the passenger’s side temperature control buttons up for warmer air
or down
for cooler air.
6 DUAL BUTTON
Press the DU AL button to turn the passenger’s side temperature controls
on or off. This will allow the passenger’s side temperature to be adjusted
independently from the driver’s side by pressing the passenger’s side
temperature control buttons.
97810
3
4
5
6
11311122
FIRST DRIVE FEATURES
2512696_17a_Quest_US_pQRG_092016.indd 169/20/16 4:47 PM
To view detailed instructional videos regarding these and other features, please go to www.nissanownersinfo.mobi.
Page 19 of 32
17
7 AIR RECIRCULATION BUTTON
Press the air recirculation button to recirculate interior air inside the
vehicle. The indicator light on the button will illuminate. This system is used to
avoid certain outside odors and to help adjust the inside vehicle temperature
more effectively.
The air recirculation mode cannot be activated when the climate control system is in the front defroster mode
FRONT or in the front defroster and
foot vent mode
.8 AUTO-RECIRCULATION BUTTON
Press the auto-recirculation button AUTO to switch to the automatic air
intake control mode. The indicator light on the button will illuminate.
In this mode, the sensor detects certain odors and gases to
automatically switch between the air recirculation mode and the outside air
circulation mode.
The auto-r ecirculation mode cannot be activated when the air flow control
is in the front defroster mode
FRONT or in the front defroster and foot
outlet mode
.9 DEFROSTING/DEFOGGING FRONT AND SIDE WINDOWS
Press the front defroster button FRONT to turn the system on.
The A/C automatically turns on when the front defroster mode is selected.
This feature removes humidity from the air.
Press the temperature control buttons or to set the desired temperature.
To defrost the front and side windows quickly, set the temperature controls
and fan speed controls to their maximum settings.
10 DEFROSTING REAR WINDOW AND OUTSIDE MIRRORS (if so equipped)
Push the r ear window defroster switch REAR to turn the system on or off.
This function automatically turns off af ter approximately 15 minutes.
11 A/C BUTTON
Press the A/C button to turn the air conditioner system on or off. This system
helps cool and dehumidify the air inside the cabin and defog the windows.
12 REAR BUT TON
To control the rear automatic air conditioning system with the front air
conditioner control panel, press the REAR button.
When the r ear automatic air conditioning
system is on, the indicator light on the REAR
button will illuminate and the front display
will switch to the rear air conditioner screen.
To adjust the front air conditioning system, press the REAR button again or wait 10 seconds.
The rear passenger controls are unavailable when REAR is shown on
the front display.
13 ON•OFF BUT TON
Press the ON•OFF button to turn the climate control system on or off.Please see your Owner’s Manual for important safety information, system limitations, and additional
operating and feature information.
For more information, refer to the “Instruments and controls (section 2)” and the“Monitor, heater, air
conditioner, audio, phone and voice recognition systems (section 4)” of your Owner’s Manual.
2512696_17a_Quest_US_pQRG_092016.indd 179/20/16 4:47 PM
To view detailed instructional videos regarding these and other features, please go to www.nissanownersinfo.mobi.
Page 20 of 32
18
65
3
12
FM/AM/SiriusXM® SATELLITE RADIO WITH CD/DVD PLAYER
(if so equipped)
1 ON•OFF BUTTON/VOL (volume) CONTROL KNOB
Press the ON•OFF button to turn the system on or off.
Turn the VO L (volume) control knob right or lef t to increase or decrease
the volume.
2 AUDIO BUTTON/TUNE/FOLDER KNOB
Press the AUDIO button to go to the audio settings screen.
To manually tune the radio, turn the TUNE/FOLDER knob lef t or right.
3 SEEK/CAT AND TRACK BUTTONS
To scan quickly and stop at the previous or next broadcast station, press the
SEEK/CAT button or the TRACK button.
For satellite radio, press the SEEK/CAT button or the TRACK button to
switch to the first channel of the previous or next category.
To change tracks on a CD, press the SEEK/CAT button or the
TRACK
button.
To rewind or fast forward a track on a CD, press and hold the SEEK/CAT
button or the TRACK
button.
4 STATION SELECT BUTTONS
Twelve stations can be set for the FM band, six for the AM band and 18 for satellite radio.
To store a station in a preset, you must first select a radio band by pressing the FM•AM button
5 or XM button 6 then tune to the desired FM, AM or
satellite radio station.
Next press and hold the desired station select button (1-6) until the sound is briefly muted. The channel indicator will then display, and the sound will
resume. Programing is now complete.
To retrieve a previously set station, select the radio band where the preset was stored then press the corresponding station select button (1-6).
Please see your Owner’s Manual for important safety information, system limitations, and additional
operating and feature information.
For more information, refer to the “Monitor, heater, air conditioner, audio, phone and voice recognition
systems (section 4)” of your Owner’s Manual.
4
FIRST DRIVE FEATURES
2512696_17a_Quest_US_pQRG_092016.indd 189/20/16 4:47 PM
To view detailed instructional videos regarding these and other features, please go to www.nissanownersinfo.mobi.