2017 NISSAN QUEST ECU
[x] Cancel search: ECUPage 171 of 520
3-20Pre-driving checks and adjustments
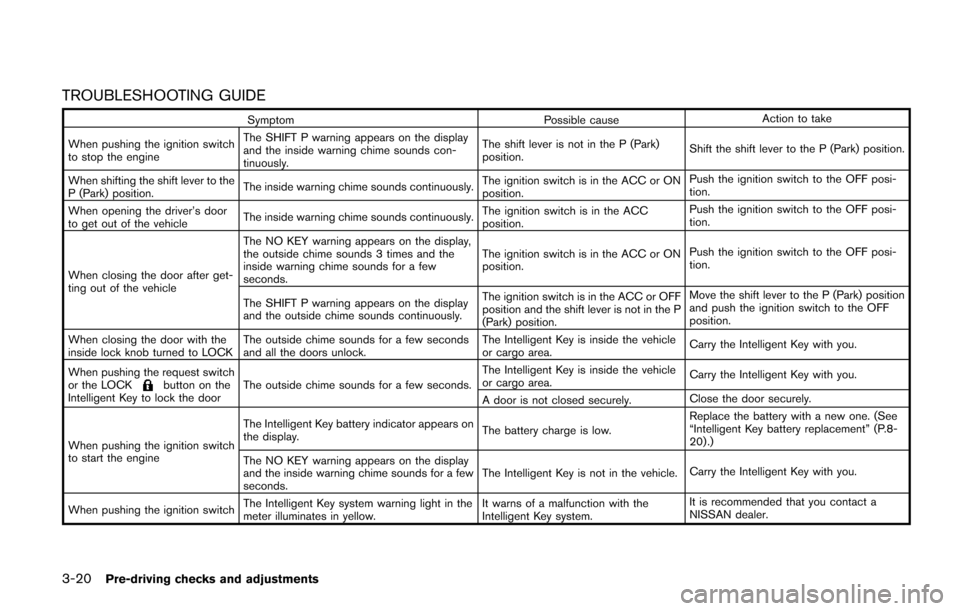
TROUBLESHOOTING GUIDE
SymptomPossible causeAction to take
When pushing the ignition switch
to stop the engine The SHIFT P warning appears on the display
and the inside warning chime sounds con-
tinuously.
The shift lever is not in the P (Park)
position.
Shift the shift lever to the P (Park) position.
When shifting the shift lever to the
P (Park) position. The inside warning chime sounds continuously.
The ignition switch is in the ACC or ON
position.Push the ignition switch to the OFF posi-
tion.
When opening the driver’s door
to get out of the vehicle The inside warning chime sounds continuously. The ignition switch is in the ACC
position.Push the ignition switch to the OFF posi-
tion.
When closing the door after get-
ting out of the vehicle The NO KEY warning appears on the display,
the outside chime sounds 3 times and the
inside warning chime sounds for a few
seconds.
The ignition switch is in the ACC or ON
position.
Push the ignition switch to the OFF posi-
tion.
The SHIFT P warning appears on the display
and the outside chime sounds continuously. The ignition switch is in the ACC or OFF
position and the shift lever is not in the P
(Park) position.Move the shift lever to the P (Park) position
and push the ignition switch to the OFF
position.
When closing the door with the
inside lock knob turned to LOCK The outside chime sounds for a few seconds
and all the doors unlock. The Intelligent Key is inside the vehicle
or cargo area.
Carry the Intelligent Key with you.
When pushing the request switch
or the LOCK
button on the
Intelligent Key to lock the door The outside chime sounds for a few seconds. The Intelligent Key is inside the vehicle
or cargo area.
Carry the Intelligent Key with you.
A door is not closed securely. Close the door securely.
When pushing the ignition switch
to start the engine The Intelligent Key battery indicator appears on
the display.
The battery charge is low.Replace the battery with a new one. (See
“Intelligent Key battery replacement” (P.8-
20) .)
The NO KEY warning appears on the display
and the inside warning chime sounds for a few
seconds. The Intelligent Key is not in the vehicle.
Carry the Intelligent Key with you.
When pushing the ignition switch The Intelligent Key system warning light in the
meter illuminates in yellow. It warns of a malfunction with the
Intelligent Key system.It is recommended that you contact a
NISSAN dealer.
Page 172 of 520
WARNING
The Intelligent Key transmits radio
waves when the buttons are pushed.
The FAA advises that radio waves may
affect aircraft navigation and commu-
nication systems. Do not operate the
Intelligent Key while on an airplane.
Make sure the buttons are not operated
unintentionally when the unit is stored
for a flight.
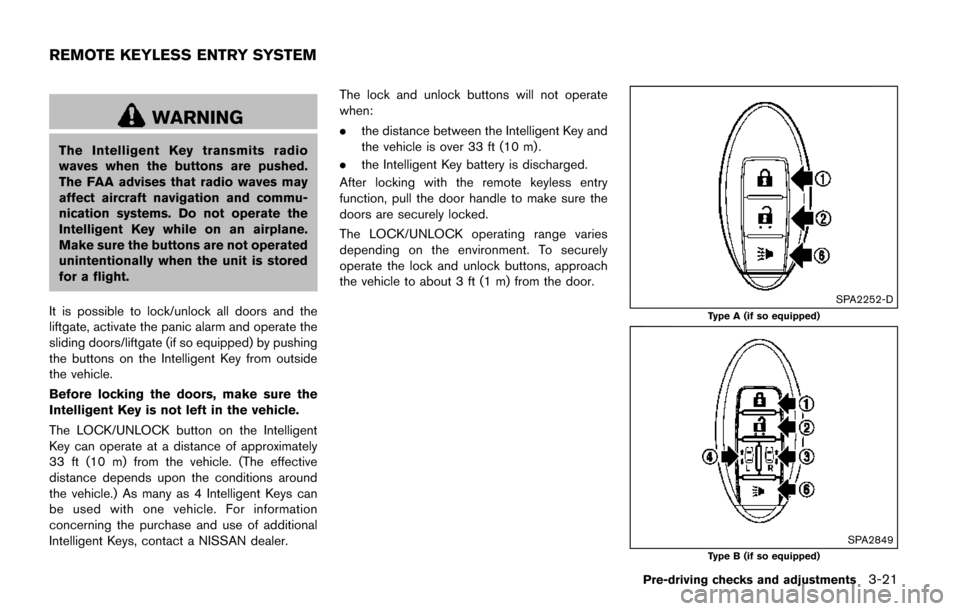
It is possible to lock/unlock all doors and the
liftgate, activate the panic alarm and operate the
sliding doors/liftgate (if so equipped) by pushing
the buttons on the Intelligent Key from outside
the vehicle.
Before locking the doors, make sure the
Intelligent Key is not left in the vehicle.
The LOCK/UNLOCK button on the Intelligent
Key can operate at a distance of approximately
33 ft (10 m) from the vehicle. (The effective
distance depends upon the conditions around
the vehicle.) As many as 4 Intelligent Keys can
be used with one vehicle. For information
concerning the purchase and use of additional
Intelligent Keys, contact a NISSAN dealer. The lock and unlock buttons will not operate
when:
.
the distance between the Intelligent Key and
the vehicle is over 33 ft (10 m) .
. the Intelligent Key battery is discharged.
After locking with the remote keyless entry
function, pull the door handle to make sure the
doors are securely locked.
The LOCK/UNLOCK operating range varies
depending on the environment. To securely
operate the lock and unlock buttons, approach
the vehicle to about 3 ft (1 m) from the door.
SPA2252-D
Type A (if so equipped)
SPA2849Type B (if so equipped)
Pre-driving checks and adjustments3-21
REMOTE KEYLESS ENTRY SYSTEM
Page 176 of 520
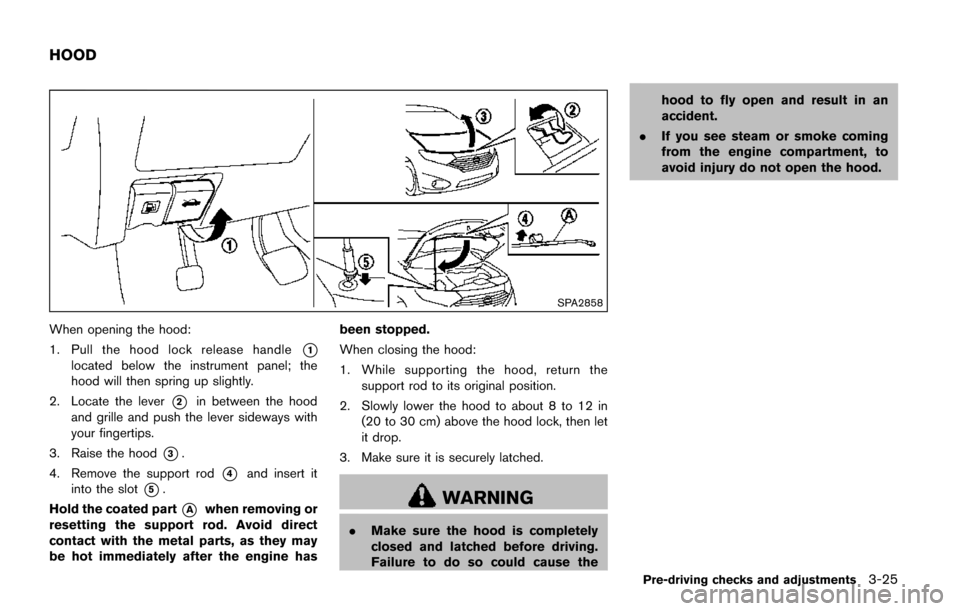
SPA2858
When opening the hood:
1. Pull the hood lock release handle
*1
located below the instrument panel; the
hood will then spring up slightly.
2. Locate the lever
*2in between the hood
and grille and push the lever sideways with
your fingertips.
3. Raise the hood
*3.
4. Remove the support rod
*4and insert it
into the slot
*5.
Hold the coated part
*Awhen removing or
resetting the support rod. Avoid direct
contact with the metal parts, as they may
be hot immediately after the engine has been stopped.
When closing the hood:
1. While supporting the hood, return the
support rod to its original position.
2. Slowly lower the hood to about 8 to 12 in (20 to 30 cm) above the hood lock, then let
it drop.
3. Make sure it is securely latched.WARNING
. Make sure the hood is completely
closed and latched before driving.
Failure to do so could cause the hood to fly open and result in an
accident.
. If you see steam or smoke coming
from the engine compartment, to
avoid injury do not open the hood.
Pre-driving checks and adjustments3-25
HOOD
Page 177 of 520
3-26Pre-driving checks and adjustments
WARNING
.Always be sure the liftgate has been
closed securely to prevent it from
opening while driving.
. Do not drive with the liftgate open.
This could allow dangerous exhaust
gases to be drawn into the vehicle.
See “Exhaust gas (carbon monox-
ide)” (P.5-2) of this manual.
. Do not leave children unattended
inside the vehicle. They could un-
knowingly activate switches or con-
trols. Unattended children could
become involved in serious acci-
dents.
. Always be sure that hands and feet
are clear of the gate frame to avoid
injury while closing the liftgate.
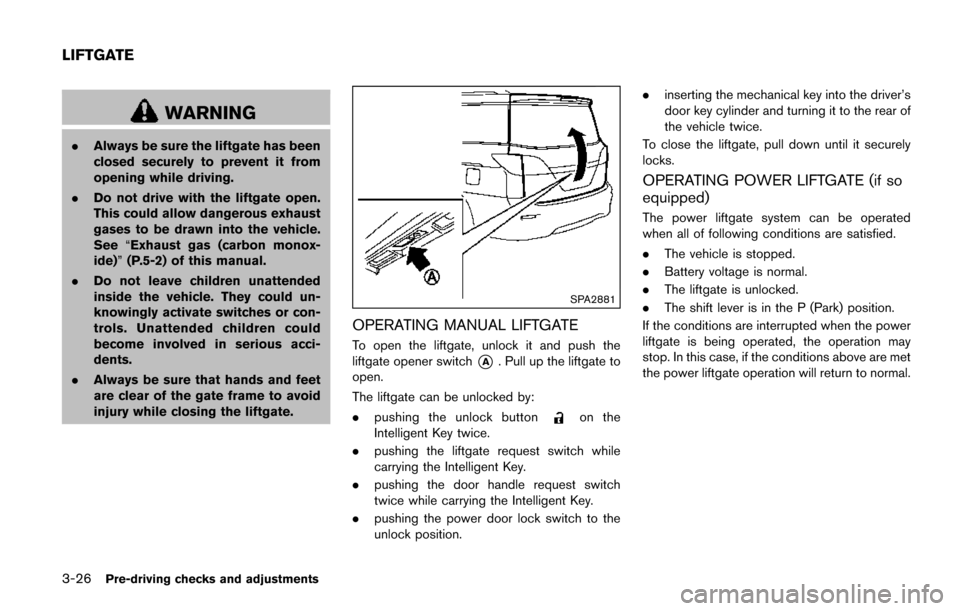
SPA2881
OPERATING MANUAL LIFTGATE
To open the liftgate, unlock it and push the
liftgate opener switch
*A. Pull up the liftgate to
open.
The liftgate can be unlocked by:
. pushing the unlock button
on the
Intelligent Key twice.
. pushing the liftgate request switch while
carrying the Intelligent Key.
. pushing the door handle request switch
twice while carrying the Intelligent Key.
. pushing the power door lock switch to the
unlock position. .
inserting the mechanical key into the driver’s
door key cylinder and turning it to the rear of
the vehicle twice.
To close the liftgate, pull down until it securely
locks.
OPERATING POWER LIFTGATE (if so
equipped)
The power liftgate system can be operated
when all of following conditions are satisfied.
. The vehicle is stopped.
. Battery voltage is normal.
. The liftgate is unlocked.
. The shift lever is in the P (Park) position.
If the conditions are interrupted when the power
liftgate is being operated, the operation may
stop. In this case, if the conditions above are met
the power liftgate operation will return to normal.
LIFTGATE
Page 228 of 520
SAA1898
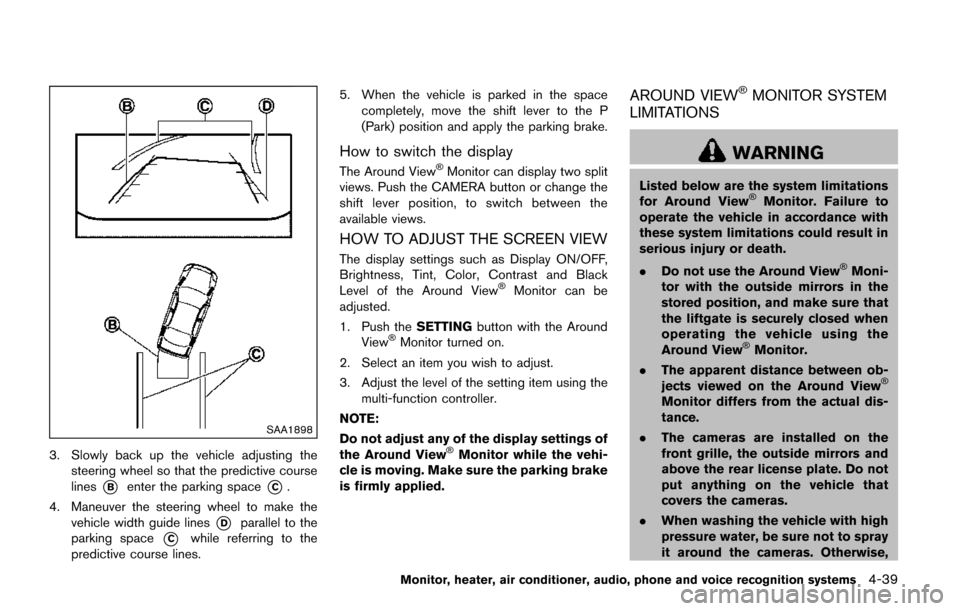
3. Slowly back up the vehicle adjusting thesteering wheel so that the predictive course
lines
*Benter the parking space*C.
4. Maneuver the steering wheel to make the vehicle width guide lines
*Dparallel to the
parking space
*Cwhile referring to the
predictive course lines. 5. When the vehicle is parked in the space
completely, move the shift lever to the P
(Park) position and apply the parking brake.
How to switch the display
The Around View�ŠMonitor can display two split
views. Push the CAMERA button or change the
shift lever position, to switch between the
available views.
HOW TO ADJUST THE SCREEN VIEW
The display settings such as Display ON/OFF,
Brightness, Tint, Color, Contrast and Black
Level of the Around View
�ŠMonitor can be
adjusted.
1. Push the SETTINGbutton with the Around
View
�ŠMonitor turned on.
2. Select an item you wish to adjust.
3. Adjust the level of the setting item using the multi-function controller.
NOTE:
Do not adjust any of the display settings of
the Around View
�ŠMonitor while the vehi-
cle is moving. Make sure the parking brake
is firmly applied.
AROUND VIEW�ŠMONITOR SYSTEM
LIMITATIONS
WARNING
Listed below are the system limitations
for Around View�ŠMonitor. Failure to
operate the vehicle in accordance with
these system limitations could result in
serious injury or death.
. Do not use the Around View
�ŠMoni-
tor with the outside mirrors in the
stored position, and make sure that
the liftgate is securely closed when
operating the vehicle using the
Around View
�ŠMonitor.
. The apparent distance between ob-
jects viewed on the Around View
�Š
Monitor differs from the actual dis-
tance.
. The cameras are installed on the
front grille, the outside mirrors and
above the rear license plate. Do not
put anything on the vehicle that
covers the cameras.
. When washing the vehicle with high
pressure water, be sure not to spray
it around the cameras. Otherwise,
Monitor, heater, air conditioner, audio, phone and voice recognition systems4-39
Page 304 of 520
SAA0978
Remote controller
SAA3611Headphones
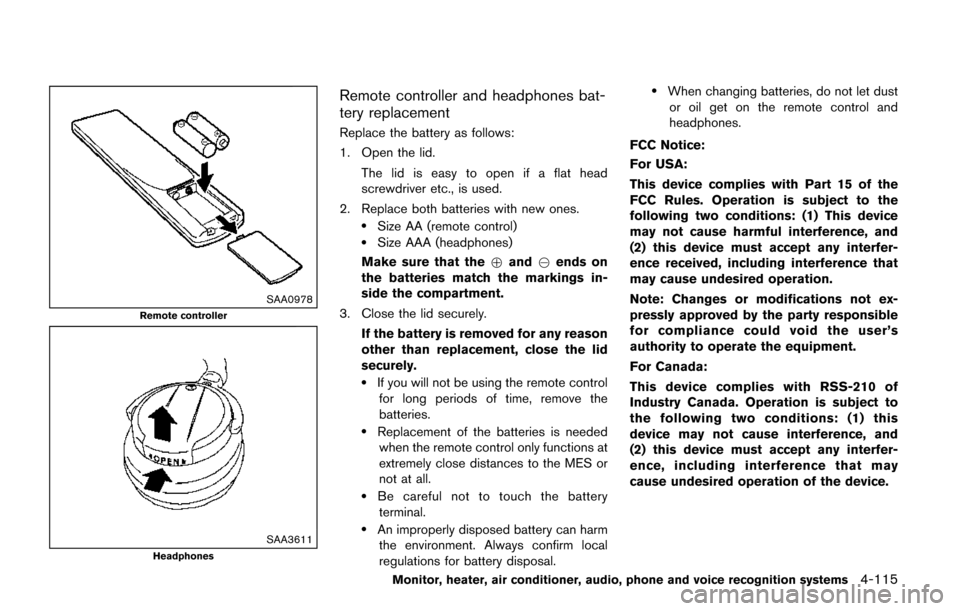
Remote controller and headphones bat-
tery replacement
Replace the battery as follows:
1. Open the lid.The lid is easy to open if a flat head
screwdriver etc., is used.
2. Replace both batteries with new ones.
.Size AA (remote control).Size AAA (headphones)
Make sure that the +and 7ends on
the batteries match the markings in-
side the compartment.
3. Close the lid securely.
If the battery is removed for any reason
other than replacement, close the lid
securely.
.If you will not be using the remote controlfor long periods of time, remove the
batteries.
.Replacement of the batteries is neededwhen the remote control only functions at
extremely close distances to the MES or
not at all.
.Be careful not to touch the batteryterminal.
.An improperly disposed battery can harm the environment. Always confirm local
regulations for battery disposal.
.When changing batteries, do not let dustor oil get on the remote control and
headphones.
FCC Notice:
For USA:
This device complies with Part 15 of the
FCC Rules. Operation is subject to the
following two conditions: (1) This device
may not cause harmful interference, and
(2) this device must accept any interfer-
ence received, including interference that
may cause undesired operation.
Note: Changes or modifications not ex-
pressly approved by the party responsible
for compliance could void the user’s
authority to operate the equipment.
For Canada:
This device complies with RSS-210 of
Industry Canada. Operation is subject to
the following two conditions: (1) this
device may not cause interference, and
(2) this device must accept any interfer-
ence, including interference that may
cause undesired operation of the device.
Monitor, heater, air conditioner, audio, phone and voice recognition systems4-115
Page 310 of 520
controller and tilt the joystick to the right or left.
Push the BACK button on the remote controller
to apply the settings and return to the previous
display.
To return the adjustment levels to the default
value, select “Execute” next to “Initialization”
using the joystick on the remote controller and
push the ENTER
button. The “Execute” key
is deactivated when the picture mode settings
are already in the default value.
Color System:
To choose the color system, select from
“NTSC”, “PAL”, “PAL-60”, “PAL-M”, “PAL-N” or
“AUTO” using the joystick on the remote
controller and tilt the joystick to the right or left.
3D Y/C filter:
Set to ON/OFF using the joystick on the remote
controller. When turned on, small characters
and an outline of the shapes will be displayed
more clearly than when turned off.
CARE AND MAINTENANCE
Use a lightly dampened, lint free cloth to clean
the surfaces of your Mobile Entertainment
System (DVD player face, screen, remote
controller, etc.) .
CAUTION
. Do not use any solvents or cleaning
solutions when cleaning the video
system.
. Do not use excessive force on the
monitor screen.
. Avoid touching or scratching the
monitor screen as it may become
dirty or damaged.
. Do not attempt to operate the
system in extreme temperature con-
ditions [below �í48F( �í208 C) and
above 1588F (708C)].
. Do not attempt to operate the
system in extreme humidity condi-
tions (less than 10% or more than
75%) . When installing a car phone or a CB radio in
your vehicle, be sure to observe the following
cautions, otherwise the new equipment may
adversely affect the electronic control modules
and electronic control system harness.
WARNING
.
A cellular phone should not be used
for any purpose while driving so full
attention may be given to vehicle
operation. Some jurisdictions prohi-
bit the use of cellular phones while
driving.
. If you must make a call while your
vehicle is in motion, the hands-free
cellular phone operational mode (if
so equipped) is highly recom-
mended. Exercise extreme caution
at all times so full attention may be
given to vehicle operation.
. If you are unable to devote full
attention to vehicle operation while
talking on the phone, pull off the
road to a safe location and stop
your vehicle.
Monitor, heater, air conditioner, audio, phone and voice recognition systems4-121
CAR PHONE OR CB RADIO
Page 314 of 520
SAA2520
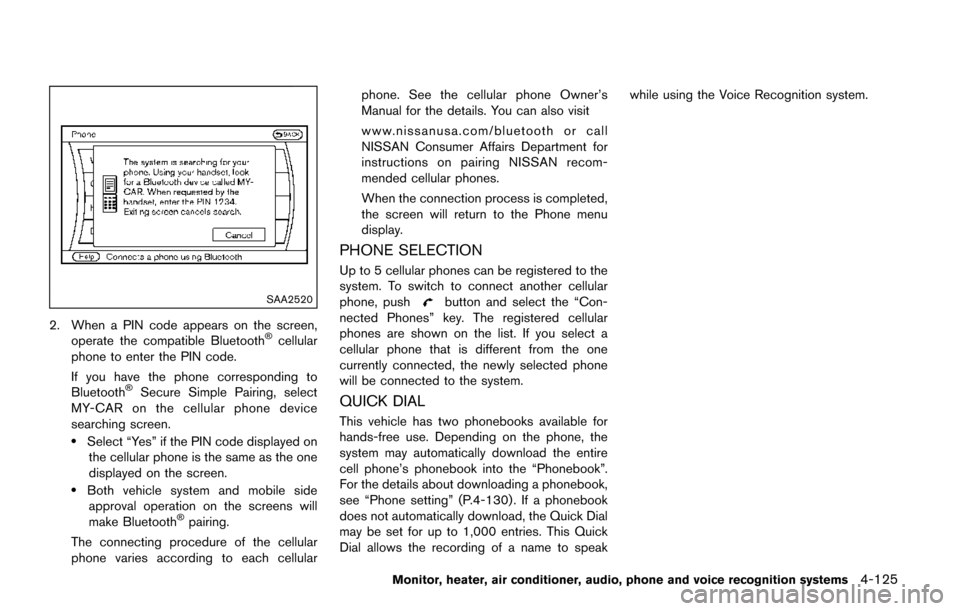
2. When a PIN code appears on the screen,operate the compatible Bluetooth�Šcellular
phone to enter the PIN code.
If you have the phone corresponding to
Bluetooth
�ŠSecure Simple Pairing, select
MY-CAR on the cellular phone device
searching screen.
.Select “Yes” if the PIN code displayed on the cellular phone is the same as the one
displayed on the screen.
.Both vehicle system and mobile sideapproval operation on the screens will
make Bluetooth
�Špairing.
The connecting procedure of the cellular
phone varies according to each cellular phone. See the cellular phone Owner’s
Manual for the details. You can also visit
www.nissanusa.com/bluetooth or call
NISSAN Consumer Affairs Department for
instructions on pairing NISSAN recom-
mended cellular phones.
When the connection process is completed,
the screen will return to the Phone menu
display.
PHONE SELECTION
Up to 5 cellular phones can be registered to the
system. To switch to connect another cellular
phone, push
button and select the “Con-
nected Phones” key. The registered cellular
phones are shown on the list. If you select a
cellular phone that is different from the one
currently connected, the newly selected phone
will be connected to the system.
QUICK DIAL
This vehicle has two phonebooks available for
hands-free use. Depending on the phone, the
system may automatically download the entire
cell phone’s phonebook into the “Phonebook”.
For the details about downloading a phonebook,
see “Phone setting” (P.4-130) . If a phonebook
does not automatically download, the Quick Dial
may be set for up to 1,000 entries. This Quick
Dial allows the recording of a name to speak while using the Voice Recognition system.
Monitor, heater, air conditioner, audio, phone and voice recognition systems4-125