2017 NISSAN QUEST AUX
[x] Cancel search: AUXPage 14 of 520
JVC0701X
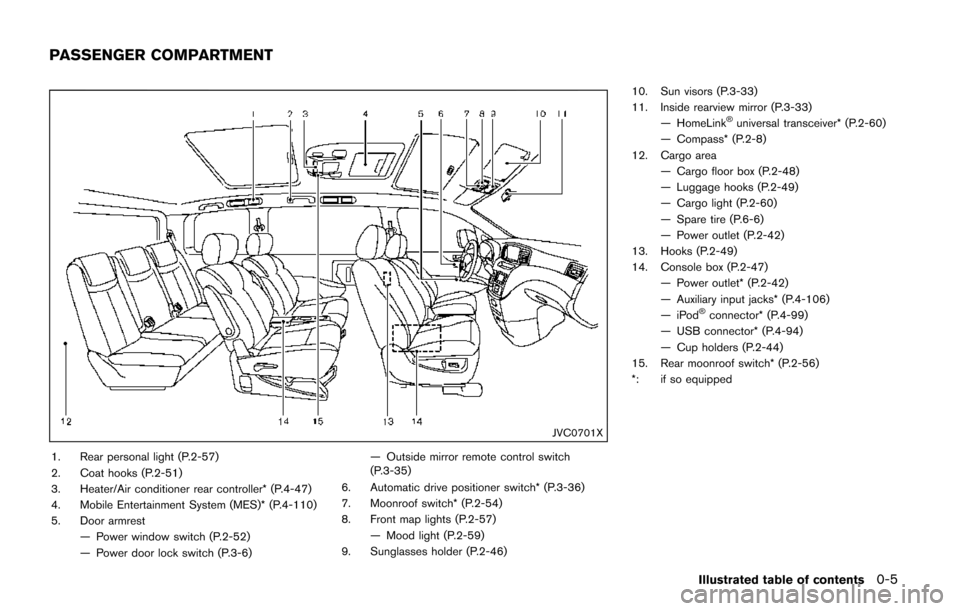
1. Rear personal light (P.2-57)
2. Coat hooks (P.2-51)
3. Heater/Air conditioner rear controller* (P.4-47)
4. Mobile Entertainment System (MES)* (P.4-110)
5. Door armrest— Power window switch (P.2-52)
— Power door lock switch (P.3-6) — Outside mirror remote control switch
(P.3-35)
6. Automatic drive positioner switch* (P.3-36)
7. Moonroof switch* (P.2-54)
8. Front map lights (P.2-57) — Mood light (P.2-59)
9. Sunglasses holder (P.2-46) 10. Sun visors (P.3-33)
11. Inside rearview mirror (P.3-33)
— HomeLink
�Šuniversal transceiver* (P.2-60)
— Compass* (P.2-8)
12. Cargo area — Cargo floor box (P.2-48)
— Luggage hooks (P.2-49)
— Cargo light (P.2-60)
— Spare tire (P.6-6)
— Power outlet (P.2-42)
13. Hooks (P.2-49)
14. Console box (P.2-47) — Power outlet* (P.2-42)
— Auxiliary input jacks* (P.4-106)
—iPod
�Šconnector* (P.4-99)
— USB connector* (P.4-94)
— Cup holders (P.2-44)
15. Rear moonroof switch* (P.2-56)
*: if so equipped
Illustrated table of contents0-5
PASSENGER COMPARTMENT
Page 191 of 520
FM-AM radio with Compact Disc (CD) player ......... 4-74
FM-AM-SAT radio with Compact Disc (CD) player
(Type A) ........................................................................\
...... 4-77
FM-AM-SAT radio with Compact Disc (CD) player
(Type B) ........................................................................\
...... 4-87
DVD (Digital Versatile Disc) player operation (if
so equipped) ..................................................................... 4-91
USB (Universal Serial Bus) connection port
(models with center multi-function control panel) ..... 4-94
iPod
�Šplayer operation (models with center
multi-function control panel) ......................................... 4-99
Bluetooth
�Šstreaming audio (models with
navigation system) ........................................................ 4-101
Auxiliary input jacks (if so equipped) ....................... 4-106
CD/DVD/USB memory care and cleaning ............. 4-107
Steering-wheel-mounted controls for audio (if
so equipped) .................................................................. 4-108
Antenna ........................................................................\
.... 4-109
NISSAN Mobile Entertainment System (MES) (if
so equipped) ........................................................................\
4-110 Digital Versatile Disc (DVD)
system components ...................................................... 4-111
Before operating the DVD Mobile
Entertainment System .................................................. 4-116
Playing a DVD ................................................................ 4-117
Care and maintenance ................................................. 4-121
Car phone or CB radio ..................................................... 4-121
Bluetooth
�Šhands-free phone system (Type A) (if
so equipped) ........................................................................\
4-122
Regulatory information ................................................. 4-123 Voice commands ......................................................... 4-124
Control buttons ............................................................ 4-124
Connecting procedure ............................................... 4-124
Phone selection ........................................................... 4-125
Quick Dial ..................................................................... 4-125
Making a call ................................................................ 4-128
Receiving a call ........................................................... 4-129
During a call ................................................................. 4-129
Phone setting ............................................................... 4-130
Troubleshooting guide ............................................... 4-132
Bluetooth
�Šhands-free phone system (Type B) (if
so equipped) ....................................................................... 4-133
Regulatory information ............................................... 4-134
Using the system ........................................................ 4-135
Control buttons ............................................................ 4-137
Getting started ............................................................ 4-137
List of voice commands ............................................ 4-139
Speaker adaptation (SA) mode ............................... 4-142
Troubleshooting guide ............................................... 4-145
Bluetooth
�Šhands-free phone system (Type C) (if
so equipped) ....................................................................... 4-146
Regulatory information ............................................... 4-147
Using the system ........................................................ 4-147
NISSAN Voice Recognition system (models with
navigation system) ............................................................. 4-154 NISSAN Voice Recognition standard mode ........ 4-155
Using the system ........................................................ 4-157
NISSAN Voice Recognition alternate
command mode ........................................................... 4-166
Page 263 of 520
4-74Monitor, heater, air conditioner, audio, phone and voice recognition systems
JVH0335X
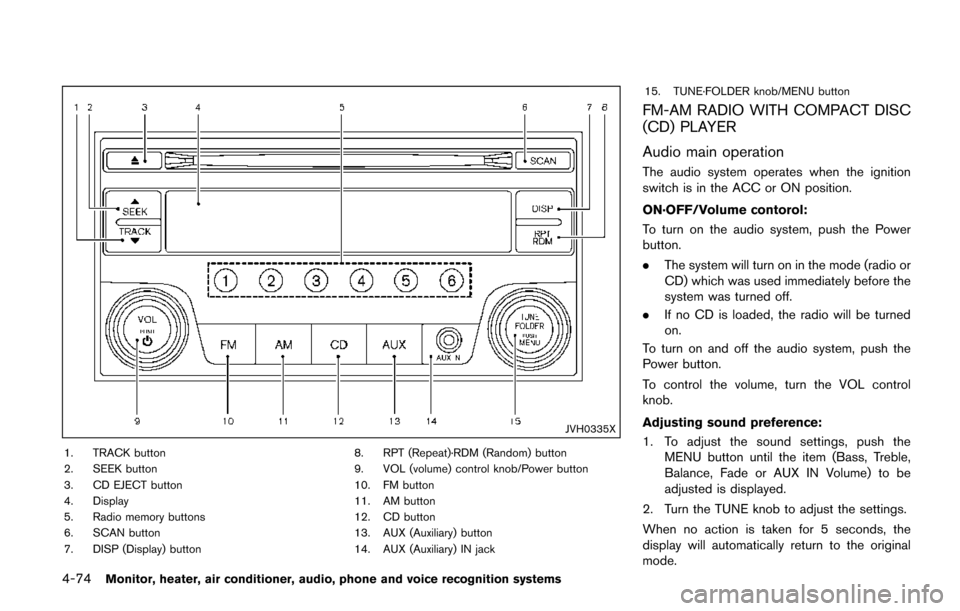
1. TRACK button
2. SEEK button
3. CD EJECT button
4. Display
5. Radio memory buttons
6. SCAN button
7. DISP (Display) button8. RPT (Repeat)·RDM (Random) button
9. VOL (volume) control knob/Power button
10. FM button
11. AM button
12. CD button
13. AUX (Auxiliary) button
14. AUX (Auxiliary) IN jack15. TUNE·FOLDER knob/MENU button
FM-AM RADIO WITH COMPACT DISC
(CD) PLAYER
Audio main operation
The audio system operates when the ignition
switch is in the ACC or ON position.
ON·OFF/Volume contorol:
To turn on the audio system, push the Power
button.
.
The system will turn on in the mode (radio or
CD) which was used immediately before the
system was turned off.
. If no CD is loaded, the radio will be turned
on.
To turn on and off the audio system, push the
Power button.
To control the volume, turn the VOL control
knob.
Adjusting sound preference:
1. To adjust the sound settings, push the MENU button until the item (Bass, Treble,
Balance, Fade or AUX IN Volume) to be
adjusted is displayed.
2. Turn the TUNE knob to adjust the settings.
When no action is taken for 5 seconds, the
display will automatically return to the original
mode.
Page 264 of 520
Clock setting:
Turning the clock ON/OFF:
1. Push the MENU button until “Clock: ON” or“Clock: OFF” is displayed.
2. Turn the TUNE·FOLDER knob to toggle between “Clock: ON” and “Clock: OFF”.
Adjusting the clock:
1. Turn on the clock.
2. Push the MENU button until “Adjust Clock” is displayed, and then select the “Yes”.
3. Push the MENU button. Turn the TUNE knob to adjust the hour.
4. Push the MENU button. Turn the TUNE knob to adjust the minutes.
5. Push the MENU button to exit the clock mode.
When no action is taken for 5 seconds, the
display will automatically return to the original
mode.
AUX button:
The AUX IN jack is located on the audio unit.
The AUX IN audio input jack accepts any
standard analog audio input such as from a
portable cassette tape player, CD player, digital
audio player or laptop computer.
Push the AUX button to play a compatible device when it is plugged into the AUX IN jack.
NISSAN strongly recommends using a stereo
mini plug cable when connecting your music
device to the audio system. Music may not play
properly when a monaural cable is used.
FM-AM radio operation
/radio (FM/AM) band select:
When the FM/AM button is pushed while the
audio system is off, the audio system will turn on
and the radio will turn on.
When the FM/AM button is pushed while
another audio source is playing, the other audio
source will turn off and the radio will turn on.
To change the radio bands (FM1, FM2, or AM) ,
push the FM/AM buttons.
TUNE (Tuning):
When adjusting the broadcasting station fre-
quency manually, turn the TUNE·FOLDER knob
until the preferred frequency is achieved.
/SEEK tuning:
To adjust the broadcasting station frequency
automatically, push and release the SEEK or
TRACK button. When the system detects a
broadcasting station, it will stop at the station.
Detected stations are skipped while SEEK or TRACK button is pushed and held.
SCAN tuning:
When the SCAN button is pushed, the system
will seek and stop at the detected broadcasting
station for 5 seconds, and then it will start to
seek for the next broadcasting station.
Push the SCAN button in this 5-second period
to stop seeking.
*1to*6Radio memory operations:
The audio system can store up to 12 FM station
frequencies (for FM1 and FM2) and 6 AM
station frequencies.
During radio reception, pushing the radio
memory button for less than 1.5 seconds will
play the stored radio station.
To store the station frequency manually:
1. Tune to the desired broadcasting station frequency using the SEEK /TRACK buttons.
2. Push and hold one of the radio memory buttons
*1-*6until a beep sounds.
3. The frequency of the selected channel will appear on the display when the memory is
stored properly.
4. Perform steps 1 - 3 for all other memory buttons.
Monitor, heater, air conditioner, audio, phone and voice recognition systems4-75
Page 267 of 520
4-78Monitor, heater, air conditioner, audio, phone and voice recognition systems
Audio main operation
The audio system operates when the ignition
switch is placed in the ON or ACC position.
Head unit:
The auto loudness circuit enhances the low and
high frequency ranges automatically in both
radio reception and CD playback.
Power button / VOL (volume) control
knob:
Push the Power button/VOL (volume) control
knob to turn on and off the audio system.
Turn the Power button/VOL (volume) control
knob to adjust the volume.
Audio settings:
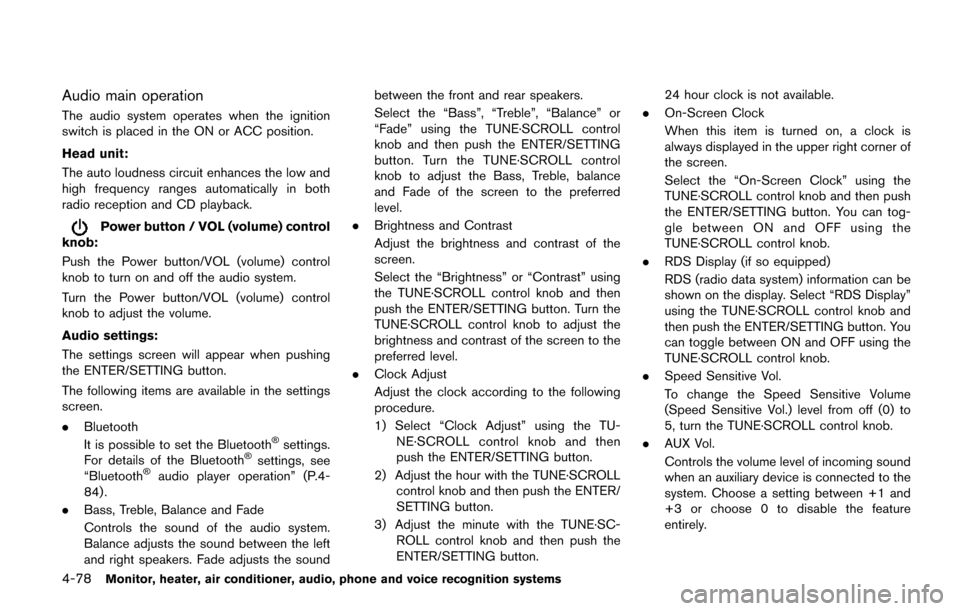
The settings screen will appear when pushing
the ENTER/SETTING button.
The following items are available in the settings
screen.
. Bluetooth
It is possible to set the Bluetooth
�Šsettings.
For details of the Bluetooth�Šsettings, see
“Bluetooth�Šaudio player operation” (P.4-
84) .
. Bass, Treble, Balance and Fade
Controls the sound of the audio system.
Balance adjusts the sound between the left
and right speakers. Fade adjusts the sound between the front and rear speakers.
Select the “Bass”, “Treble”, “Balance” or
“Fade” using the TUNE·SCROLL control
knob and then push the ENTER/SETTING
button. Turn the TUNE·SCROLL control
knob to adjust the Bass, Treble, balance
and Fade of the screen to the preferred
level.
. Brightness and Contrast
Adjust the brightness and contrast of the
screen.
Select the “Brightness” or “Contrast” using
the TUNE·SCROLL control knob and then
push the ENTER/SETTING button. Turn the
TUNE·SCROLL control knob to adjust the
brightness and contrast of the screen to the
preferred level.
. Clock Adjust
Adjust the clock according to the following
procedure.
1) Select “Clock Adjust” using the TU-
NE·SCROLL control knob and then
push the ENTER/SETTING button.
2) Adjust the hour with the TUNE·SCROLL control knob and then push the ENTER/
SETTING button.
3) Adjust the minute with the TUNE·SC- ROLL control knob and then push the
ENTER/SETTING button. 24 hour clock is not available.
. On-Screen Clock
When this item is turned on, a clock is
always displayed in the upper right corner of
the screen.
Select the “On-Screen Clock” using the
TUNE·SCROLL control knob and then push
the ENTER/SETTING button. You can tog-
gle between ON and OFF using the
TUNE·SCROLL control knob.
. RDS Display (if so equipped)
RDS (radio data system) information can be
shown on the display. Select “RDS Display”
using the TUNE·SCROLL control knob and
then push the ENTER/SETTING button. You
can toggle between ON and OFF using the
TUNE·SCROLL control knob.
. Speed Sensitive Vol.
To change the Speed Sensitive Volume
(Speed Sensitive Vol.) level from off (0) to
5, turn the TUNE·SCROLL control knob.
. AUX Vol.
Controls the volume level of incoming sound
when an auxiliary device is connected to the
system. Choose a setting between +1 and
+3 or choose 0 to disable the feature
entirely.
Page 268 of 520
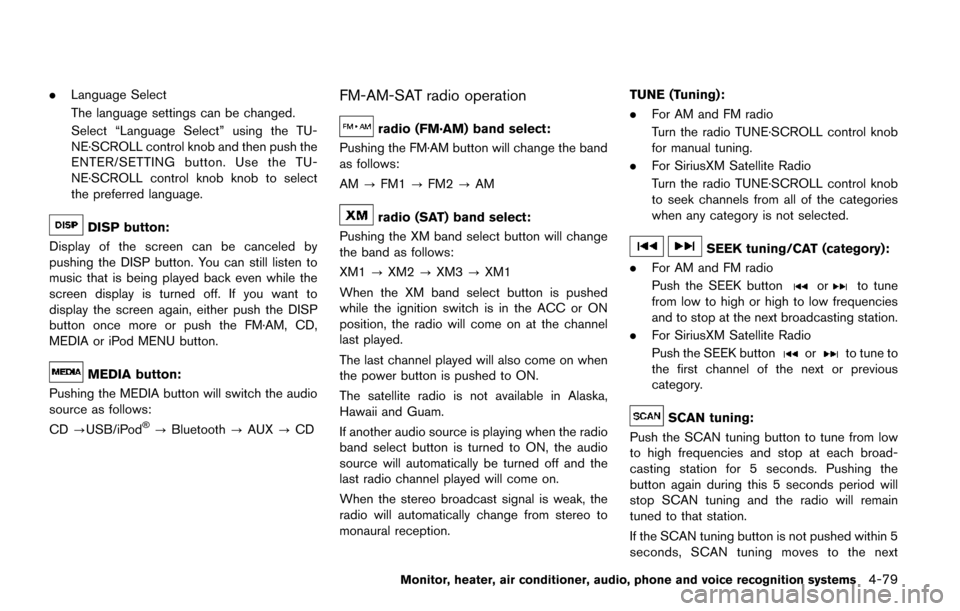
.Language Select
The language settings can be changed.
Select “Language Select” using the TU-
NE·SCROLL control knob and then push the
ENTER/SETTING button. Use the TU-
NE·SCROLL control knob knob to select
the preferred language.
DISP button:
Display of the screen can be canceled by
pushing the DISP button. You can still listen to
music that is being played back even while the
screen display is turned off. If you want to
display the screen again, either push the DISP
button once more or push the FM·AM, CD,
MEDIA or iPod MENU button.
MEDIA button:
Pushing the MEDIA button will switch the audio
source as follows:
CD ?USB/iPod
�Š?Bluetooth ?AUX ?CD
FM-AM-SAT radio operation
radio (FM·AM) band select:
Pushing the FM·AM button will change the band
as follows:
AM ?FM1 ?FM2 ?AM
radio (SAT) band select:
Pushing the XM band select button will change
the band as follows:
XM1 ?XM2 ?XM3 ?XM1
When the XM band select button is pushed
while the ignition switch is in the ACC or ON
position, the radio will come on at the channel
last played.
The last channel played will also come on when
the power button is pushed to ON.
The satellite radio is not available in Alaska,
Hawaii and Guam.
If another audio source is playing when the radio
band select button is turned to ON, the audio
source will automatically be turned off and the
last radio channel played will come on.
When the stereo broadcast signal is weak, the
radio will automatically change from stereo to
monaural reception. TUNE (Tuning):
.
For AM and FM radio
Turn the radio TUNE·SCROLL control knob
for manual tuning.
. For SiriusXM Satellite Radio
Turn the radio TUNE·SCROLL control knob
to seek channels from all of the categories
when any category is not selected.
SEEK tuning/CAT (category):
. For AM and FM radio
Push the SEEK button
orto tune
from low to high or high to low frequencies
and to stop at the next broadcasting station.
. For SiriusXM Satellite Radio
Push the SEEK button
orto tune to
the first channel of the next or previous
category.
SCAN tuning:
Push the SCAN tuning button to tune from low
to high frequencies and stop at each broad-
casting station for 5 seconds. Pushing the
button again during this 5 seconds period will
stop SCAN tuning and the radio will remain
tuned to that station.
If the SCAN tuning button is not pushed within 5
seconds, SCAN tuning moves to the next
Monitor, heater, air conditioner, audio, phone and voice recognition systems4-79
Page 274 of 520
JVH0620X
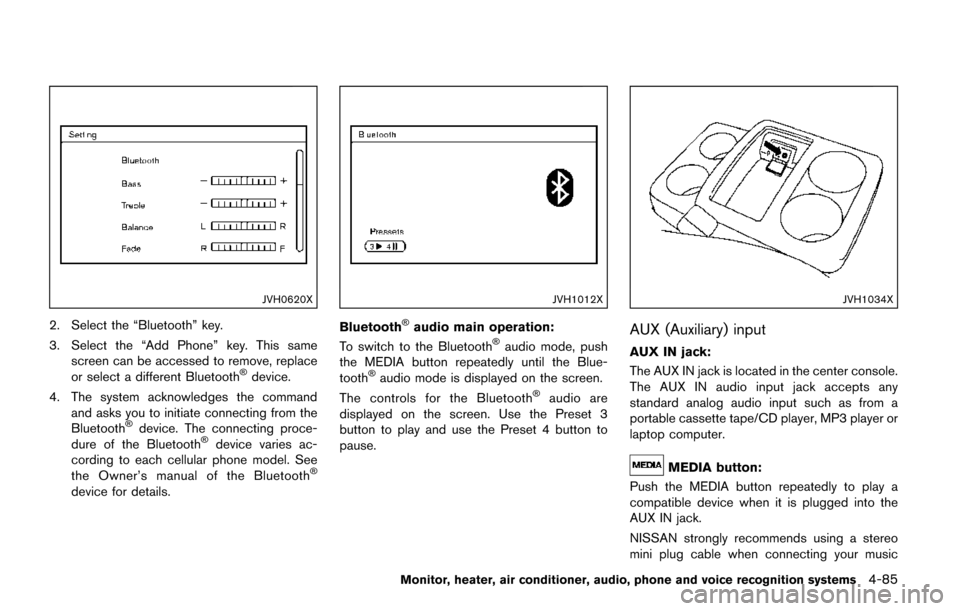
2. Select the “Bluetooth” key.
3. Select the “Add Phone” key. This samescreen can be accessed to remove, replace
or select a different Bluetooth
�Šdevice.
4. The system acknowledges the command and asks you to initiate connecting from the
Bluetooth
�Šdevice. The connecting proce-
dure of the Bluetooth�Šdevice varies ac-
cording to each cellular phone model. See
the Owner’s manual of the Bluetooth
�Š
device for details.
JVH1012X
Bluetooth�Šaudio main operation:
To switch to the Bluetooth�Šaudio mode, push
the MEDIA button repeatedly until the Blue-
tooth
�Šaudio mode is displayed on the screen.
The controls for the Bluetooth�Šaudio are
displayed on the screen. Use the Preset 3
button to play and use the Preset 4 button to
pause.
JVH1034X
AUX (Auxiliary) input
AUX IN jack:
The AUX IN jack is located in the center console.
The AUX IN audio input jack accepts any
standard analog audio input such as from a
portable cassette tape/CD player, MP3 player or
laptop computer.
MEDIA button:
Push the MEDIA button repeatedly to play a
compatible device when it is plugged into the
AUX IN jack.
NISSAN strongly recommends using a stereo
mini plug cable when connecting your music
Monitor, heater, air conditioner, audio, phone and voice recognition systems4-85
Page 276 of 520
JVH0174X
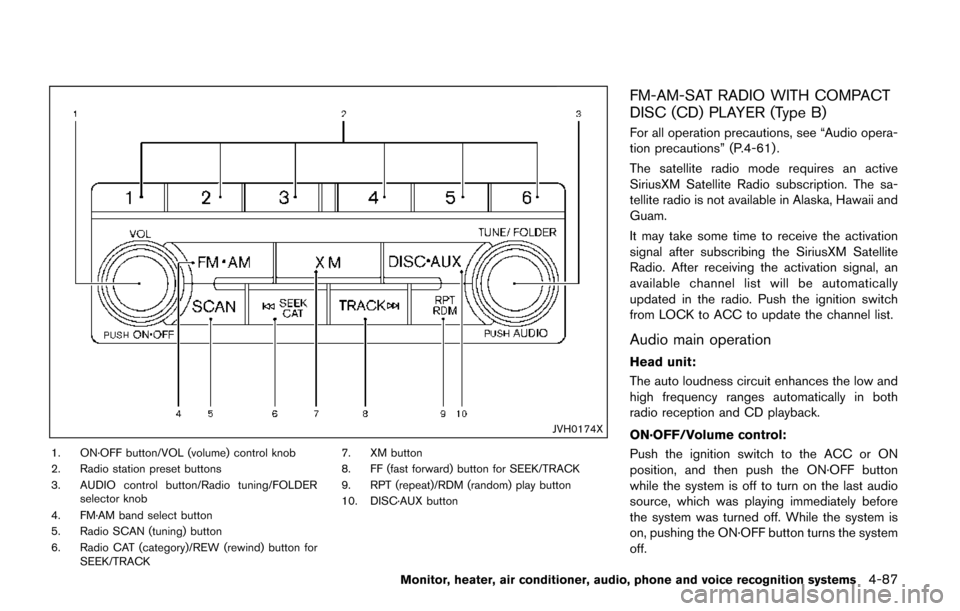
1. ON·OFF button/VOL (volume) control knob
2. Radio station preset buttons
3. AUDIO control button/Radio tuning/FOLDERselector knob
4. FM·AM band select button
5. Radio SCAN (tuning) button
6. Radio CAT (category)/REW (rewind) button for SEEK/TRACK 7. XM button
8. FF (fast forward) button for SEEK/TRACK
9. RPT (repeat)/RDM (random) play button
10. DISC·AUX button
FM-AM-SAT RADIO WITH COMPACT
DISC (CD) PLAYER (Type B)
For all operation precautions, see “Audio opera-
tion precautions” (P.4-61) .
The satellite radio mode requires an active
SiriusXM Satellite Radio subscription. The sa-
tellite radio is not available in Alaska, Hawaii and
Guam.
It may take some time to receive the activation
signal after subscribing the SiriusXM Satellite
Radio. After receiving the activation signal, an
available channel list will be automatically
updated in the radio. Push the ignition switch
from LOCK to ACC to update the channel list.
Audio main operation
Head unit:
The auto loudness circuit enhances the low and
high frequency ranges automatically in both
radio reception and CD playback.
ON·OFF/Volume control:
Push the ignition switch to the ACC or ON
position, and then push the ON·OFF button
while the system is off to turn on the last audio
source, which was playing immediately before
the system was turned off. While the system is
on, pushing the ON·OFF button turns the system
off.
Monitor, heater, air conditioner, audio, phone and voice recognition systems4-87