2017 NISSAN PATHFINDER climate settings
[x] Cancel search: climate settingsPage 305 of 555
OPERATING TIPS
●The rear USB (rear media interface) and the rear
HDMI cannot be played on the front screen.
●Devices connected to the USB connection
port for the front display cannot be played on
the rear displays.
● When connecting a device to the USB port
for the first time, the system structures the
file list and this could slow down the opera-
tion speed. This is not a malfunction.
●
The operation speed of the system could slow
down when the left and right displays play
different files from the same device connected
to the USB port. This is not a malfunction.
● Images from DVDs or devices connected to
the USB port may not be displayed in ad-
equate ratio depending on the resolution. To
correct the ratio, adjust the aspect using the
remote controller. For additional information,
refer to “System settings” in this section.
● If a computer with an HDMI output terminal
is connected to the HDMI input terminal, the
computer may not automatically shift to the
output mode. To view images on the rear
displays, operate the computer and change
the mode to the output mode according to
the computer Owner’s Manual.
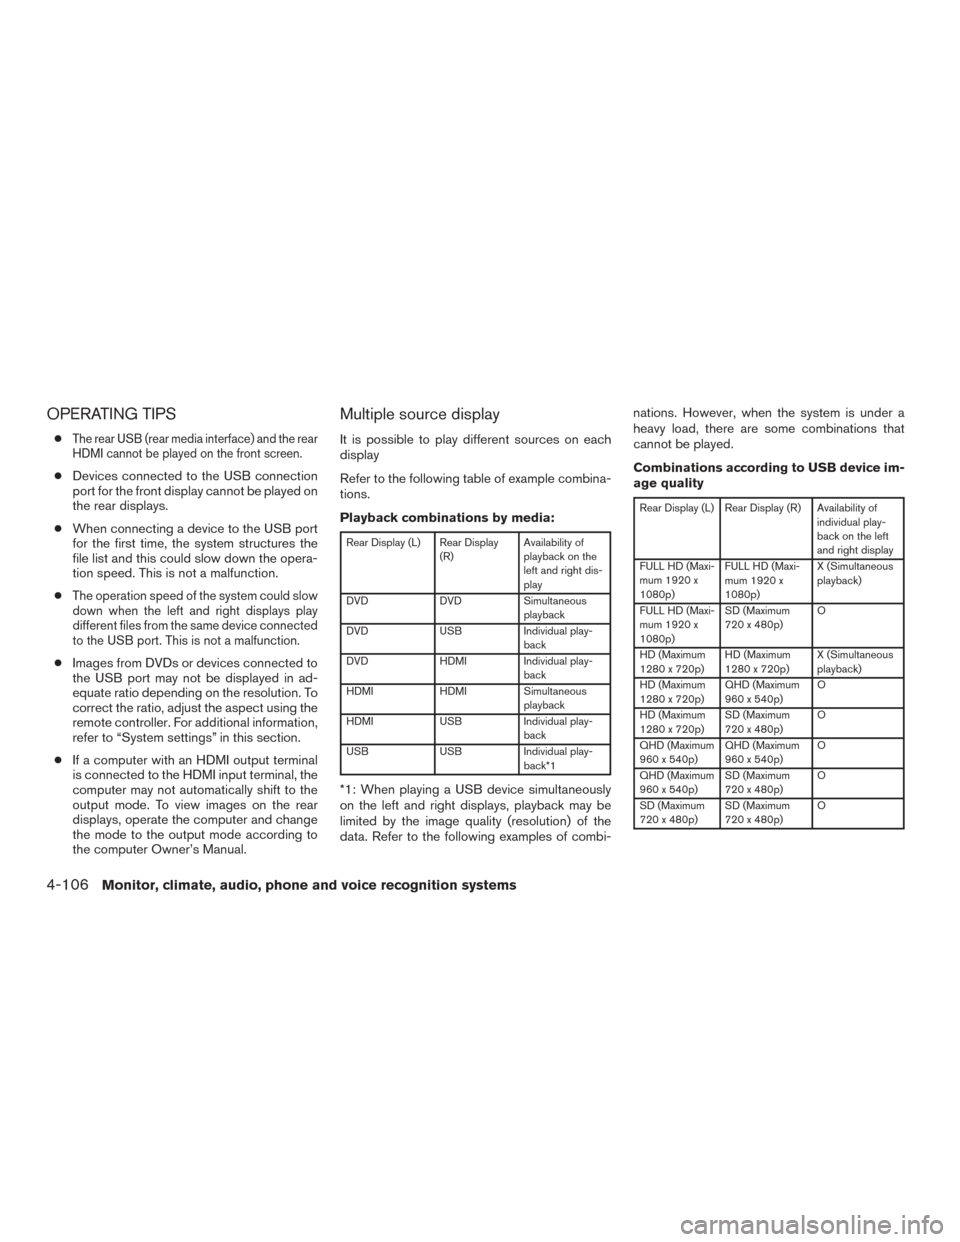
Multiple source display
It is possible to play different sources on each
display
Refer to the following table of example combina-
tions.
Playback combinations by media:
Rear Display (L) Rear Display
(R)Availability of
playback on the
left and right dis-
play
DVD DVDSimultaneous
playback
DVD USBIndividual play-
back
DVD HDMIIndividual play-
back
HDMI HDMISimultaneous
playback
HDMI USBIndividual play-
back
USB USBIndividual play-
back*1
*1: When playing a USB device simultaneously
on the left and right displays, playback may be
limited by the image quality (resolution) of the
data. Refer to the following examples of combi- nations. However, when the system is under a
heavy load, there are some combinations that
cannot be played.
Combinations according to USB device im-
age quality
Rear Display (L) Rear Display (R) Availability of
individual play-
back on the left
and right display
FULL HD (Maxi-
mum 1920 x
1080p) FULL HD (Maxi-
mum 1920 x
1080p) X (Simultaneous
playback)
FULL HD (Maxi-
mum 1920 x
1080p) SD (Maximum
720 x 480p)
O
HD (Maximum
1280 x 720p) HD (Maximum
1280 x 720p) X (Simultaneous
playback)
HD (Maximum
1280 x 720p) QHD (Maximum
960 x 540p) O
HD (Maximum
1280 x 720p) SD (Maximum
720 x 480p) O
QHD (Maximum
960 x 540p) QHD (Maximum
960 x 540p) O
QHD (Maximum
960 x 540p) SD (Maximum
720 x 480p) O
SD (Maximum
720 x 480p) SD (Maximum
720 x 480p) O
4-106Monitor, climate, audio, phone and voice recognition systems
Page 306 of 555
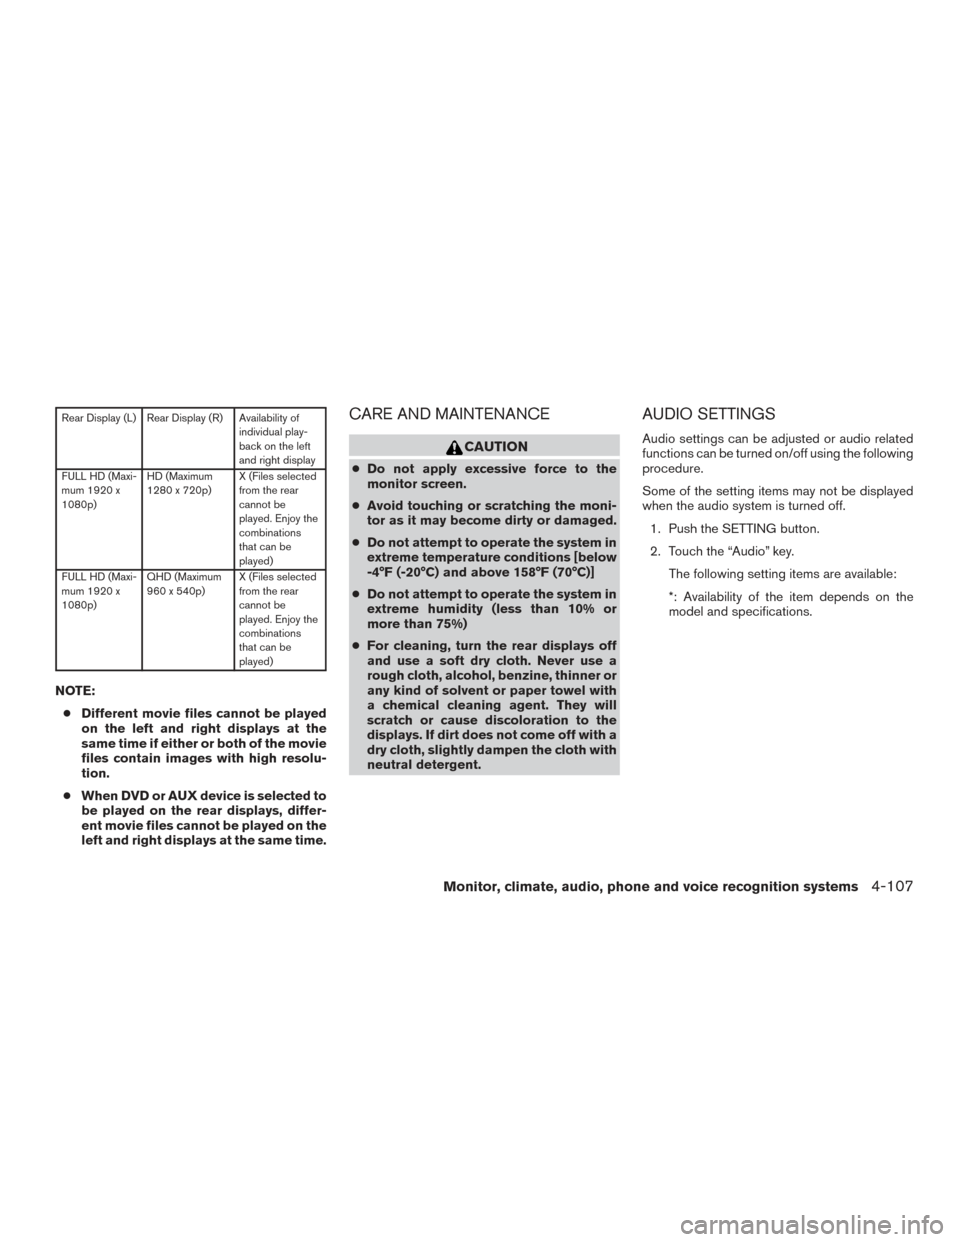
Rear Display (L) Rear Display (R) Availability ofindividual play-
back on the left
and right display
FULL HD (Maxi-
mum 1920 x
1080p) HD (Maximum
1280 x 720p)
X (Files selected
from the rear
cannot be
played. Enjoy the
combinations
that can be
played)
FULL HD (Maxi-
mum 1920 x
1080p) QHD (Maximum
960 x 540p)
X (Files selected
from the rear
cannot be
played. Enjoy the
combinations
that can be
played)
NOTE:
● Different movie files cannot be played
on the left and right displays at the
same time if either or both of the movie
files contain images with high resolu-
tion.
● When DVD or AUX device is selected to
be played on the rear displays, differ-
ent movie files cannot be played on the
left and right displays at the same time.
CARE AND MAINTENANCE
CAUTION
●Do not apply excessive force to the
monitor screen.
● Avoid touching or scratching the moni-
tor as it may become dirty or damaged.
● Do not attempt to operate the system in
extreme temperature conditions [below
-4°F (-20°C) and above 158°F (70°C)]
● Do not attempt to operate the system in
extreme humidity (less than 10% or
more than 75%)
● For cleaning, turn the rear displays off
and use a soft dry cloth. Never use a
rough cloth, alcohol, benzine, thinner or
any kind of solvent or paper towel with
a chemical cleaning agent. They will
scratch or cause discoloration to the
displays. If dirt does not come off with a
dry cloth, slightly dampen the cloth with
neutral detergent.
AUDIO SETTINGS
Audio settings can be adjusted or audio related
functions can be turned on/off using the following
procedure.
Some of the setting items may not be displayed
when the audio system is turned off.
1. Push the SETTING button.
2. Touch the “Audio” key. The following setting items are available:
*: Availability of the item depends on the
model and specifications.
Monitor, climate, audio, phone and voice recognition systems4-107
Page 307 of 555
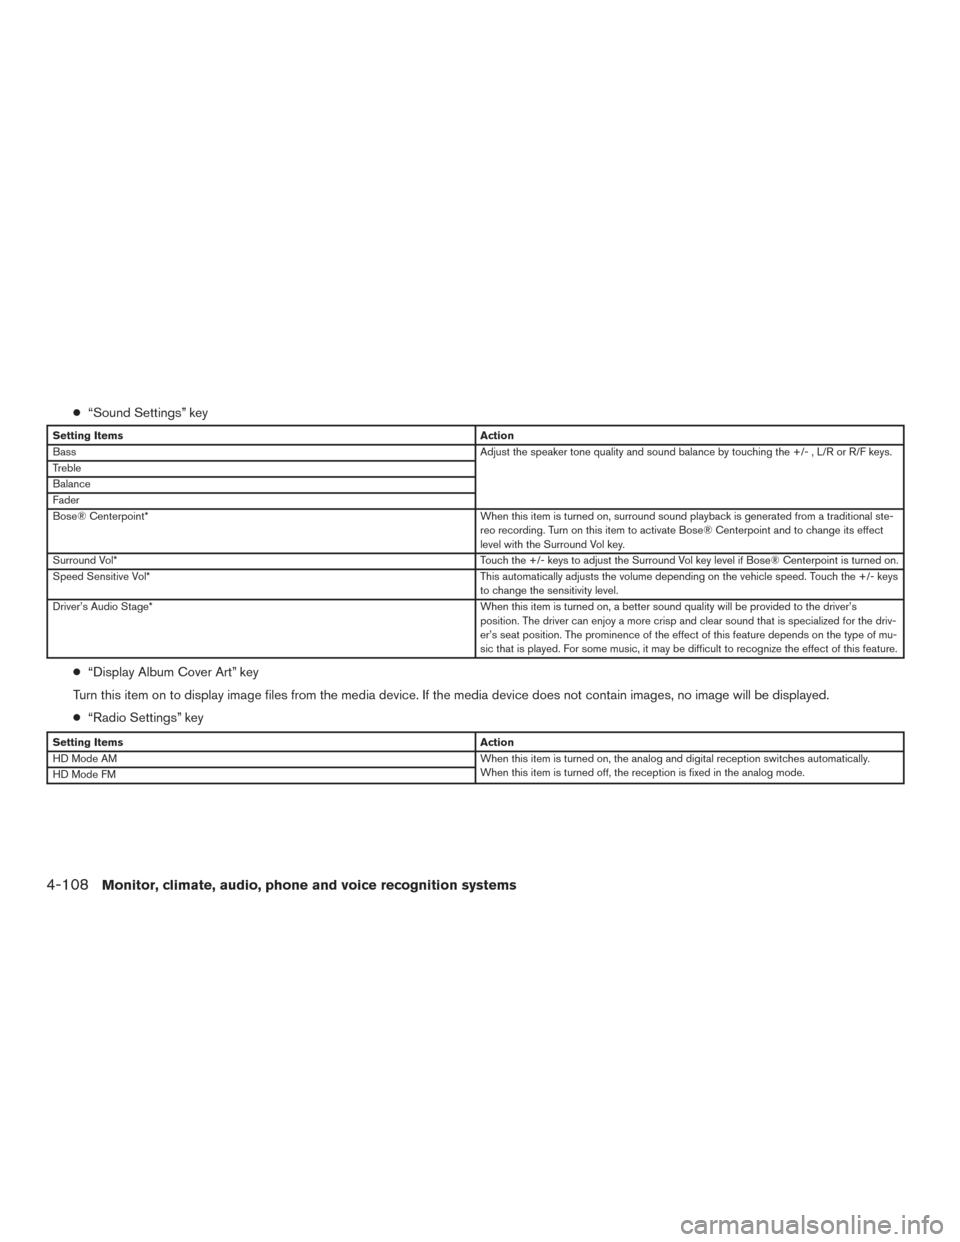
●“Sound Settings” key
Setting Items Action
Bass Adjust the speaker tone quality and sound balance by touching the +/- , L/R or R/F keys.
Treble
Balance
Fader
Bose® Centerpoint* When this item is turned on, surround sound playback is generated from a traditional ste-
reo recording. Turn on this item to activate Bose® Centerpoint and to change its effect
level with the Surround Vol key.
Surround Vol* Touch the +/- keys to adjust the Surround Vol key level if Bose® Centerpoint is turned on.
Speed Sensitive Vol* This automatically adjusts the volume depending on the vehicle speed. Touch the +/- keys
to change the sensitivity level.
Driver’s Audio Stage* When this item is turned on, a better sound quality will be provided to the driver’s
position. The driver can enjoy a more crisp and clear sound that is specialized for the driv-
er’s seat position. The prominence of the effect of this feature depends on the type of mu-
sic that is played. For some music, it may be difficult to recognize the effect of this feature.
● “Display Album Cover Art” key
Turn this item on to display image files from the media device. If the media device does not contain images, no image will be displayed.
● “Radio Settings” key
Setting Items Action
HD Mode AM When this item is turned on, the analog and digital reception switches automatically.
When this item is turned off, the reception is fixed in the analog mode.
HD Mode FM
4-108Monitor, climate, audio, phone and voice recognition systems
Page 308 of 555
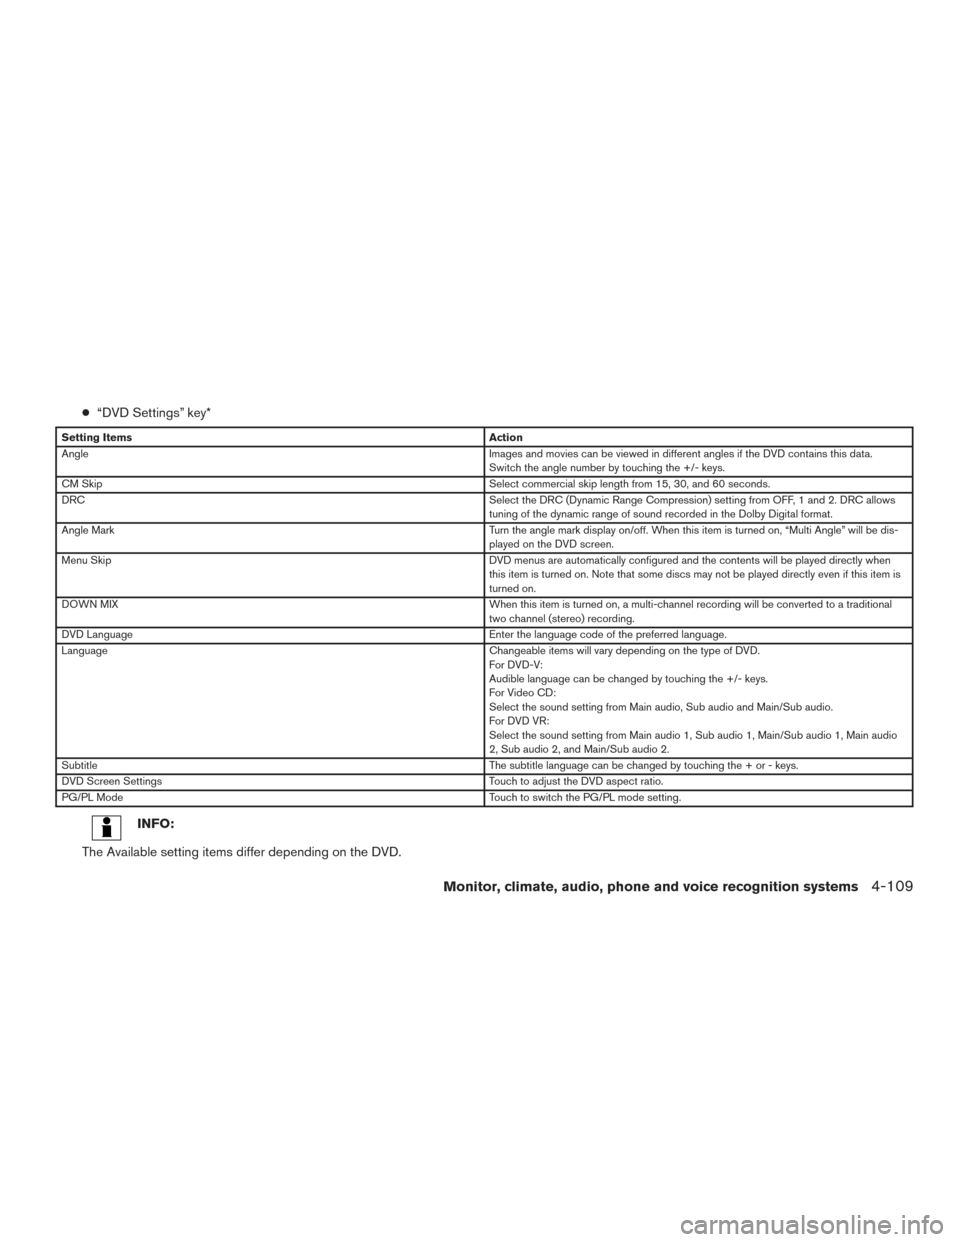
●“DVD Settings” key*
Setting Items Action
Angle Images and movies can be viewed in different angles if the DVD contains this data.
Switch the angle number by touching the +/- keys.
CM Skip Select commercial skip length from 15, 30, and 60 seconds.
DRC Select the DRC (Dynamic Range Compression) setting from OFF, 1 and 2. DRC allows
tuning of the dynamic range of sound recorded in the Dolby Digital format.
Angle Mark Turn the angle mark display on/off. When this item is turned on, “Multi Angle” will be dis-
played on the DVD screen.
Menu Skip DVD menus are automatically configured and the contents will be played directly when
this item is turned on. Note that some discs may not be played directly even if this item is
turned on.
DOWN MIX When this item is turned on, a multi-channel recording will be converted to a traditional
two channel (stereo) recording.
DVD Language Enter the language code of the preferred language.
Language Changeable items will vary depending on the type of DVD.
For DVD-V:
Audible language can be changed by touching the +/- keys.
For Video CD:
Select the sound setting from Main audio, Sub audio and Main/Sub audio.
For DVD VR:
Select the sound setting from Main audio 1, Sub audio 1, Main/Sub audio 1, Main audio
2, Sub audio 2, and Main/Sub audio 2.
Subtitle The subtitle language can be changed by touching the + or - keys.
DVD Screen Settings Touch to adjust the DVD aspect ratio.
PG/PL Mode Touch to switch the PG/PL mode setting.
INFO:
The Available setting items differ depending on the DVD.
Monitor, climate, audio, phone and voice recognition systems4-109
Page 309 of 555
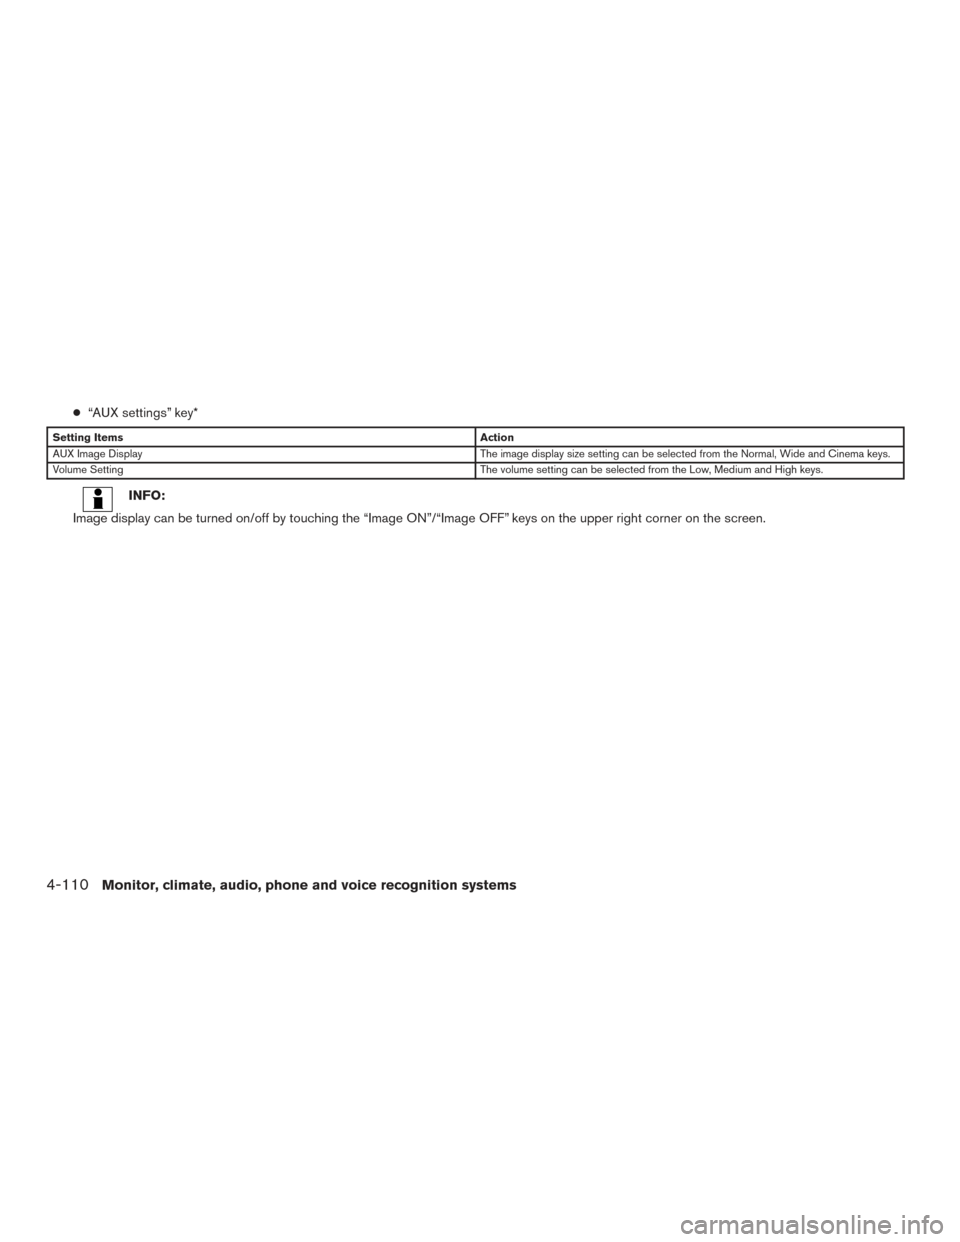
●“AUX settings” key*
Setting Items Action
AUX Image Display The image display size setting can be selected from the Normal, Wide and Cinema keys.
Volume Setting The volume setting can be selected from the Low, Medium and High keys.
INFO:
Image display can be turned on/off by touching the “Image ON”/“Image OFF” keys on the upper right corner on the screen.
4-110Monitor, climate, audio, phone and voice recognition systems
Page 316 of 555
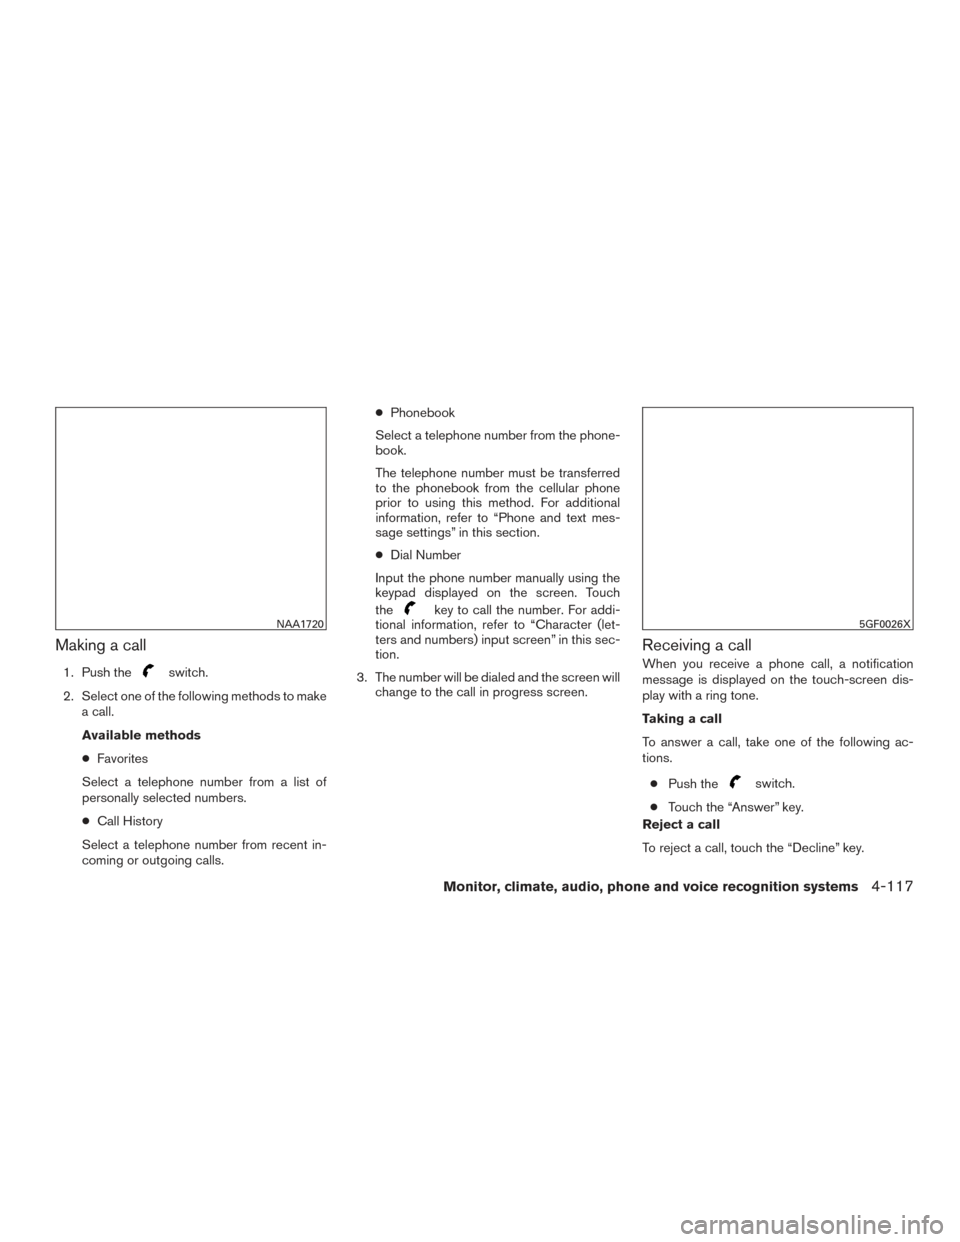
Making a call
1. Push theswitch.
2. Select one of the following methods to make a call.
Available methods
● Favorites
Select a telephone number from a list of
personally selected numbers.
● Call History
Select a telephone number from recent in-
coming or outgoing calls. ●
Phonebook
Select a telephone number from the phone-
book.
The telephone number must be transferred
to the phonebook from the cellular phone
prior to using this method. For additional
information, refer to “Phone and text mes-
sage settings” in this section.
● Dial Number
Input the phone number manually using the
keypad displayed on the screen. Touch
the
key to call the number. For addi-
tional information, refer to “Character (let-
ters and numbers) input screen” in this sec-
tion.
3. The number will be dialed and the screen will change to the call in progress screen.
Receiving a call
When you receive a phone call, a notification
message is displayed on the touch-screen dis-
play with a ring tone.
Taking a call
To answer a call, take one of the following ac-
tions.
● Push the
switch.
● Touch the “Answer” key.
Reject a call
To reject a call, touch the “Decline” key.
NAA17205GF0026X
Monitor, climate, audio, phone and voice recognition systems4-117
Page 318 of 555
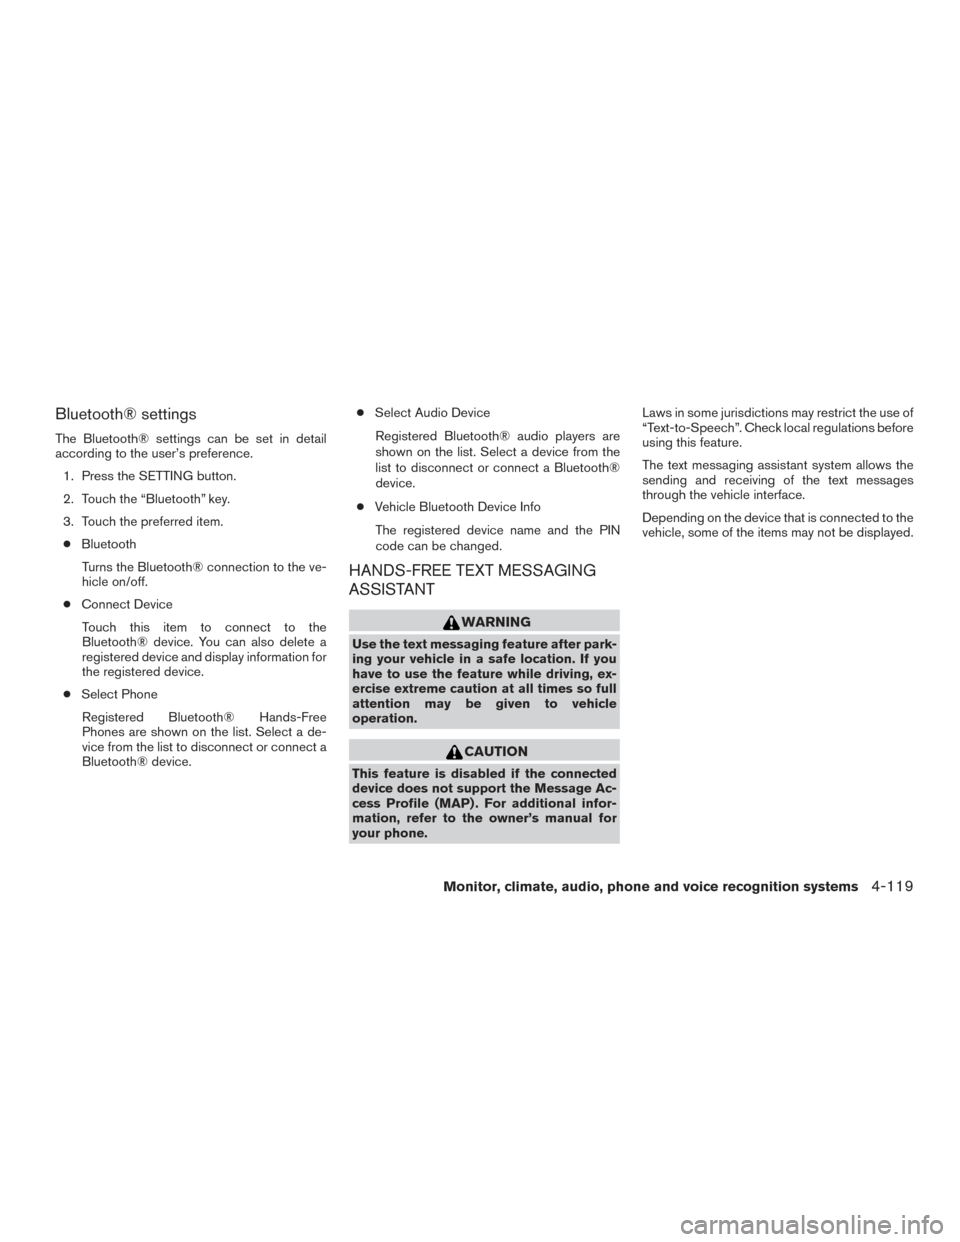
Bluetooth® settings
The Bluetooth® settings can be set in detail
according to the user’s preference.1. Press the SETTING button.
2. Touch the “Bluetooth” key.
3. Touch the preferred item.● Bluetooth
Turns the Bluetooth® connection to the ve-
hicle on/off.
● Connect Device
Touch this item to connect to the
Bluetooth® device. You can also delete a
registered device and display information for
the registered device.
● Select Phone
Registered Bluetooth® Hands-Free
Phones are shown on the list. Select a de-
vice from the list to disconnect or connect a
Bluetooth® device. ●
Select Audio Device
Registered Bluetooth® audio players are
shown on the list. Select a device from the
list to disconnect or connect a Bluetooth®
device.
● Vehicle Bluetooth Device Info
The registered device name and the PIN
code can be changed.
HANDS-FREE TEXT MESSAGING
ASSISTANT
WARNING
Use the text messaging feature after park-
ing your vehicle in a safe location. If you
have to use the feature while driving, ex-
ercise extreme caution at all times so full
attention may be given to vehicle
operation.
CAUTION
This feature is disabled if the connected
device does not support the Message Ac-
cess Profile (MAP) . For additional infor-
mation, refer to the owner’s manual for
your phone. Laws in some jurisdictions may restrict the use of
“Text-to-Speech”. Check local regulations before
using this feature.
The text messaging assistant system allows the
sending and receiving of the text messages
through the vehicle interface.
Depending on the device that is connected to the
vehicle, some of the items may not be displayed.
Monitor, climate, audio, phone and voice recognition systems4-119
Page 322 of 555
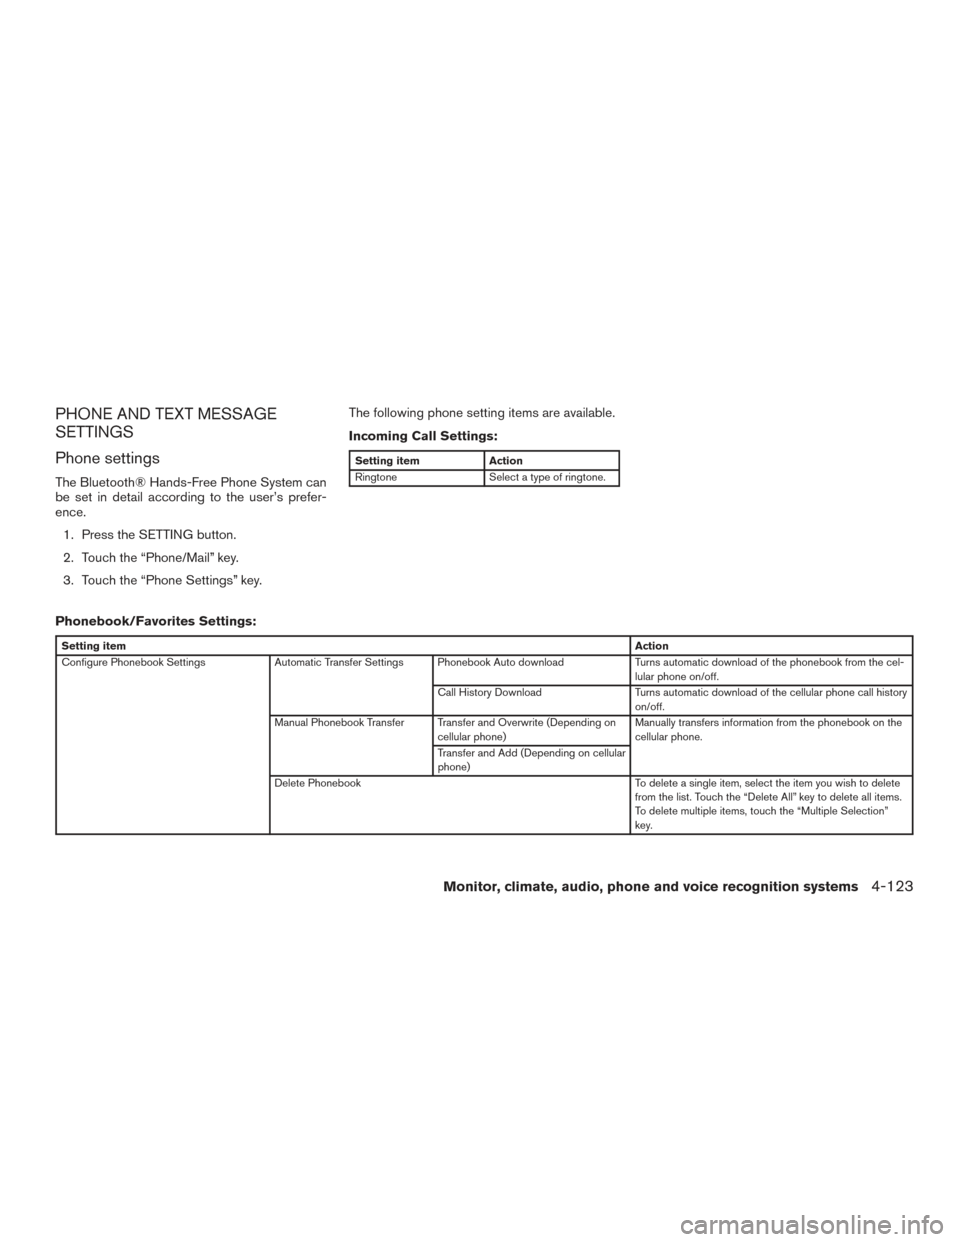
PHONE AND TEXT MESSAGE
SETTINGS
Phone settings
The Bluetooth® Hands-Free Phone System can
be set in detail according to the user’s prefer-
ence.1. Press the SETTING button.
2. Touch the “Phone/Mail” key.
3. Touch the “Phone Settings” key. The following phone setting items are available.
Incoming Call Settings:
Setting item
Action
Ringtone Select a type of ringtone.
Phonebook/Favorites Settings:
Setting item Action
Configure Phonebook Settings Automatic Transfer Settings Phonebook Auto download Turns automatic download of the phonebook from the cel-
lular phone on/off.
Call History Download Turns automatic download of the cellular phone call history
on/off.
Manual Phonebook Transfer Transfer and Overwrite (Depending on cellular phone) Manually transfers information from the phonebook on the
cellular phone.
Transfer and Add (Depending on cellular
phone)
Delete Phonebook To delete a single item, select the item you wish to delete
from the list. Touch the “Delete All” key to delete all items.
To delete multiple items, touch the “Multiple Selection”
key.
Monitor, climate, audio, phone and voice recognition systems4-123