2017 NISSAN MURANO change wheel
[x] Cancel search: change wheelPage 4 of 38
3
2
NEW SYSTEM FEATURES
AROUND VIEW® MONITOR ( AVM) WITH MOVING OBJECT
DETECTION (MOD) (if so equipped)
With the ignition switch in the ON position, the
Around View® Monitor is activated by pressing
the CAMERA button
1, located on the
control panel, or by moving the shift lever to the
R (REVERSE) position. The monitor displays
various views of the position of the vehicle.
When the shift lever is in the P (PARK), N (NEUTRAL) or D (DRIVE) position and the CAMERA button
1 is pressed, the
following views will display in order:
1
Start from any Control Panel screen
Front view & front-side view
Press Press
Front view & bird’s-eye view
Press
HEATED STEERING WHEEL (if so equipped)
Once activated, your heated steering wheel
will automatically turn on and off to maint
ain a
temperature above 68°F (20°C).
When the surface temperature of the steering wheel is above 68°F (20°C) and the control
switch
1 is turned on, the system will not heat
the steering wheel. This does not indicate a malfunction.
For more information, refer to the “Instruments and controls (section 2)” of your Owner’s Manual.
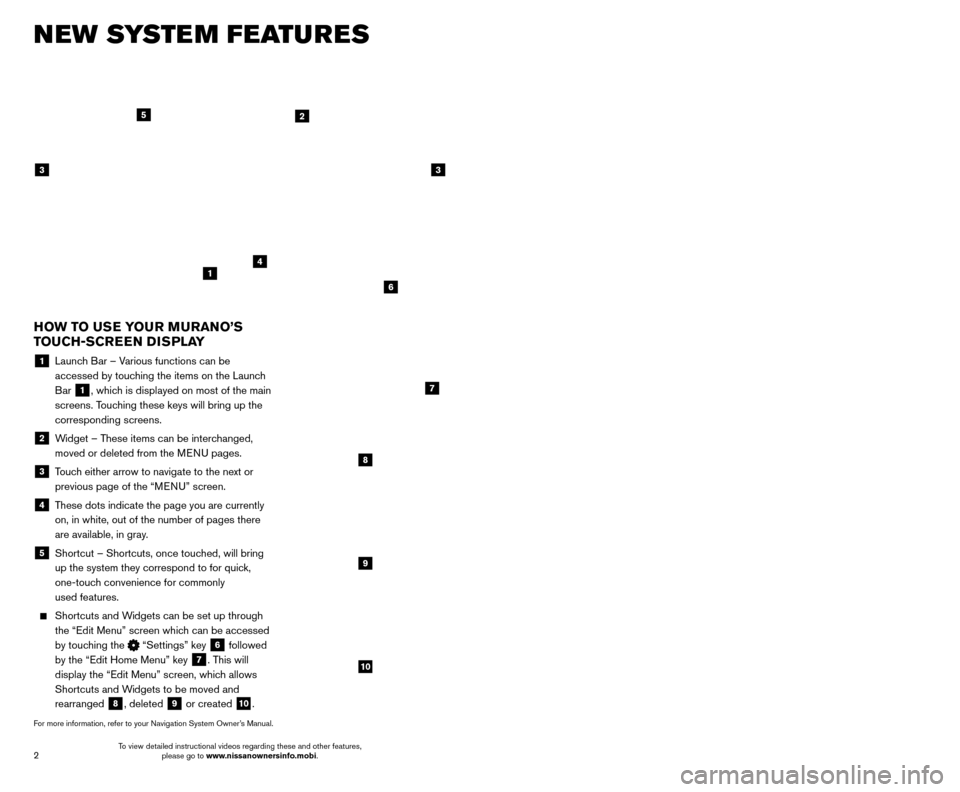
HOW TO USE YOUR MURANO’S
TOUCH-SCREEN DISPLAY
1 Launch Bar – Various functions can be accessed by touching the items on the Launch
Bar
1, which is displayed on most of the main
screens. Touching these keys will bring up the
corresponding screens.
2 Widget – These items can be interchanged, moved or deleted from the MENU pages.
3 Touch either arrow to navigate to the next or previous page of the “MENU” screen.
4 These dots indicate the page you are currently on, in white, out of the number of pages there
are available, in gray.
5 Shortcut – Shortcuts, once touc hed, will bring
up the system they correspond to for quick,
one-touch convenience for commonly
used features.
Shortcuts and W idgets can be set up through
the “Edit Menu” screen which can be accessed
by touching the
“Settings” key 6 followed
by the “Edit Home Menu” key
7. This will
display the “Edit Menu” screen, which allows
Shortcuts and Widgets to be moved and
rearranged
8, deleted 9 or created 10.
For more information, refer to your Navigation System Owner’s Manual.
1
4
2
33
5
7
8
9
10
1
6
To view detailed instructional videos regarding these and other features, please go to www.nissanownersinfo.mobi. To view detailed instructional videos regarding these and other features,
please go to www.nissanownersinfo.mobi.
Page 5 of 38
3
2
NEW SYSTEM FEATURES
AROUND VIEW® MONITOR ( AVM) WITH MOVING OBJECT
DETECTION (MOD) (if so equipped)
With the ignition switch in the ON position, the
Around View® Monitor is activated by pressing
the CAMERA button
1, located on the
control panel, or by moving the shift lever to the
R (REVERSE) position. The monitor displays
various views of the position of the vehicle.
When the shift lever is in the P (PARK), N (NEUTRAL) or D (DRIVE) position and the CAMERA button
1 is pressed, the
following views will display in order:
1
Start from any Control Panel screen
Front view & front-side view
Press Press
Front view & bird’s-eye view
Press
HEATED STEERING WHEEL (if so equipped)
Once activated, your heated steering wheel
will automatically turn on and off to maint
ain a
temperature above 68°F (20°C).
When the surface temperature of the steering wheel is above 68°F (20°C) and the control
switch
1 is turned on, the system will not heat
the steering wheel. This does not indicate a malfunction.
For more information, refer to the “Instruments and controls (section 2)” of your Owner’s Manual.
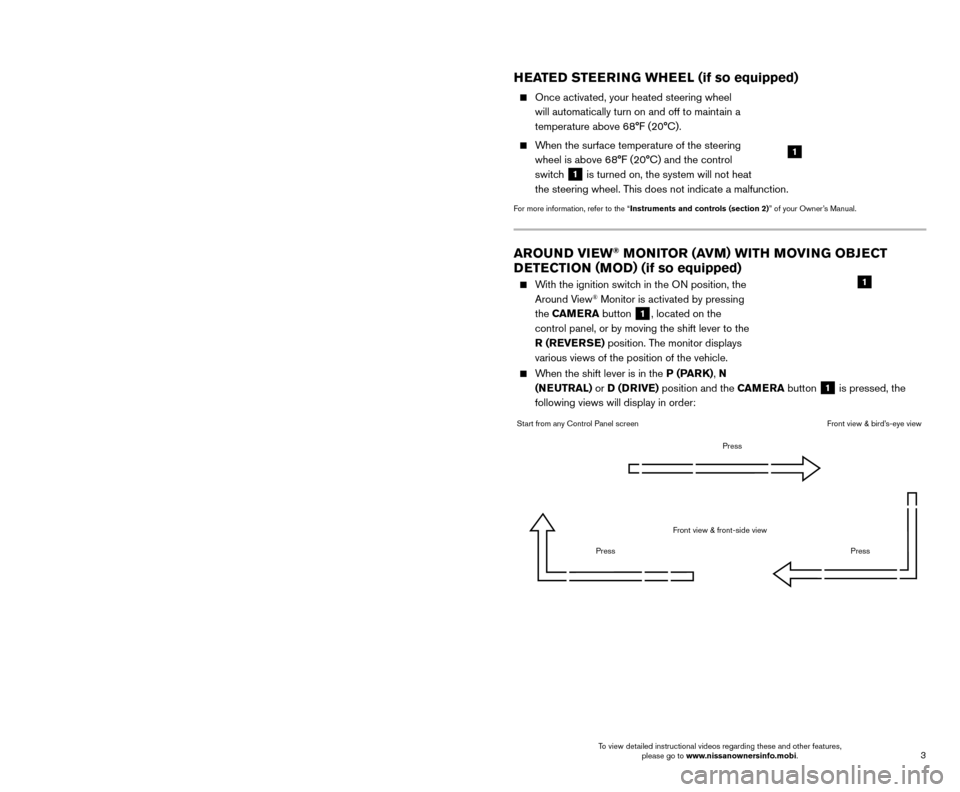
HOW TO USE YOUR MURANO’S
TOUCH-SCREEN DISPLAY
1 Launch Bar – Various functions can be accessed by touching the items on the Launch
Bar
1, which is displayed on most of the main
screens. Touching these keys will bring up the
corresponding screens.
2 Widget – These items can be interchanged, moved or deleted from the MENU pages.
3 Touch either arrow to navigate to the next or previous page of the “MENU” screen.
4 These dots indicate the page you are currently on, in white, out of the number of pages there
are available, in gray.
5 Shortcut – Shortcuts, once touc hed, will bring
up the system they correspond to for quick,
one-touch convenience for commonly
used features.
Shortcuts and W idgets can be set up through
the “Edit Menu” screen which can be accessed
by touching the
“Settings” key 6 followed
by the “Edit Home Menu” key
7. This will
display the “Edit Menu” screen, which allows
Shortcuts and Widgets to be moved and
rearranged
8, deleted 9 or created 10.
For more information, refer to your Navigation System Owner’s Manual.
1
4
2
33
5
7
8
9
10
1
6
To view detailed instructional videos regarding these and other features, please go to www.nissanownersinfo.mobi. To view detailed instructional videos regarding these and other features,
please go to www.nissanownersinfo.mobi.
Page 22 of 38
21
20
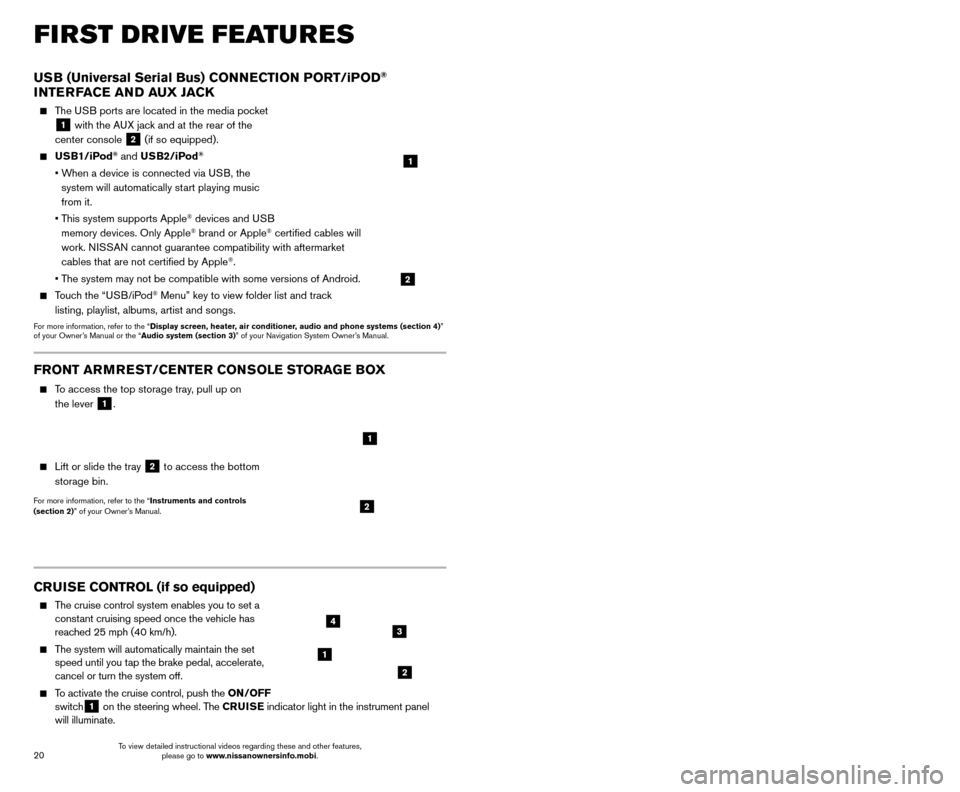
CRUISE CONTROL (if so equipped)
The cruise control system enables you to set a
constant cruising speed once the vehicle has
reached 25 mph (40 km/h).
The system will automatically maintain the set speed until you tap the brake pedal, accelerate,
cancel or turn the system off.
To activate the cruise control, push the ON/OFF
switch1 on the steering wheel. The CRUISE
indicator light in the instrument panel
will illuminate.
USB (Universal Serial Bus) CONNECTION PORT/iPOD®
INTERFACE AND AUX JACK
The USB ports are located in the media pocket
1 with the AUX jack and at the rear of the
center console
2 (if so equipped).
USB1/iPod® and USB2/iPod®
• When a device is connected via USB, the
system will automatically start playing music
from it.
•
T
his system supports Apple
® devices and USB
memory devices. Only Apple® brand or Apple® certified cables will
work. NISSAN cannot guarantee compatibility with aftermarket
cables that are not certified by Apple
®.
• T
he system may not be compatible with some versions of Android.
Touch the “USB/iPod® Menu” key to view folder list and track
listing, playlist, albums, artist and songs.
For more information, refer to the “Display screen, heater, air conditioner, audio and phone systems (section 4)”
of your Owner’s Manual or the “Audio system (section 3)” of your Navigation System Owner’s Manual.
1
2
FIRST DRIVE FEATURES
To set a cruising speed, accelerate the vehicle to the desired speed, pus\
h the
SET/- switch 2 on the steering wheel and release. Take your foot off the accelerator
pedal. Your vehicle will maintain the set speed.
To reset at a faster cruising speed, push and hold the RES/+ switch 3 on the
steering wheel. When the vehicle attains the desired speed, release the switch.
To reset at a slower cruising speed, push and hold the SET/- switch 2 on the steering
wheel. Release the switch when the vehicle slows to the desired speed.
To cancel the preset speed, tap the brake pedal or push the CANCEL switch 4
on the steering wheel.
To turn off cruise control, push the ON/OFF switch 1 on the steering wheel. The
CRUISE indicator light in the instrument panel will extinguish.
For more information, refer to the “Starting and driving (section 5)” of your Owner’s Manual.
1
2
34
FRONT ARMREST /CENTER CONSOLE STORAGE BOX
To access the top storage tray, pull up on
the lever
1.
Lift or slide the tray 2 to access the bottom
storage bin.
For more information, refer to the “Instruments and controls
(section 2)” of your Owner’s Manual.2
1
INTELLIGENT CRUISE CONTROL (ICC) (if so equipped)
VEHICLE-TO-VEHICLE DISTANCE CONTROL MODE
To set Vehicle-To-Vehicle Distance Control mode, press the CRUISE ON/OFF button
1 on the steering wheel. The CRUISE
indicator light 2 will illuminate.
Accelerate to the desired speed.
Push down on the SET/- switch 3 on the
steering wheel and release it. ICC will be set to
the desired speed.
Press the dist ance button 4 on the steering
wheel repeatedly to change the set distance
between long, middle and short.
When a vehicle is not detected ahead of you in the lane, the set distance and set vehicle speed
indicator lights will illuminate
5 in set mode.
When a vehicle is detected ahead of you in the lane, the vehicle ahead detection, set distance and set vehicle speed indicator
lights will illuminate
6 in set mode.
To reset at a faster cruising speed, push and hold the RES/+
switch
7 on the steering wheel. When the vehicle attains the
desired speed, release the switch.
To reset at a slower cruising speed, push and hold the SET/- switch
3 on the steering wheel. Release the switch when the vehicle slows
to the desired speed.
To cancel the preset speed, push the CANCEL switch 8 on the steering wheel or
tap the brake pedal. The set vehicle speed indicator
5 will extinguish.
To turn off ICC, press the CRUISE ON/OFF button 1 on the steering wheel. The
CRUISE indicator light 2 in the instrument panel will extinguish.
For more information, refer to the “Starting and driving (section 5)” of your Owner’s Manual.
2
5
6
1
4
87
3
To view detailed instructional videos regarding these and other features, please go to www.nissanownersinfo.mobi. To view detailed instructional videos regarding these and other features,
please go to www.nissanownersinfo.mobi.
Page 23 of 38
21
20
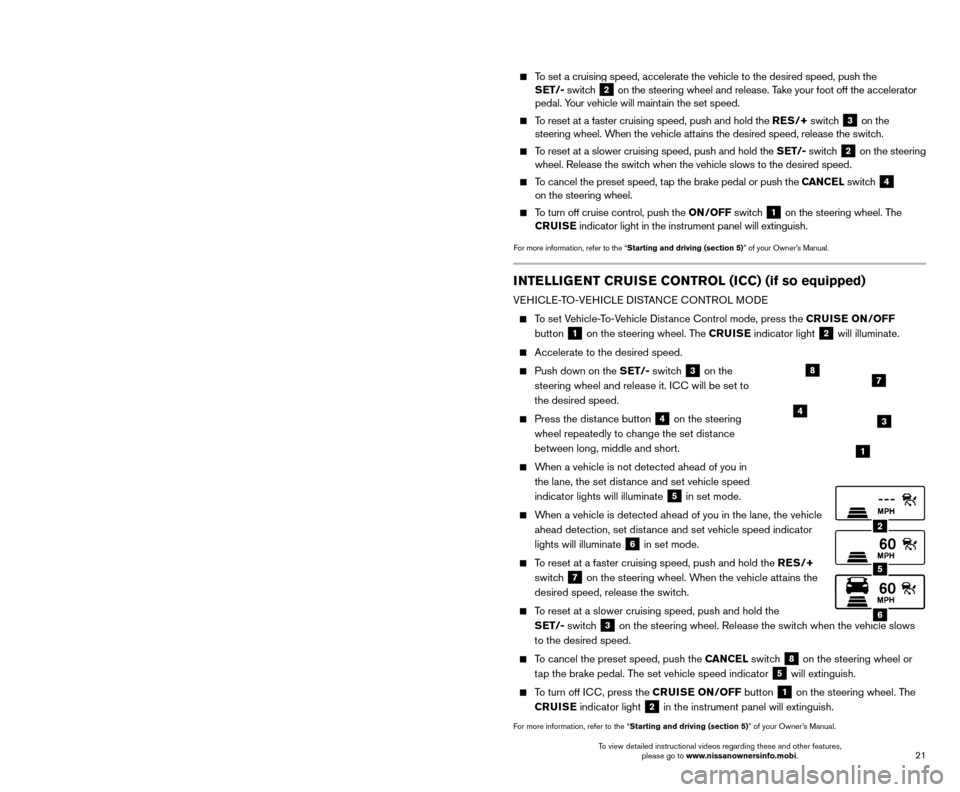
CRUISE CONTROL (if so equipped)
The cruise control system enables you to set a
constant cruising speed once the vehicle has
reached 25 mph (40 km/h).
The system will automatically maintain the set speed until you tap the brake pedal, accelerate,
cancel or turn the system off.
To activate the cruise control, push the ON/OFF
switch1 on the steering wheel. The CRUISE
indicator light in the instrument panel
will illuminate.
USB (Universal Serial Bus) CONNECTION PORT/iPOD®
INTERFACE AND AUX JACK
The USB ports are located in the media pocket
1 with the AUX jack and at the rear of the
center console
2 (if so equipped).
USB1/iPod® and USB2/iPod®
• When a device is connected via USB, the
system will automatically start playing music
from it.
•
T
his system supports Apple
® devices and USB
memory devices. Only Apple® brand or Apple® certified cables will
work. NISSAN cannot guarantee compatibility with aftermarket
cables that are not certified by Apple
®.
• T
he system may not be compatible with some versions of Android.
Touch the “USB/iPod® Menu” key to view folder list and track
listing, playlist, albums, artist and songs.
For more information, refer to the “Display screen, heater, air conditioner, audio and phone systems (section 4)”
of your Owner’s Manual or the “Audio system (section 3)” of your Navigation System Owner’s Manual.
1
2
FIRST DRIVE FEATURES
To set a cruising speed, accelerate the vehicle to the desired speed, pus\
h the
SET/- switch 2 on the steering wheel and release. Take your foot off the accelerator
pedal. Your vehicle will maintain the set speed.
To reset at a faster cruising speed, push and hold the RES/+ switch 3 on the
steering wheel. When the vehicle attains the desired speed, release the switch.
To reset at a slower cruising speed, push and hold the SET/- switch 2 on the steering
wheel. Release the switch when the vehicle slows to the desired speed.
To cancel the preset speed, tap the brake pedal or push the CANCEL switch 4
on the steering wheel.
To turn off cruise control, push the ON/OFF switch 1 on the steering wheel. The
CRUISE indicator light in the instrument panel will extinguish.
For more information, refer to the “Starting and driving (section 5)” of your Owner’s Manual.
1
2
34
FRONT ARMREST /CENTER CONSOLE STORAGE BOX
To access the top storage tray, pull up on
the lever
1.
Lift or slide the tray 2 to access the bottom
storage bin.
For more information, refer to the “Instruments and controls
(section 2)” of your Owner’s Manual.2
1
INTELLIGENT CRUISE CONTROL (ICC) (if so equipped)
VEHICLE-TO-VEHICLE DISTANCE CONTROL MODE
To set Vehicle-To-Vehicle Distance Control mode, press the CRUISE ON/OFF button
1 on the steering wheel. The CRUISE
indicator light 2 will illuminate.
Accelerate to the desired speed.
Push down on the SET/- switch 3 on the
steering wheel and release it. ICC will be set to
the desired speed.
Press the dist ance button 4 on the steering
wheel repeatedly to change the set distance
between long, middle and short.
When a vehicle is not detected ahead of you in the lane, the set distance and set vehicle speed
indicator lights will illuminate
5 in set mode.
When a vehicle is detected ahead of you in the lane, the vehicle ahead detection, set distance and set vehicle speed indicator
lights will illuminate
6 in set mode.
To reset at a faster cruising speed, push and hold the RES/+
switch
7 on the steering wheel. When the vehicle attains the
desired speed, release the switch.
To reset at a slower cruising speed, push and hold the SET/- switch
3 on the steering wheel. Release the switch when the vehicle slows
to the desired speed.
To cancel the preset speed, push the CANCEL switch 8 on the steering wheel or
tap the brake pedal. The set vehicle speed indicator
5 will extinguish.
To turn off ICC, press the CRUISE ON/OFF button 1 on the steering wheel. The
CRUISE indicator light 2 in the instrument panel will extinguish.
For more information, refer to the “Starting and driving (section 5)” of your Owner’s Manual.
2
5
6
1
4
87
3
To view detailed instructional videos regarding these and other features, please go to www.nissanownersinfo.mobi. To view detailed instructional videos regarding these and other features,
please go to www.nissanownersinfo.mobi.
Page 24 of 38
23
22
SYSTEM GUIDE
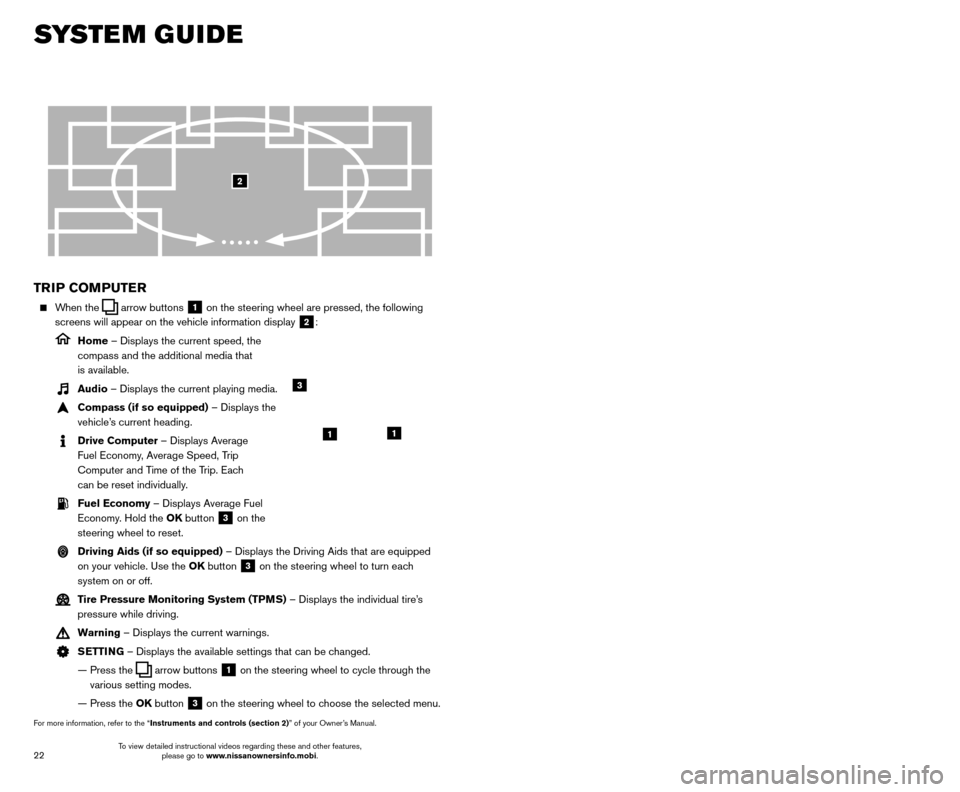
TRIP COMPUTER
When the arrow buttons 1 on the steering wheel are pressed, the following
screens will appear on the vehicle information display
2:
Home – Displays the current speed, the
compass and the additional media that
is available.
Audio – Displays the current playing media.
Compass (if so equipped) – Displays the
vehicle’s current heading.
Drive Computer – Displays Average
Fuel Economy, Average Speed, Trip
Computer and Time of the Trip. Each
can be reset individually.
Fuel Economy – Displays Average Fuel Economy. Hold the OK button
3 on the
steering wheel to reset.
Driving Aids (if so equipped) – Displays the Driving Aids that are equipped on your vehicle. Use the OK button
3 on the steering wheel to turn each
system on or off.
Tire Pressure Monitoring System (TPMS) – Displays the individual tire’s pressure while driving.
Warning – Displays the current warnings.
SETTING – Displays the available settings that can be changed.
—
Press the arrow buttons 1 on the steering wheel to cycle through the
various setting modes.
— Press the
OK button
3 on the steering wheel to choose the selected menu.
For more information, refer to the “Instruments and controls (section 2)” of your Owner’s Manual.
3
11
2
HANDS-FREE TEXT MESSAGING
ASSISTANT1,2 (if so equipped)
This system allows for sending and receiving text messages through the vehicle’s interface.
Using predefined or custom mess ages, send a
text to a name or phone number stored in your
Bluetooth
® Hands-free Phone System3.
Once enabled, the text mess age, sender and delivery time are shown on the control
panel display when the vehicle speed is less than 5 mph (8 km/h).
Text messages have the option of being read aloud at all vehicle speeds.
Once the vehicle is in motion, text mess ages can only be replied to using the Voice
Recognition
button on the steering wheel.
Custom text mess ages can be created manually when the vehicle is not in motion.
Custom text messages must be created in advance.
Many cellular phones may require special permission to enable text mess aging.
Check the cellular phone’s screen during Bluetooth®,3 pairing and accept any
permission requests for message access or text messages. For some cellular phones,
you may need to enable “Notifications” in the cellular phone’\
s Bluetooth
®,3 menu for
text messages to appear on the touch-screen display. For more detailed information
and instructions, refer to your cellular phone’s Owner’s Manual.
Text message integration requires that the cellular phone support Message Access Profile (MAP) for both receiving and sending text messages. Some
cellular phones may not support all text messaging features. Please see
www.NissanUSA.com/bluetooth for compatibility information as well as
your device’s Owner’s Manual.
1 Laws in some jurisdictions may restrict the use of “T ext-to-Speech”. Some of the applications and features, such
as social networking and texting, may also be restricted. Check local regulations for any requirements before using
these features.
2 Compatible smartphone required. Text rates and/or data usage may apply.
3 Availability of specific features is dependent upon the cellular phone’\
s Bluetooth® support. Please refer to your cellular
phone’s Owner’s Manual for details. Bluetooth® word mark and logos are owned by Bluetooth SIG, Inc., and any use of
such marks by NISSAN is under license. See www.NissanUSA.com/bluetooth for details.
For more information, refer to the “Hands-free phone (section 4)” of your Navigation System Owner’s Manual.
To view detailed instructional videos regarding these and other features, please go to www.nissanownersinfo.mobi. To view detailed instructional videos regarding these and other features,
please go to www.nissanownersinfo.mobi.
Page 25 of 38

23
22
SYSTEM GUIDE
TRIP COMPUTER
When the arrow buttons 1 on the steering wheel are pressed, the following
screens will appear on the vehicle information display
2:
Home – Displays the current speed, the
compass and the additional media that
is available.
Audio – Displays the current playing media.
Compass (if so equipped) – Displays the
vehicle’s current heading.
Drive Computer – Displays Average
Fuel Economy, Average Speed, Trip
Computer and Time of the Trip. Each
can be reset individually.
Fuel Economy – Displays Average Fuel Economy. Hold the OK button
3 on the
steering wheel to reset.
Driving Aids (if so equipped) – Displays the Driving Aids that are equipped on your vehicle. Use the OK button
3 on the steering wheel to turn each
system on or off.
Tire Pressure Monitoring System (TPMS) – Displays the individual tire’s pressure while driving.
Warning – Displays the current warnings.
SETTING – Displays the available settings that can be changed.
—
Press the arrow buttons 1 on the steering wheel to cycle through the
various setting modes.
— Press the
OK button
3 on the steering wheel to choose the selected menu.
For more information, refer to the “Instruments and controls (section 2)” of your Owner’s Manual.
3
11
2
HANDS-FREE TEXT MESSAGING
ASSISTANT1,2 (if so equipped)
This system allows for sending and receiving text messages through the vehicle’s interface.
Using predefined or custom mess ages, send a
text to a name or phone number stored in your
Bluetooth
® Hands-free Phone System3.
Once enabled, the text mess age, sender and delivery time are shown on the control
panel display when the vehicle speed is less than 5 mph (8 km/h).
Text messages have the option of being read aloud at all vehicle speeds.
Once the vehicle is in motion, text mess ages can only be replied to using the Voice
Recognition
button on the steering wheel.
Custom text mess ages can be created manually when the vehicle is not in motion.
Custom text messages must be created in advance.
Many cellular phones may require special permission to enable text mess aging.
Check the cellular phone’s screen during Bluetooth®,3 pairing and accept any
permission requests for message access or text messages. For some cellular phones,
you may need to enable “Notifications” in the cellular phone’\
s Bluetooth
®,3 menu for
text messages to appear on the touch-screen display. For more detailed information
and instructions, refer to your cellular phone’s Owner’s Manual.
Text message integration requires that the cellular phone support Message Access Profile (MAP) for both receiving and sending text messages. Some
cellular phones may not support all text messaging features. Please see
www.NissanUSA.com/bluetooth for compatibility information as well as
your device’s Owner’s Manual.
1 Laws in some jurisdictions may restrict the use of “T ext-to-Speech”. Some of the applications and features, such
as social networking and texting, may also be restricted. Check local regulations for any requirements before using
these features.
2 Compatible smartphone required. Text rates and/or data usage may apply.
3 Availability of specific features is dependent upon the cellular phone’\
s Bluetooth® support. Please refer to your cellular
phone’s Owner’s Manual for details. Bluetooth® word mark and logos are owned by Bluetooth SIG, Inc., and any use of
such marks by NISSAN is under license. See www.NissanUSA.com/bluetooth for details.
For more information, refer to the “Hands-free phone (section 4)” of your Navigation System Owner’s Manual.
To view detailed instructional videos regarding these and other features, please go to www.nissanownersinfo.mobi. To view detailed instructional videos regarding these and other features,
please go to www.nissanownersinfo.mobi.
Page 26 of 38
25
24
SYSTEM GUIDE
BLUETOOTH® HANDS-FREE
PHONE SYSTEM1
A cellular telephone should not be used
while driving so full attention may be given to
vehicle operation.
2
SYSTEM OPERATING TIPS
Press the button on the steering wheel to interrupt the voice prompts at any time\
and speak a command after the tone.
The “Help” command can be used to hear a list of available commands\
at any time.
Reduce bac kground noise as much as possible by closing windows and pointing
HVAC vents away from the ceiling.
Bluetooth®
Controls
NISSANCONNECTSM MOBILE APPS1 (if so equipped)
Press the MENU button on the control panel, touch the “Info” key on the Launch Bar
and then touch the NissanConnectsm Mobile Apps key.
Integrates popular smartphone apps and services into your vehicle.
-
T
o enroll in NissanConnect Mobile Apps, start by creating a Nissan Owner’s Portal
account at owners.NissanUSA.com.
-
Next, download the Niss
anConnect Mobile Apps companion app from Google Play
or the Apple App Store.
-
Launc
h the app and sign-in with the email user name and password you created \
when registering on the Nissan Owner’s Portal website.
For more information on how to pair your cellular phone and set up NissanConnect Mobile Apps, visit: www.NissanUSA.com/connect/support.
1 Only use features when s afe to do so. App availability is dependent upon vehicle model, trim lev\
el, packaging,
and/or options. See www.NissanUSA.com/Connect for complete app availability details. Compatible smartphone
required. Cellular network and GPS signals not available in all areas and/or at all times. NISSAN is not responsible for
associated costs, if any, for continued operation due to cellular network or other third party termination/changes. Cellular
or other third party provider may terminate/restrict respective service \
without notice. Subscription Agreement required.
See www.NissanUSA.com/connect for details. Text rates and/or data usage may apply.
2 iPhone is registered trademark of Apple, Inc. All rights reserved. iPhon\
e not included.3 Android® is a registered trademark of Google, Inc.4 Availability of specific features is dependent upon the cellular phone’\
s Bluetooth® support. Please refer to your cellular
phone’s Owner’s Manual for details. Bluetooth® word mark and logos are owned by Bluetooth SIG, Inc., and any use of
such marks by NISSAN is under license. See www.NissanUSA.com/bluetooth for details.
For more information, refer to the “Display screen, heater, air conditioner, audio and phone systems (section 4)”
of your Owner’s Manual or the “Information (section 5)” of your Navigation System Owner’s Manual.
Speak naturally without long pauses and without raising your voice.
If you experience difficulty with the V oice
Recognition System recognizing a contact
name, please try saying both the first and last
name of the contact as this improves
recognition accuracy.
To cancel a Voice Recognition session, say “Cancel” or “Quit” or press and hold the
button on the steering wheel for
5 seconds.
For more detailed information and instructions, refer to your cellular phone’s Owner’s Manual and visit www.NissanUSA.com/bluetooth.
1 Availability of specific features is dependent upon the cellular phone’\
s Bluetooth® support. Please refer to your cellular
phone’s Owner’s Manual for details. Bluetooth® word mark and logos are owned by Bluetooth SIG, Inc., and any use of
such marks by NISSAN is under license. See www.NissanUSA.com/bluetooth for details.
2 Some jurisdictions prohibit the use of cellular telephones while drivin\
g.
BLUETOOTH® SYSTEM WITH NAVIGATION1,2 (if so equipped)
Bluetooth®,2 Streaming Audio allows you to use a compatible Bluetooth®,2 cellular
phone to play audio files on your device. Your compatible cellular phone can be
connected to the vehicle’s audio system, allowing audio files to play through the vehicle’s speakers.
CONNECTING PROCEDURE
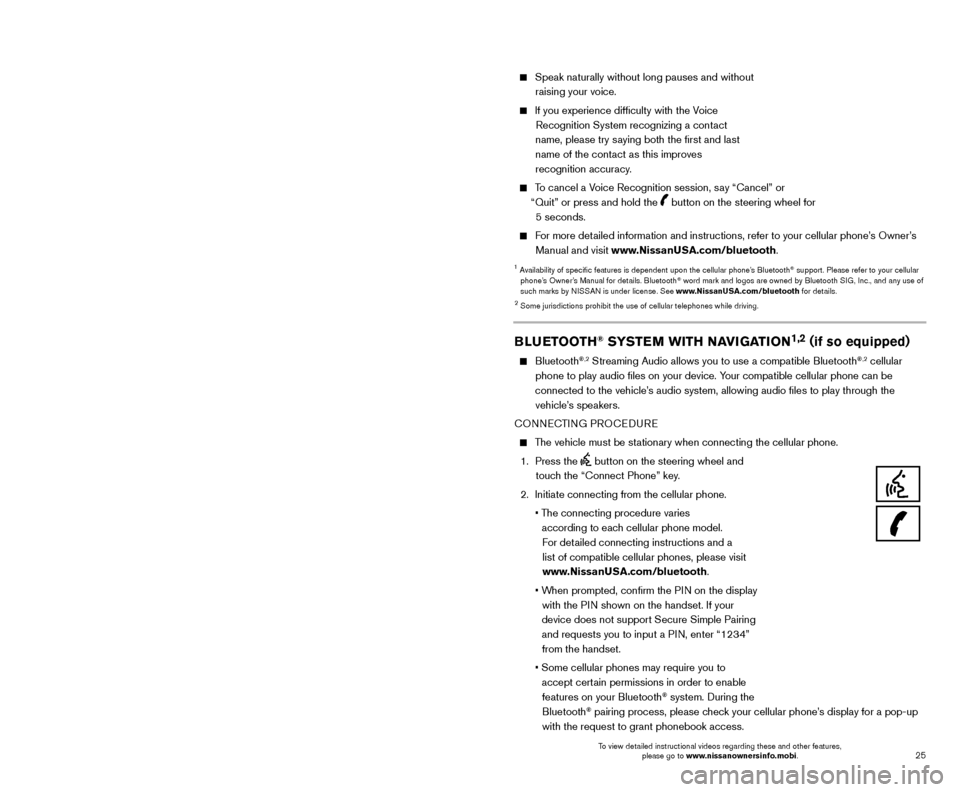
The vehicle must be stationary when connecting the cellular phone.
1.
Press the
button on the steering wheel and
touch the “Connect Phone” key.
2.
Initiate connecting from the cellular phone.
•
T
he connecting procedure varies
according to each cellular phone model. For detailed connecting instructions and a list of compatible cellular phones, please visit
www.NissanUSA.com/bluetooth.
•
W
hen prompted, confirm the PIN on the display
with the PIN shown on the handset. If your
device does not support Secure Simple Pairing and requests you to input a PIN, enter “1234” from the handset.
•
Some cellular phones may require you to accept cert
ain permissions in order to enable
features on your Bluetooth
® system. During the
Bluetooth® pairing process, please check your cellular phone’s display for a pop-up
with the request to grant phonebook access.
Microphone
To view detailed instructional videos regarding these and other features, please go to www.nissanownersinfo.mobi. To view detailed instructional videos regarding these and other features,
please go to www.nissanownersinfo.mobi.
Page 27 of 38
25
24
SYSTEM GUIDE
BLUETOOTH® HANDS-FREE
PHONE SYSTEM1
A cellular telephone should not be used
while driving so full attention may be given to
vehicle operation.
2
SYSTEM OPERATING TIPS
Press the button on the steering wheel to interrupt the voice prompts at any time\
and speak a command after the tone.
The “Help” command can be used to hear a list of available commands\
at any time.
Reduce bac kground noise as much as possible by closing windows and pointing
HVAC vents away from the ceiling.
Bluetooth®
Controls
NISSANCONNECTSM MOBILE APPS1 (if so equipped)
Press the MENU button on the control panel, touch the “Info” key on the Launch Bar
and then touch the NissanConnectsm Mobile Apps key.
Integrates popular smartphone apps and services into your vehicle.
-
T
o enroll in NissanConnect Mobile Apps, start by creating a Nissan Owner’s Portal
account at owners.NissanUSA.com.
-
Next, download the Niss
anConnect Mobile Apps companion app from Google Play
or the Apple App Store.
-
Launc
h the app and sign-in with the email user name and password you created \
when registering on the Nissan Owner’s Portal website.
For more information on how to pair your cellular phone and set up NissanConnect Mobile Apps, visit: www.NissanUSA.com/connect/support.
1 Only use features when s afe to do so. App availability is dependent upon vehicle model, trim lev\
el, packaging,
and/or options. See www.NissanUSA.com/Connect for complete app availability details. Compatible smartphone
required. Cellular network and GPS signals not available in all areas and/or at all times. NISSAN is not responsible for
associated costs, if any, for continued operation due to cellular network or other third party termination/changes. Cellular
or other third party provider may terminate/restrict respective service \
without notice. Subscription Agreement required.
See www.NissanUSA.com/connect for details. Text rates and/or data usage may apply.
2 iPhone is registered trademark of Apple, Inc. All rights reserved. iPhon\
e not included.3 Android® is a registered trademark of Google, Inc.4 Availability of specific features is dependent upon the cellular phone’\
s Bluetooth® support. Please refer to your cellular
phone’s Owner’s Manual for details. Bluetooth® word mark and logos are owned by Bluetooth SIG, Inc., and any use of
such marks by NISSAN is under license. See www.NissanUSA.com/bluetooth for details.
For more information, refer to the “Display screen, heater, air conditioner, audio and phone systems (section 4)”
of your Owner’s Manual or the “Information (section 5)” of your Navigation System Owner’s Manual.
Speak naturally without long pauses and without raising your voice.
If you experience difficulty with the V oice
Recognition System recognizing a contact
name, please try saying both the first and last
name of the contact as this improves
recognition accuracy.
To cancel a Voice Recognition session, say “Cancel” or “Quit” or press and hold the
button on the steering wheel for
5 seconds.
For more detailed information and instructions, refer to your cellular phone’s Owner’s Manual and visit www.NissanUSA.com/bluetooth.
1 Availability of specific features is dependent upon the cellular phone’\
s Bluetooth® support. Please refer to your cellular
phone’s Owner’s Manual for details. Bluetooth® word mark and logos are owned by Bluetooth SIG, Inc., and any use of
such marks by NISSAN is under license. See www.NissanUSA.com/bluetooth for details.
2 Some jurisdictions prohibit the use of cellular telephones while drivin\
g.
BLUETOOTH® SYSTEM WITH NAVIGATION1,2 (if so equipped)
Bluetooth®,2 Streaming Audio allows you to use a compatible Bluetooth®,2 cellular
phone to play audio files on your device. Your compatible cellular phone can be
connected to the vehicle’s audio system, allowing audio files to play through the vehicle’s speakers.
CONNECTING PROCEDURE
The vehicle must be stationary when connecting the cellular phone.
1.
Press the
button on the steering wheel and
touch the “Connect Phone” key.
2.
Initiate connecting from the cellular phone.
•
T
he connecting procedure varies
according to each cellular phone model. For detailed connecting instructions and a list of compatible cellular phones, please visit
www.NissanUSA.com/bluetooth.
•
W
hen prompted, confirm the PIN on the display
with the PIN shown on the handset. If your
device does not support Secure Simple Pairing and requests you to input a PIN, enter “1234” from the handset.
•
Some cellular phones may require you to accept cert
ain permissions in order to enable
features on your Bluetooth
® system. During the
Bluetooth® pairing process, please check your cellular phone’s display for a pop-up
with the request to grant phonebook access.
Microphone
To view detailed instructional videos regarding these and other features, please go to www.nissanownersinfo.mobi. To view detailed instructional videos regarding these and other features,
please go to www.nissanownersinfo.mobi.