2017 NISSAN MURANO brake light
[x] Cancel search: brake lightPage 16 of 38

15
14
FIRST DRIVE FEATURES
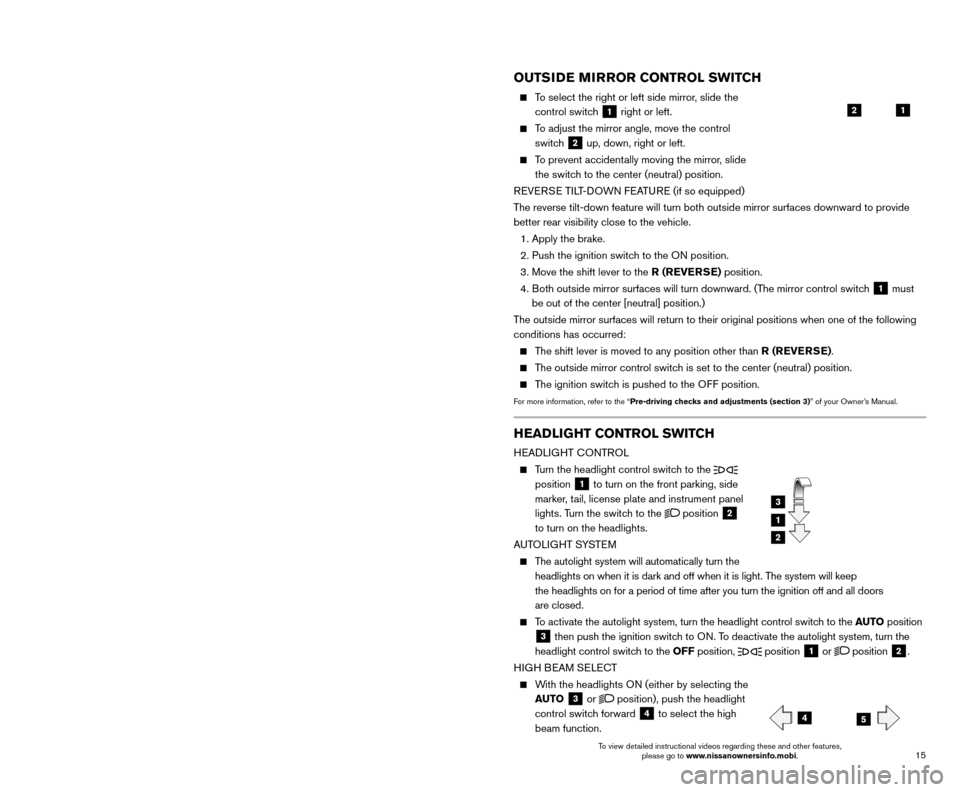
OUTSIDE MIRROR CONTROL SWITCH
To select the right or left side mirror, slide the
control switch
1 right or left.
To adjust the mirror angle, move the control switch
2 up, down, right or left.
To prevent accidentally moving the mirror, slide the switch to the center (neutral) position.
REVERSE TILT-DOWN FEATURE (if so equipped)
The reverse tilt-down feature will turn both outside mirror surfaces down\
ward to provide
better rear visibility close to the vehicle.
1. Apply the brake.
2. Push the ignition switc
h to the ON position.
3.
Move the shift lever to the
R (REVERSE) position.
4.
B
oth outside mirror surfaces will turn downward. (The mirror control switch
1 must
be out of the center [neutral] position.)
The outside mirror surfaces will return to their original positions when \
one of the following
conditions has occurred:
The shift lever is moved to any position other than R (REVERSE).
The outside mirror control switch is set to the center (neutral) position.
The ignition switch is pushed to the OFF position.
For more information, refer to the “Pre-driving checks and adjustments (section 3)” of your Owner’s Manual.
1
STARTING/STOPPING THE ENGINE
It is import ant to make sure the Nissan Intelligent
Key® is with you (that is, in your
pocket or purse).
Depress the brake pedal.
Press the ignition switc h START/STOP button
to start the engine.
TURNING THE ENGINE OFF
Move the shift lever to the P (PARK) position.
Press the ignition switch START/STOP button to turn the engine off.
For more information, refer to the “Starting and driving (section 5)” of your Owner’s Manual.
2
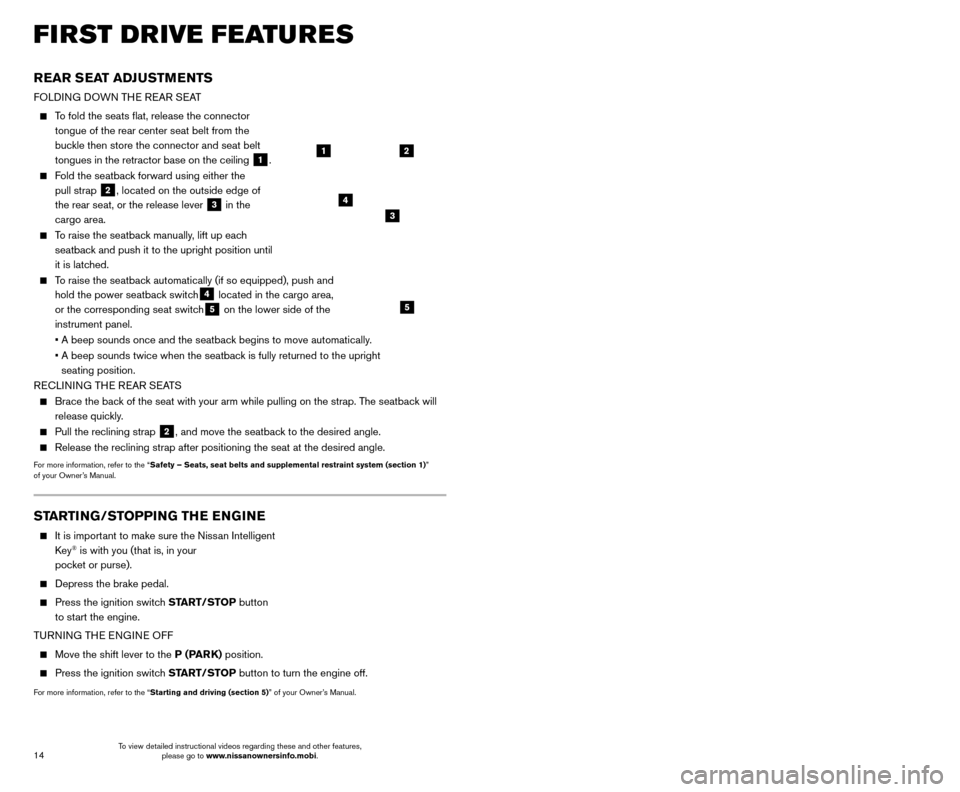
REAR SEAT ADJUSTMENTS
FOLDING DOWN THE REAR SEAT
To fold the seats flat, release the connector
tongue of the rear center seat belt from the
buckle then store the connector and seat belt
tongues in the retractor base on the ceiling
1.
Fold the seatback forward using either the pull strap
2, located on the outside edge of
the rear seat, or the release lever
3 in the
cargo area.
To raise the seatback manually, lift up each seatback and push it to the upright position until
it is latched.
To raise the seatback automatically (if so equipped), push and hold the power seatback switch
4 located in the cargo area,
or the corresponding seat switch5 on the lower side of the
instrument panel.
•
A beep sounds once and the seatbac
k begins to move automatically.
•
A beep sounds twice when the seatbac
k is fully returned to the upright
seating position.
RECLINING THE REAR SEATS
Brace the bac k of the seat with your arm while pulling on the strap. The seatback will
release quickly.
Pull the reclining strap 2, and move the seatback to the desired angle.
Release the reclining strap after positioning the seat at the desired an\
gle.
For more information, refer to the “Safety – Seats, seat belts and supplemental restraint system (sectio\
n 1) ”
of your Owner’s Manual.
4
21
3
5
HEADLIGHT CONTROL SWITCH
HEADLIGHT CONTROL
Turn the headlight control switch to the
position
1 to turn on the front parking, side
marker, tail, license plate and instrument panel
lights. Turn the switch to the
position 2
to turn on the headlights.
AUTOLIGHT SYSTEM
The autolight system will automatically turn the headlights on when it is dark and off when it is light. The system will keep
the headlights on for a period of time after you turn the ignition off a\
nd all doors
are closed.
To activate the autolight system, turn the headlight control switch to the AUTO position
3 then push the ignition switch to ON. To deactivate the autolight system, turn the
headlight control switch to the OFF position,
position 1 or position 2.
HIGH BEAM SELECT
With the headlights ON (either by selecting the AUTO
3 or position), push the headlight
control switch forward
4 to select the high
beam function.
1
3
2
45
To view detailed instructional videos regarding these and other features, please go to www.nissanownersinfo.mobi. To view detailed instructional videos regarding these and other features,
please go to www.nissanownersinfo.mobi.
Page 17 of 38

15
14
FIRST DRIVE FEATURES
OUTSIDE MIRROR CONTROL SWITCH
To select the right or left side mirror, slide the
control switch
1 right or left.
To adjust the mirror angle, move the control switch
2 up, down, right or left.
To prevent accidentally moving the mirror, slide the switch to the center (neutral) position.
REVERSE TILT-DOWN FEATURE (if so equipped)
The reverse tilt-down feature will turn both outside mirror surfaces down\
ward to provide
better rear visibility close to the vehicle.
1. Apply the brake.
2. Push the ignition switc
h to the ON position.
3.
Move the shift lever to the
R (REVERSE) position.
4.
B
oth outside mirror surfaces will turn downward. (The mirror control switch
1 must
be out of the center [neutral] position.)
The outside mirror surfaces will return to their original positions when \
one of the following
conditions has occurred:
The shift lever is moved to any position other than R (REVERSE).
The outside mirror control switch is set to the center (neutral) position.
The ignition switch is pushed to the OFF position.
For more information, refer to the “Pre-driving checks and adjustments (section 3)” of your Owner’s Manual.
1
STARTING/STOPPING THE ENGINE
It is import ant to make sure the Nissan Intelligent
Key® is with you (that is, in your
pocket or purse).
Depress the brake pedal.
Press the ignition switc h START/STOP button
to start the engine.
TURNING THE ENGINE OFF
Move the shift lever to the P (PARK) position.
Press the ignition switch START/STOP button to turn the engine off.
For more information, refer to the “Starting and driving (section 5)” of your Owner’s Manual.
2
REAR SEAT ADJUSTMENTS
FOLDING DOWN THE REAR SEAT
To fold the seats flat, release the connector
tongue of the rear center seat belt from the
buckle then store the connector and seat belt
tongues in the retractor base on the ceiling
1.
Fold the seatback forward using either the pull strap
2, located on the outside edge of
the rear seat, or the release lever
3 in the
cargo area.
To raise the seatback manually, lift up each seatback and push it to the upright position until
it is latched.
To raise the seatback automatically (if so equipped), push and hold the power seatback switch
4 located in the cargo area,
or the corresponding seat switch5 on the lower side of the
instrument panel.
•
A beep sounds once and the seatbac
k begins to move automatically.
•
A beep sounds twice when the seatbac
k is fully returned to the upright
seating position.
RECLINING THE REAR SEATS
Brace the bac k of the seat with your arm while pulling on the strap. The seatback will
release quickly.
Pull the reclining strap 2, and move the seatback to the desired angle.
Release the reclining strap after positioning the seat at the desired an\
gle.
For more information, refer to the “Safety – Seats, seat belts and supplemental restraint system (sectio\
n 1) ”
of your Owner’s Manual.
4
21
3
5
HEADLIGHT CONTROL SWITCH
HEADLIGHT CONTROL
Turn the headlight control switch to the
position
1 to turn on the front parking, side
marker, tail, license plate and instrument panel
lights. Turn the switch to the
position 2
to turn on the headlights.
AUTOLIGHT SYSTEM
The autolight system will automatically turn the headlights on when it is dark and off when it is light. The system will keep
the headlights on for a period of time after you turn the ignition off a\
nd all doors
are closed.
To activate the autolight system, turn the headlight control switch to the AUTO position
3 then push the ignition switch to ON. To deactivate the autolight system, turn the
headlight control switch to the OFF position,
position 1 or position 2.
HIGH BEAM SELECT
With the headlights ON (either by selecting the AUTO
3 or position), push the headlight
control switch forward
4 to select the high
beam function.
1
3
2
45
To view detailed instructional videos regarding these and other features, please go to www.nissanownersinfo.mobi. To view detailed instructional videos regarding these and other features,
please go to www.nissanownersinfo.mobi.
Page 22 of 38

21
20
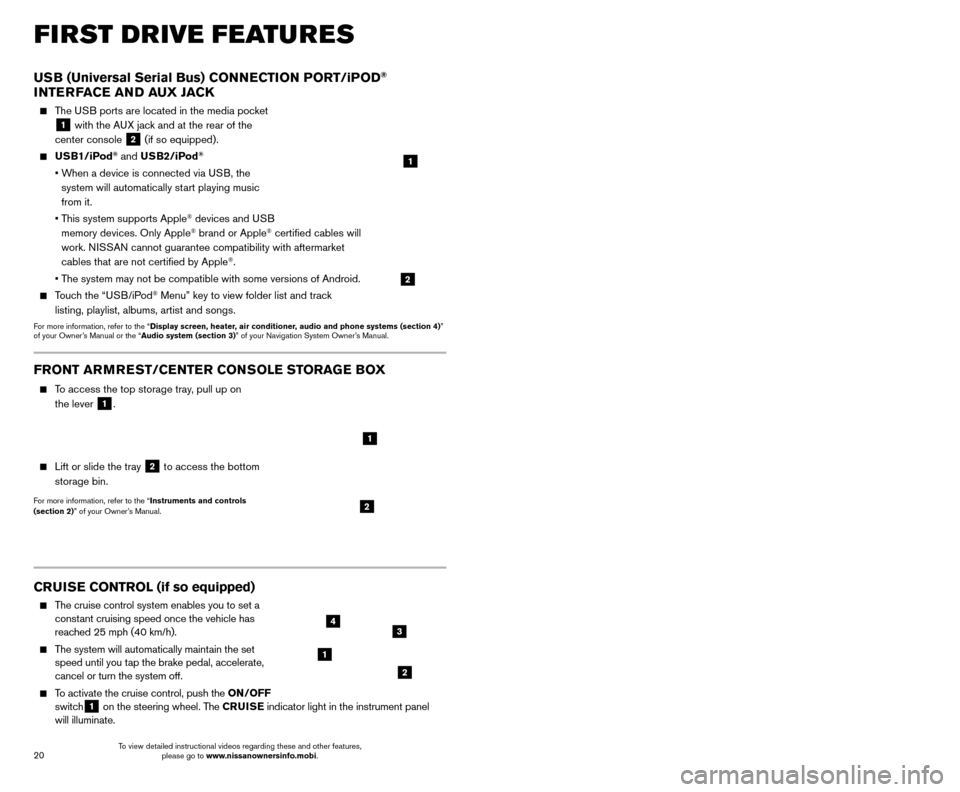
CRUISE CONTROL (if so equipped)
The cruise control system enables you to set a
constant cruising speed once the vehicle has
reached 25 mph (40 km/h).
The system will automatically maintain the set speed until you tap the brake pedal, accelerate,
cancel or turn the system off.
To activate the cruise control, push the ON/OFF
switch1 on the steering wheel. The CRUISE
indicator light in the instrument panel
will illuminate.
USB (Universal Serial Bus) CONNECTION PORT/iPOD®
INTERFACE AND AUX JACK
The USB ports are located in the media pocket
1 with the AUX jack and at the rear of the
center console
2 (if so equipped).
USB1/iPod® and USB2/iPod®
• When a device is connected via USB, the
system will automatically start playing music
from it.
•
T
his system supports Apple
® devices and USB
memory devices. Only Apple® brand or Apple® certified cables will
work. NISSAN cannot guarantee compatibility with aftermarket
cables that are not certified by Apple
®.
• T
he system may not be compatible with some versions of Android.
Touch the “USB/iPod® Menu” key to view folder list and track
listing, playlist, albums, artist and songs.
For more information, refer to the “Display screen, heater, air conditioner, audio and phone systems (section 4)”
of your Owner’s Manual or the “Audio system (section 3)” of your Navigation System Owner’s Manual.
1
2
FIRST DRIVE FEATURES
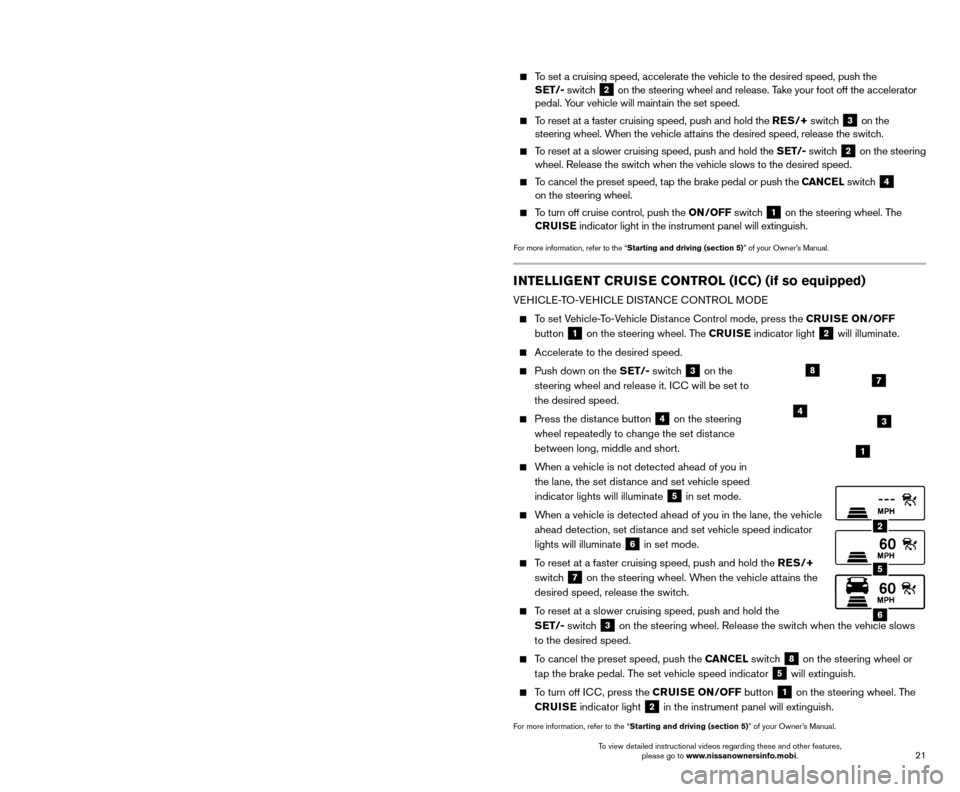
To set a cruising speed, accelerate the vehicle to the desired speed, pus\
h the
SET/- switch 2 on the steering wheel and release. Take your foot off the accelerator
pedal. Your vehicle will maintain the set speed.
To reset at a faster cruising speed, push and hold the RES/+ switch 3 on the
steering wheel. When the vehicle attains the desired speed, release the switch.
To reset at a slower cruising speed, push and hold the SET/- switch 2 on the steering
wheel. Release the switch when the vehicle slows to the desired speed.
To cancel the preset speed, tap the brake pedal or push the CANCEL switch 4
on the steering wheel.
To turn off cruise control, push the ON/OFF switch 1 on the steering wheel. The
CRUISE indicator light in the instrument panel will extinguish.
For more information, refer to the “Starting and driving (section 5)” of your Owner’s Manual.
1
2
34
FRONT ARMREST /CENTER CONSOLE STORAGE BOX
To access the top storage tray, pull up on
the lever
1.
Lift or slide the tray 2 to access the bottom
storage bin.
For more information, refer to the “Instruments and controls
(section 2)” of your Owner’s Manual.2
1
INTELLIGENT CRUISE CONTROL (ICC) (if so equipped)
VEHICLE-TO-VEHICLE DISTANCE CONTROL MODE
To set Vehicle-To-Vehicle Distance Control mode, press the CRUISE ON/OFF button
1 on the steering wheel. The CRUISE
indicator light 2 will illuminate.
Accelerate to the desired speed.
Push down on the SET/- switch 3 on the
steering wheel and release it. ICC will be set to
the desired speed.
Press the dist ance button 4 on the steering
wheel repeatedly to change the set distance
between long, middle and short.
When a vehicle is not detected ahead of you in the lane, the set distance and set vehicle speed
indicator lights will illuminate
5 in set mode.
When a vehicle is detected ahead of you in the lane, the vehicle ahead detection, set distance and set vehicle speed indicator
lights will illuminate
6 in set mode.
To reset at a faster cruising speed, push and hold the RES/+
switch
7 on the steering wheel. When the vehicle attains the
desired speed, release the switch.
To reset at a slower cruising speed, push and hold the SET/- switch
3 on the steering wheel. Release the switch when the vehicle slows
to the desired speed.
To cancel the preset speed, push the CANCEL switch 8 on the steering wheel or
tap the brake pedal. The set vehicle speed indicator
5 will extinguish.
To turn off ICC, press the CRUISE ON/OFF button 1 on the steering wheel. The
CRUISE indicator light 2 in the instrument panel will extinguish.
For more information, refer to the “Starting and driving (section 5)” of your Owner’s Manual.
2
5
6
1
4
87
3
To view detailed instructional videos regarding these and other features, please go to www.nissanownersinfo.mobi. To view detailed instructional videos regarding these and other features,
please go to www.nissanownersinfo.mobi.
Page 23 of 38

21
20
CRUISE CONTROL (if so equipped)
The cruise control system enables you to set a
constant cruising speed once the vehicle has
reached 25 mph (40 km/h).
The system will automatically maintain the set speed until you tap the brake pedal, accelerate,
cancel or turn the system off.
To activate the cruise control, push the ON/OFF
switch1 on the steering wheel. The CRUISE
indicator light in the instrument panel
will illuminate.
USB (Universal Serial Bus) CONNECTION PORT/iPOD®
INTERFACE AND AUX JACK
The USB ports are located in the media pocket
1 with the AUX jack and at the rear of the
center console
2 (if so equipped).
USB1/iPod® and USB2/iPod®
• When a device is connected via USB, the
system will automatically start playing music
from it.
•
T
his system supports Apple
® devices and USB
memory devices. Only Apple® brand or Apple® certified cables will
work. NISSAN cannot guarantee compatibility with aftermarket
cables that are not certified by Apple
®.
• T
he system may not be compatible with some versions of Android.
Touch the “USB/iPod® Menu” key to view folder list and track
listing, playlist, albums, artist and songs.
For more information, refer to the “Display screen, heater, air conditioner, audio and phone systems (section 4)”
of your Owner’s Manual or the “Audio system (section 3)” of your Navigation System Owner’s Manual.
1
2
FIRST DRIVE FEATURES
To set a cruising speed, accelerate the vehicle to the desired speed, pus\
h the
SET/- switch 2 on the steering wheel and release. Take your foot off the accelerator
pedal. Your vehicle will maintain the set speed.
To reset at a faster cruising speed, push and hold the RES/+ switch 3 on the
steering wheel. When the vehicle attains the desired speed, release the switch.
To reset at a slower cruising speed, push and hold the SET/- switch 2 on the steering
wheel. Release the switch when the vehicle slows to the desired speed.
To cancel the preset speed, tap the brake pedal or push the CANCEL switch 4
on the steering wheel.
To turn off cruise control, push the ON/OFF switch 1 on the steering wheel. The
CRUISE indicator light in the instrument panel will extinguish.
For more information, refer to the “Starting and driving (section 5)” of your Owner’s Manual.
1
2
34
FRONT ARMREST /CENTER CONSOLE STORAGE BOX
To access the top storage tray, pull up on
the lever
1.
Lift or slide the tray 2 to access the bottom
storage bin.
For more information, refer to the “Instruments and controls
(section 2)” of your Owner’s Manual.2
1
INTELLIGENT CRUISE CONTROL (ICC) (if so equipped)
VEHICLE-TO-VEHICLE DISTANCE CONTROL MODE
To set Vehicle-To-Vehicle Distance Control mode, press the CRUISE ON/OFF button
1 on the steering wheel. The CRUISE
indicator light 2 will illuminate.
Accelerate to the desired speed.
Push down on the SET/- switch 3 on the
steering wheel and release it. ICC will be set to
the desired speed.
Press the dist ance button 4 on the steering
wheel repeatedly to change the set distance
between long, middle and short.
When a vehicle is not detected ahead of you in the lane, the set distance and set vehicle speed
indicator lights will illuminate
5 in set mode.
When a vehicle is detected ahead of you in the lane, the vehicle ahead detection, set distance and set vehicle speed indicator
lights will illuminate
6 in set mode.
To reset at a faster cruising speed, push and hold the RES/+
switch
7 on the steering wheel. When the vehicle attains the
desired speed, release the switch.
To reset at a slower cruising speed, push and hold the SET/- switch
3 on the steering wheel. Release the switch when the vehicle slows
to the desired speed.
To cancel the preset speed, push the CANCEL switch 8 on the steering wheel or
tap the brake pedal. The set vehicle speed indicator
5 will extinguish.
To turn off ICC, press the CRUISE ON/OFF button 1 on the steering wheel. The
CRUISE indicator light 2 in the instrument panel will extinguish.
For more information, refer to the “Starting and driving (section 5)” of your Owner’s Manual.
2
5
6
1
4
87
3
To view detailed instructional videos regarding these and other features, please go to www.nissanownersinfo.mobi. To view detailed instructional videos regarding these and other features,
please go to www.nissanownersinfo.mobi.