Page 44 of 466

WARNING
Do not allow children to play with the seat
belts. Most seating positions are
equipped with Automatic Locking Retrac-
tor (ALR) mode seat belts. If the seat belt
becomes wrapped around a child’s neck
with the ALR mode activated, the child can
be seriously injured or killed if the seat
belt retracts and becomes tight. This can
occur even if the vehicle is parked. Un-
buckle the seat belt to release the child. If
the seat belt cannot be unbuckled or is
already unbuckled, release the child by
cutting the seat belt with a suitable tool
(such as a knife or scissors) to release the
seat belt.
Children need adults to help protect them.
They need to be properly restrained.
In addition to the general information in this
manual, child safety information is available from
many other sources, including doctors, teachers,
government traffic safety offices, and community
organizations. Every child is different, so be sure
to learn the best way to transport your child.
There are three basic types of child restraint
systems: ● Rear-facing child restraints ●
Forward-facing child restraints
● Booster seats
The proper restraint depends on the child’s size.
Generally, infants up to about 1 year and less
than 20 lbs. (9 kg) should be placed in rear-
facing child restraints. Forward-facing child re-
straints are available for children who outgrow
rear-facing child restraints and are at least 1 year
old. Booster seats are used to help position a
vehicle lap/shoulder belt on a child who can no
longer use a forward-facing child restraint.
Page 146 of 466

WARNING
●Do not use the HomeLink® Universal
Transceiver with any garage door
opener that lacks safety stop and re-
verse features as required by federal
safety standards. (These standards be-
came effective for opener models
manufactured after April 1, 1982) . A ga-
rage door opener which cannot detect
an object in the path of a closing garage
door and then automatically stop and
reverse, does not meet current federal
safety standards. Using a garage door
opener without these features in-
creases the risk of serious injury or
death.
● During the programming procedure
your garage door or security gate will
open and close (if the transmitter is
within range) . Make sure that people or
objects are clear of the garage door,
gate, etc. that you are programming.
● Your vehicle’s engine should be turned
off while programming the HomeLink®
Universal Transceiver.
PROGRAMMING HOMELINK®
If you have any questions or are having difficulty
programming your HomeLink® buttons, refer to
the HomeLink® web site at: www.homelink.com
or call 1-800-355-3515.
NOTE:
Place the ignition switch in the ACC posi-
tion (if so equipped) when programming
HomeLink®. It is also recommended that a
new battery be placed in the hand-held
transmitter of the device being pro-
grammed to HomeLink® for quicker pro-
gramming and accurate transmission of
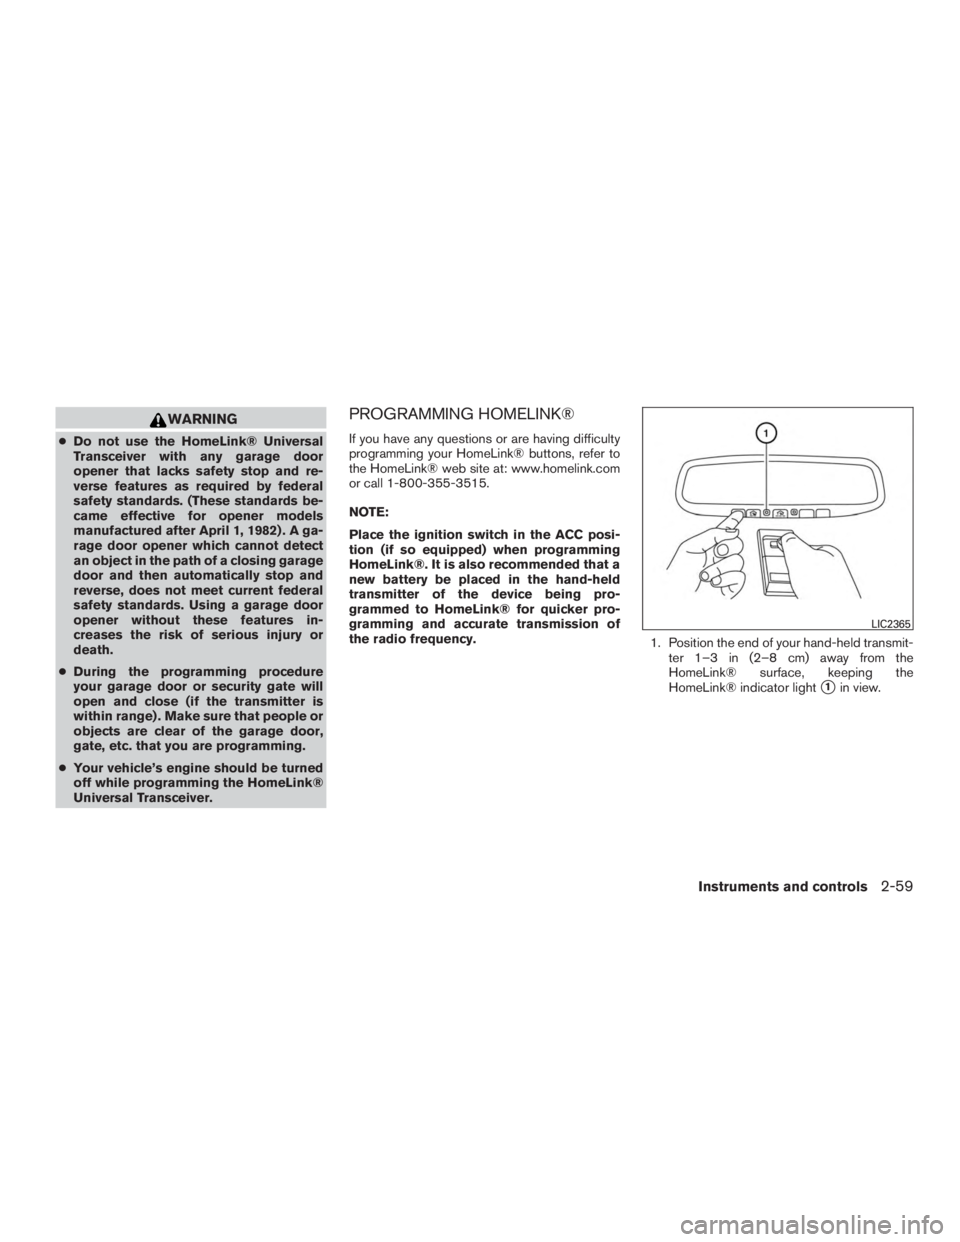
the radio frequency. 1. Position the end of your hand-held transmit-
ter 1–3 in (2–8 cm) away from the
HomeLink® surface, keeping the
HomeLink® indicator light
�1in view.
Page 175 of 466
Auto Reverse:
If an obstacle is detected during power open or
power close, a warning chime will sound and the
liftgate will reverse direction and return to the full
open or full close position. If a second obstacle is
detected, the liftgate motion will stop and the
liftgate will enter manual mode.
A pinch strip is mounted on each side of the
liftgate. If an obstacle is detected by a pinch strip
during power close, the liftgate will reverse direc-
tion and return to the full open position.
NOTE:
If the pinch strip is damaged or removed,
the power close function will not operate.
Page 212 of 466

●When the shift lever is in the R (Reverse)
position and the vehicle speed is below ap-
proximately 6 mph (10 km/h), the MOD sys-
tem detects moving objects in the rear view.
The MOD system will not operate if the
liftgate is open.
The MOD system does not detect moving ob-
jects in the front-side view. The MOD icon is not
displayed on the screen when in this view.
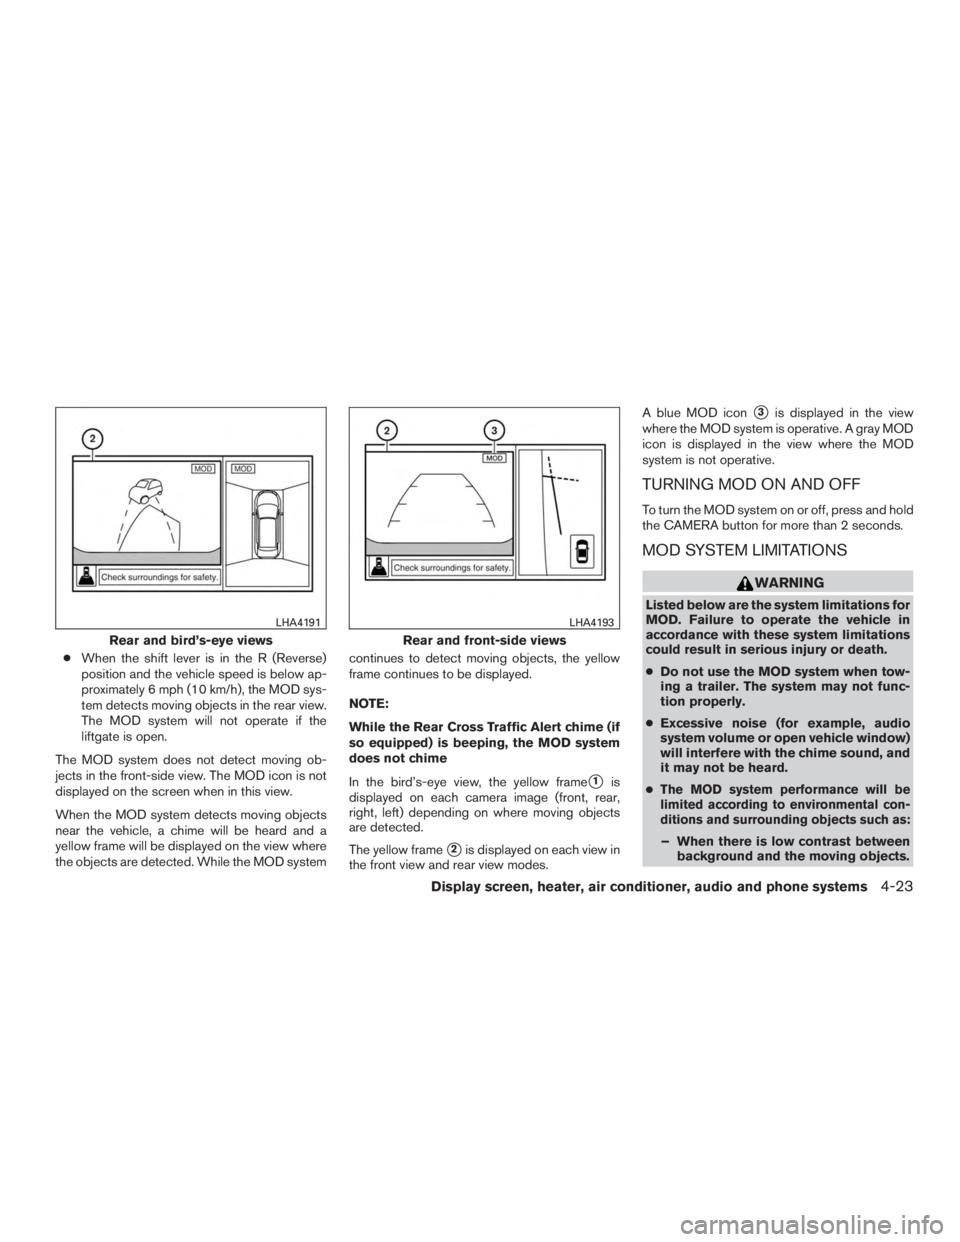
When the MOD system detects moving objects
near the vehicle, a chime will be heard and a
yellow frame will be displayed on the view where
the objects are detected. While the MOD system continues to detect moving objects, the yellow
frame continues to be displayed.
NOTE:
While the Rear Cross Traffic Alert chime (if
so equipped) is beeping, the MOD system
does not chime
In the bird’s-eye view, the yellow frame
�1is
displayed on each camera image (front, rear,
right, left) depending on where moving objects
are detected.
The yellow frame
�2is displayed on each view in
the front view and rear view modes. A blue MOD icon
�3is displayed in the view
where the MOD system is operative. A gray MOD
icon is displayed in the view where the MOD
system is not operative.
TURNING MOD ON AND OFF
To turn the MOD system on or off, press and hold
the CAMERA button for more than 2 seconds.
MOD SYSTEM LIMITATIONS
Page 218 of 466
●When the outside and interior cabin tem-
peratures are moderate to high, the intake
setting may default to turn off air recircula-
tion to allow fresh air into the passenger
compartment. You may notice air flow from
the foot mode vent outlets for a maximum of
15 seconds. This is not a malfunction. After
the initial warm air is expelled, the intake will
return to automatic control, air flow outlet will
return to previous settings, and operation
may continue normally. To exit, press any
climate control button.
● Keep the moonroof (if so equipped) closed
while the air conditioner is in operation.
● If you feel that the air flow mode you have
selected and the outlets the air is coming out
do not match, select the
Page 358 of 466
For additional information about towing your front
wheel drive vehicle behind a Recreational Vehicle
(RV) , refer to “Flat towing for front wheel drive
vehicle” in the “Technical and consumer informa-
tion” section of this manual.
For additional information about towing your all-
wheel drive vehicle behind a Recreational Vehicle
(RV) , refer to “Flat towing for all-wheel drive
vehicle” in the “Technical and consumer informa-
tion” section of this manual.
TOWING RECOMMENDED BY
NISSAN
NISSAN recommends towing your vehicle based
upon the type of drivetrain. Please refer to the
diagrams in this section to ensure that your ve-
hicle is properly towed.
All-Wheel Drive (AWD) models
NISSAN recommends that towing dollies be
used when towing your vehicle or the vehicle be
placed on a flatbed truck as illustrated.
Page 359 of 466
Front-Wheel Drive (FWD) models
NISSAN recommends that your vehicle be towed
with the driving wheels (front) off the ground or
place the vehicle on a flatbed truck as illustrated.
Page 446 of 466

Pre-towing tips
●Be certain your vehicle maintains a level
position when a loaded and/or unloaded
trailer is hitched. Do not drive the vehicle if it
has an abnormal nose-up or nose-down
condition; check for improper tongue load,
overload, worn suspension or other possible
causes of either condition.
● Always secure items in the trailer to prevent
load shift while driving.
●
Keep the cargo load as low as possible in the
trailer to keep the trailer center of gravity low.
● Load the trailer so approximately 60% of the
trailer load is in the front half and 40% is in
the back half. Also make sure the load is
balanced side to side.
● Check your hitch, trailer tire pressure, ve-
hicle tire pressure, trailer light operation, and
trailer wheel lug nuts every time you attach a
trailer to the vehicle.
● Be certain your rearview mirrors conform to
all federal, state or local regulations. If not,
install any mirrors required for towing before
driving the vehicle. ●
Determine the overall height of the vehicle
and trailer so the required clearance is
known.
Trailer towing tips
In order to gain skill and an understanding of the
vehicle’s behavior, you should practice turning,
stopping and backing up in an area which is free
from traffic. Steering stability and braking perfor-
mance will be somewhat different than under
normal driving conditions.
● Always secure items in the trailer to prevent
load shift while driving.
● Lock the trailer hitch coupler with a pin or
lock to prevent the coupler from inadver-
tently becoming unlatched.
● Avoid abrupt starts, acceleration or stops.
● Avoid sharp turns or lane changes.
● Always drive your vehicle at a moderate
speed.
● When backing up, hold the bottom of the
steering wheel with one hand. Move your
hand in the direction in which you want the
trailer to go. Make small corrections and
back up slowly. If possible, have someone
guide you when you are backing up. Always block the wheels on both vehicle and
trailer when parking. Parking on a slope is not
recommended; however, if you must do so: