2017 NISSAN MURANO navigation
[x] Cancel search: navigationPage 160 of 466
AUTOMATIC DOOR LOCKS
●All doors lock automatically when the vehicle
speed reaches 15 mph (24 km/h).
● All doors unlock automatically when the ig-
nition is placed in the OFF position.
CHILD SAFETY REAR DOOR LOCK
Child safety locks help prevent the rear doors
from being opened accidentally, especially when
small children are in the vehicle.
The child safety lock levers are located on the
edge of the rear doors.
When the lever is in the LOCK position, the
door can be opened only from the outside.
WARNING
● Radio waves could adversely affect
electric medical equipment. Those who
use a pacemaker should contact the
electric medical equipment manufac-
turer for the possible influences before
use.
● The Intelligent Key transmits radio
waves when the buttons are pressed.
The FAA advises the radio waves may
affect aircraft navigation and communi-
cation systems. Do not operate the In-
telligent Key while on an airplane. Make
sure the buttons are not operated unin-
tentionally when the unit is stored for a
flight.
● Never leave the Intelligent Key in the
vehicle when you leave the vehicle.
The Intelligent Key system can operate all the
door locks using the remote control function or
pushing the request switch on the vehicle without
taking the key out from a pocket or purse. The
operating environment and/or conditions may af-
fect the Intelligent Key system operation.
Be sure to read the following before using the
Intelligent Key system.
LPD2374
NISSAN INTELLIGENT KEY®
Pre-driving checks and adjustments3-7
Page 191 of 466
4 Display screen, heater, air conditioner,
audio and phone systems
RearView Monitor.................................4-2
RearView Monitor system operation ..............4-3
How to read the displayed lines ..................4-3
Difference between predicted and actual
distances ......................................4-4
How to park with predicted course lines ...........4-5
Adjusting the screen ............................4-7
How to turn on and off predicted course
lines (models with navigation) ....................4-7
RearView Monitor system limitations ..............4-8
System maintenance ............................4-9
Around View® Monitor (if so equipped) .............4-10
Around View® Monitor system operation .........4-11
Difference between predicted and actual
distances ..................................... 4-14
How to park with predicted course lines ..........4-16
How to switch the display ......................4-17
Adjusting the screen ........................... 4-18
Around View® Monitor system limitations ........4-18
System maintenance ........................... 4-20
Moving Object Detection (MOD) (if so equipped) ....4-21
MOD system operation ......................... 4-22
Turning MOD on and off ........................ 4-23
MOD system limitations ........................ 4-23System maintenance
........................... 4-24
Vents ........................................... 4-25
Heater and Air Conditioner (automatic) ..............4-26
Automatic operation ........................... 4-27
Manual operation .............................. 4-28
Operating tips ................................. 4-28
Servicing air conditioner ........................... 4-29
Audio system .................................... 4-29
Radio ........................................ 4-29
FM radio reception ............................ 4-30
AM radio reception ............................ 4-30
Satellite radio reception ........................ 4-30
Audio operation precautions ....................4-31
FM/AM/SAT radio with compact disc (CD)
player (if so equipped) ......................... 4-38
USB (Universal Serial Bus) Connection Port
(models without Navigation System)
(if
so equipped) ............................... 4-42
iPod®* player operation without Navigation
System (if so equipped) ........................ 4-45
Bluetooth® streaming audio without
Navigation System ............................. 4-47
CD care and cleaning .......................... 4-48
Steering wheel switch for audio control ..........4-49
Page 192 of 466
Antenna...................................... 4-50
Siri® Eyes Free .................................. 4-50
Requirements ................................. 4-50
Siri® Activation ............................... 4-51
Operating Siri® Eyes Free ......................4-51
Changing Siri® Eyes Free Settings
(models without navigation system) ..............4-52
Troubleshooting guide ......................... 4-53
Car phone or CB radio ............................ 4-54
Bluetooth® Hands-Free Phone System without
Navigation System (if so equipped) .................4-54
Regulatory Information ......................... 4-56Using the system
.............................. 4-56
Control buttons ............................... 4-58
Connecting procedure ......................... 4-58
Voice commands .............................. 4-60
Making a call . ................................. 4-61
Receiving a call ............................... 4-62
During a call .................................. 4-62
Ending a call .................................. 4-62
Text messaging (if so equipped) .................4-62
Bluetooth® settings ........................... 4-64
Manual control . . .............................. 4-65
Troubleshooting guide ......................... 4-66
Page 198 of 466
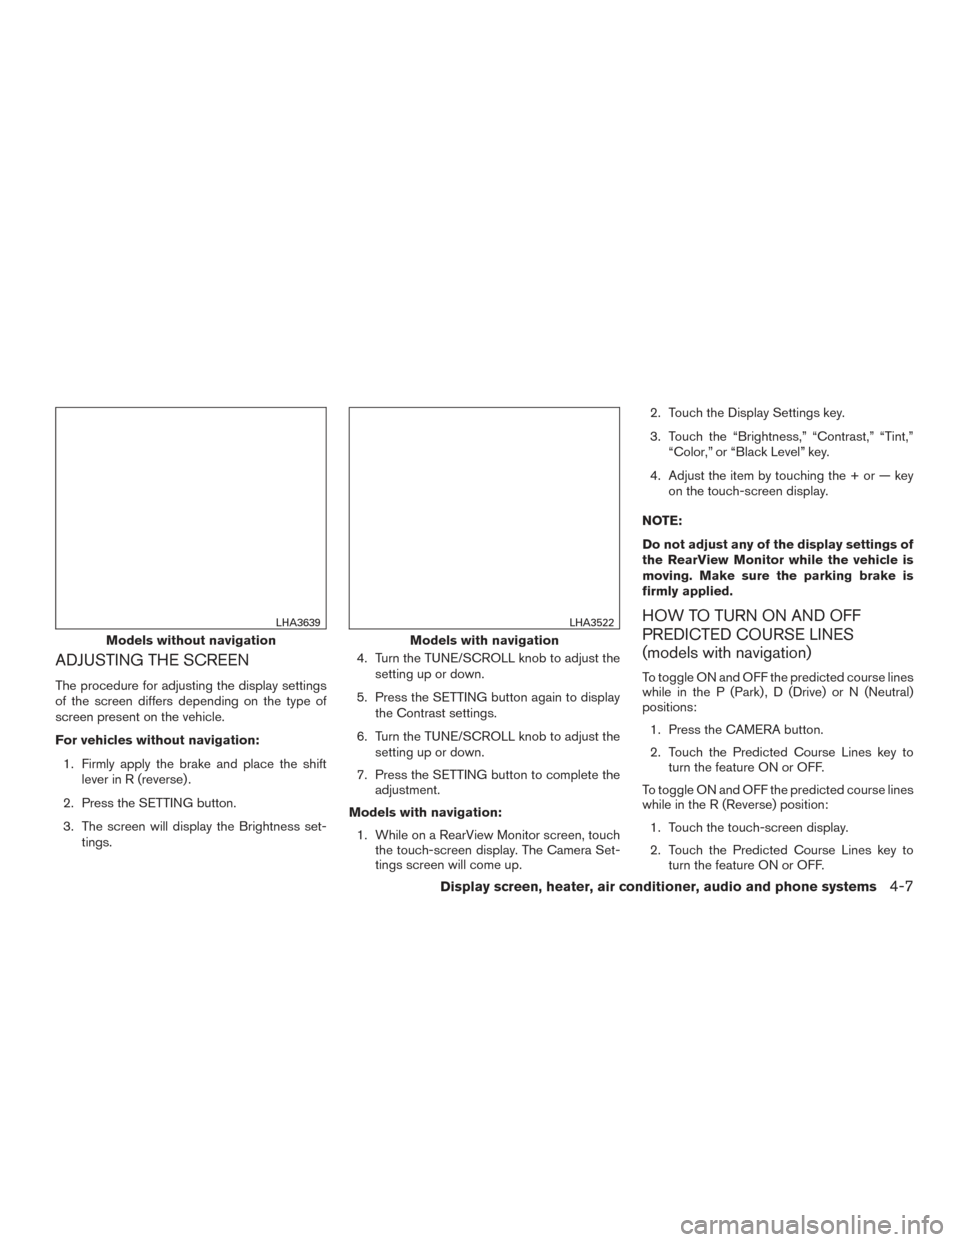
ADJUSTING THE SCREEN
The procedure for adjusting the display settings
of the screen differs depending on the type of
screen present on the vehicle.
For vehicles without navigation:1. Firmly apply the brake and place the shift lever in R (reverse) .
2. Press the SETTING button.
3. The screen will display the Brightness set- tings. 4. Turn the TUNE/SCROLL knob to adjust the
setting up or down.
5. Press the SETTING button again to display the Contrast settings.
6. Turn the TUNE/SCROLL knob to adjust the setting up or down.
7. Press the SETTING button to complete the adjustment.
Models with navigation: 1. While on a RearView Monitor screen, touch the touch-screen display. The Camera Set-
tings screen will come up. 2. Touch the Display Settings key.
3. Touch the “Brightness,” “Contrast,” “Tint,”
“Color,” or “Black Level” key.
4. Adjust the item by touching the + or — key on the touch-screen display.
NOTE:
Do not adjust any of the display settings of
the RearView Monitor while the vehicle is
moving. Make sure the parking brake is
firmly applied.
HOW TO TURN ON AND OFF
PREDICTED COURSE LINES
(models with navigation)
To toggle ON and OFF the predicted course lines
while in the P (Park) , D (Drive) or N (Neutral)
positions: 1. Press the CAMERA button.
2. Touch the Predicted Course Lines key to turn the feature ON or OFF.
To toggle ON and OFF the predicted course lines
while in the R (Reverse) position: 1. Touch the touch-screen display.
2. Touch the Predicted Course Lines key to turn the feature ON or OFF.
Models without navigation
LHA3639
Models with navigation
LHA3522
Display screen, heater, air conditioner, audio and phone systems4-7
Page 230 of 466
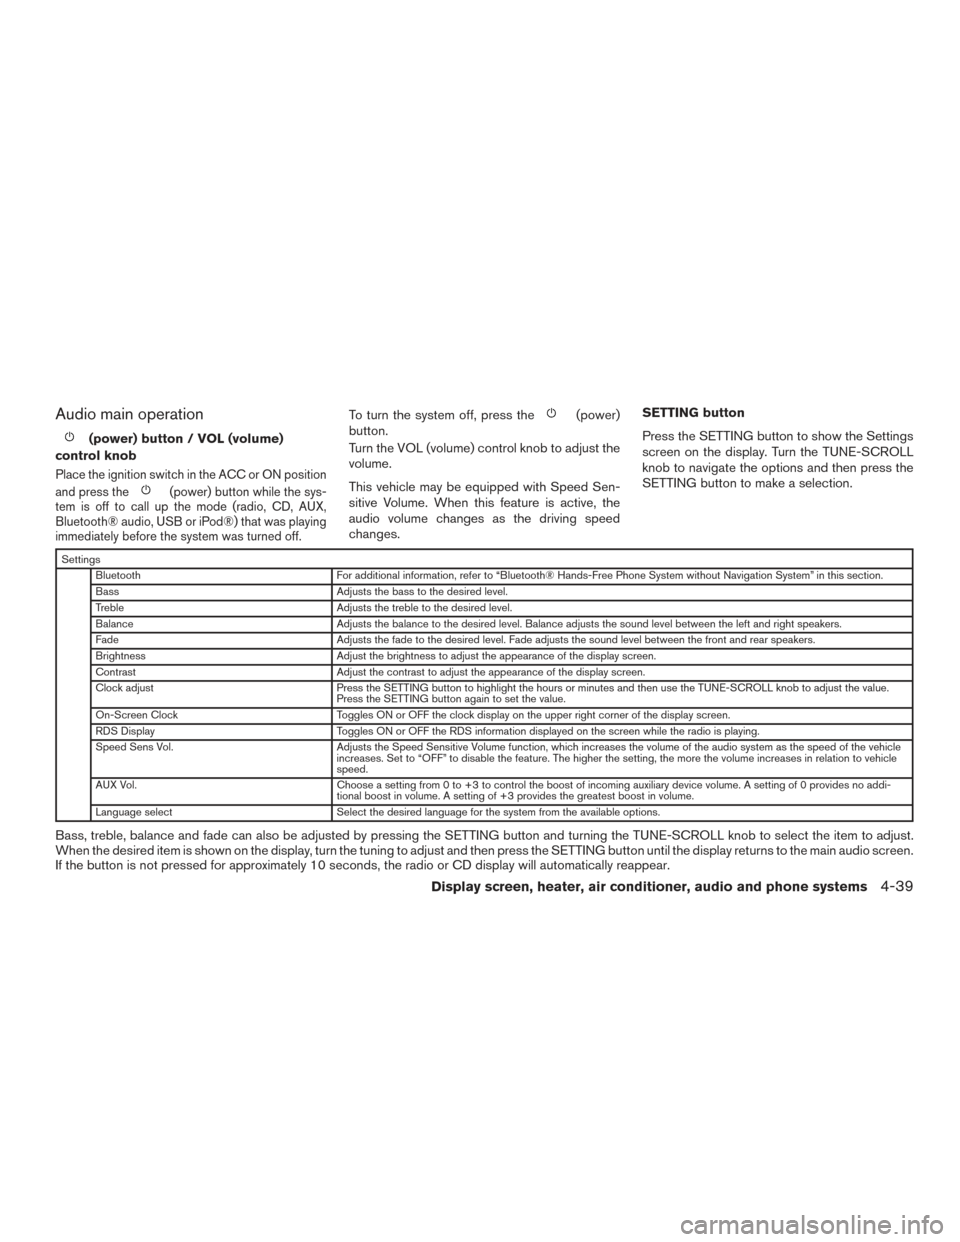
Audio main operation
(power) button / VOL (volume)
control knob
Place the ignition switch in the ACC or ON position
and press the
(power) button while the sys-
tem is off to call up the mode (radio, CD, AUX,
Bluetooth® audio, USB or iPod®) that was playing
immediately before the system was turned off.
To turn the system off, press the(power)
button.
Turn the VOL (volume) control knob to adjust the
volume.
This vehicle may be equipped with Speed Sen-
sitive Volume. When this feature is active, the
audio volume changes as the driving speed
changes. SETTING button
Press the SETTING button to show the Settings
screen on the display. Turn the TUNE-SCROLL
knob to navigate the options and then press the
SETTING button to make a selection.
Settings
Bluetooth For additional information, refer to “Bluetooth® Hands-Free Phone System without Navigation System” in this section.
Bass Adjusts the bass to the desired level.
Treble Adjusts the treble to the desired level.
Balance Adjusts the balance to the desired level. Balance adjusts the sound level between the left and right speakers.
Fade Adjusts the fade to the desired level. Fade adjusts the sound level between the front and rear speakers.
Brightness Adjust the brightness to adjust the appearance of the display screen.
Contrast Adjust the contrast to adjust the appearance of the display screen.
Clock adjust Press the SETTING button to highlight the hours or minutes and then use the TUNE-SCROLL knob to adjust the value.
Press the SETTING button again to set the value.
On-Screen Clock Toggles ON or OFF the clock display on the upper right corner of the display screen.
RDS Display Toggles ON or OFF the RDS information displayed on the screen while the radio is playing.
Speed Sens Vol. Adjusts the Speed Sensitive Volume function, which increases the volume of the audio system as the speed of the vehicle
increases. Set to “OFF” to disable the feature. The higher the setting, the more the volume increases in relation to vehicle
speed.
AUX Vol. Choose a setting from 0 to +3 to control the boost of incoming auxiliary device volume. A setting of 0 provides no addi-
tional boost in volume. A setting of +3 provides the greatest boost in volume.
Language select Select the desired language for the system from the available options.
Bass, treble, balance and fade can also be adjusted by pressing the SETTING button and turning the TUNE-SCROLL knob to select the item to adjust.
When the desired item is shown on the display, turn the tuning to adjust and then press the SETTING button until the display returns to the main audio screen.
If the button is not pressed for approximately 10 seconds, the radio or CD display will automatically reappear.
Display screen, heater, air conditioner, audio and phone systems4-39
Page 231 of 466
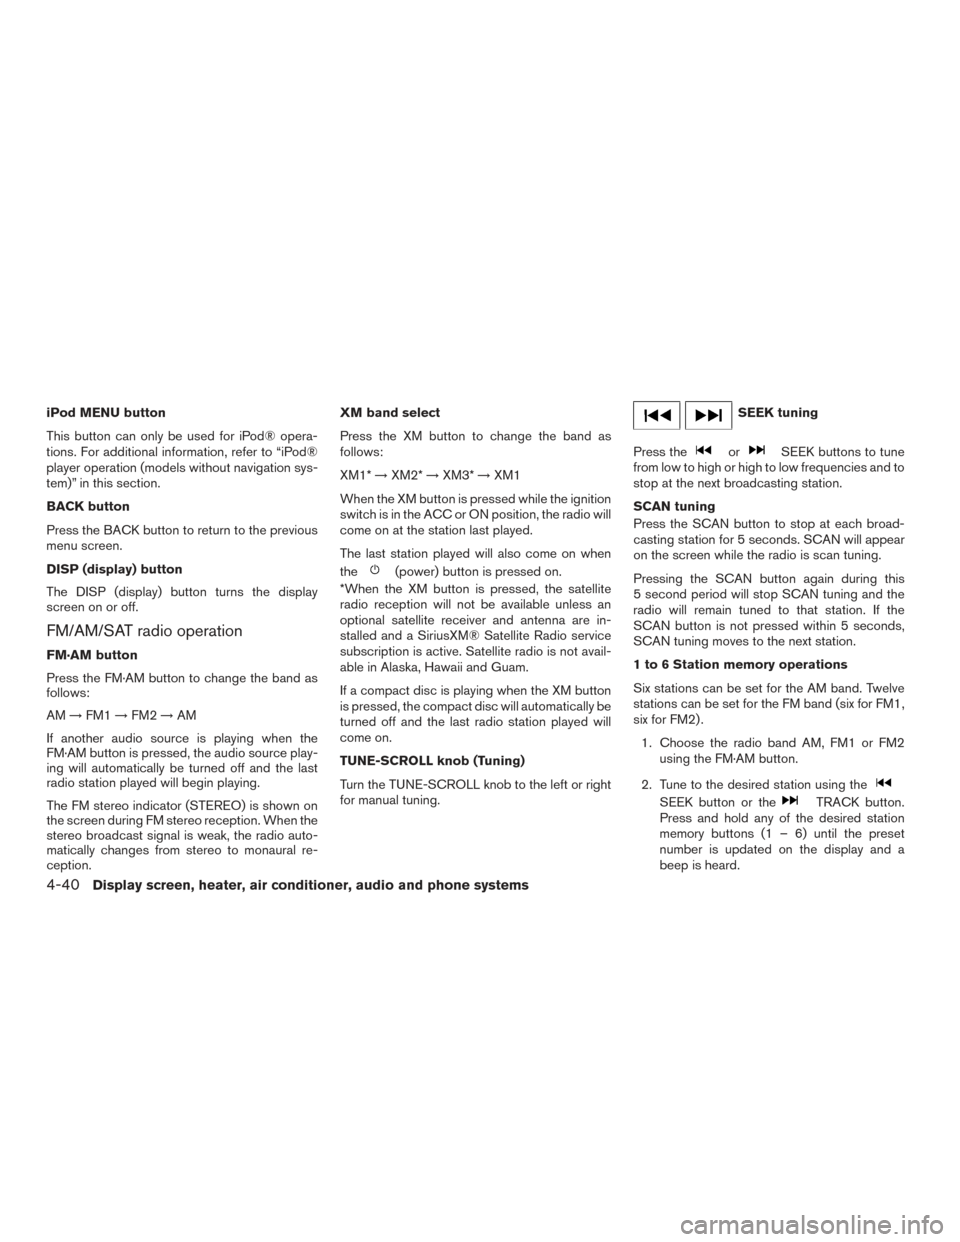
iPod MENU button
This button can only be used for iPod® opera-
tions. For additional information, refer to “iPod®
player operation (models without navigation sys-
tem)” in this section.
BACK button
Press the BACK button to return to the previous
menu screen.
DISP (display) button
The DISP (display) button turns the display
screen on or off.
FM/AM/SAT radio operation
FM·AM button
Press the FM·AM button to change the band as
follows:
AM→FM1 →FM2 →AM
If another audio source is playing when the
FM·AM button is pressed, the audio source play-
ing will automatically be turned off and the last
radio station played will begin playing.
The FM stereo indicator (STEREO) is shown on
the screen during FM stereo reception. When the
stereo broadcast signal is weak, the radio auto-
matically changes from stereo to monaural re-
ception. XM band select
Press the XM button to change the band as
follows:
XM1*
→XM2* →XM3* →XM1
When the XM button is pressed while the ignition
switch is in the ACC or ON position, the radio will
come on at the station last played.
The last station played will also come on when
the
(power) button is pressed on.
*When the XM button is pressed, the satellite
radio reception will not be available unless an
optional satellite receiver and antenna are in-
stalled and a SiriusXM® Satellite Radio service
subscription is active. Satellite radio is not avail-
able in Alaska, Hawaii and Guam.
If a compact disc is playing when the XM button
is pressed, the compact disc will automatically be
turned off and the last radio station played will
come on.
TUNE-SCROLL knob (Tuning)
Turn the TUNE-SCROLL knob to the left or right
for manual tuning.
SEEK tuning
Press the
orSEEK buttons to tune
from low to high or high to low frequencies and to
stop at the next broadcasting station.
SCAN tuning
Press the SCAN button to stop at each broad-
casting station for 5 seconds. SCAN will appear
on the screen while the radio is scan tuning.
Pressing the SCAN button again during this
5 second period will stop SCAN tuning and the
radio will remain tuned to that station. If the
SCAN button is not pressed within 5 seconds,
SCAN tuning moves to the next station.
1 to 6 Station memory operations
Six stations can be set for the AM band. Twelve
stations can be set for the FM band (six for FM1,
six for FM2) .
1. Choose the radio band AM, FM1 or FM2 using the FM·AM button.
2. Tune to the desired station using the
SEEK button or theTRACK button.
Press and hold any of the desired station
memory buttons (1 – 6) until the preset
number is updated on the display and a
beep is heard.
4-40Display screen, heater, air conditioner, audio and phone systems
Page 233 of 466
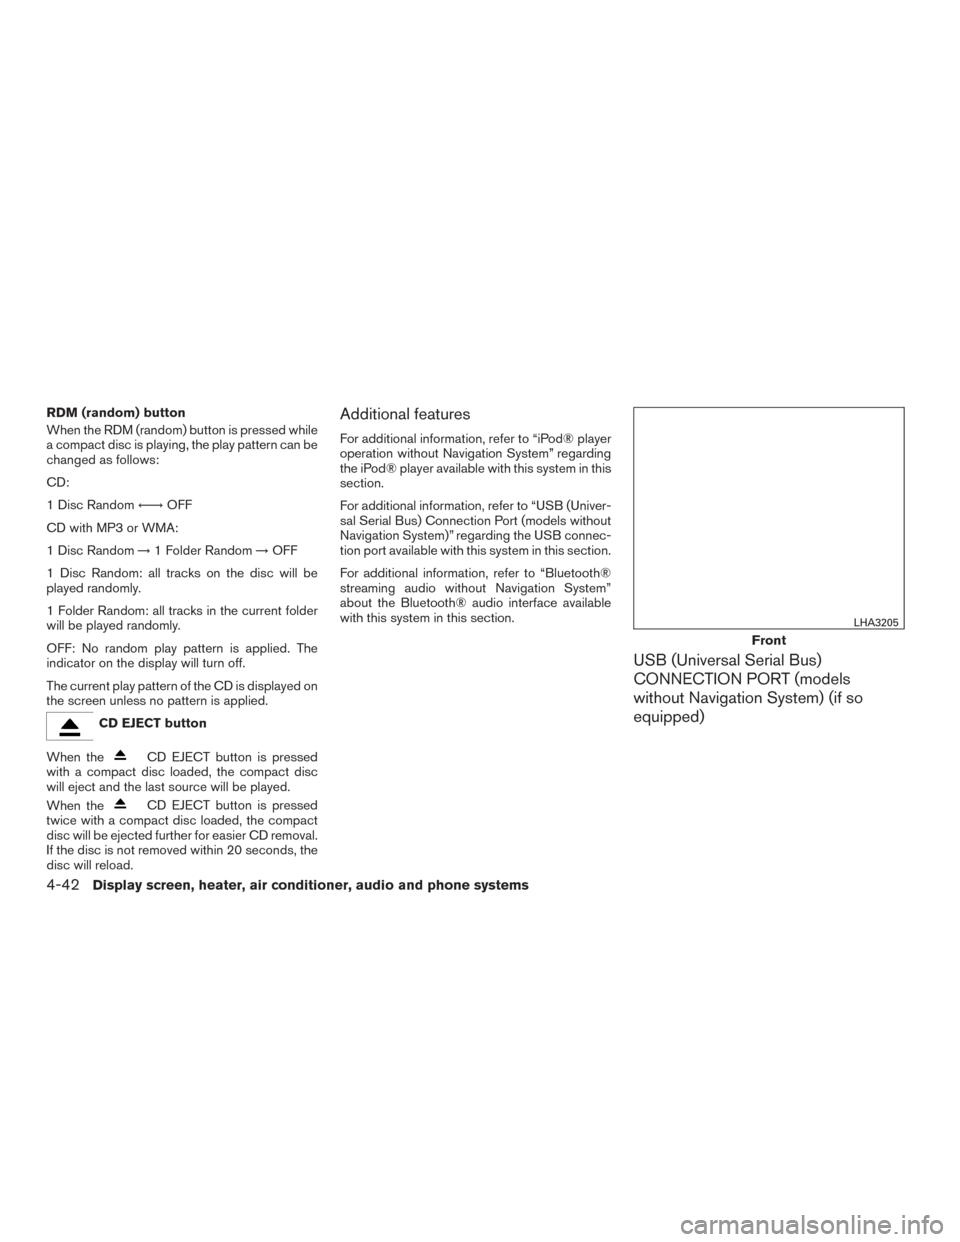
RDM (random) button
When the RDM (random) button is pressed while
a compact disc is playing, the play pattern can be
changed as follows:
CD:
1 Disc Random←→OFF
CD with MP3 or WMA:
1 Disc Random →1 Folder Random →OFF
1 Disc Random: all tracks on the disc will be
played randomly.
1 Folder Random: all tracks in the current folder
will be played randomly.
OFF: No random play pattern is applied. The
indicator on the display will turn off.
The current play pattern of the CD is displayed on
the screen unless no pattern is applied.
CD EJECT button
When the
CD EJECT button is pressed
with a compact disc loaded, the compact disc
will eject and the last source will be played.
When the
CD EJECT button is pressed
twice with a compact disc loaded, the compact
disc will be ejected further for easier CD removal.
If the disc is not removed within 20 seconds, the
disc will reload.
Additional features
For additional information, refer to “iPod® player
operation without Navigation System” regarding
the iPod® player available with this system in this
section.
For additional information, refer to “USB (Univer-
sal Serial Bus) Connection Port (models without
Navigation System)” regarding the USB connec-
tion port available with this system in this section.
For additional information, refer to “Bluetooth®
streaming audio without Navigation System”
about the Bluetooth® audio interface available
with this system in this section.
USB (Universal Serial Bus)
CONNECTION PORT (models
without Navigation System) (if so
equipped)
Front
LHA3205
4-42Display screen, heater, air conditioner, audio and phone systems
Page 236 of 466
iPod®* PLAYER OPERATION
WITHOUT NAVIGATION SYSTEM (if
so equipped)
Connecting iPod®
WARNING
Do not connect, disconnect, or operate the
USB device while driving. Doing so can be
a distraction. If distracted you could lose
control of your vehicle and cause an acci-
dent or serious injury.
CAUTION
●Do not force the USB device into the
USB port. Inserting the USB device
tilted or up-side-down into the port may
damage the port. Make sure that the
USB device is connected correctly into
the USB port.
● Do not grab the USB port cover (if so
equipped) when pulling the USB device
out of the port. This could damage the
port and the cover. ●
Do not leave the USB cable in a place
where it can be pulled unintentionally.
Pulling the cable may damage the port.
For additional information, refer to your device
manufacturer’s owner information regarding the
proper use and care of the device.
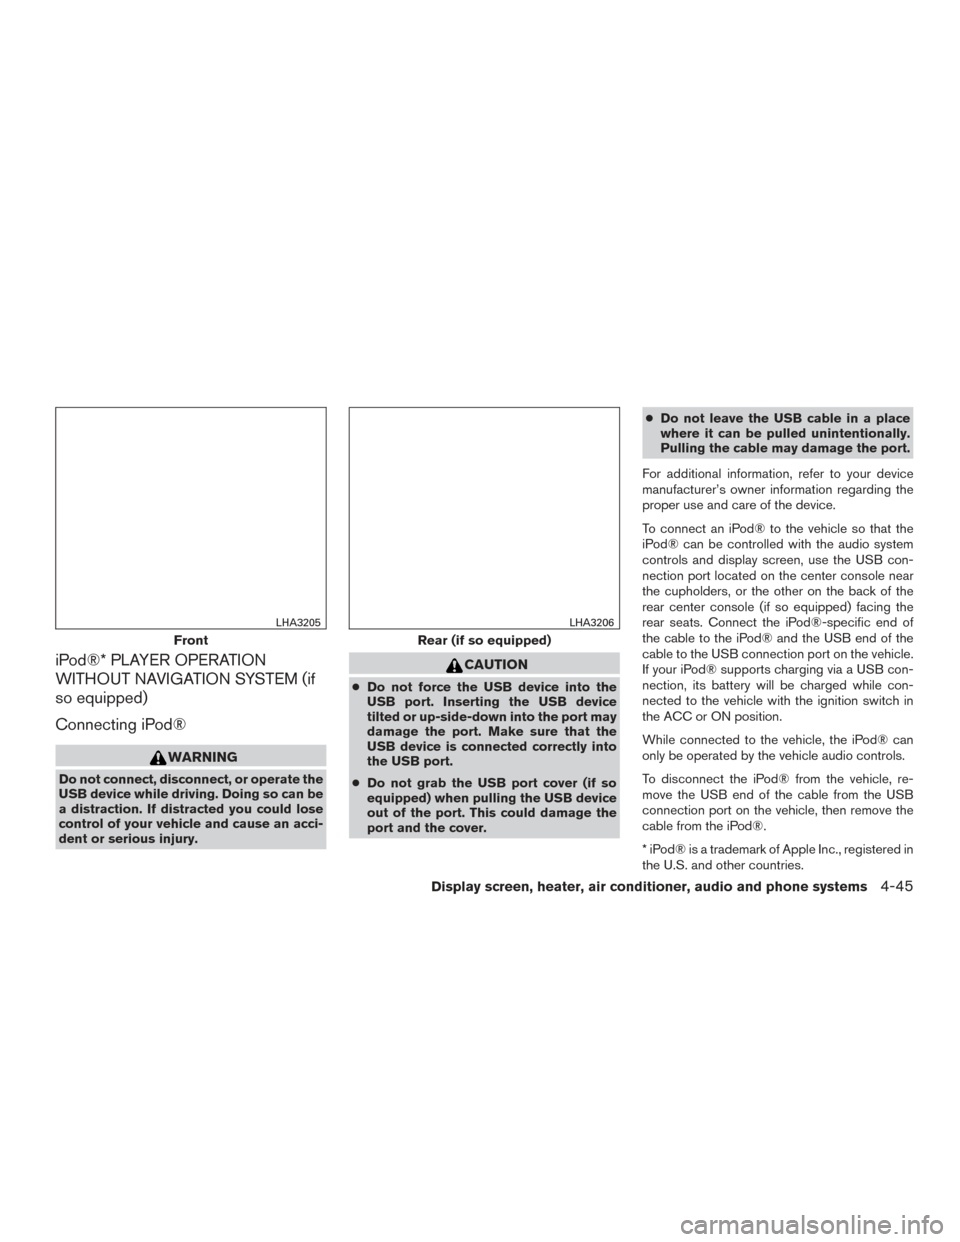
To connect an iPod® to the vehicle so that the
iPod® can be controlled with the audio system
controls and display screen, use the USB con-
nection port located on the center console near
the cupholders, or the other on the back of the
rear center console (if so equipped) facing the
rear seats. Connect the iPod®-specific end of
the cable to the iPod® and the USB end of the
cable to the USB connection port on the vehicle.
If your iPod® supports charging via a USB con-
nection, its battery will be charged while con-
nected to the vehicle with the ignition switch in
the ACC or ON position.
While connected to the vehicle, the iPod® can
only be operated by the vehicle audio controls.
To disconnect the iPod® from the vehicle, re-
move the USB end of the cable from the USB
connection port on the vehicle, then remove the
cable from the iPod®.
* iPod® is a trademark of Apple Inc., registered in
the U.S. and other countries.
Front
LHA3205
Rear (if so equipped)
LHA3206
Display screen, heater, air conditioner, audio and phone systems4-45